User guide for SplashID Classic
This site is the user guide for version 1.0 of SplashID Classic, an easy to use password manager without any data storage on the internet.
Screenshots
We have included screenshots in certain sections throughout this guide to help you understand a feature. You can click or tap on the screenshots to see them in a magnified view.
SplashID Classic and SplashID
SplashID Classic will also be referred to as SplashID at places in this documentation for convenience. Any references to our other editions of SplashID will be with their full name e.g. SplashID Pro 9 for the version 9 apps, and SplashID Safe for the version 8 apps.
SplashID Classic apps are single user apps that do not connect to our servers on the internet, and do not store your account profile or your data on our servers. The data you have in SplashID Classic will remain only on your devices.
Since you have full control over your installations and data, you are responsible for syncing your profile and data across your devices over your local network.
SplashID Classic does not support the following.
- Cloud sync and cloud backups
- No attachments and own icons in records
- No sharing between users
Quick start
To get started do the following.
- Install a SplashID Classic app from the App Store, Microsoft Store or Play Store on your device.
- Launch the installed app, select No to not copy your profile from another device, and then create your SplashID Classic profile for the first time on the profile sign up screen.
- Complete the initial profile setup. You can use your name or email address or any other string as your profile name.
- Start using SplashID Classic.
- Install SplashID Classic on your other devices. Launch them and set them up using any of your existing devices that has your profile setup. On these devices select Yes to copy your profile from another device of yours that you had previously setup.
You can use your apps to sync using WiFi or in no sync mode.
Install apps
SplashID Classic apps are distributed through the following application stores provided on your devices.
- App Store on iPhones and iPads
- Mac App Store on MacBooks
- Microsoft Store on Windows 10 and 11
- Play Store on Android phones and tablets
| Mac | Windows |
|---|---|
 |
 |
| Android | iPhone |
|---|---|
  |
  |
| iPad |
|---|
   |
To begin, download and install SplashID Classic on one of your laptops, desktops, tablets or mobiles. After the initial setup, you can then install them on any number of devices.
Please visit the downloads page on our website for more details on available applications.
Install on your device
- Launch App Store, Play Store or Microsoft Store on your device.
- Search for SplashID Classic.
- Proceed to install the application on your device.
If SplashID Classic is not listed on your device, then it is quite likely that you have an older version of the operating system on your device that is not supported by SplashID Classic. You will need to upgrade your device to a later version for being able to use SplashID Classic.
Whats new in SplashID Classic?
SplashID Classic retains the core features of SplashID Safe without cloud features, and simplifies record management by removing attachments and usage of own icons. It brings to you a set of new features that will help you easily manage your information.
- Applications are standalone single user apps.
- There is no cloud sync of your data or profile information.
- No attachments in a record.
- No use of own icons in a record.
- Add multiple notes in records and see them in a separate notes view.
- Store your authenticator one time codes in records, and access all of them in a single view.
- Archive your records that you do not need.
- Delete records and send them to recycle bin before you decide to permanently delete them.
- Create a recovery kit for regaining access to your profile, if you forget your master password.
- View, create and access all your local backups in one view.
Migrate from SplashID Safe or SplashID Pro 9
If you are an existing SplashID Safe or SplashID Pro 9 user, then you can copy your data to SplashID Classic using SVID9, SVID or VID files.
For more details on how to migrate your data to SplashID Classic, please refer to the migration page.
Free v/s Pro license
A Pro license gives you unlimited installations across your devices using the same application store, and unlimited access to all the records that you setup SplashID Classic on.
A free license restricts the number of records to 10 on a device.
Next steps
- Learn how the user interface of the record screens looks like.
- Setup your profile and sign in.
- Create personal records and view them in diferent ways.
- Install on your other devices and copy your profile on them.
- Synchronize your data between your devices.
How does the application look?
Screen layout
The user interface that you see after you unlock a SplashID Classic application depends on the device in which you are using it.
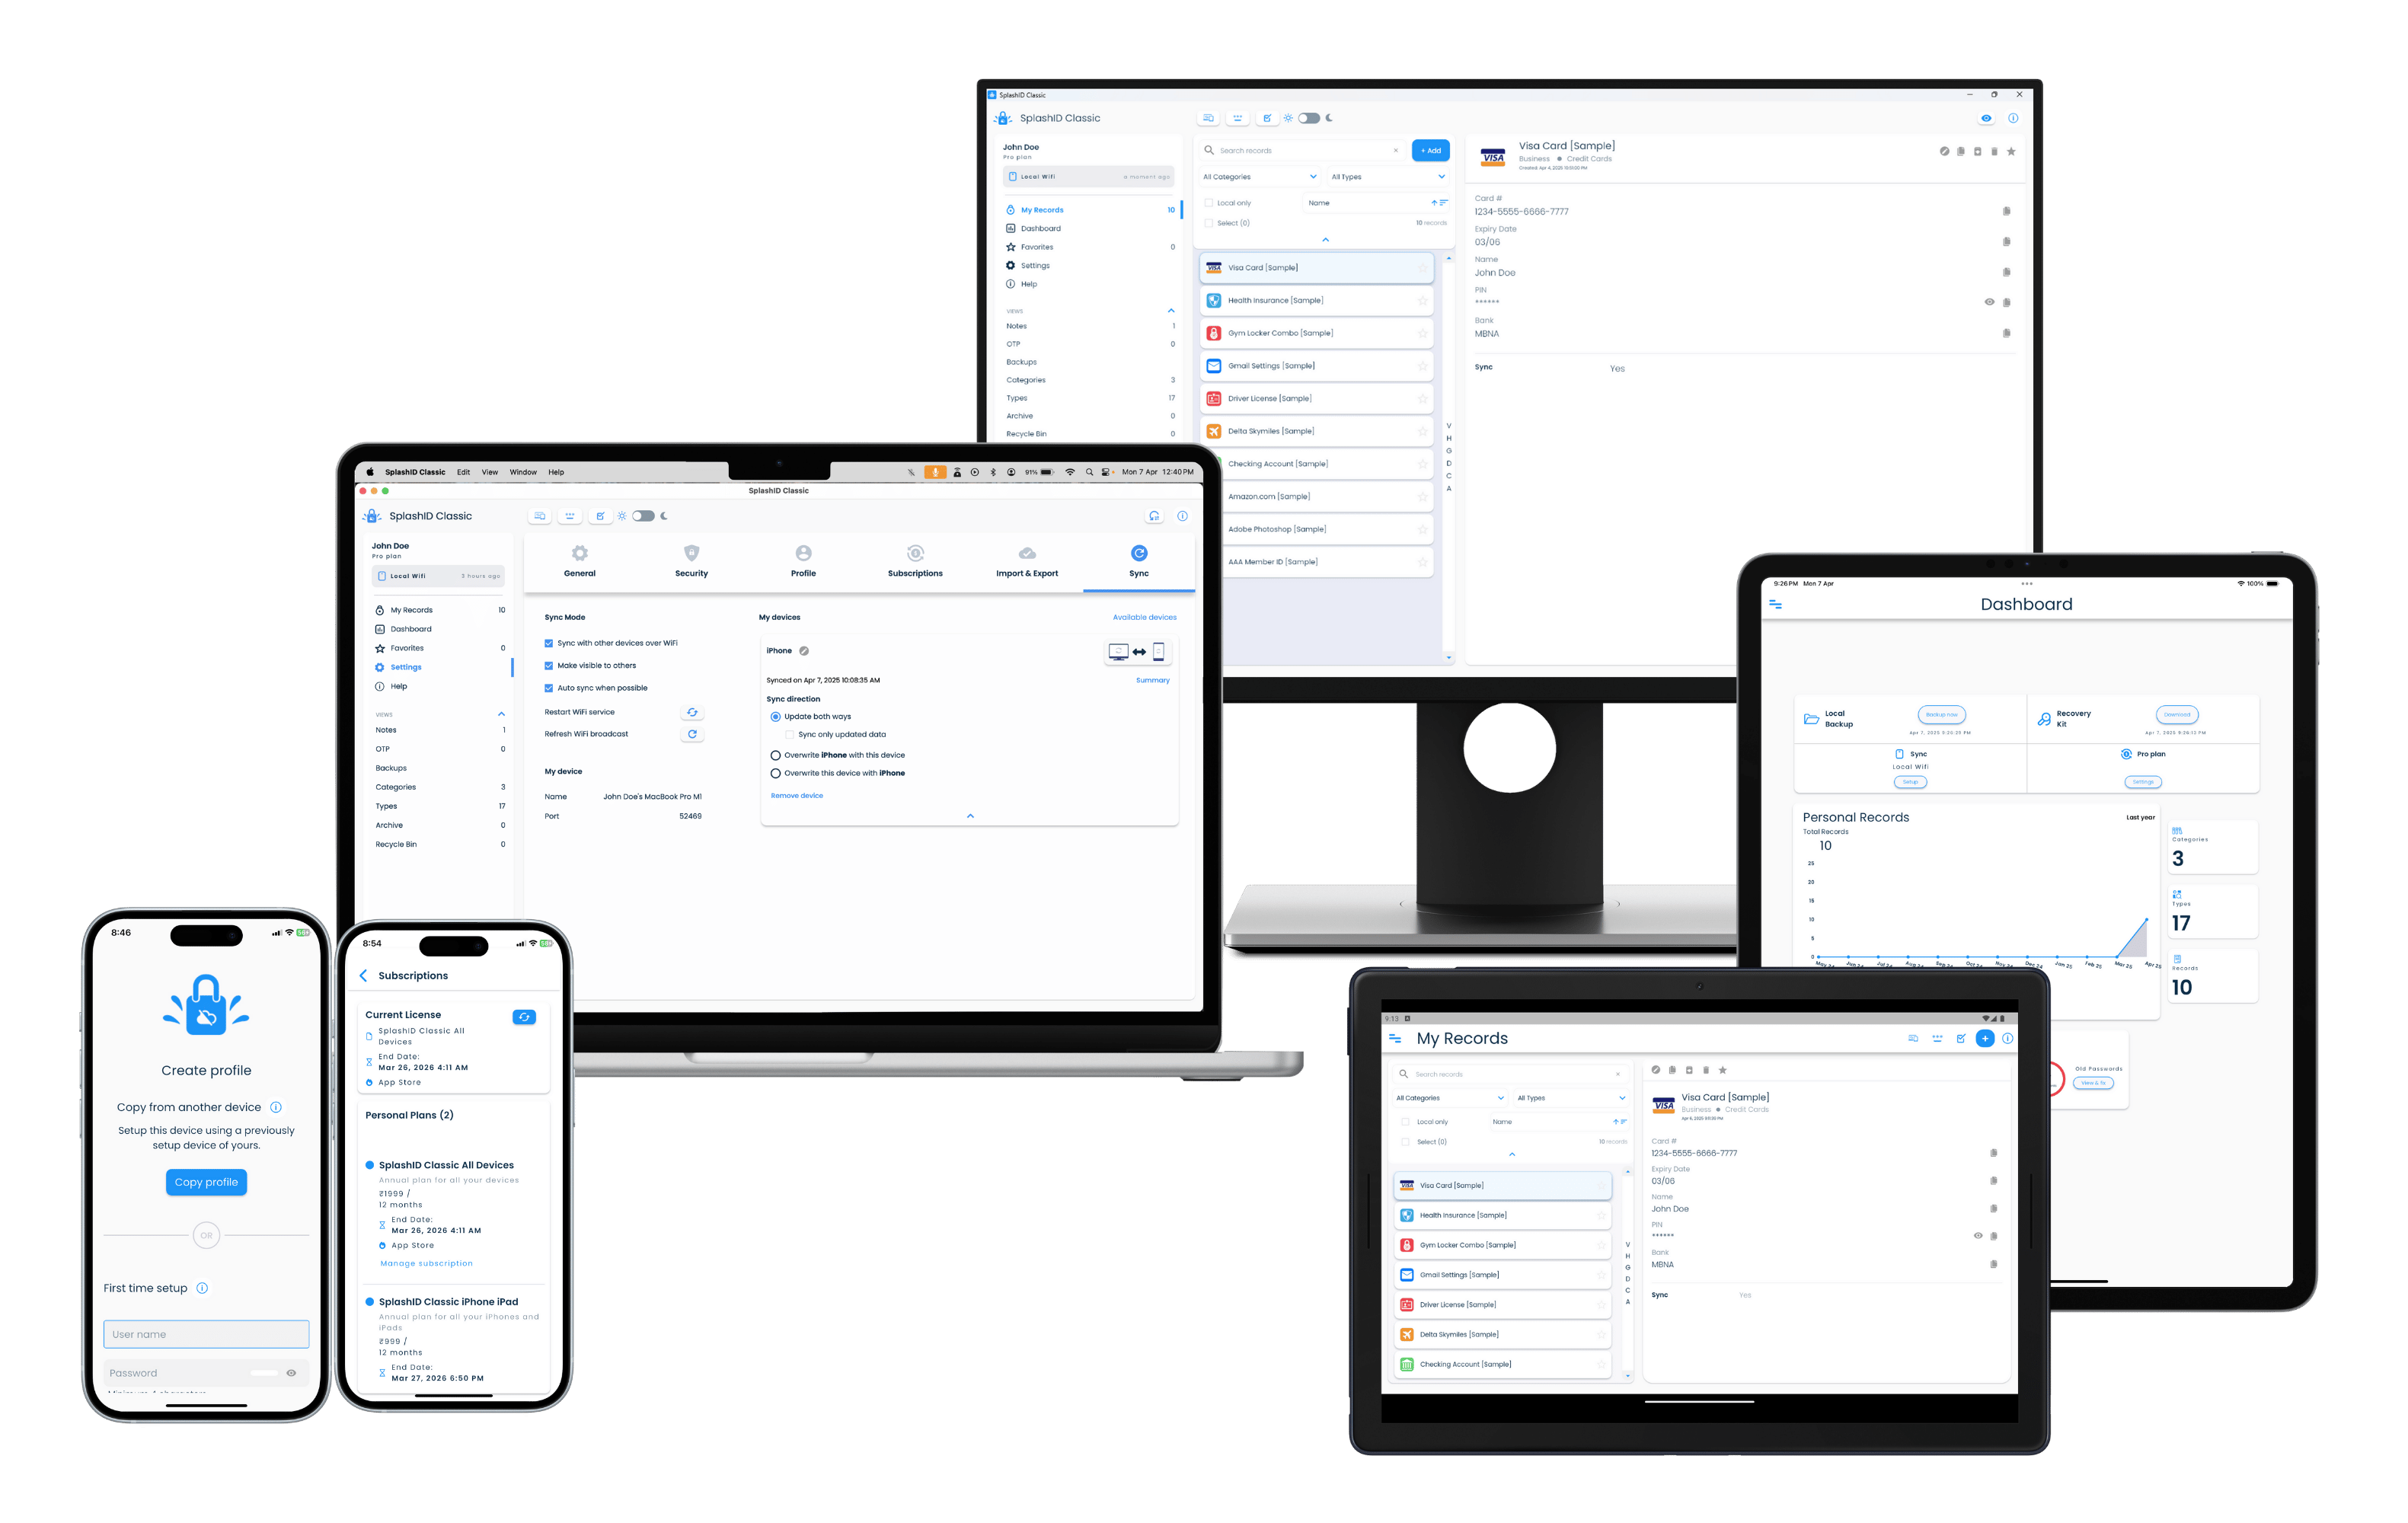
The screens that display your records and their content are composed of panels as listed in the table below. Other screens have a simpler layout.
| Device | Layout for records |
|---|---|
| Laptops and desktops | 3 panel layout |
| Tablets | 2 panel layout |
| Mobiles | 1 panel layout |
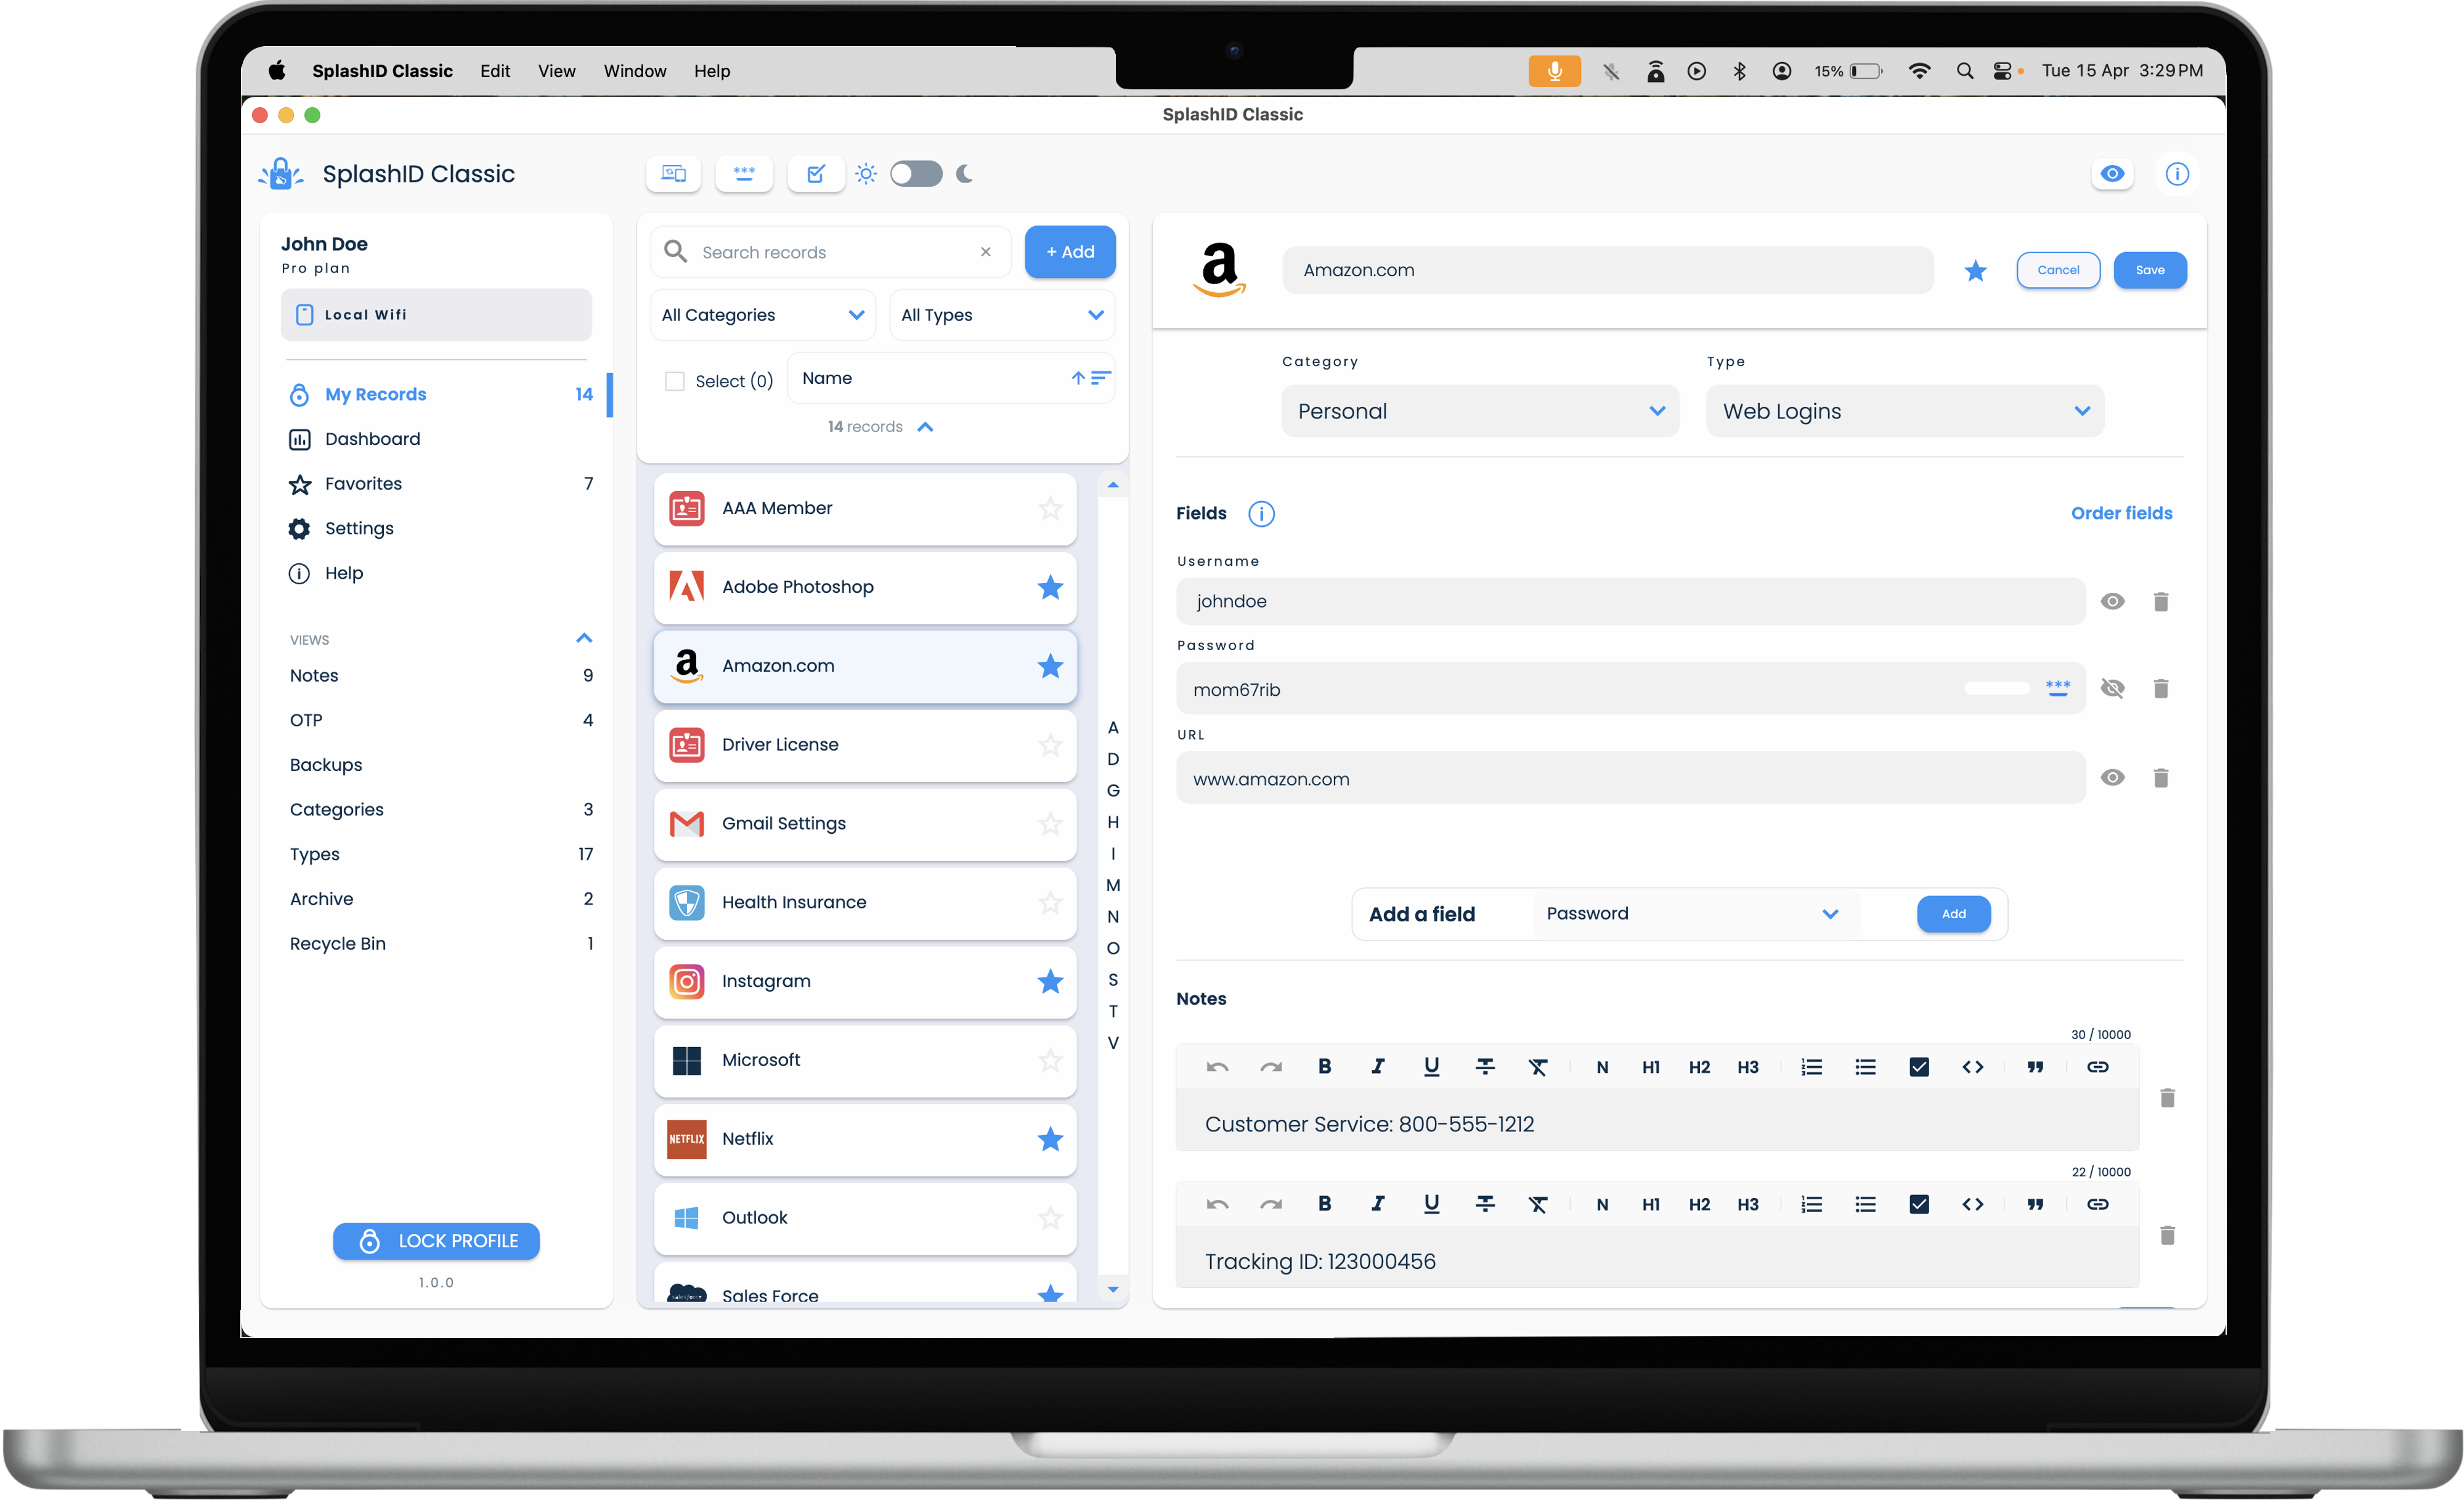
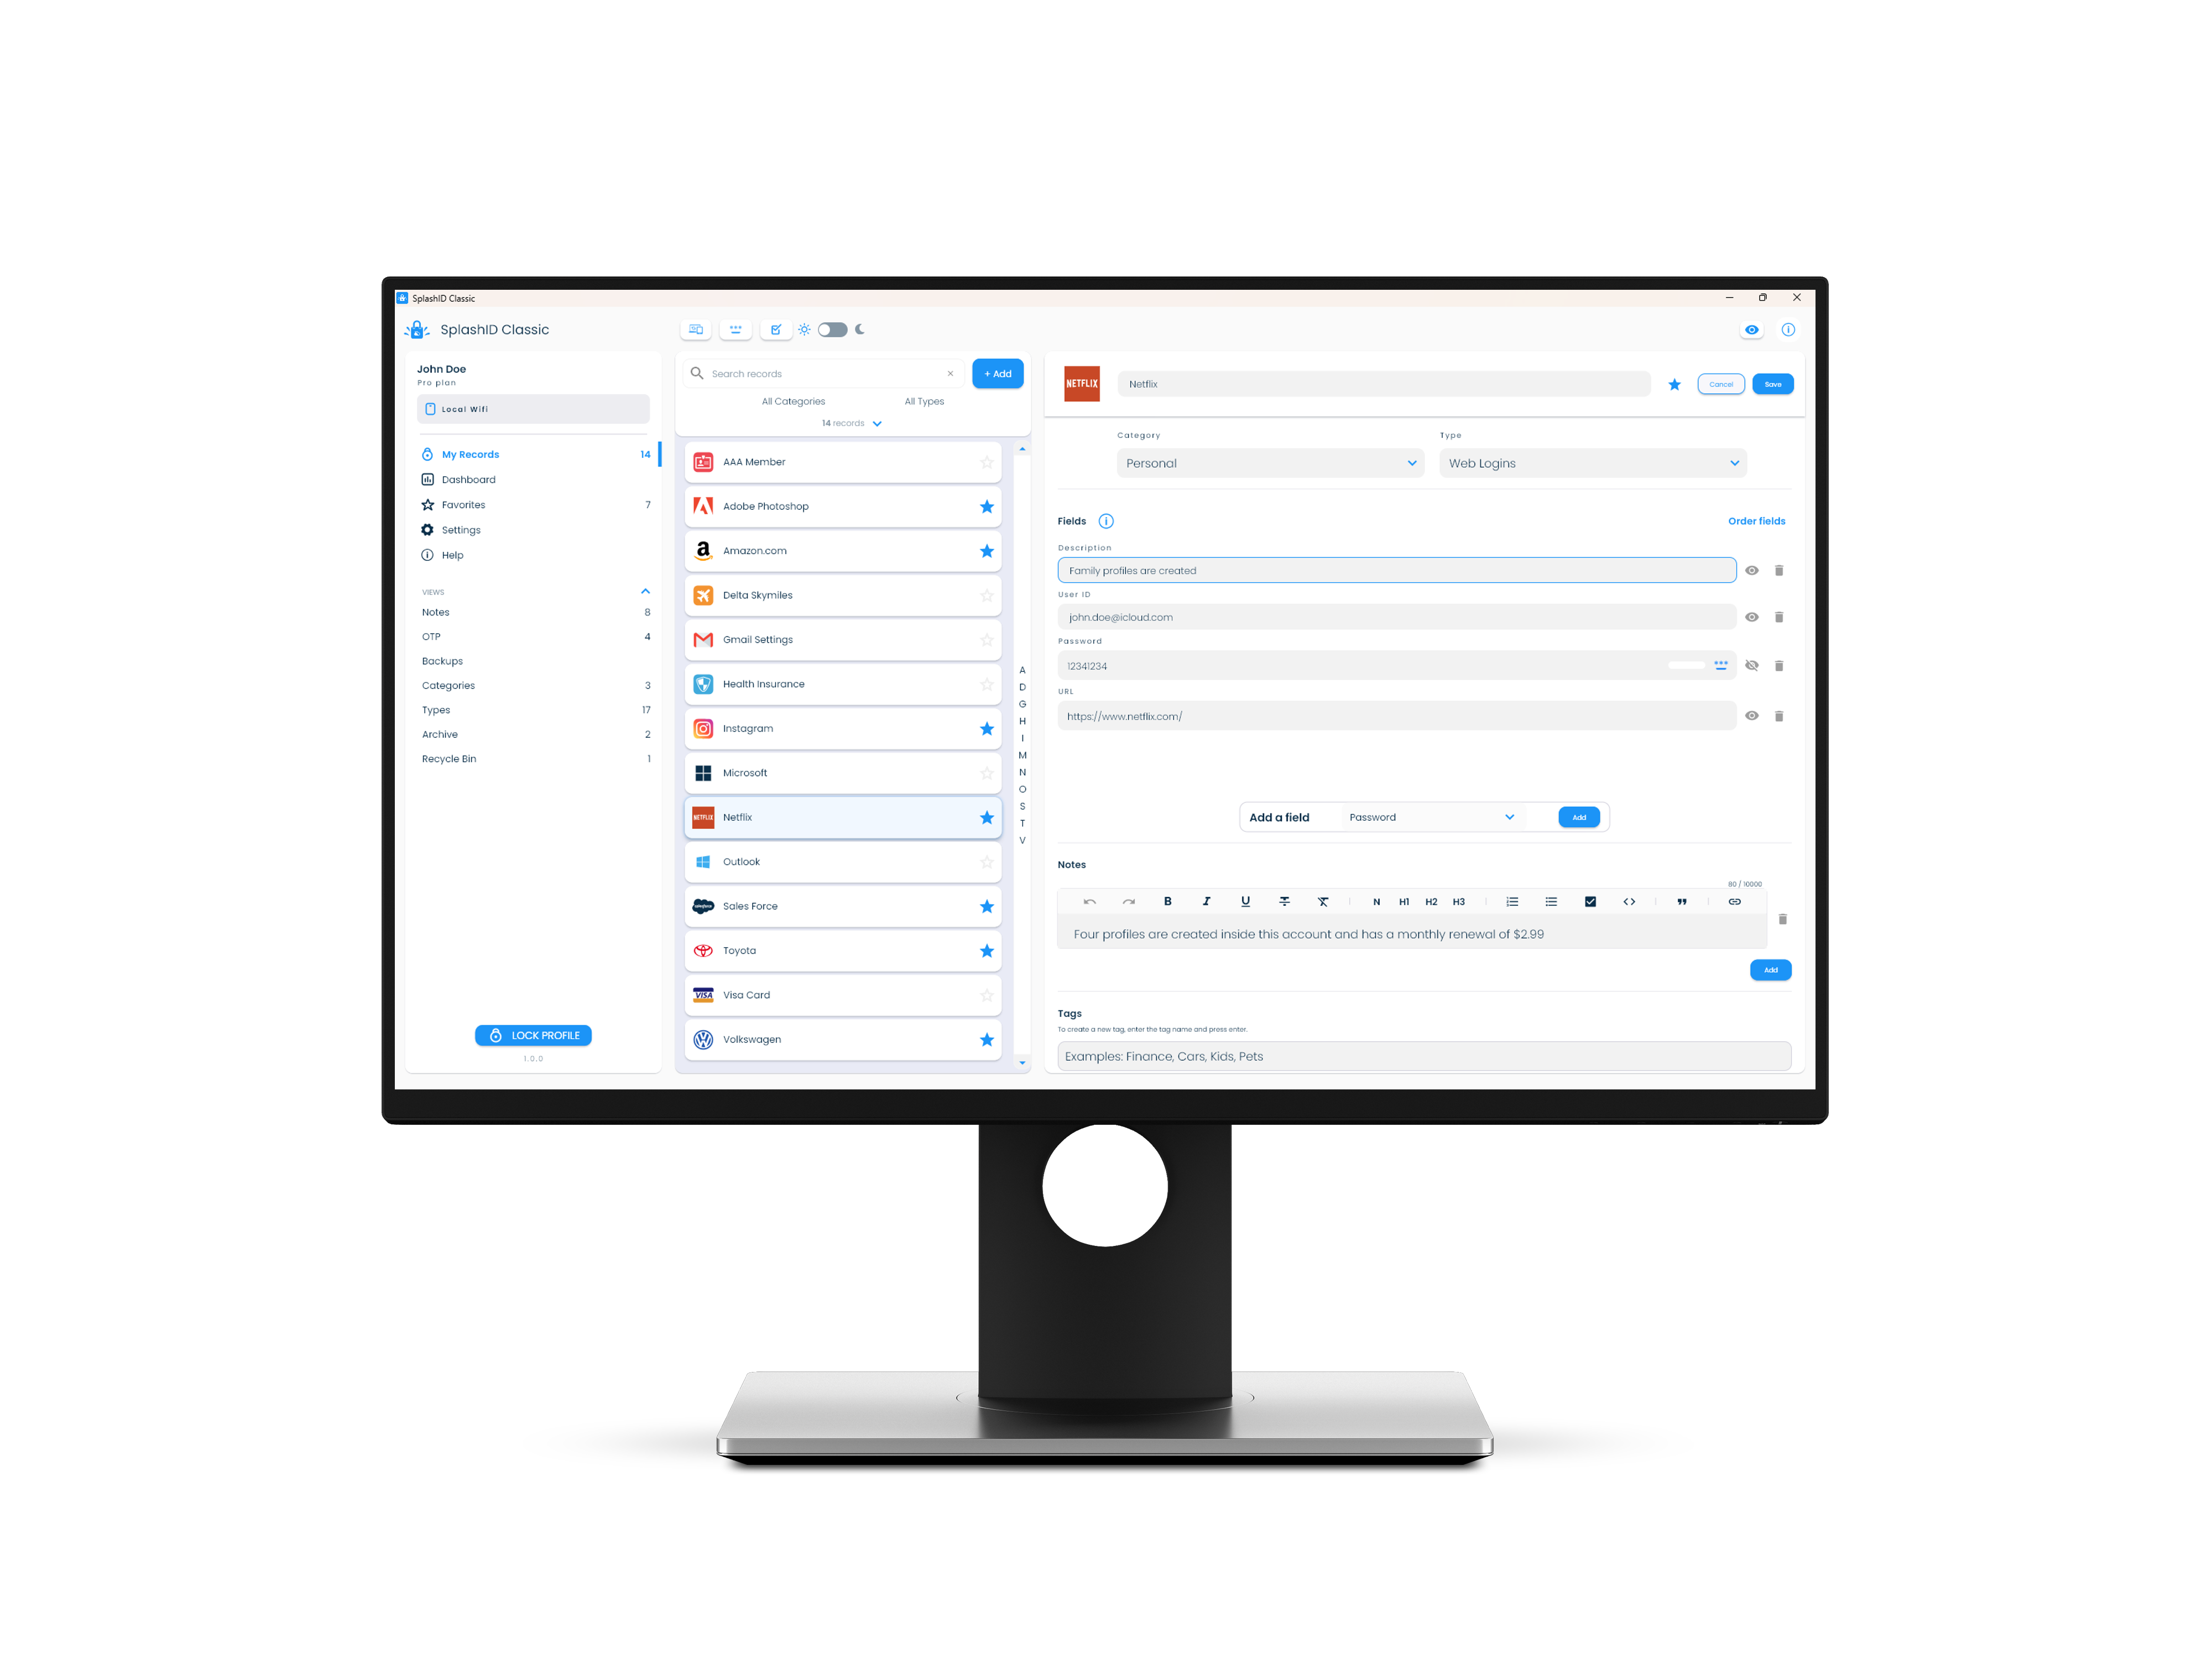
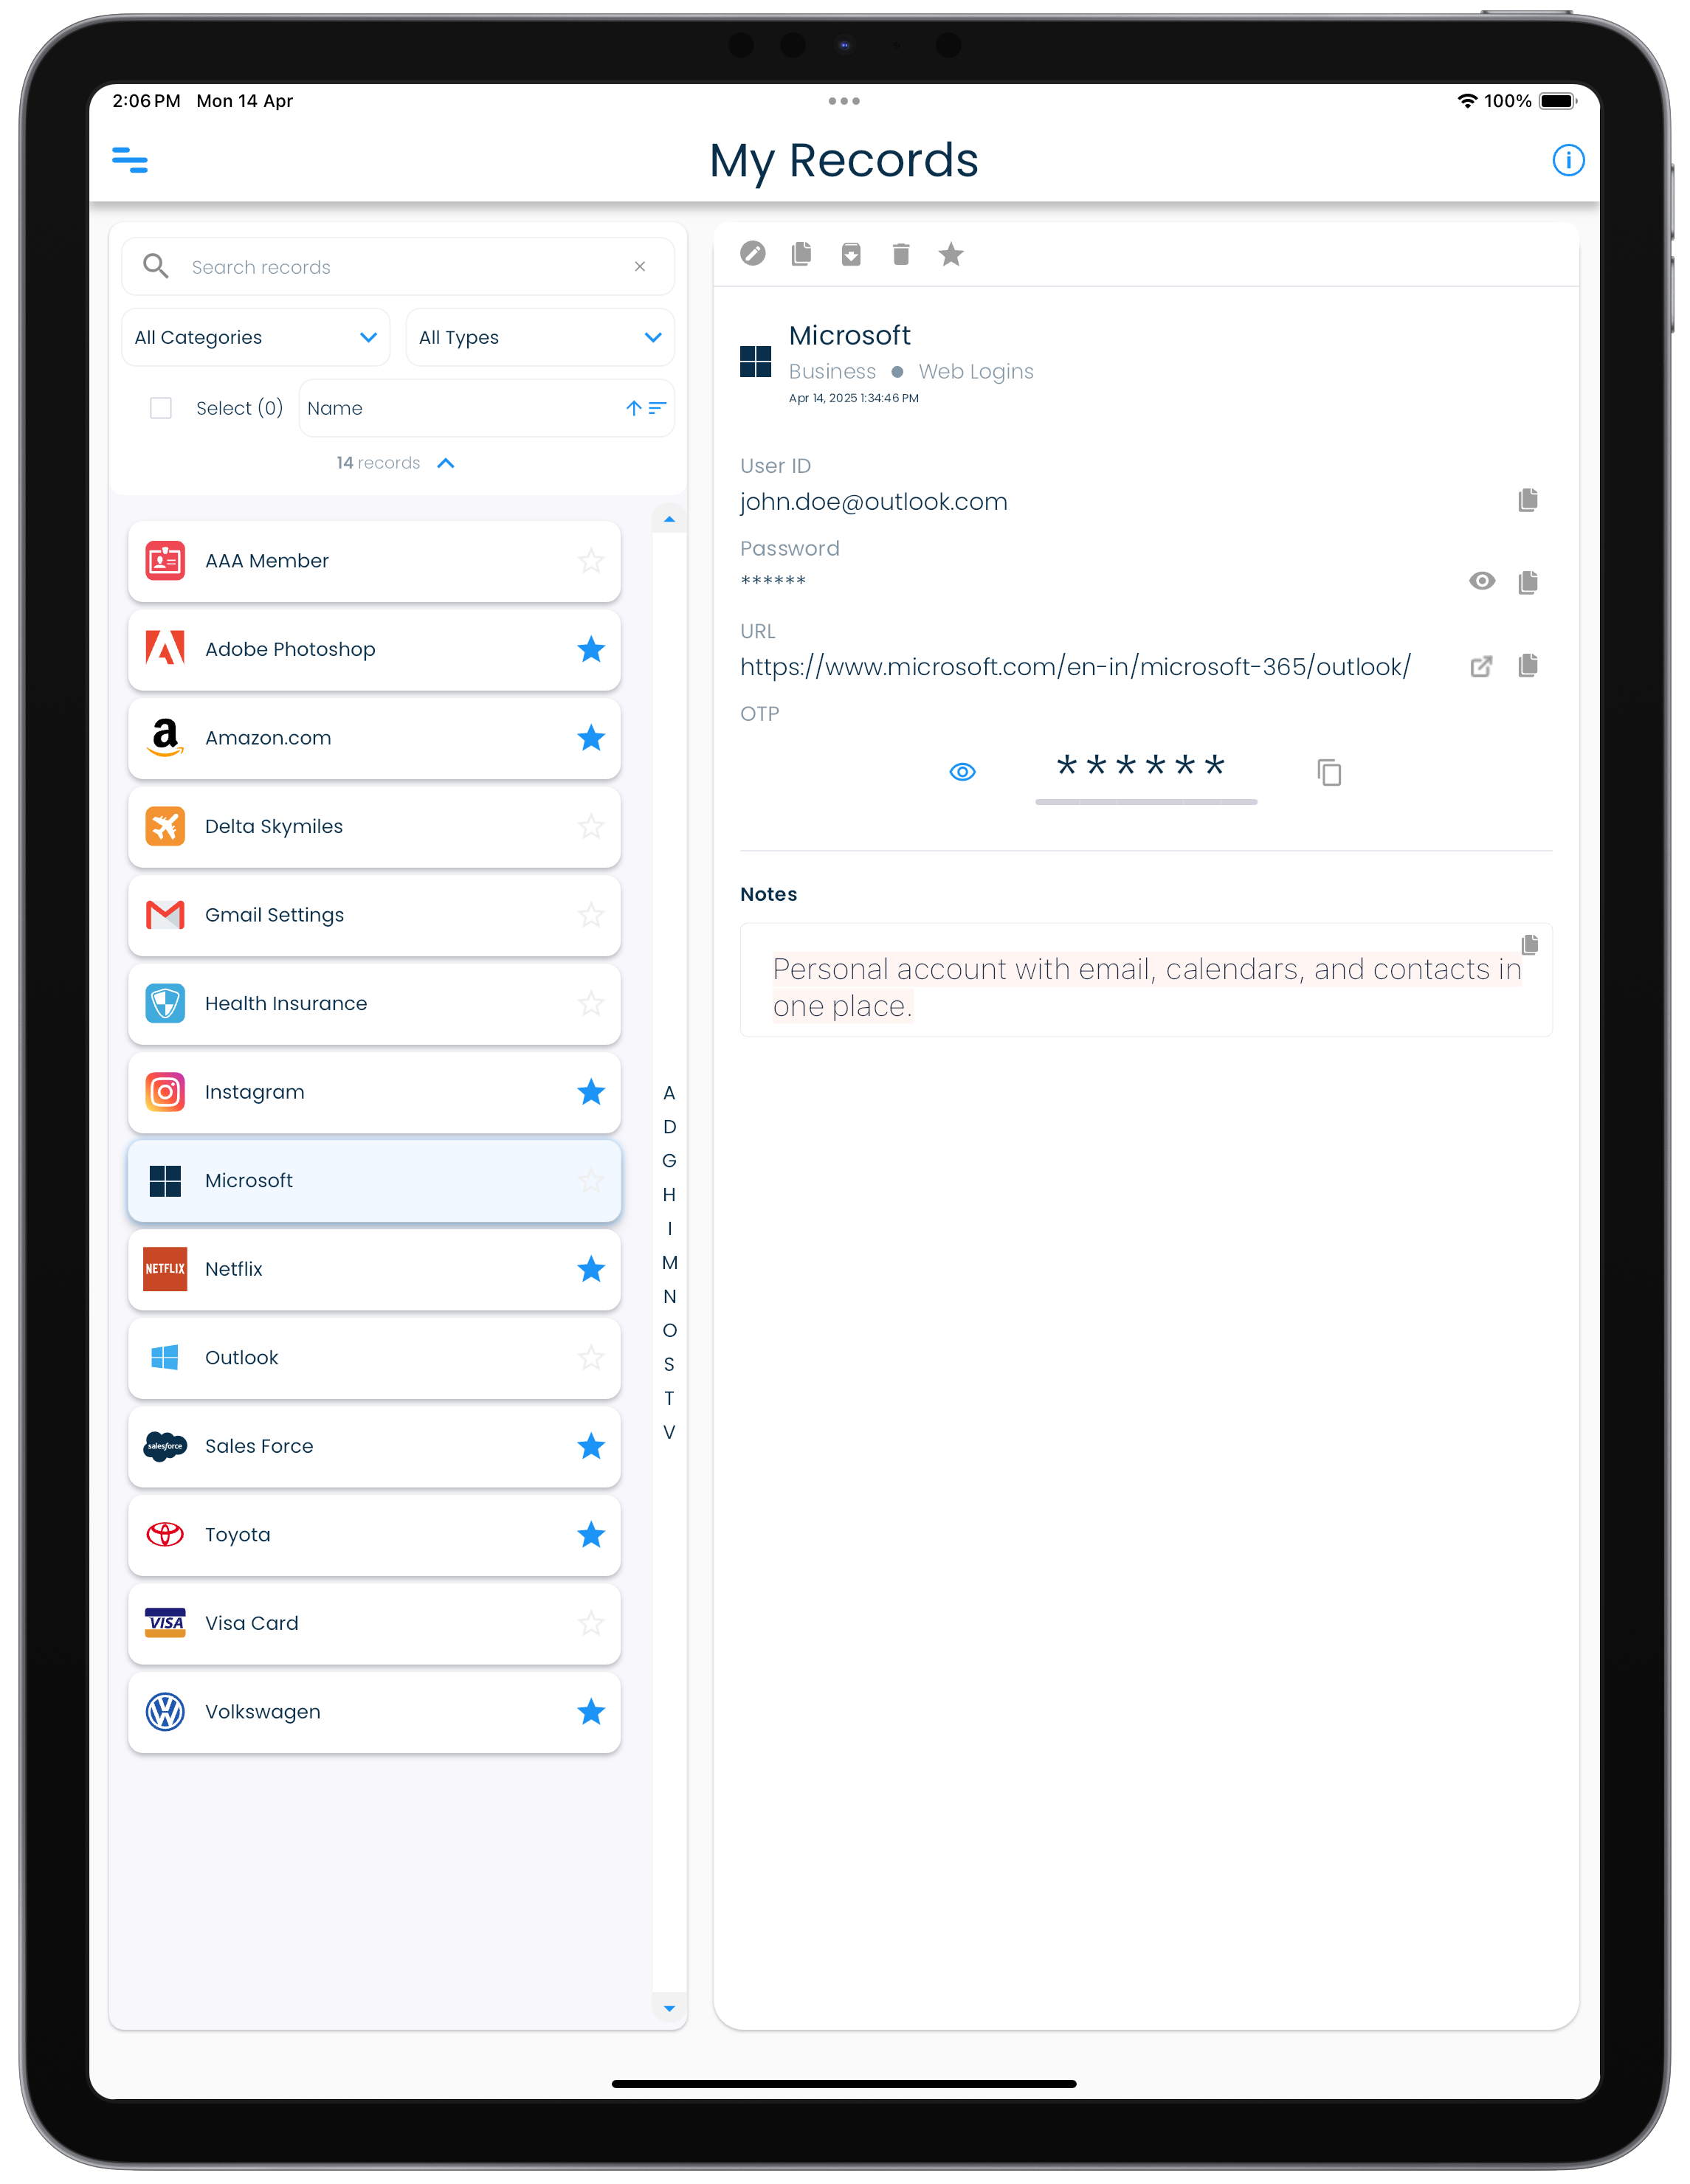
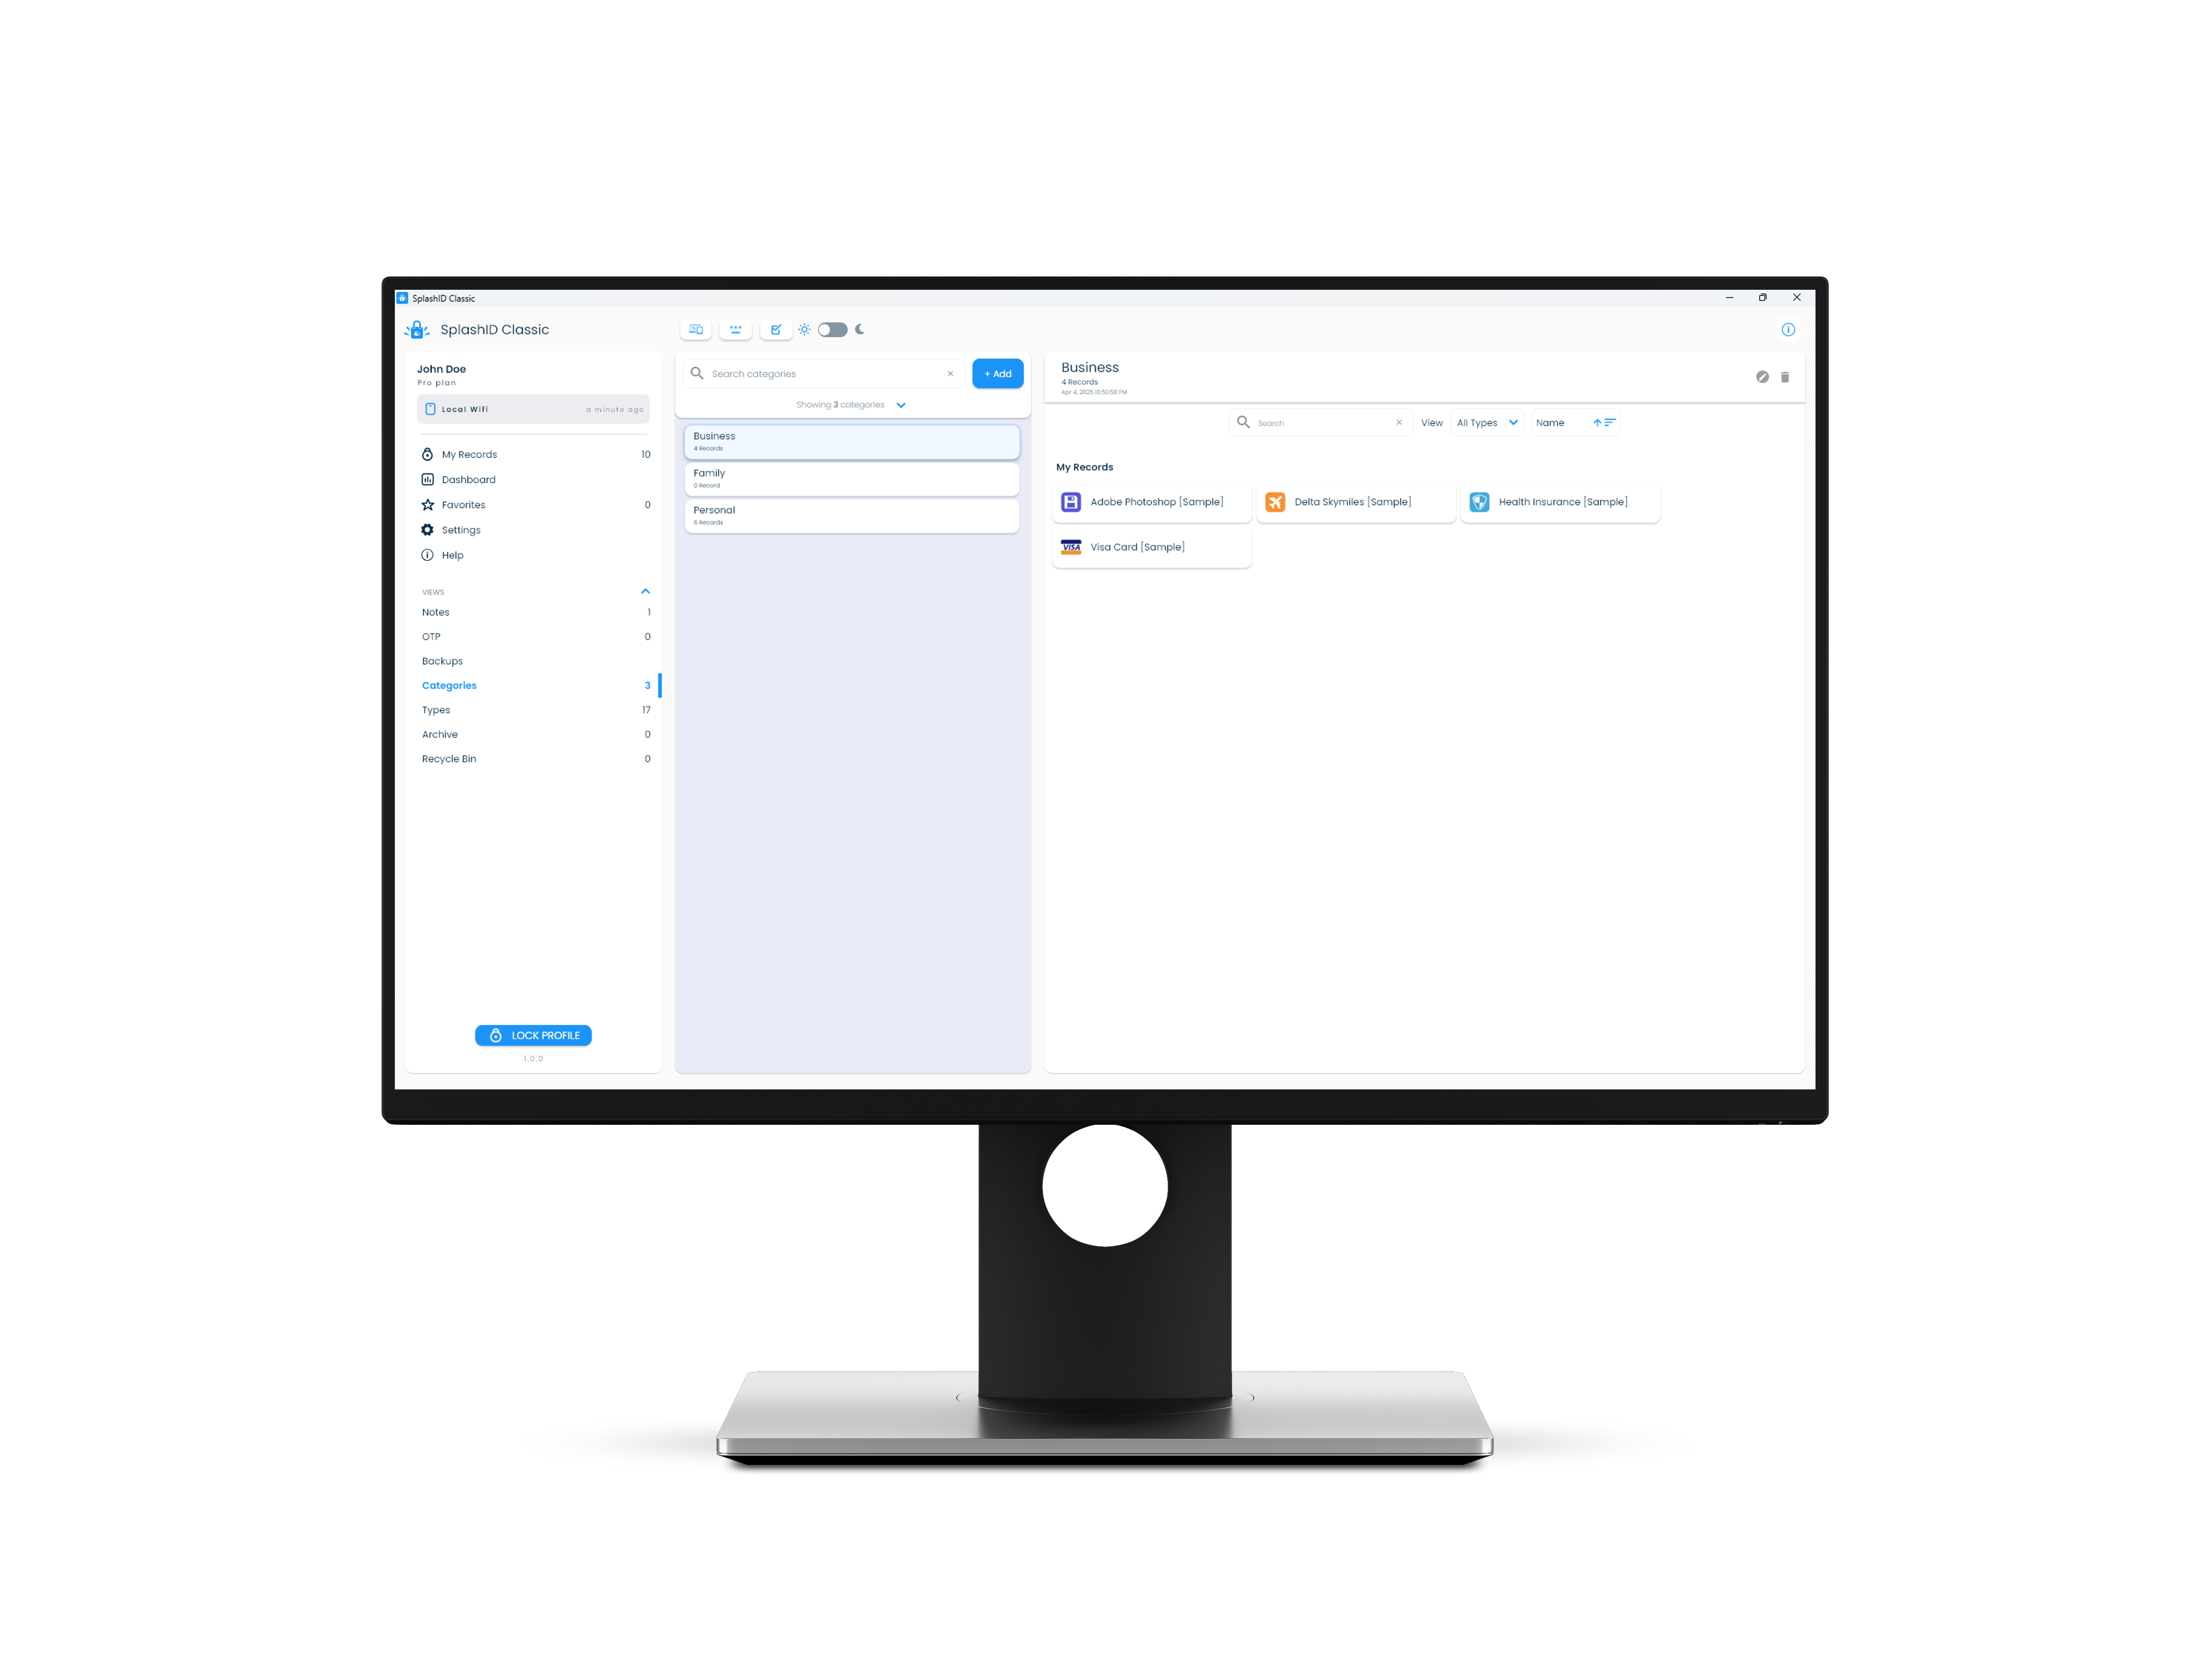
Desktops and laptops
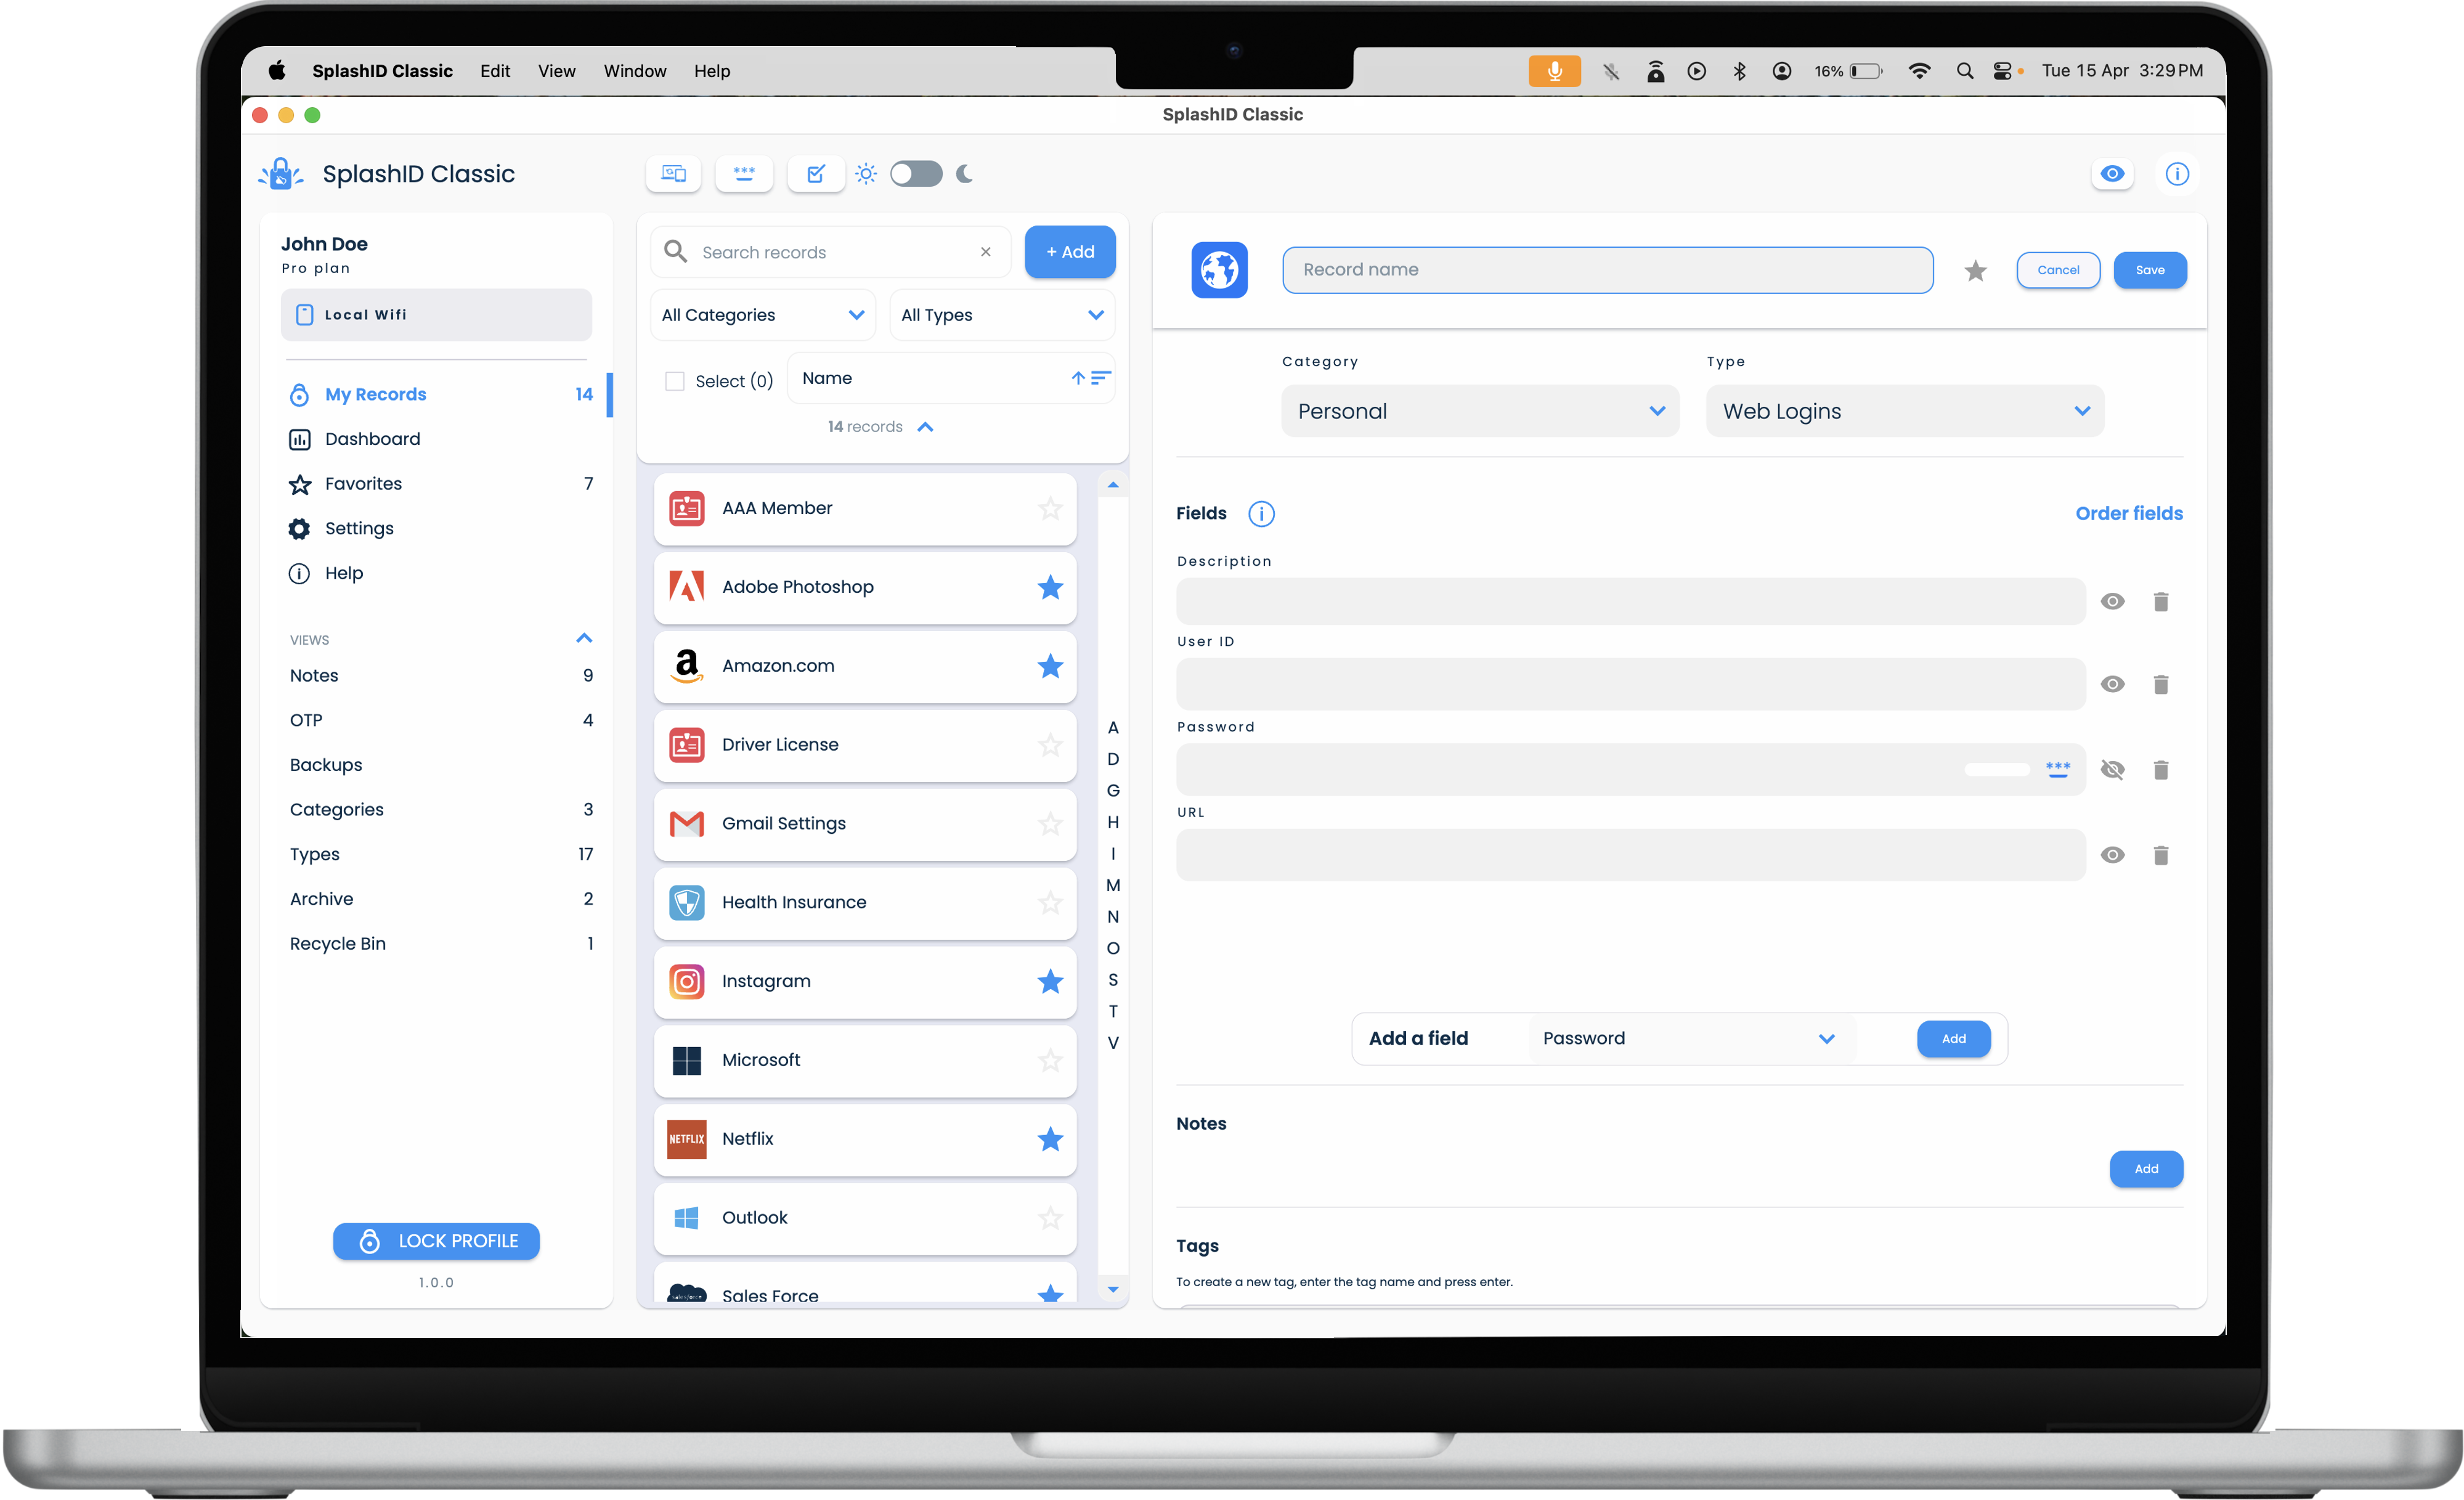
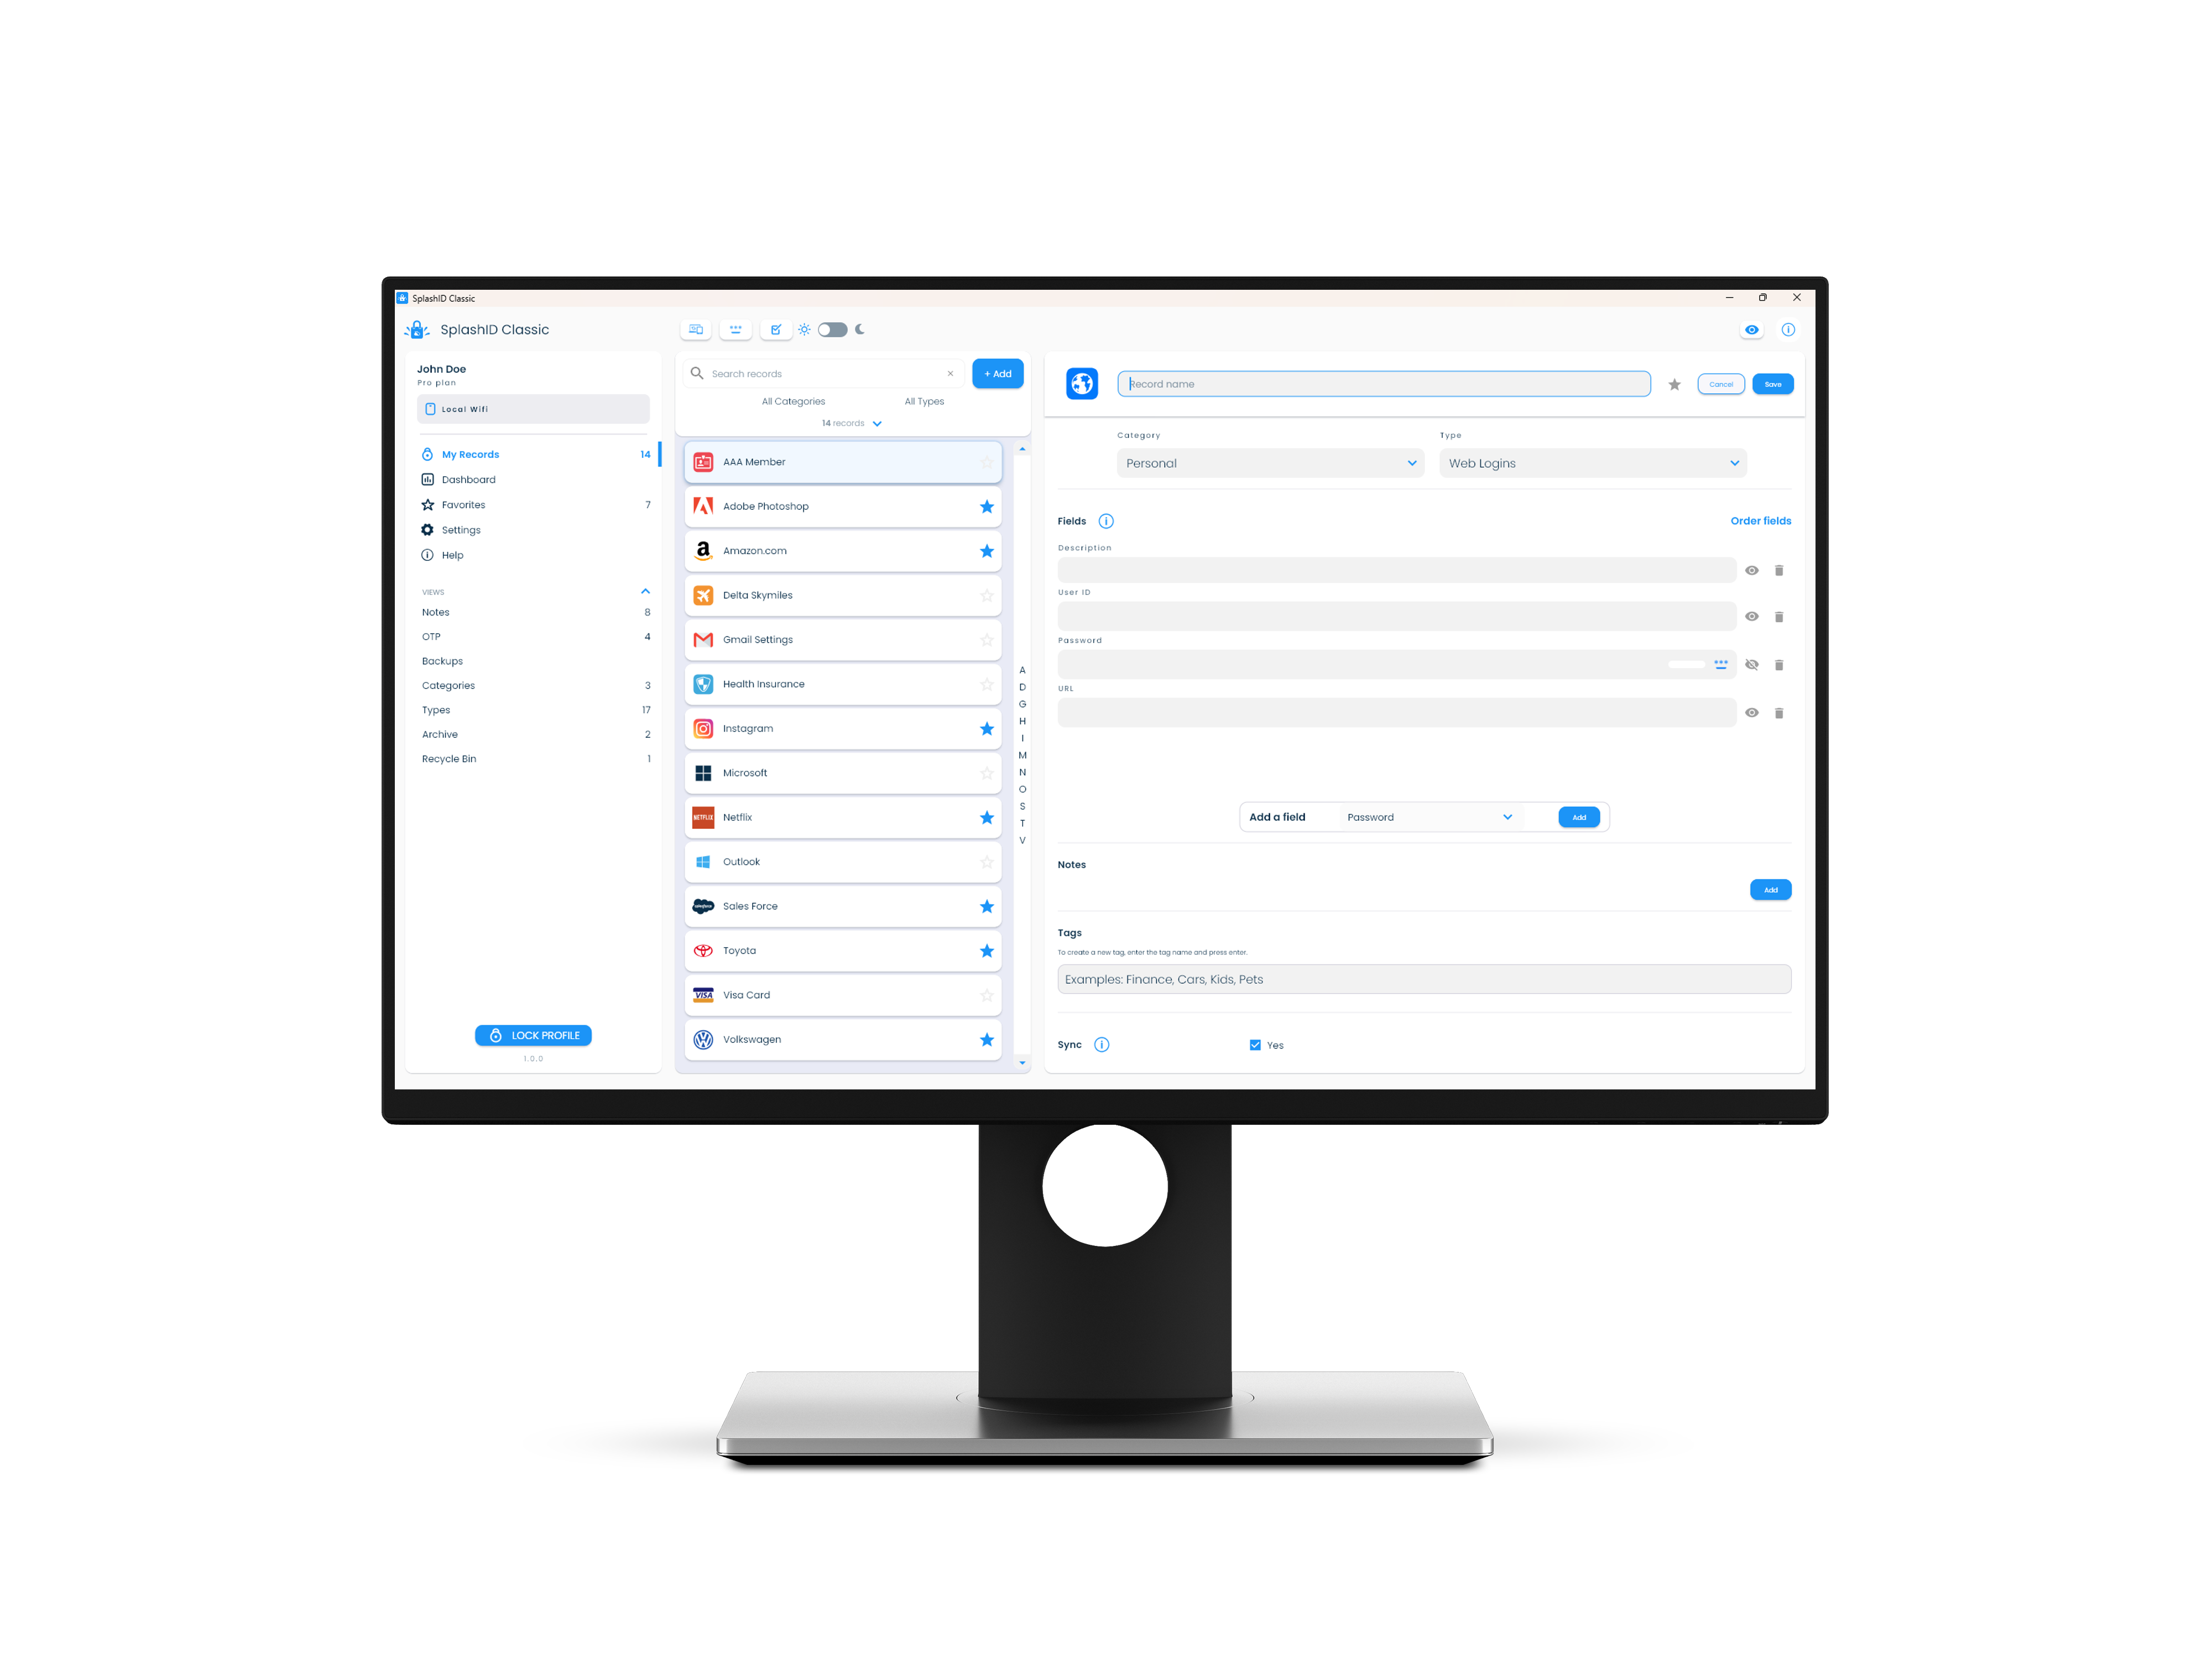
On desktops and laptops, the records screens are organised into three columns as listed below.
| Column | Purpose |
|---|---|
| 1, the left panel | Shows the navigation menu for the application |
| 2, the center panel | Show a list of all records that can be sorted and filtered |
| 3, the right panel | Shows the details of the selected record |
If you reduce the width of the window in desktops and laptops, it will change into a two column view. In this view the application menu can be opened by tapping on the app icon in the top left part of the application.
Tablets
On tablets, the records screens are organised into two columns as listed below.
| Column | Purpose |
|---|---|
| 1, the left panel | Show a list of all records that can be sorted and filtered |
| 2, the right panel | Shows the details of the selected record |
In this view the application menu can be seen by tapping on the list menu icon in the top left part of the application.
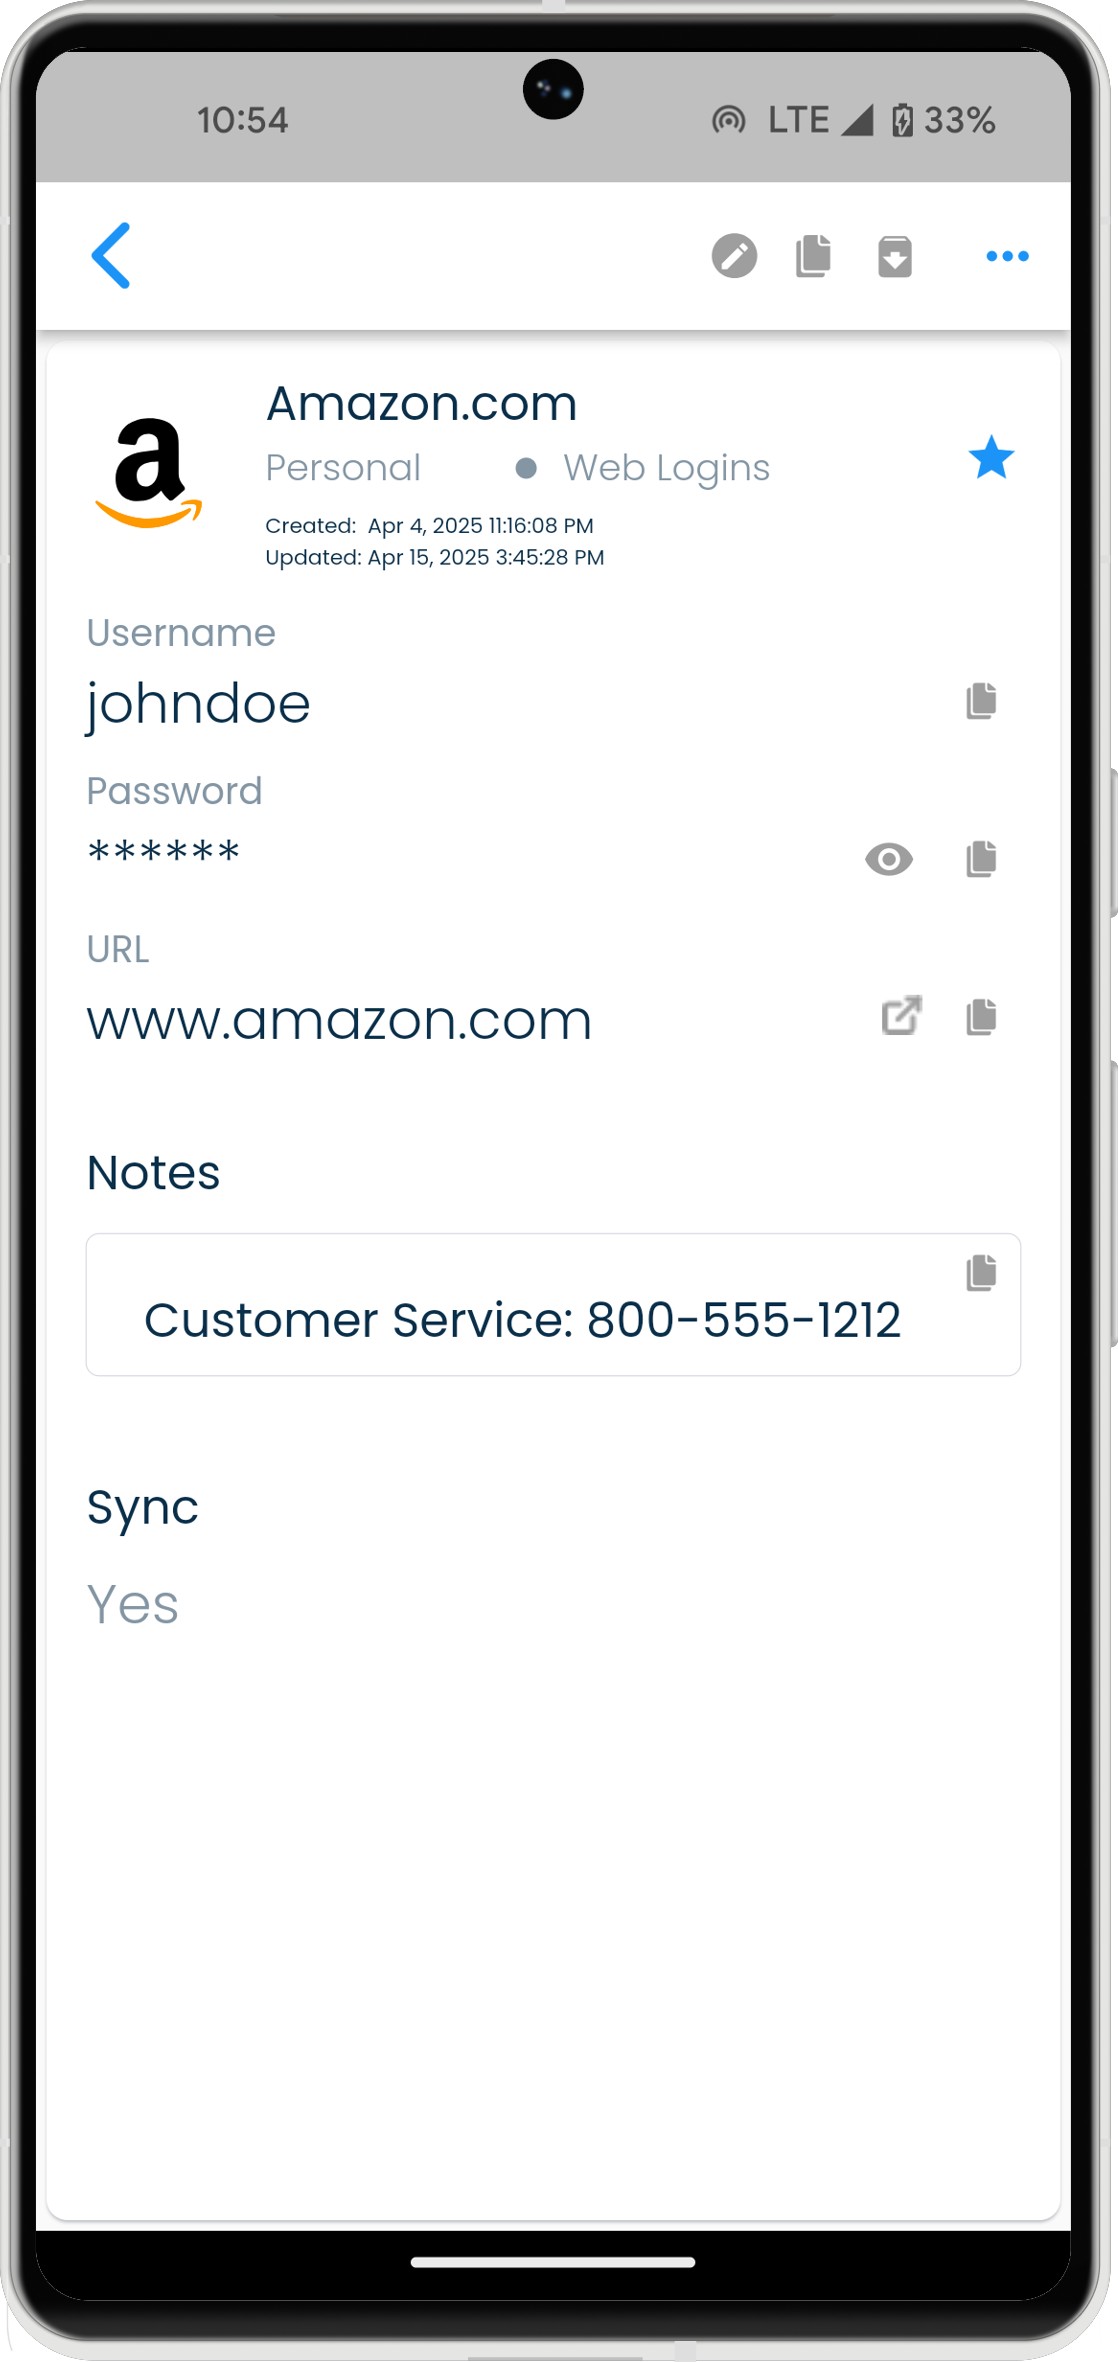
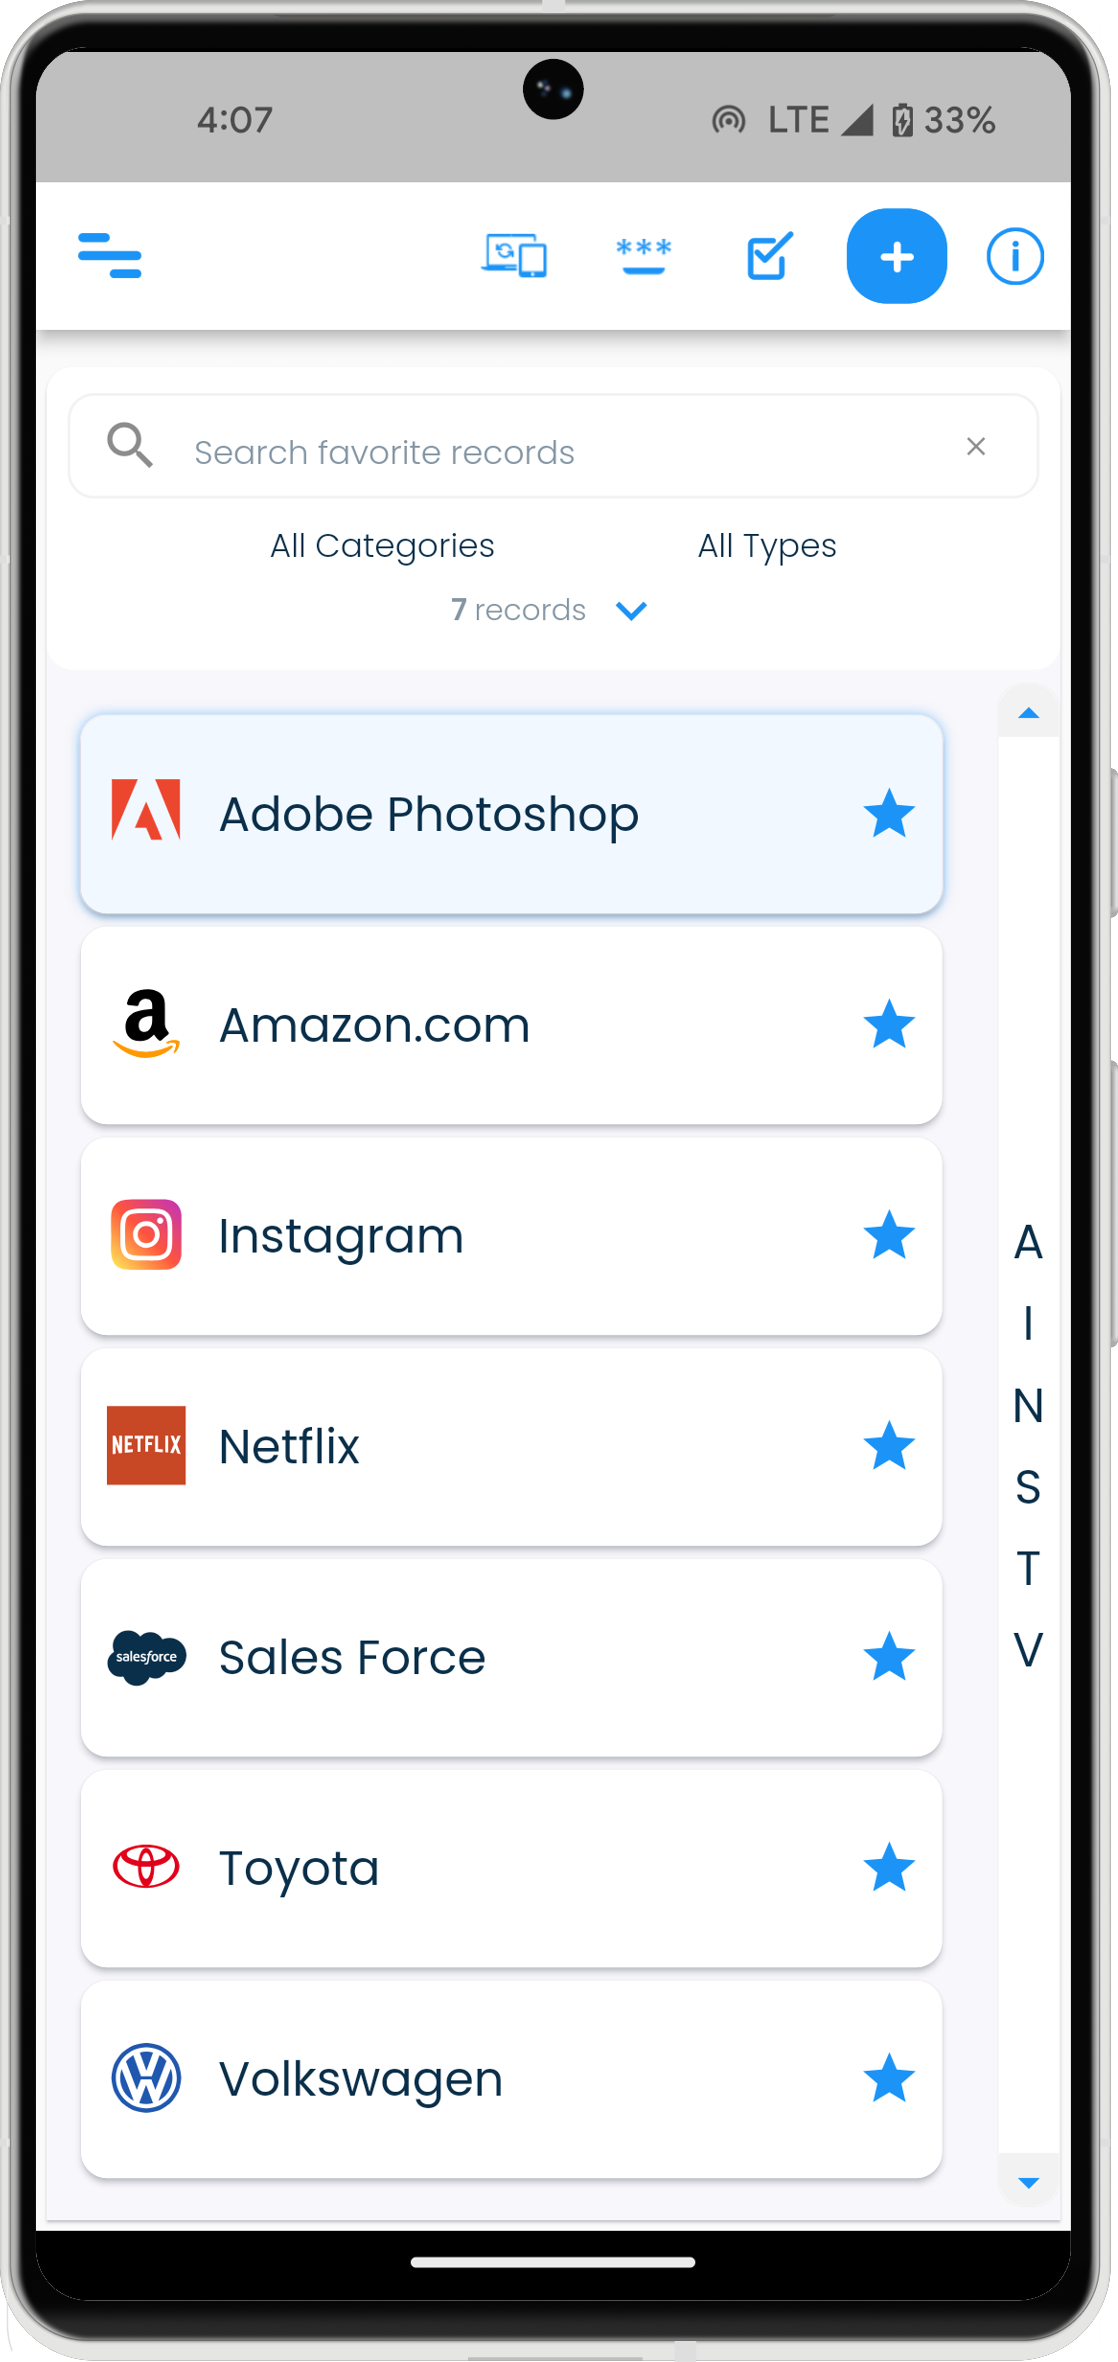
Mobiles
On mobiles, the records screens are shown with a list of records that can be sorted and filtered using the given options.
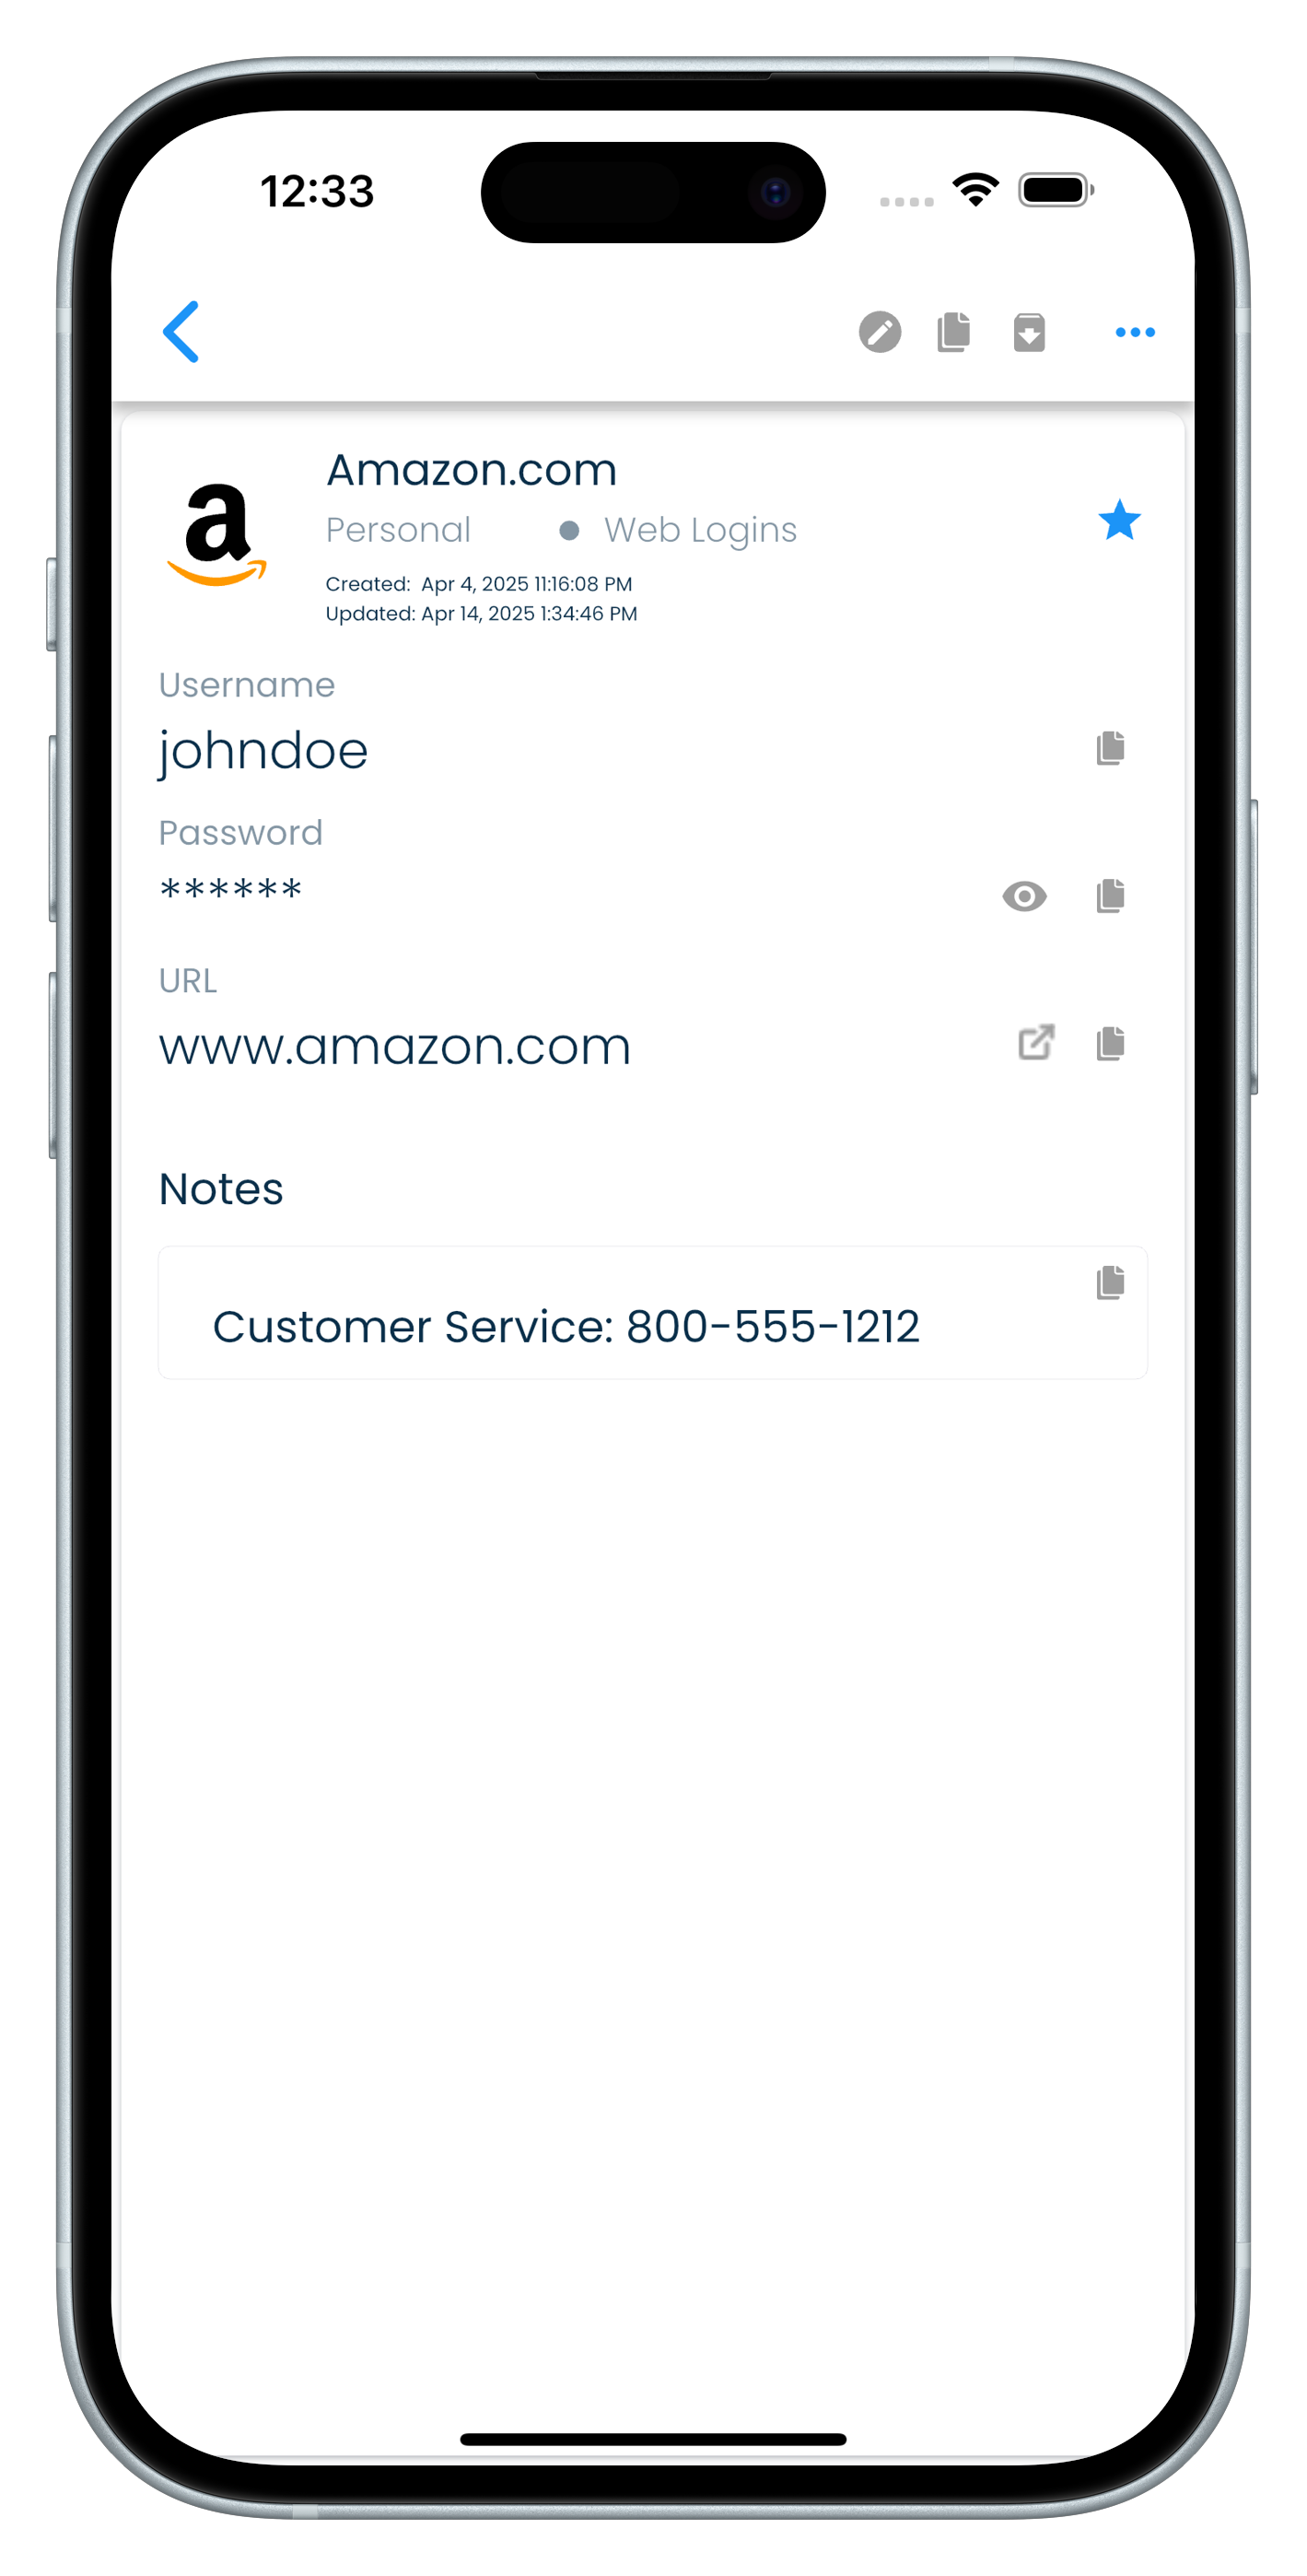
On selecting a record, the view will change to showing the details of the selected record. The details displayed include the record name, fields, notes, and update time.
In this view the application menu can be seen by tapping on the list menu icon in the top left part of the application.
Navigating between screens
You can switch between different screens by clicking or tapping on an item in the application menu list. The application menu is displayed in the first panel in the 3 column view on desktops. In 2 column and 1 column views, the application menu can be opened by clicking or tapping on the app icon in the top left part of the screen.
The table below summarises the application menu items.
| Menu item | Description |
|---|---|
| My Records | Show a list of all your records. You can search, sort, filter and store personalised views that are a combination of search, sort and filters used. |
| Dashboard | Displays important information related to your profile. |
| Favorites | Shows all the records that are marked as favorites. |
| Settings | All the settings for SplashID Classic and your profile can be managed from this view. |
| Help | Shows all the topics on which help content is available. |
| Notes | Shows all the notes that exist across all the records. |
| OTP | Shows all the authenticator fields that you have setup in all your records. These are the OTP codes that you use as 2 factor codes in other sites and applications. |
| Backups | You can see all the local backups for your profile here. These exist only on the device where they are displayed. |
| Categories | Shows a list of categories that you have. Categories are used to organise your records into high level groups. |
| Types | Shows all the available templates of records in your profile. Types contain a pre-defined set of fields that are used when a new record is created. |
| Archive | Displays all the records that you have archived. Archived records can be used to move records that you no longer actively use, and dont want to be shown as part of the main record lists. |
| Recycle Bin | All the records that you have deleted will be moved to the Recycle Bin. You can permanently delete them from here if you are sure that you no longer need them. |
Customising the navigation menu
You can customise the navigation menu to suit your preference. You can hide one or more of the following navigation menu list items if you do not use them.
- Help
- Notes
- OTP
- Categories
- Types
To do this go to the Side Menu group of settings in the General section in Settings.
Create and use a SplashID Classic profile
Getting ready
Before you start to sign up please have the following two pieces of information handy.
- A name or email address you want to use for your profile.
- A strong master password for your profile that is at least 4 characters long.
Strong master password
You should use a combination of lowercase and uppercase characters, numbers and some special characters (!, @, #, $, %, ^, &, *,... etc.) for your master password, and it should be long enough to make it all the more secure.
We recommend that you have a master password that is 12 or more characters long, and that you do not use common words, names, dates or other known pieces of information about yourself.
SplashID Classic security is designed in such a way that your profile can be accessed only with a master password. To keep your profile secure, ensure that only you know this critical piece of information.
We cannot reset your master password
We do not have any mechanism to reset your password in case you forget it.
Please download a recovery kit after you create your profile. The recovery kit can be used to access your profile if you do not remember your master password.
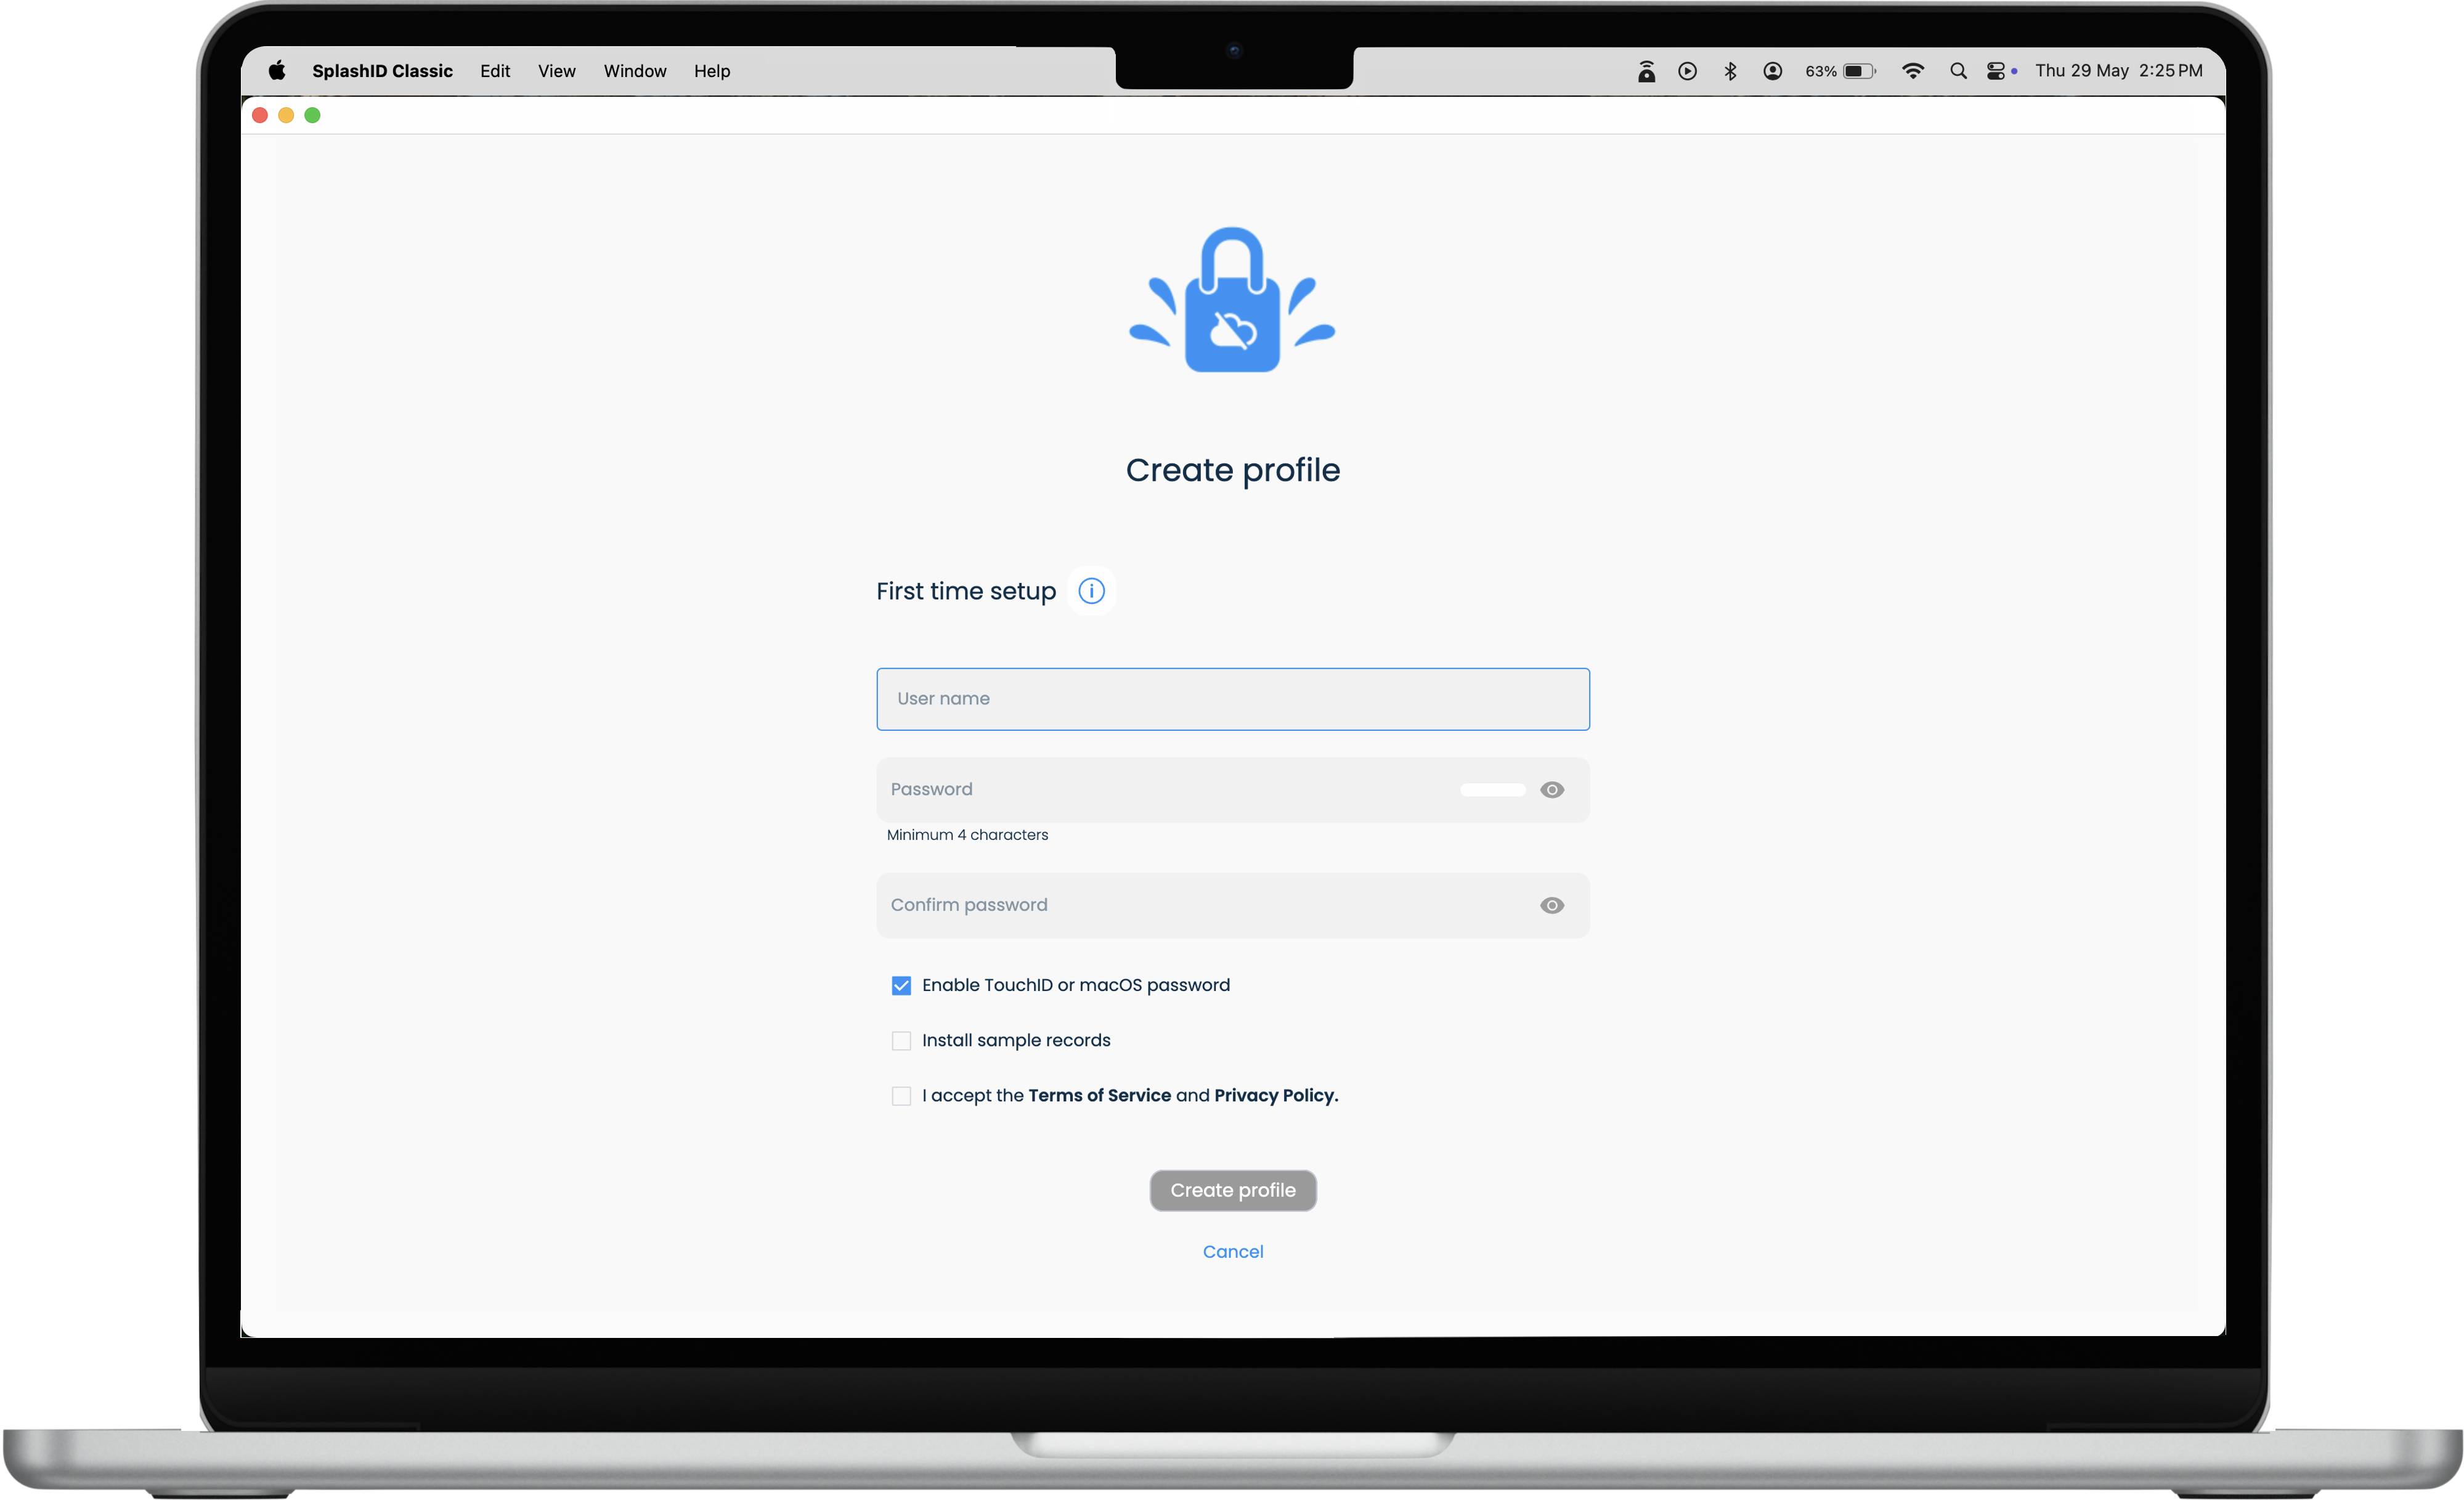
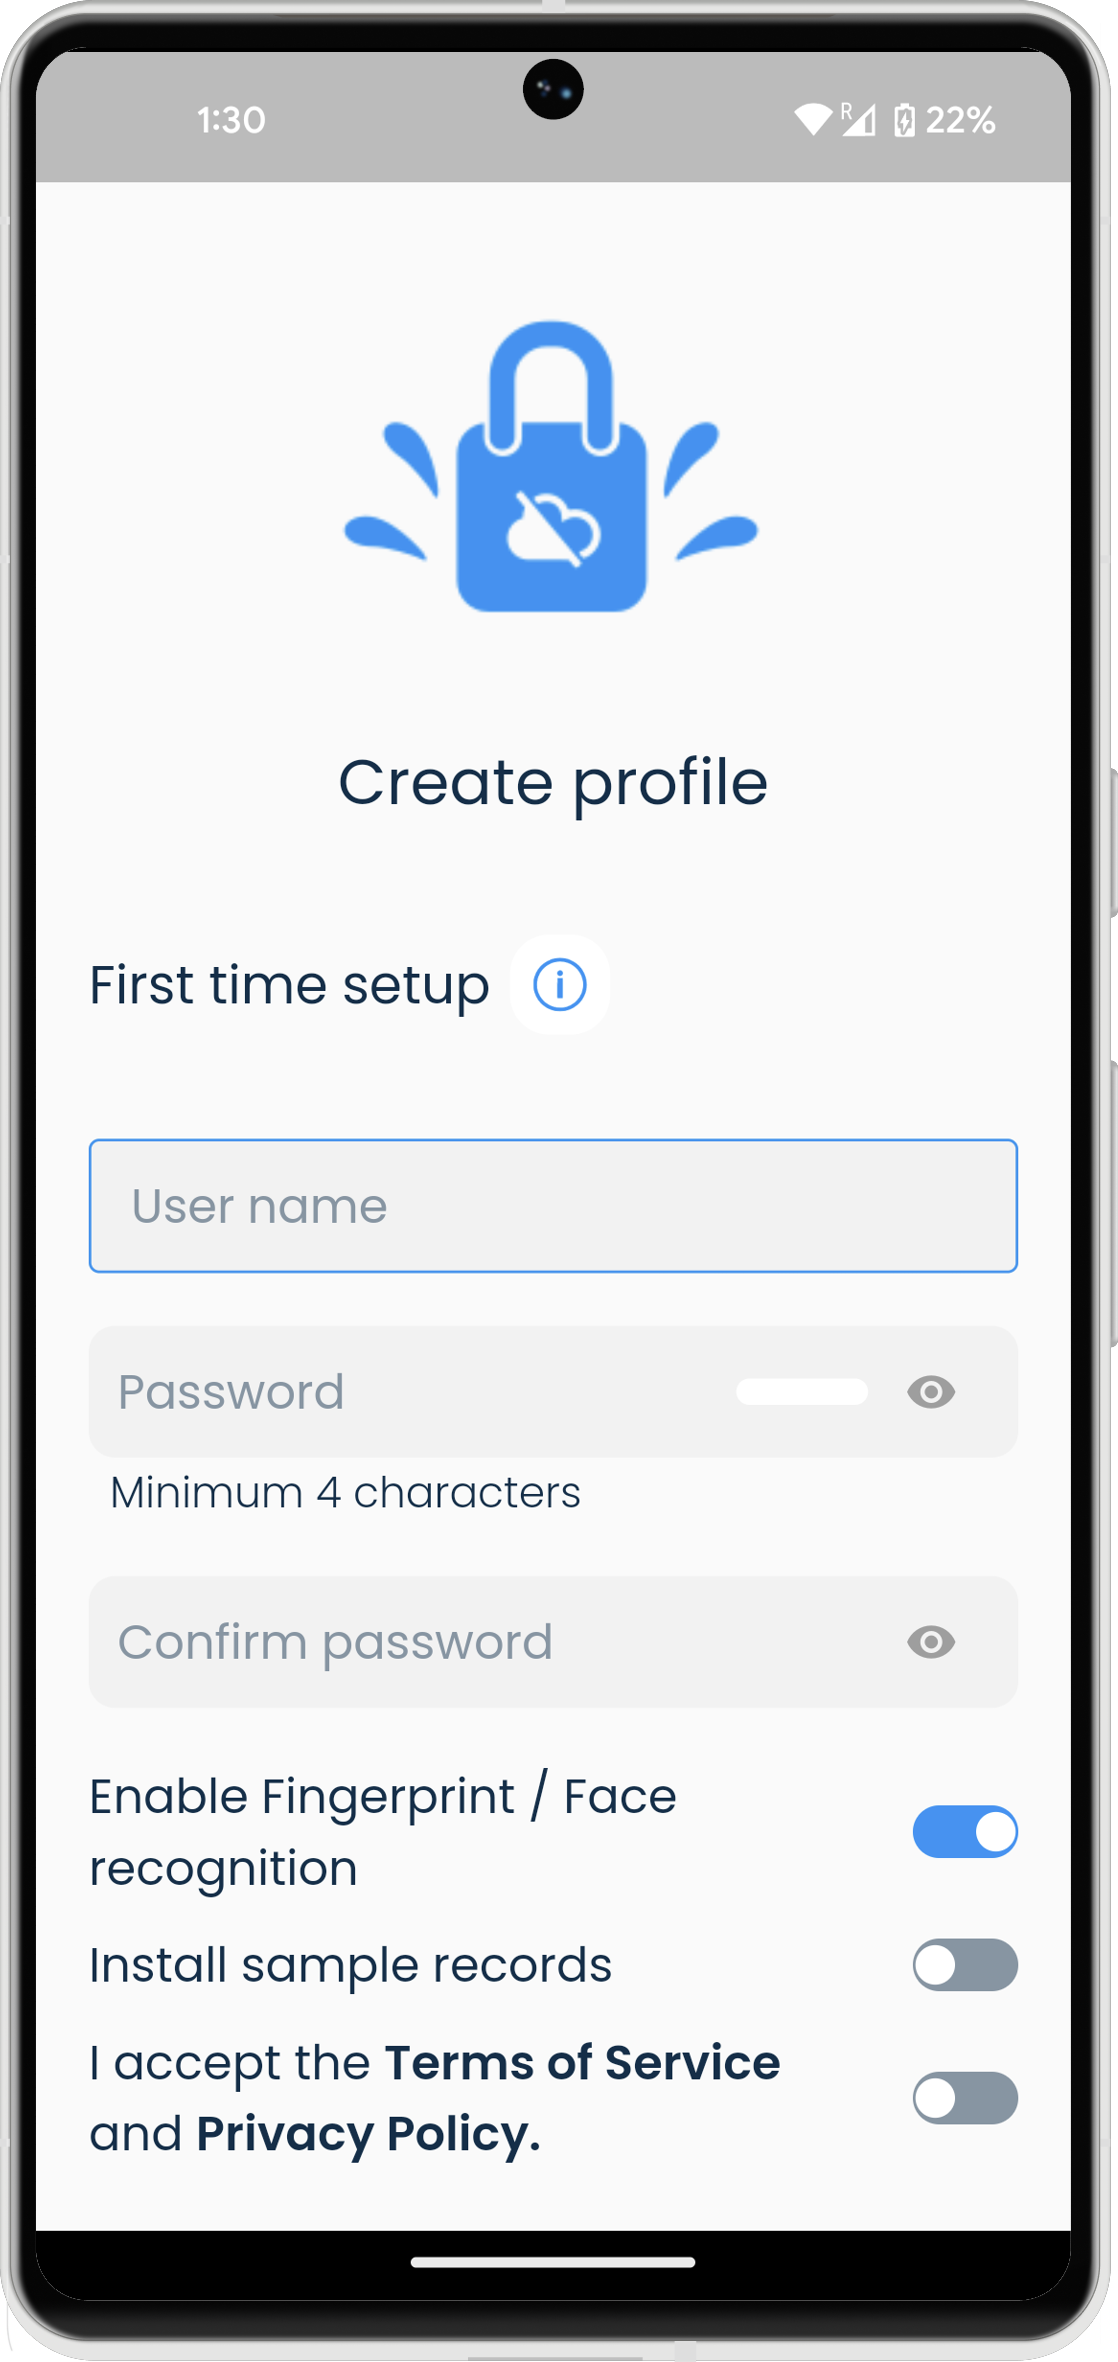
Profile creation
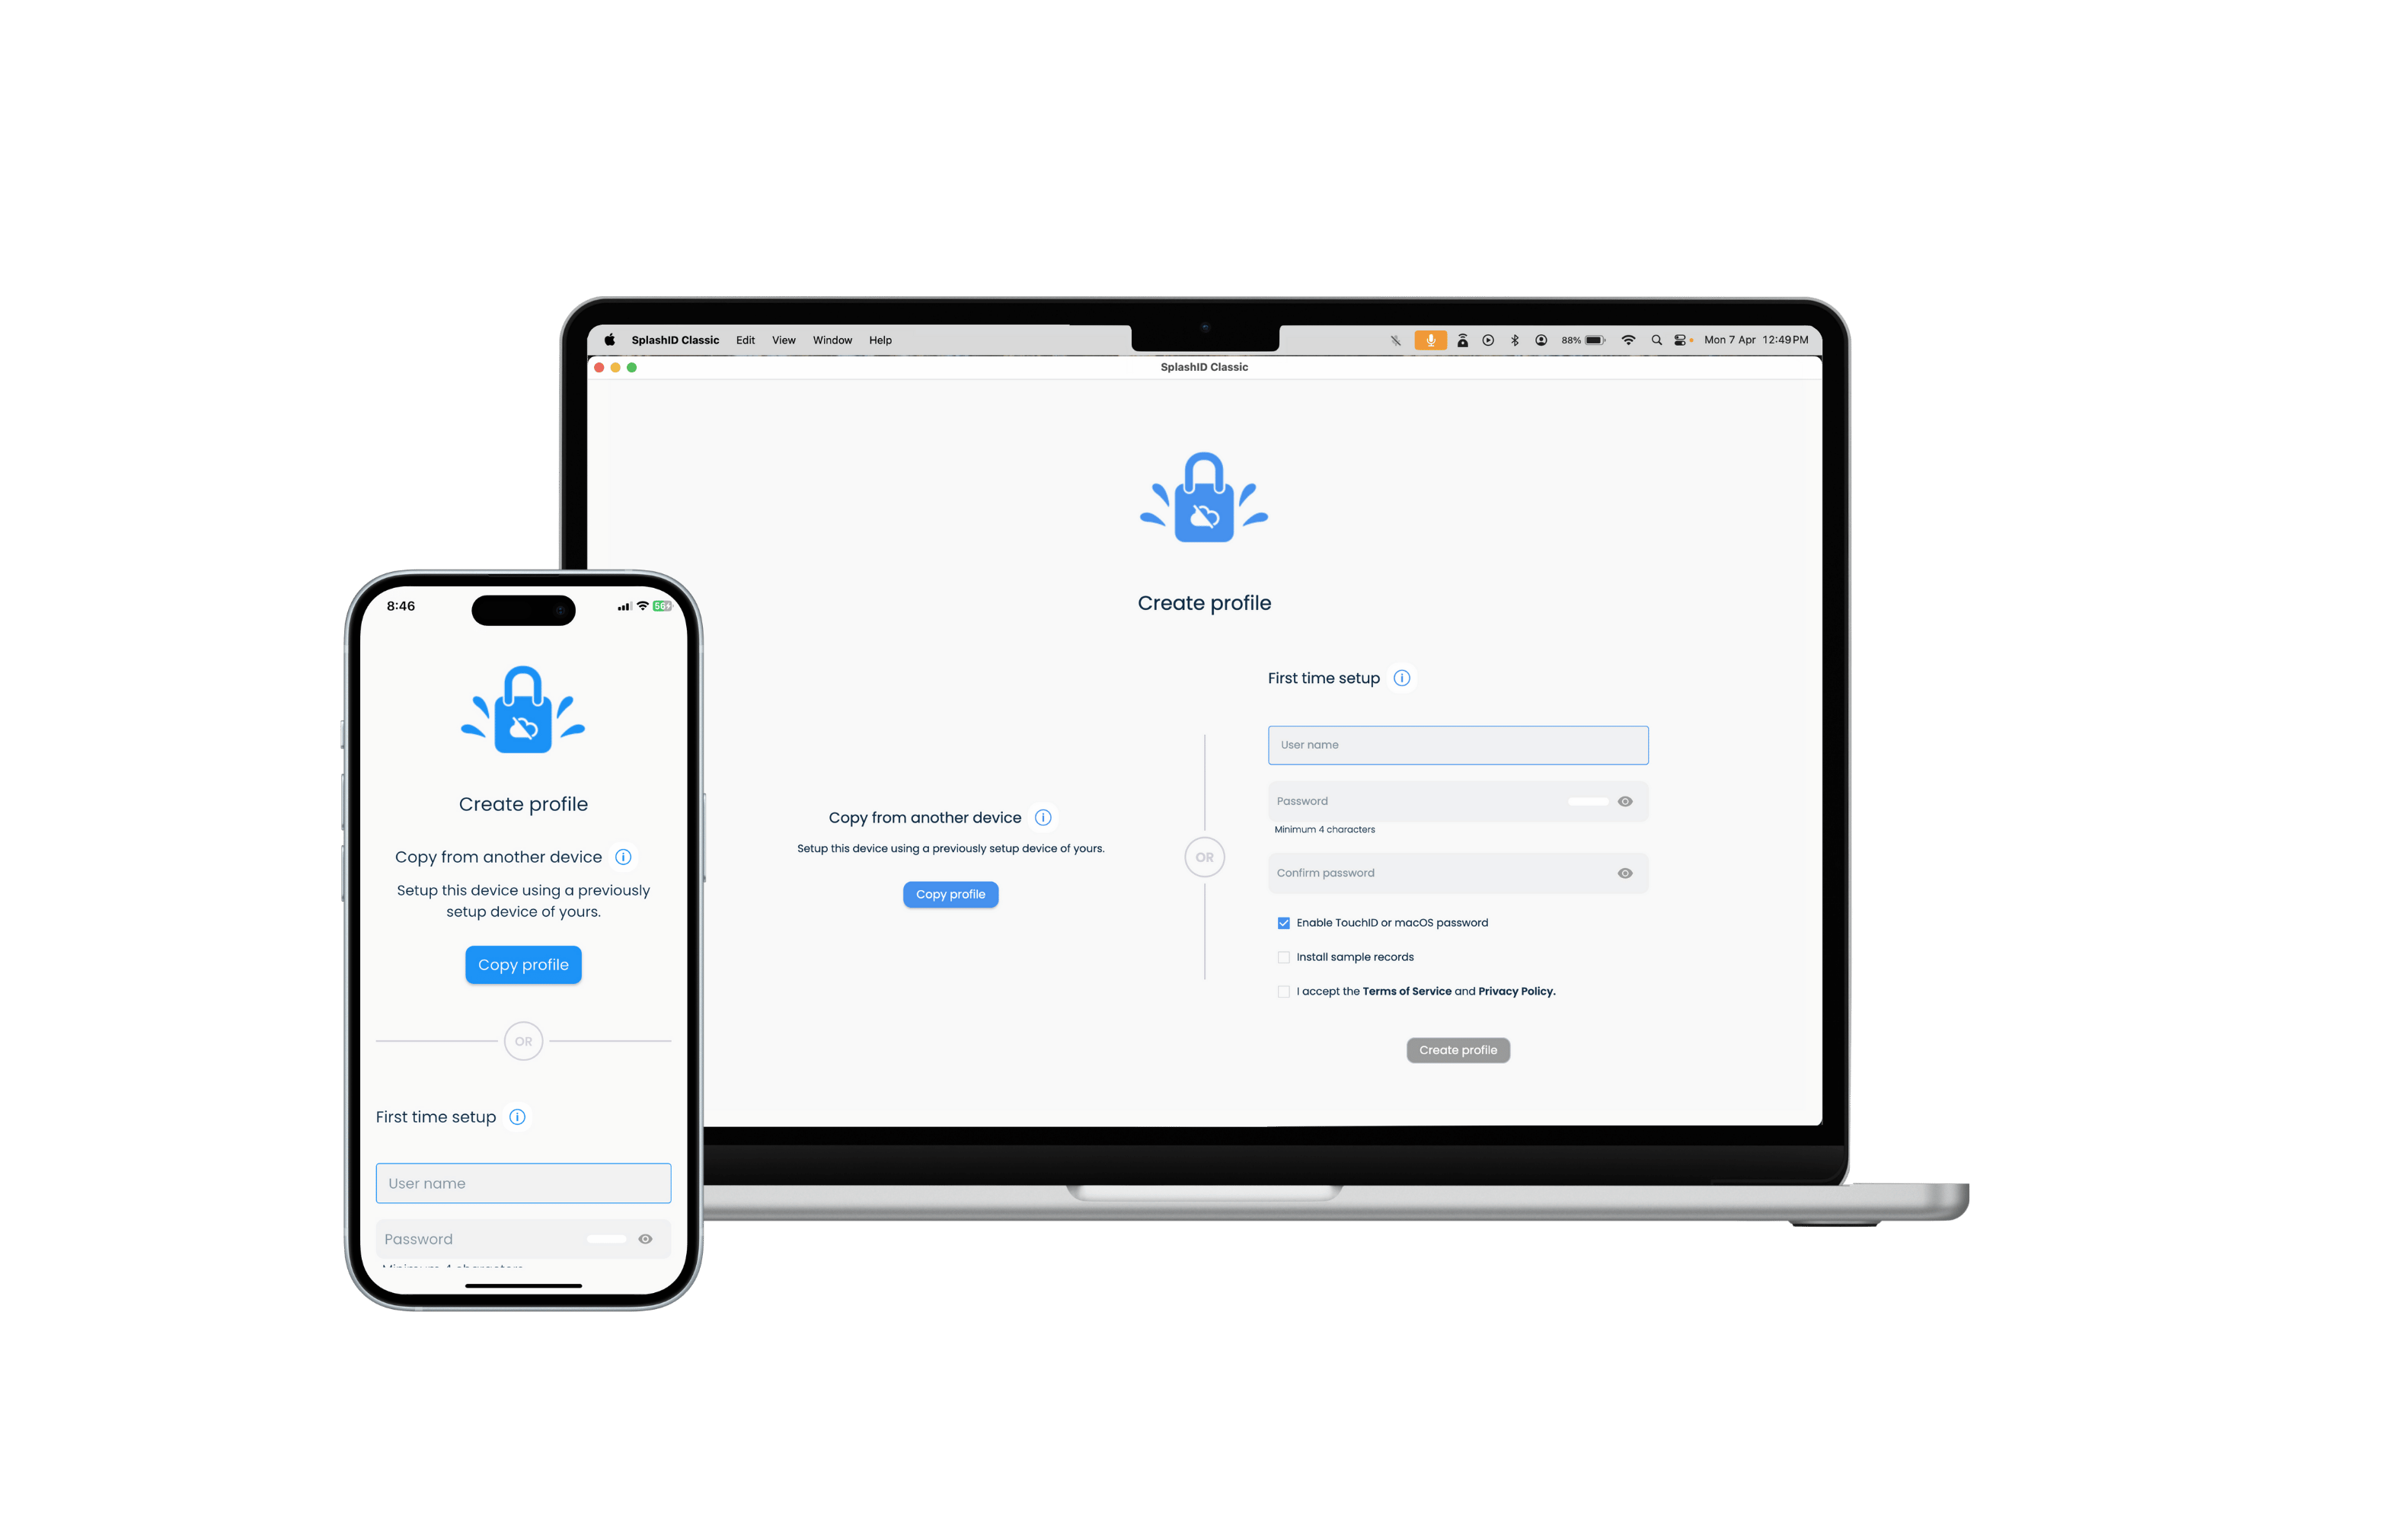
You can create a SplashID profile for yourself in a desktop, tablet or mobile application by following the steps given below.
- Install SplashID Classic from the application store on your phone, tablet, laptop or desktop.
- Launch the installed SplashID Classic app, and accept any permissions that the device asks for. Not accepting any of the required permissions will cause some functions in the application to stop working.
- Select No as you are creating your profile for the first time.
- Enter your name or email address, master password, confirm your master password, and accept the terms of our service. Click or tap on the Create profile button to start the profile creation process.
- Next select Local WiFi or No sync as your sync method.
- Finally download a Recovery kit and save it safely somewhere.
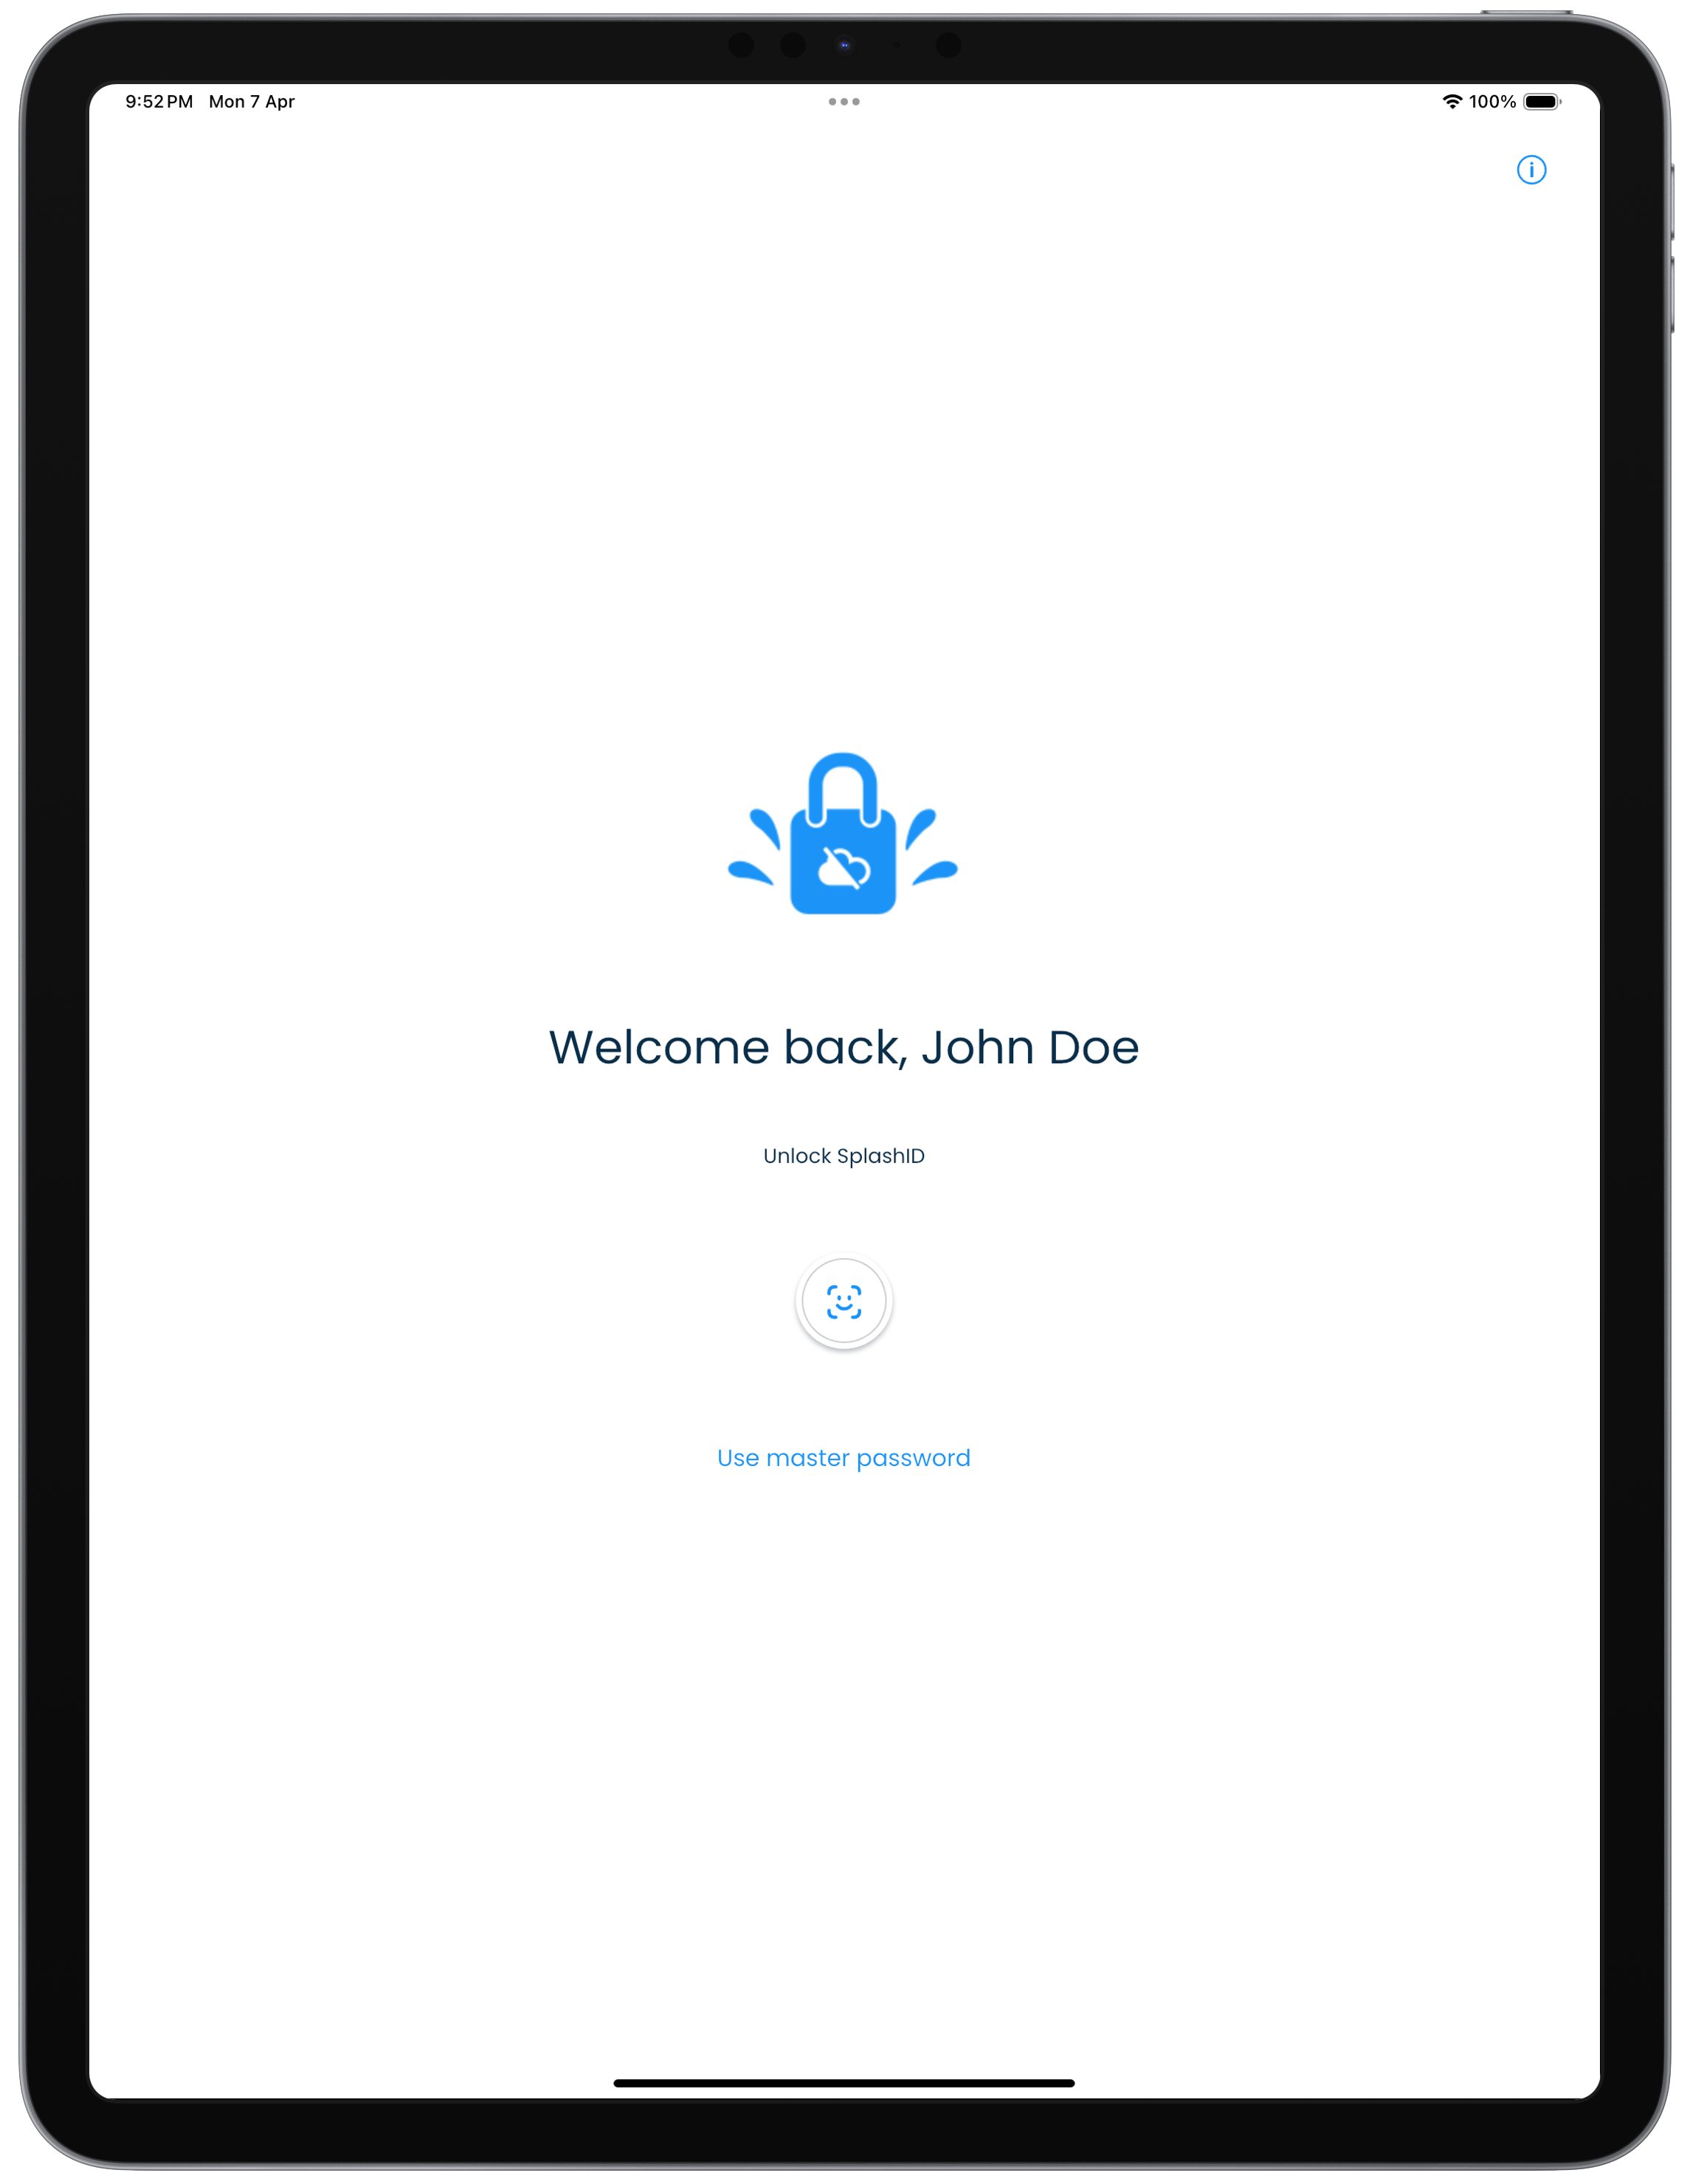
Unlock
After you have completed creating your profile on a device, you will need to unlock it for regular usage when you start the application.
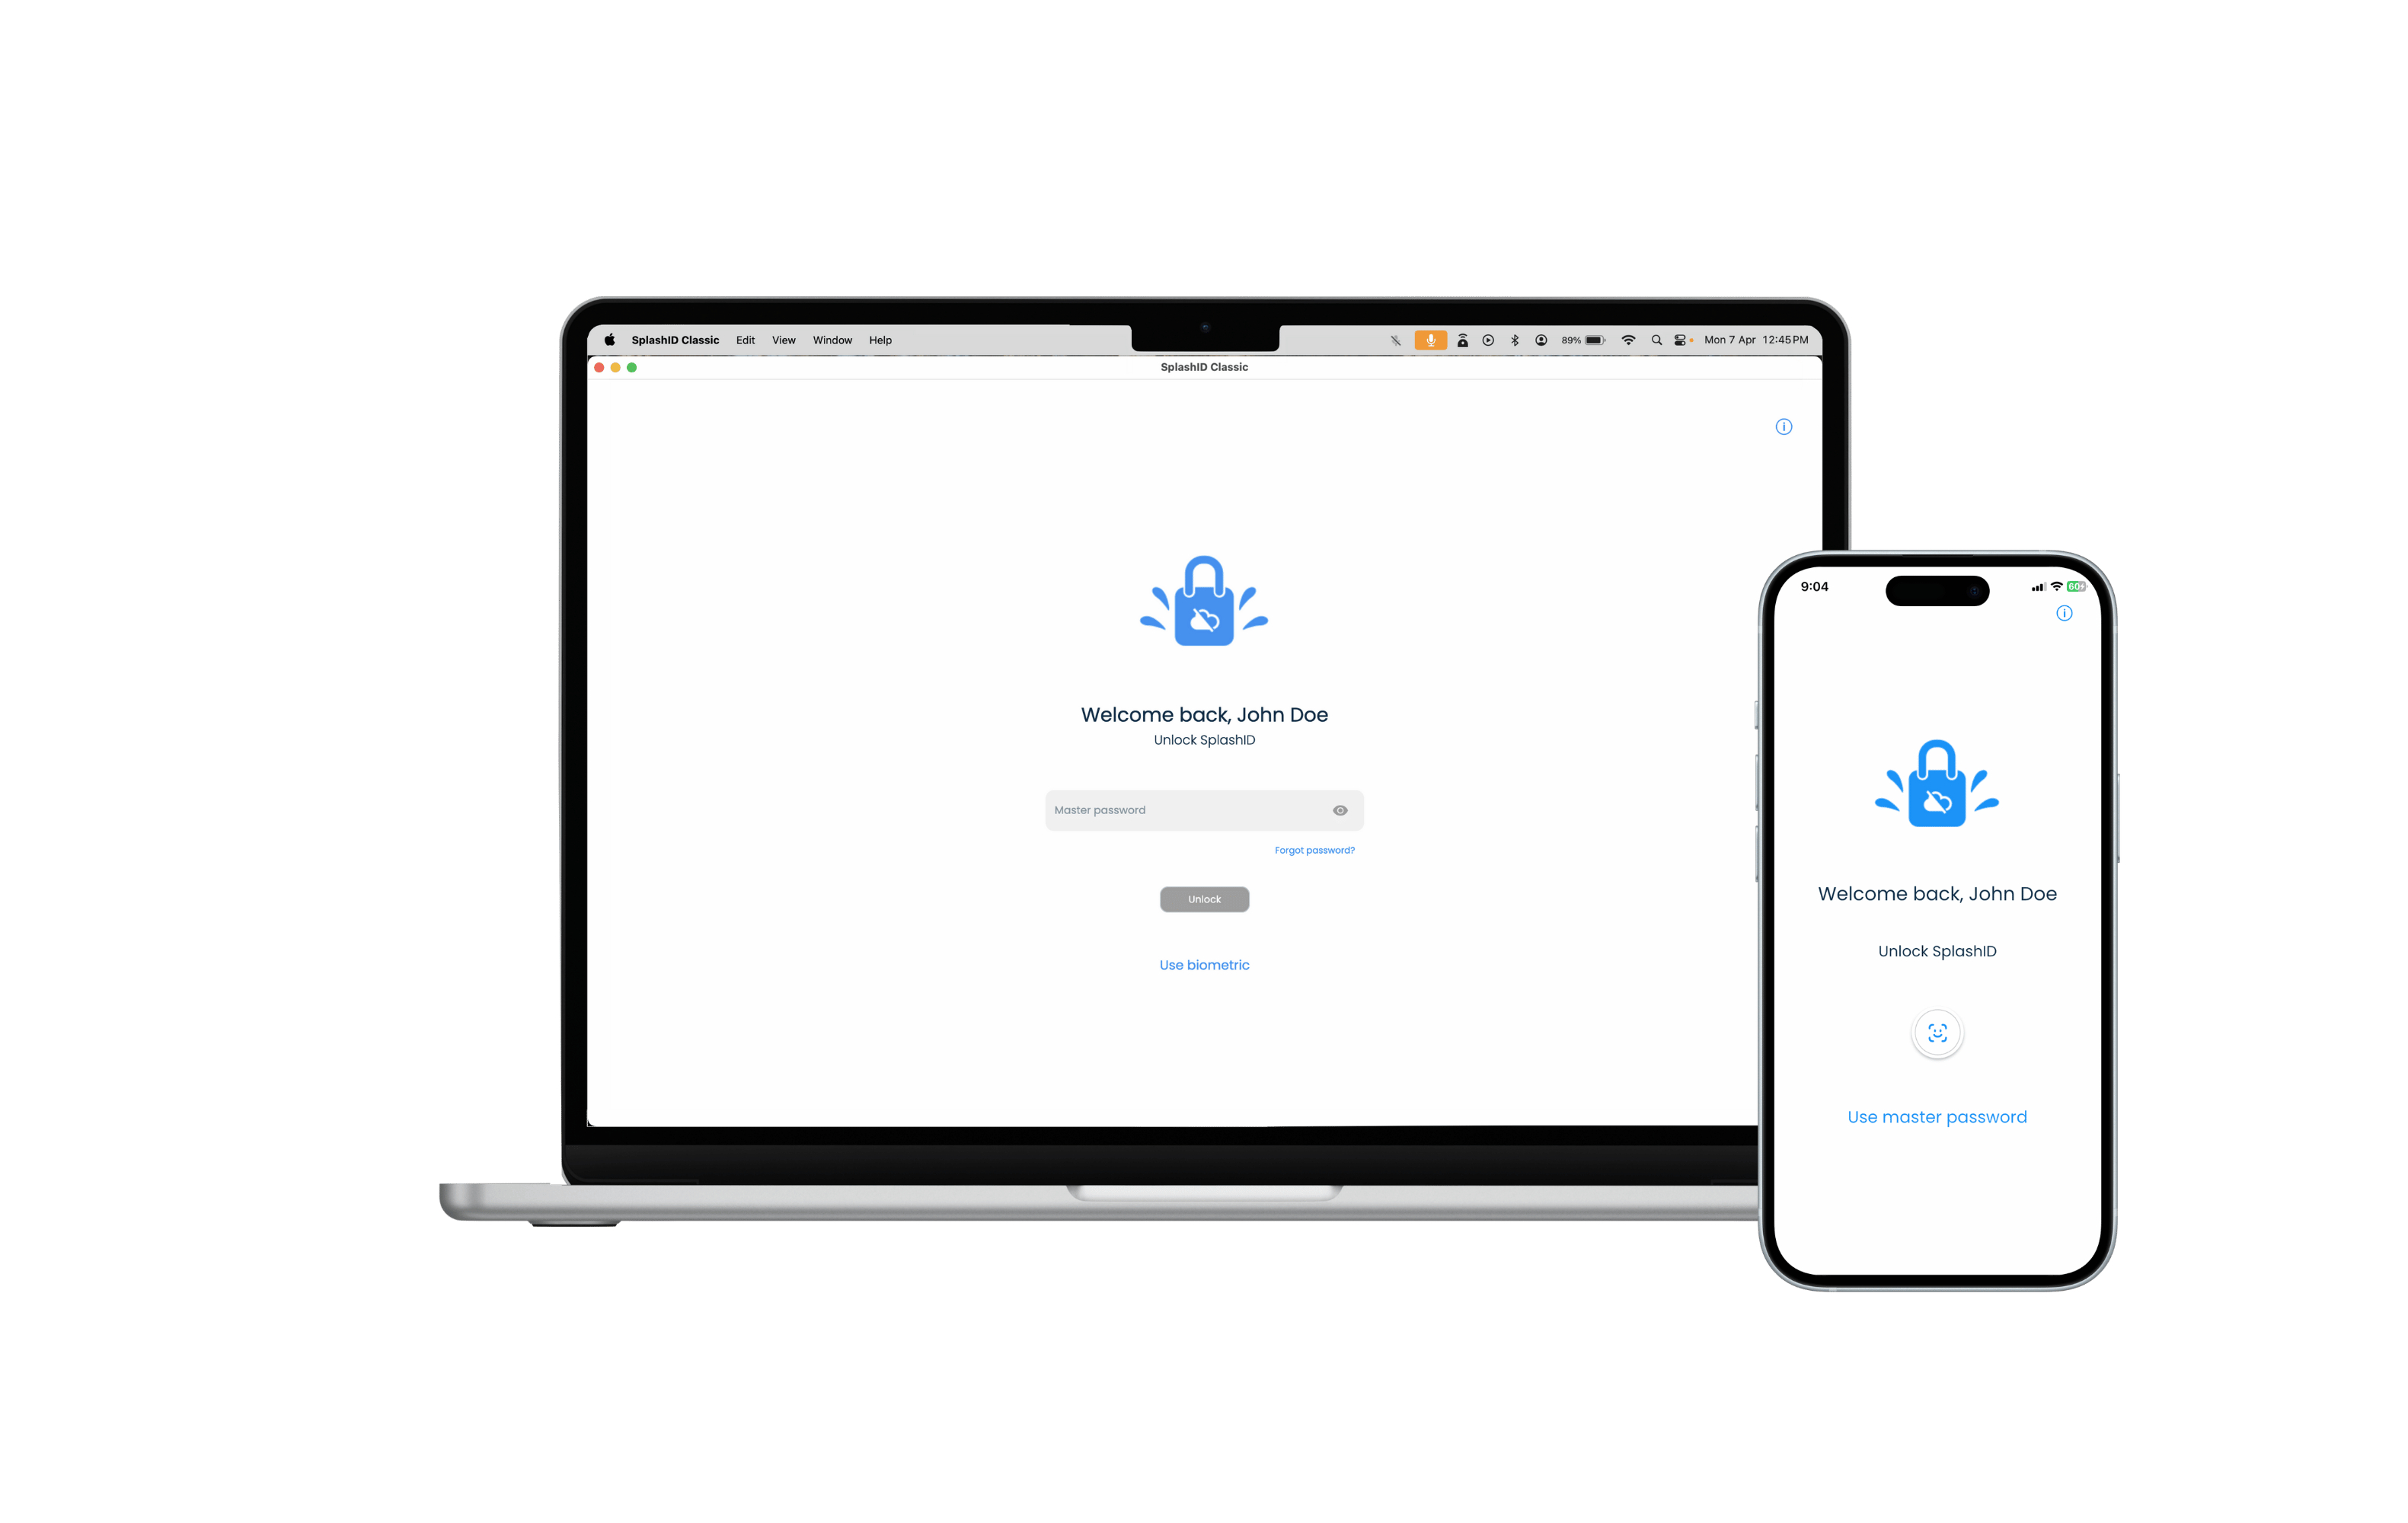
The steps to unlock a SplashID Classic application are given below.
-
Check the displayed name in the Unlock screen.
-
Enter the master password you had used during the profile creation phase.
If you have fingerprint or face recognition support on your device, you can use this instead of the master password to unlock the app. You can enable or disable fingerprint or face recognition support in the Security screen in Settings.
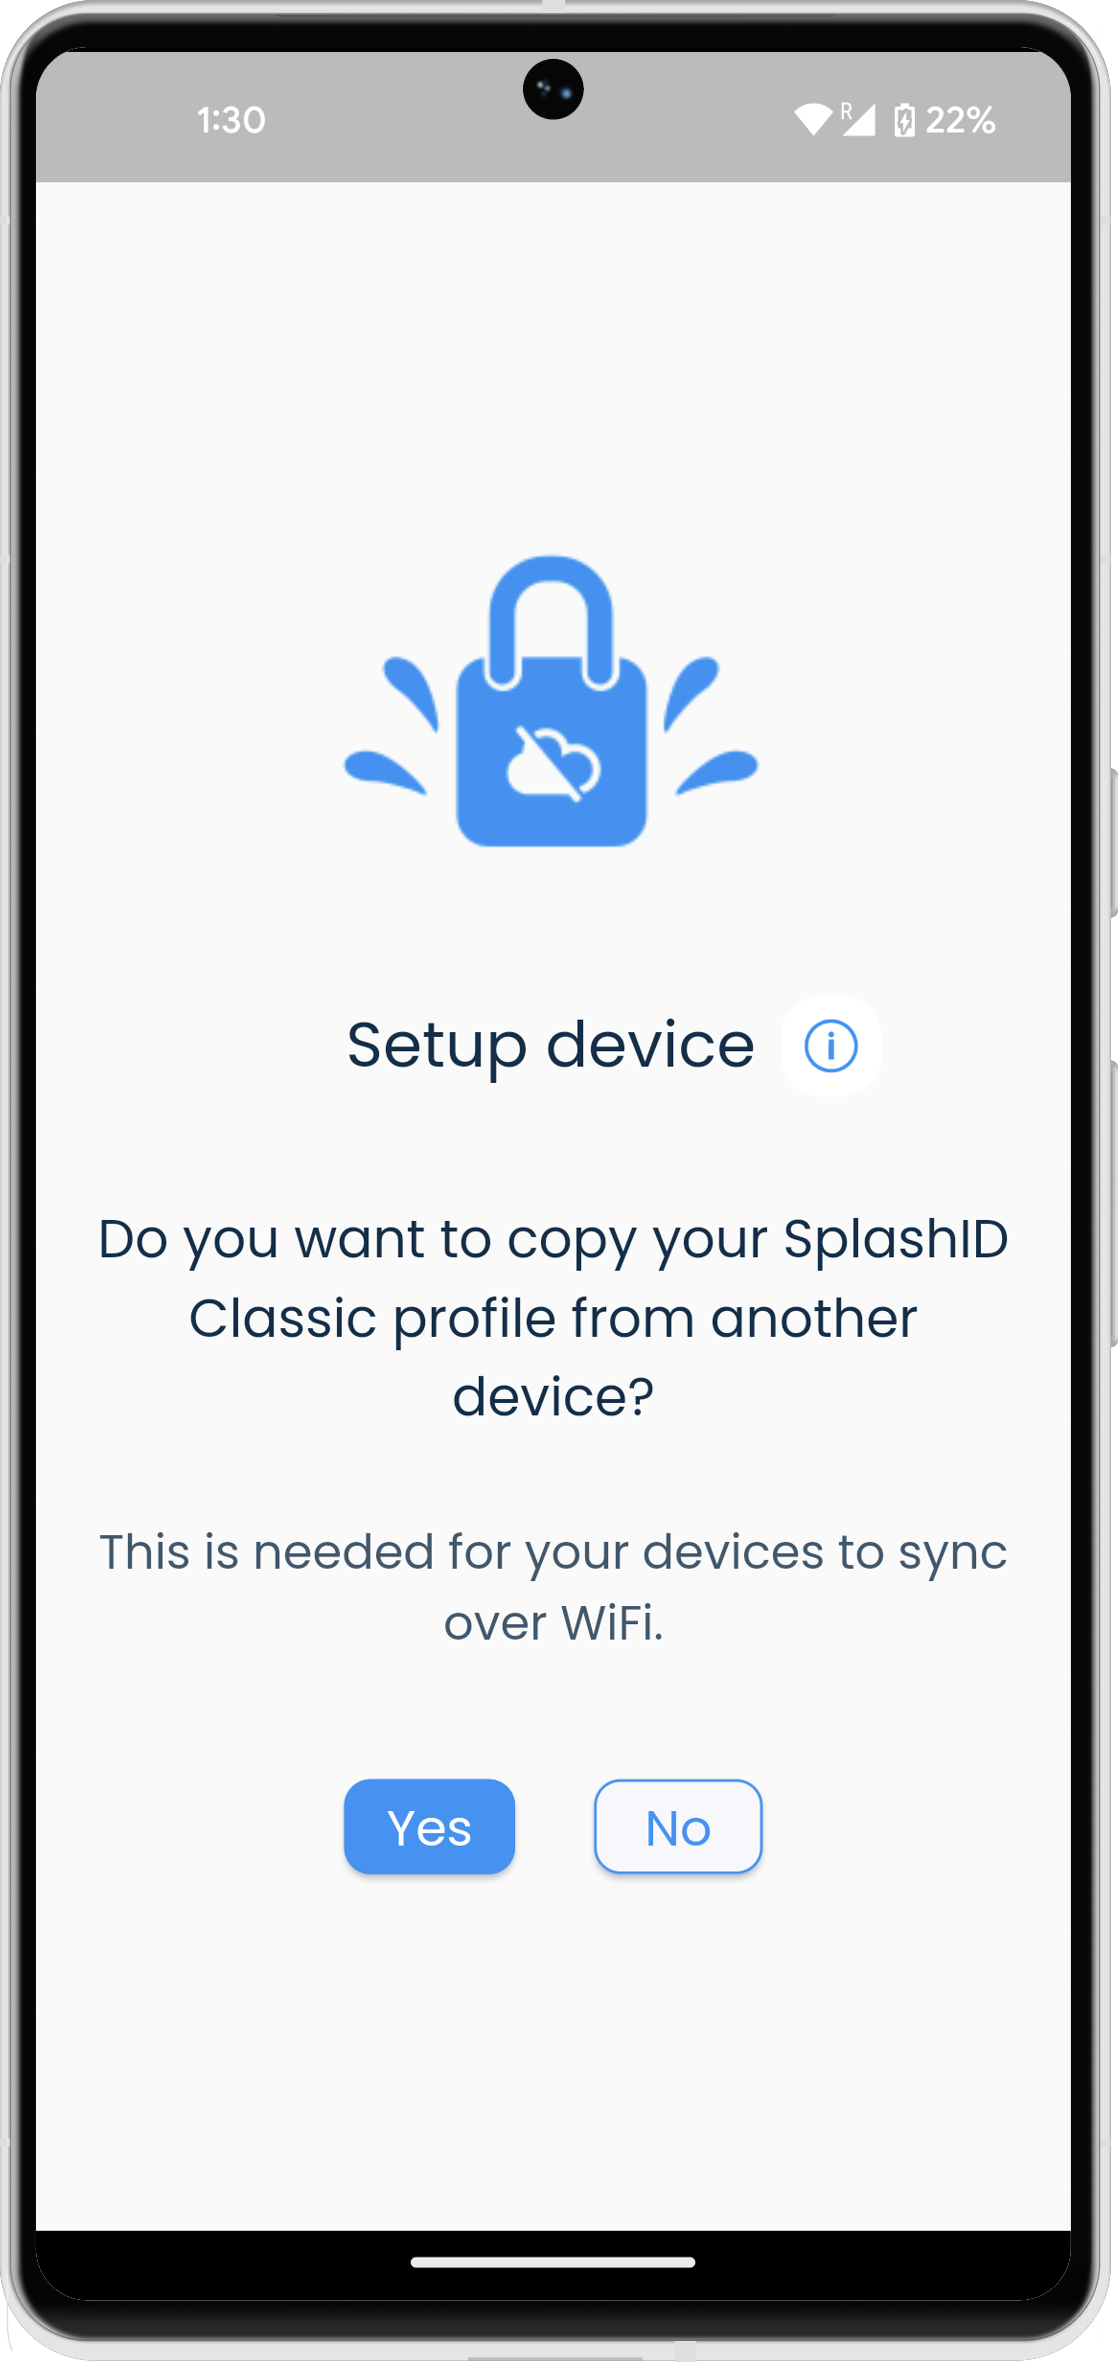
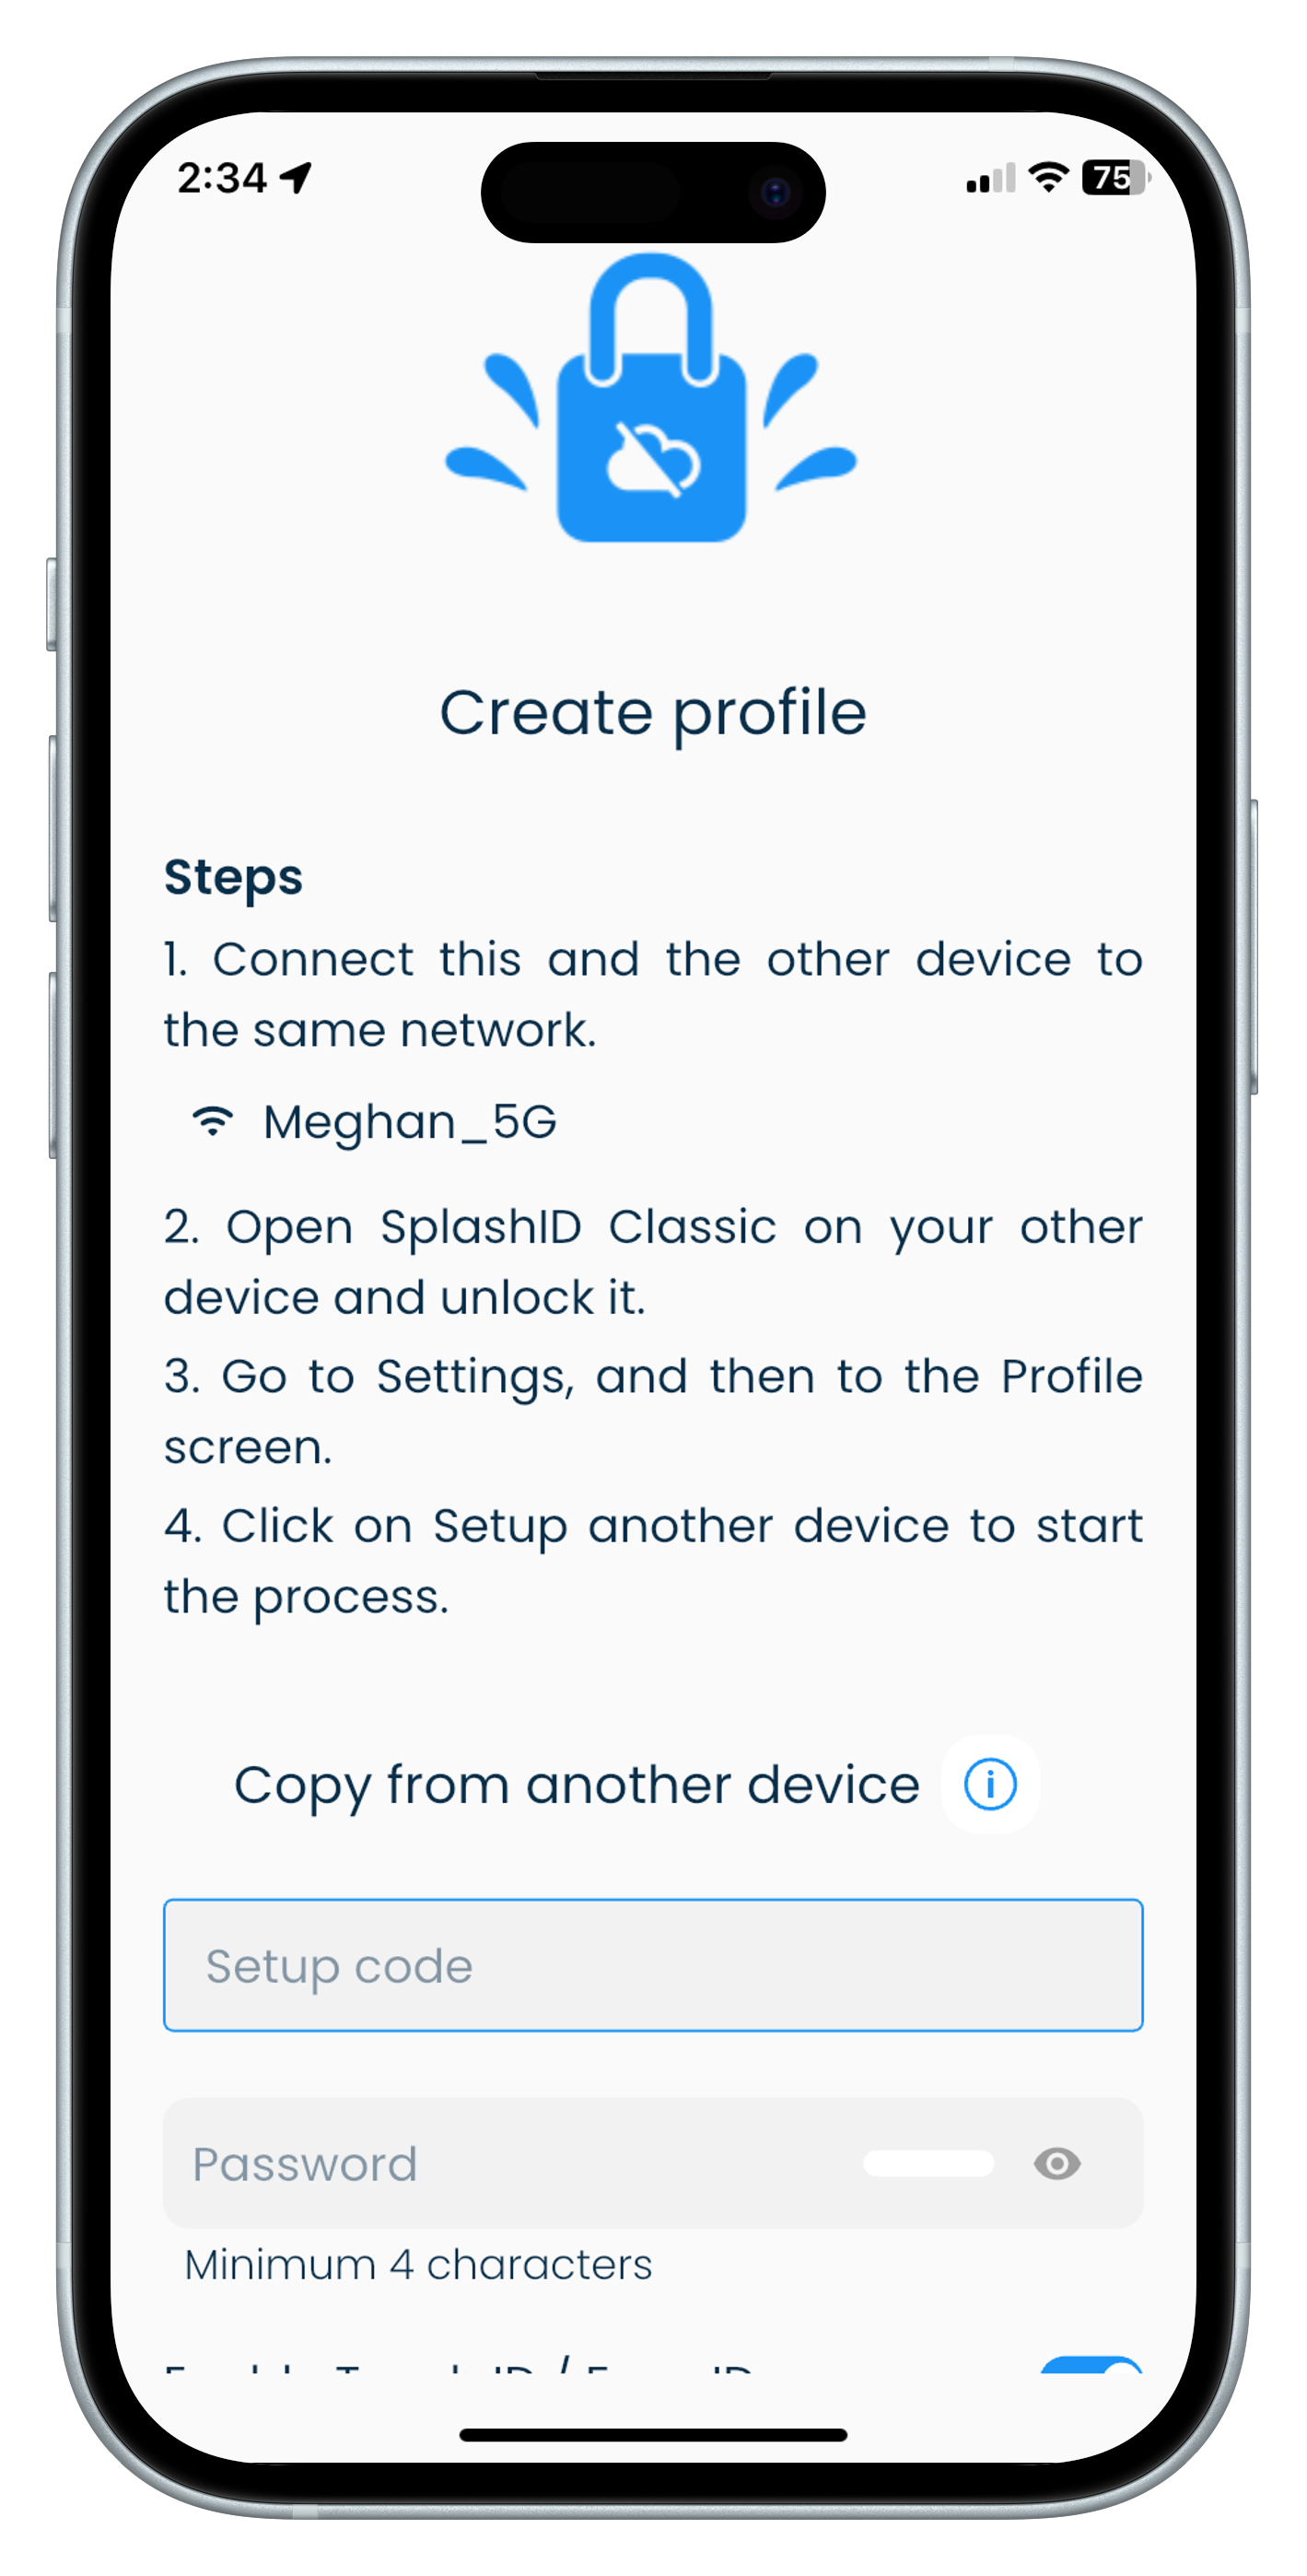
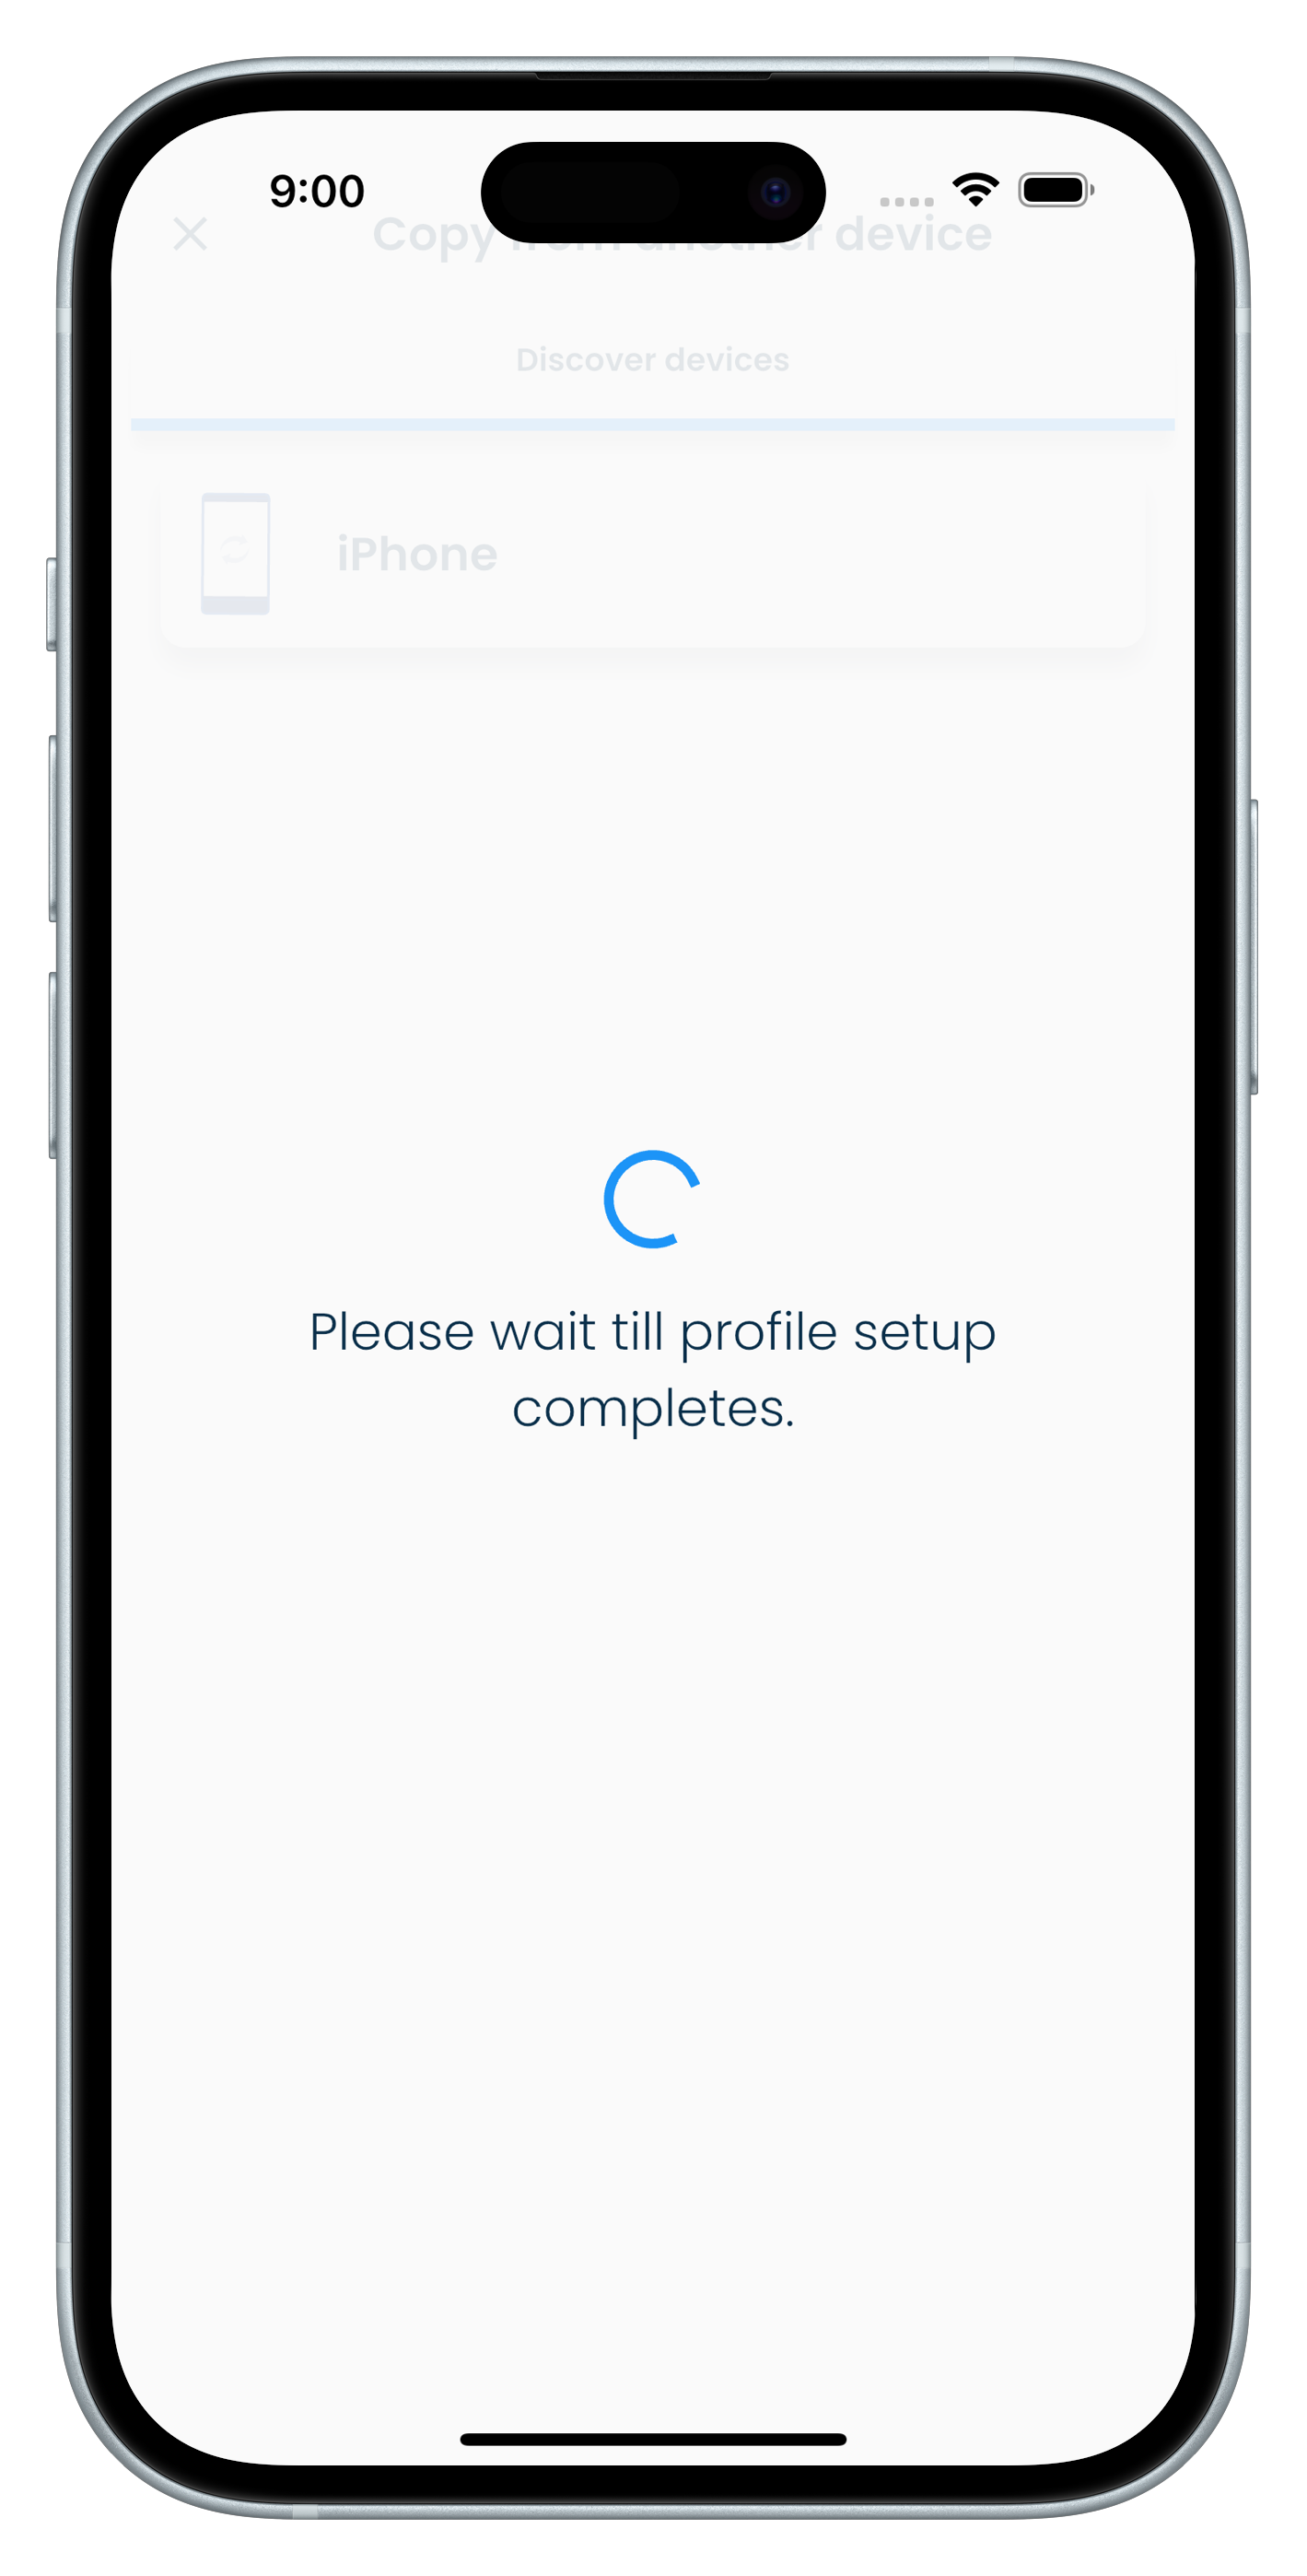
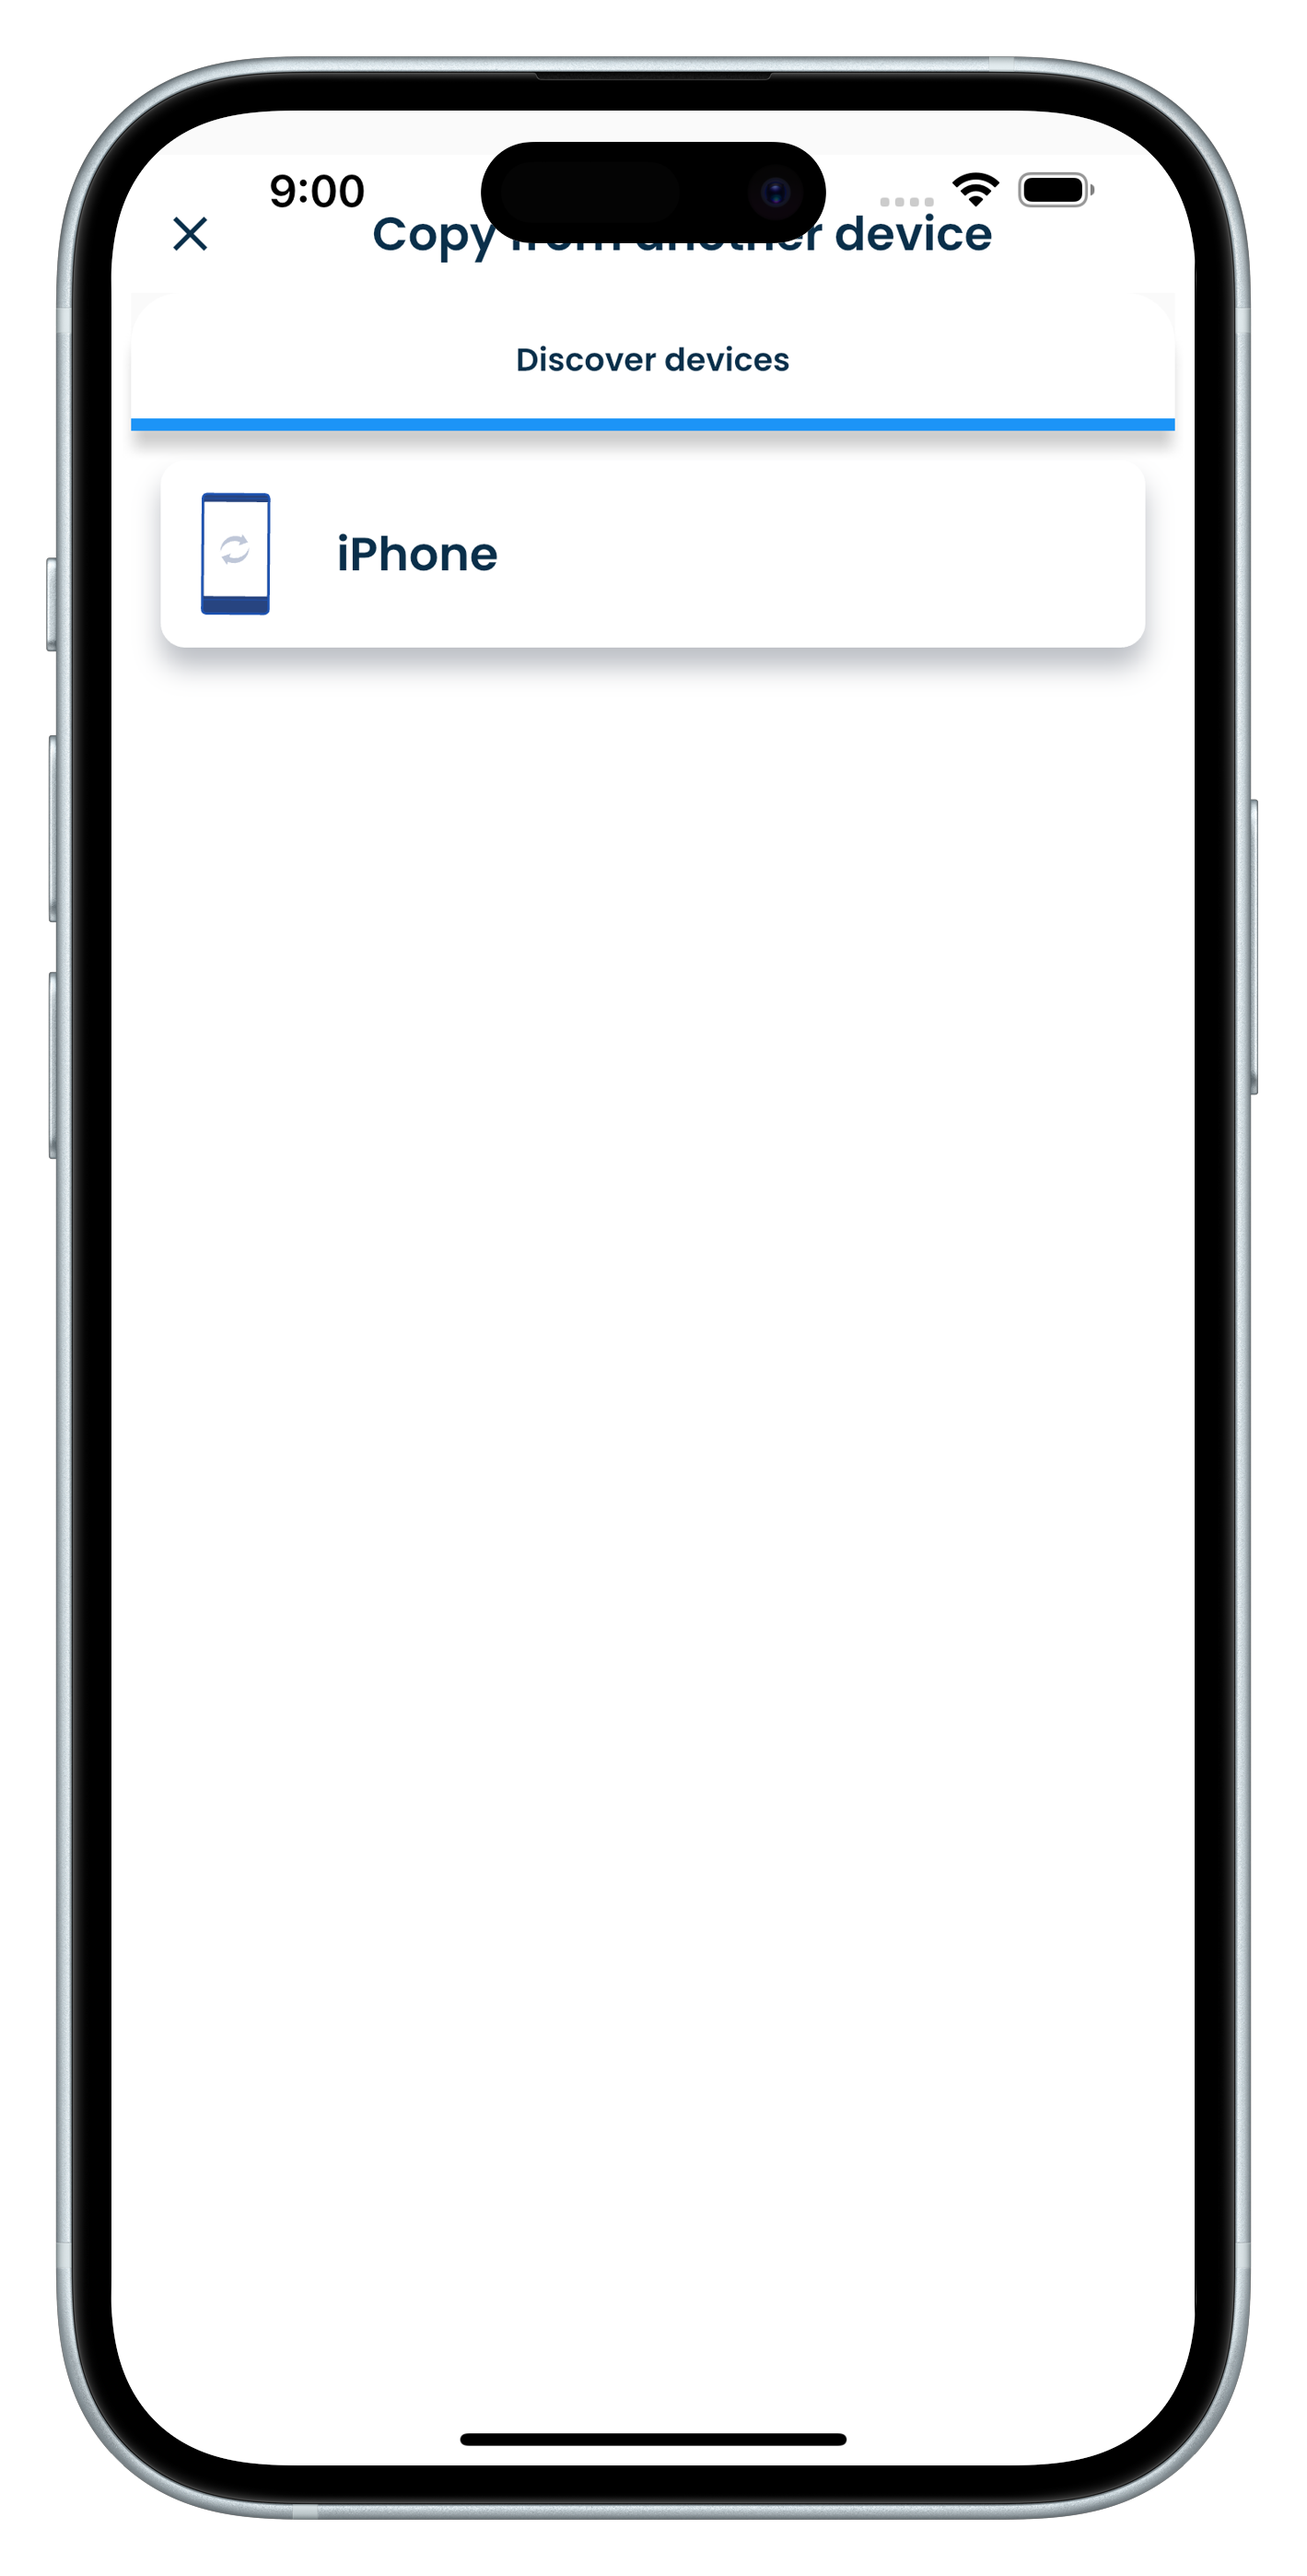
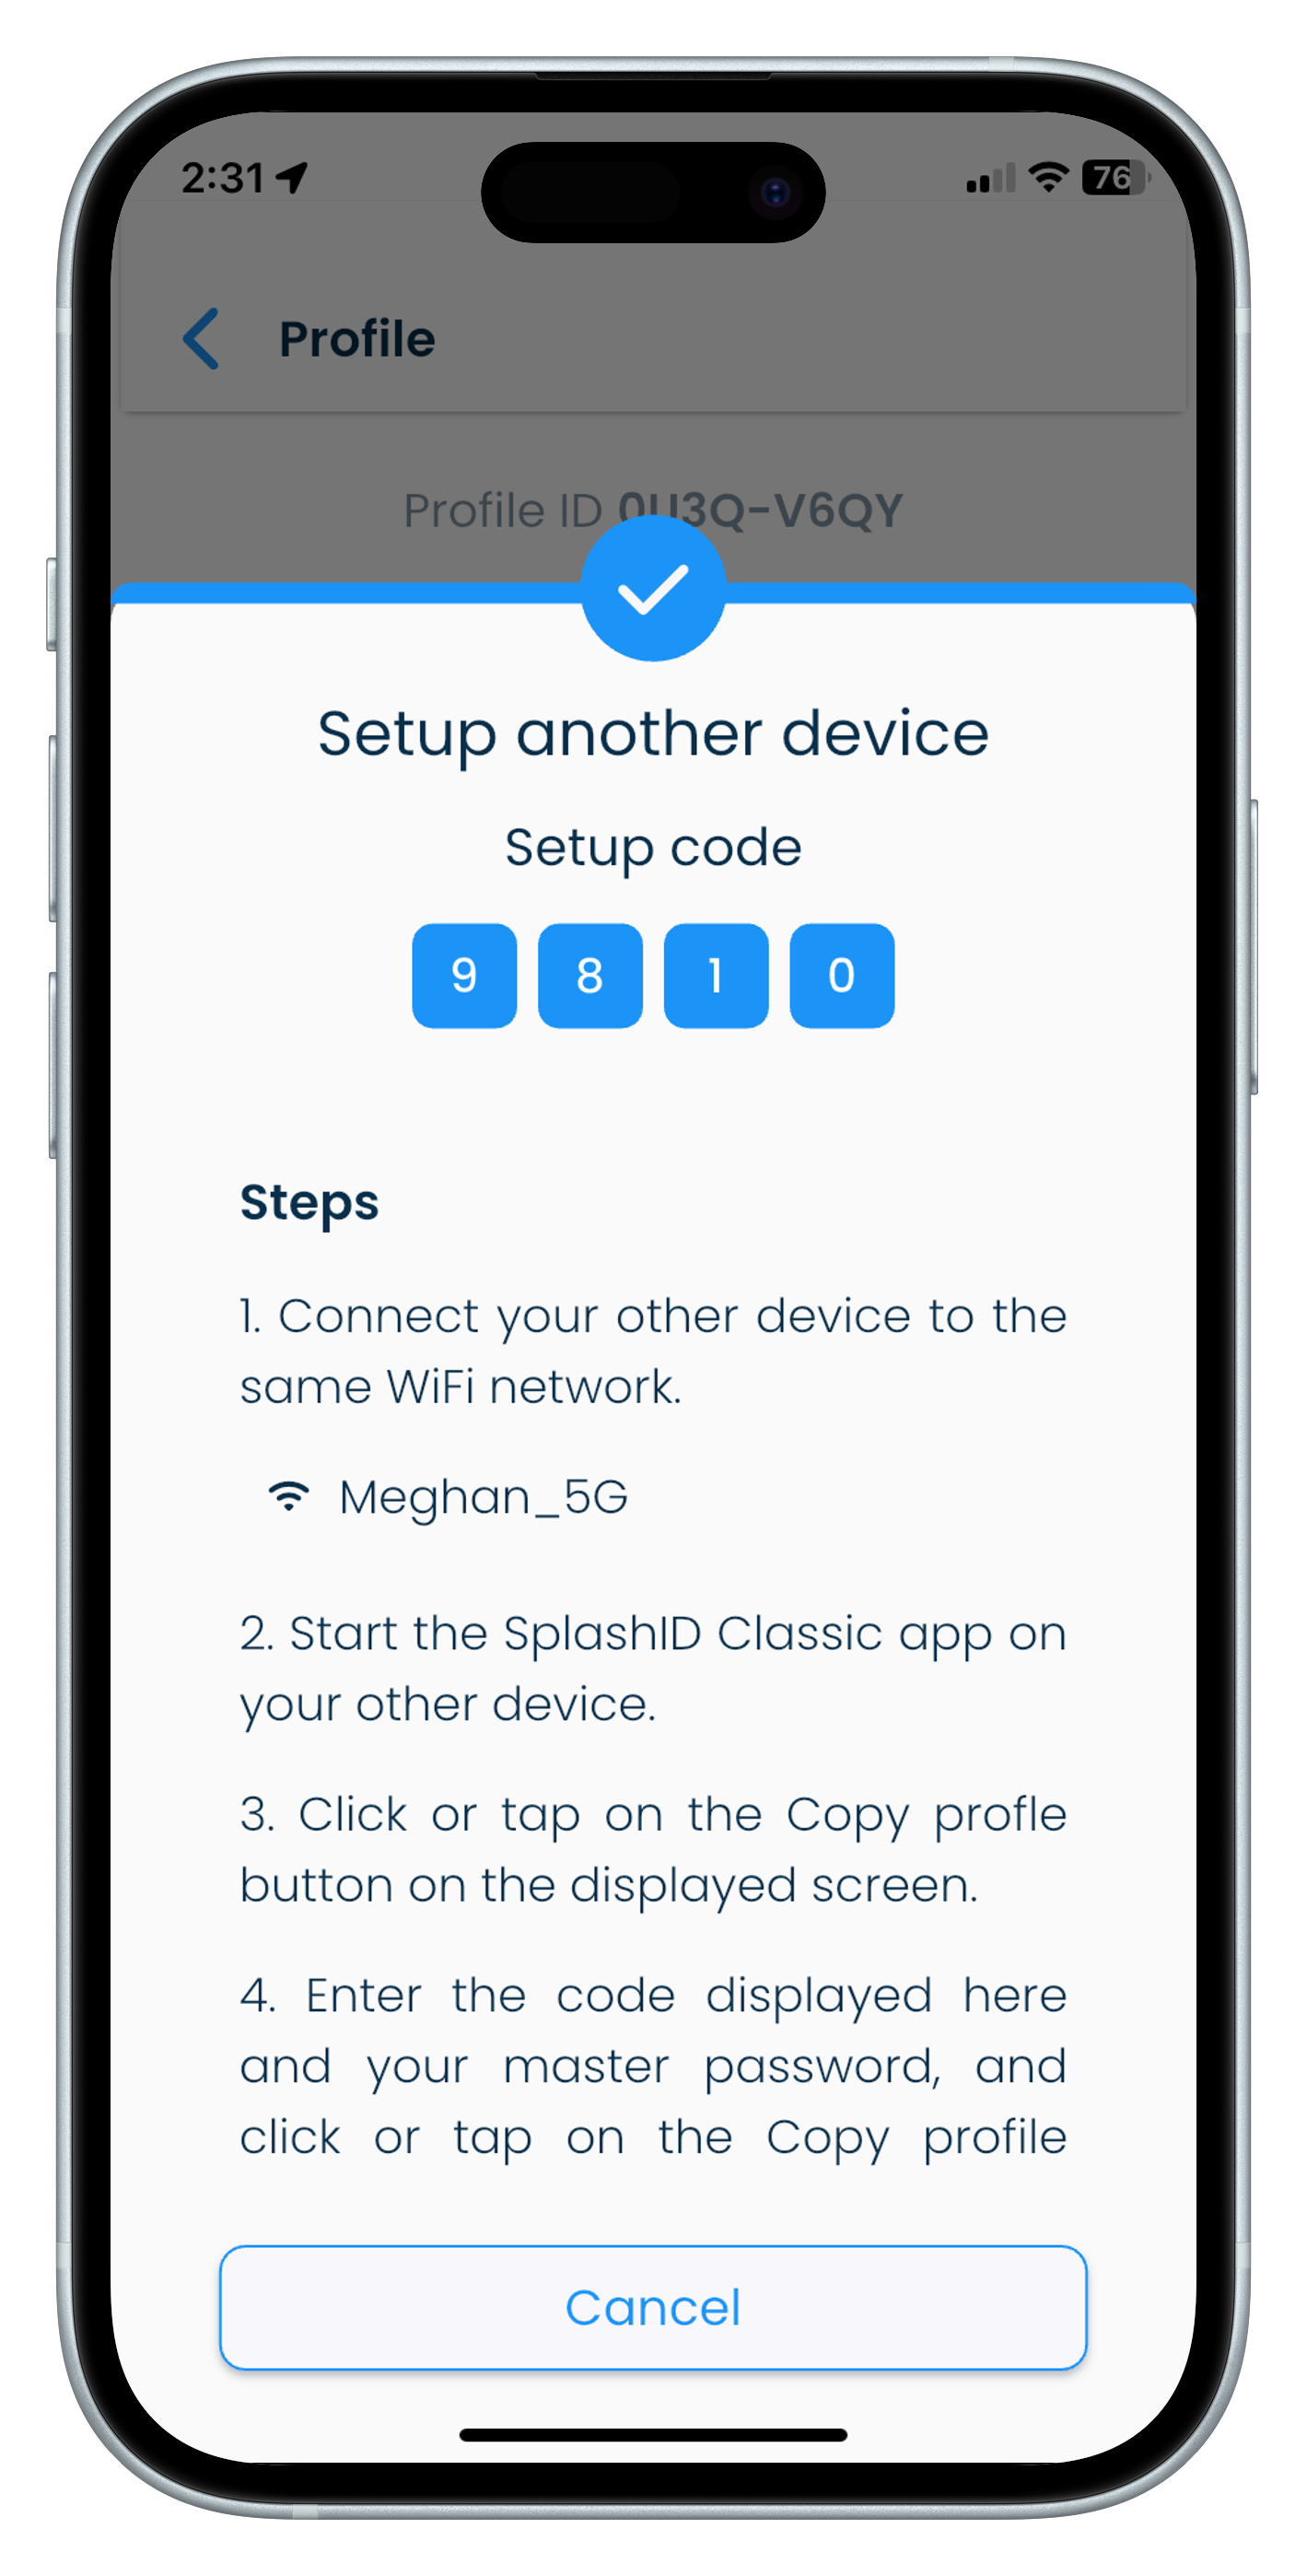
Copying profile
You can use a device with an existing profile of yours to setup another device. On your other devices, install SplashID Classic, select Yes to copy your existing profile from another device. and use the copy profile feature to setup your local profile on them.
While setting up the other devices, they should be on the same local network as your device from which you are copying from.
Follow the copy profile instructions shown on the screen to complete the setup of other devices.
As an example the screenshots below show how to copy a profile from one iPhone to another.
| Copying to | Copying from |
|---|---|
 |
  |
Recover your password
If you do not remember your master password, locate the recovery kit that you had safely stored during the profile creation phase and open it.
Open the recovery kit with any PDF viewer software like the free Adobe Acrobat reader. It contains a 32 character recovery code that can be used by you to regain access to your profile and change your master password to a new one.
Use the latest generated recovery kit
Only the latest downloaded recovery kit will be valid. Any previously downloaded recovery kits can no longer be used.
Keep the latest recovery kit very safely, and discard the old recovery kits to prevent any confusion in the future.
Download kit
You can generate and download a new recovery kit on your device by following the steps given below.
- Launch SplashID Classic and unlock it on your desktop, mobile or tablet.
- Go to the Settings screen by clicking or tapping on the Settings entry in the application menu.
- Click or tap on the Profile tab.
- In the Recovery Kit section, click or tap on the Download Kit button to generate the recovery kit.
- Using the file explorer on your device navigate to the Downloads folder to get hold of your recovery kit.
- Open the recovery kit and verify that it has a code generated for your profile.
- Copy the file somewhere very safe.
Recovery kit name
The downloaded file will be called
SplashID-Classic-Recovery-Kit-DATE-AND-TIME.pdf
| Mac | Windows |
|---|---|
 |
 |
| Android | iPhone |
|---|---|
 |
|
| iPad |
|---|
 |
Storing your kit
- Take a print of the recovery kit document.
- Write down some hints to help you remember your password. If you can remember your password with your hint then you wont need to use the recovery kit to regain access to your profile.
- Keep it in a safe or locker. Only you, or people you trust should have access to this document.
- You might choose to store this document in a cloud drive if you are aware of the risks with it. In the event that your cloud drive account gets hacked, then you are at serious risk of this document getting into the wrong persons hands.
Recover profile
To recover your profile and change the master password, locate your recovery kit document and keep your personalised 32 character recovery code ready.
Then follow the steps listed below.
- Launch and unlock your SplashID Classic profile on your desktop, mobile or tablet.
- On the unlock screen click or tap on the Forgot password? link below the Master password entry box.
- Enter your 32 character recovery code exactly as shown in the recovery kit.
- Set a new password and confirm it.
- Tap or click on the Recover profile button to proceed.
It is recommended to download a new recovery kit once a recovery code has been used.
Unlock profile
Your profile will get locked after 10 successive failed sign in attempts on a device. The profile will remain locked for 60 minutes, and will automatically get unlocked after this time period.
If you want to unlock your profile before the 60 minute time period expires, then you can also use your recovery kit to unlock your profile.
Follow the steps below to unlock your profile yourself.
- Launch and try to unlock your SplashID Classic profile on your desktop, mobile or tablet.
- On the unlock screen, click or tap on the Unlock profile button displayed. You can also see the time left till the profile gets unlocked automatically.
- Enter the recovery code from the recovery kit document in the application screen.
- Tap or click on Unlock profile to start the recovery process.
Unlocking an profile
Unlocking a profile makes use of the profile recovery procedure.
You should set a new master password if you suspect that your master password was compromised.
Additionally, you should create a new recovery kit to ensure that only you have a new recovery code from that moment onwards.
Records
How to store and access information?
Overview
Your information in SplashID Classic is stored as records.
Each record belongs to a category and is of a particular type. Use categories and types to organise your records as you wish.
Each record contains
- A name
- A category
- A type
- Unlimited fields with labels
- Unlimited notes
- Tags
- Sync option
- Dates and times to track its creation and updates to it
Records screens
All your records can be viewed in the My Records screen. The My Records screen can be reached by clicking on the My Records link in the application menu.
Some examples of records are shown below. You can use your imagination to store information in the way you like it.
- Login information to a website or application
- Personal ID
- Driving license
- Passport details
- Insurance details
- Bank profiles
When you unlock the application on your device, you will be taken to the screen that shows all your records by default. You can search, filter or sort them to see them in the way that suits you.
The sections below explain more about records, and other related elements that you will use to manage your information in records.
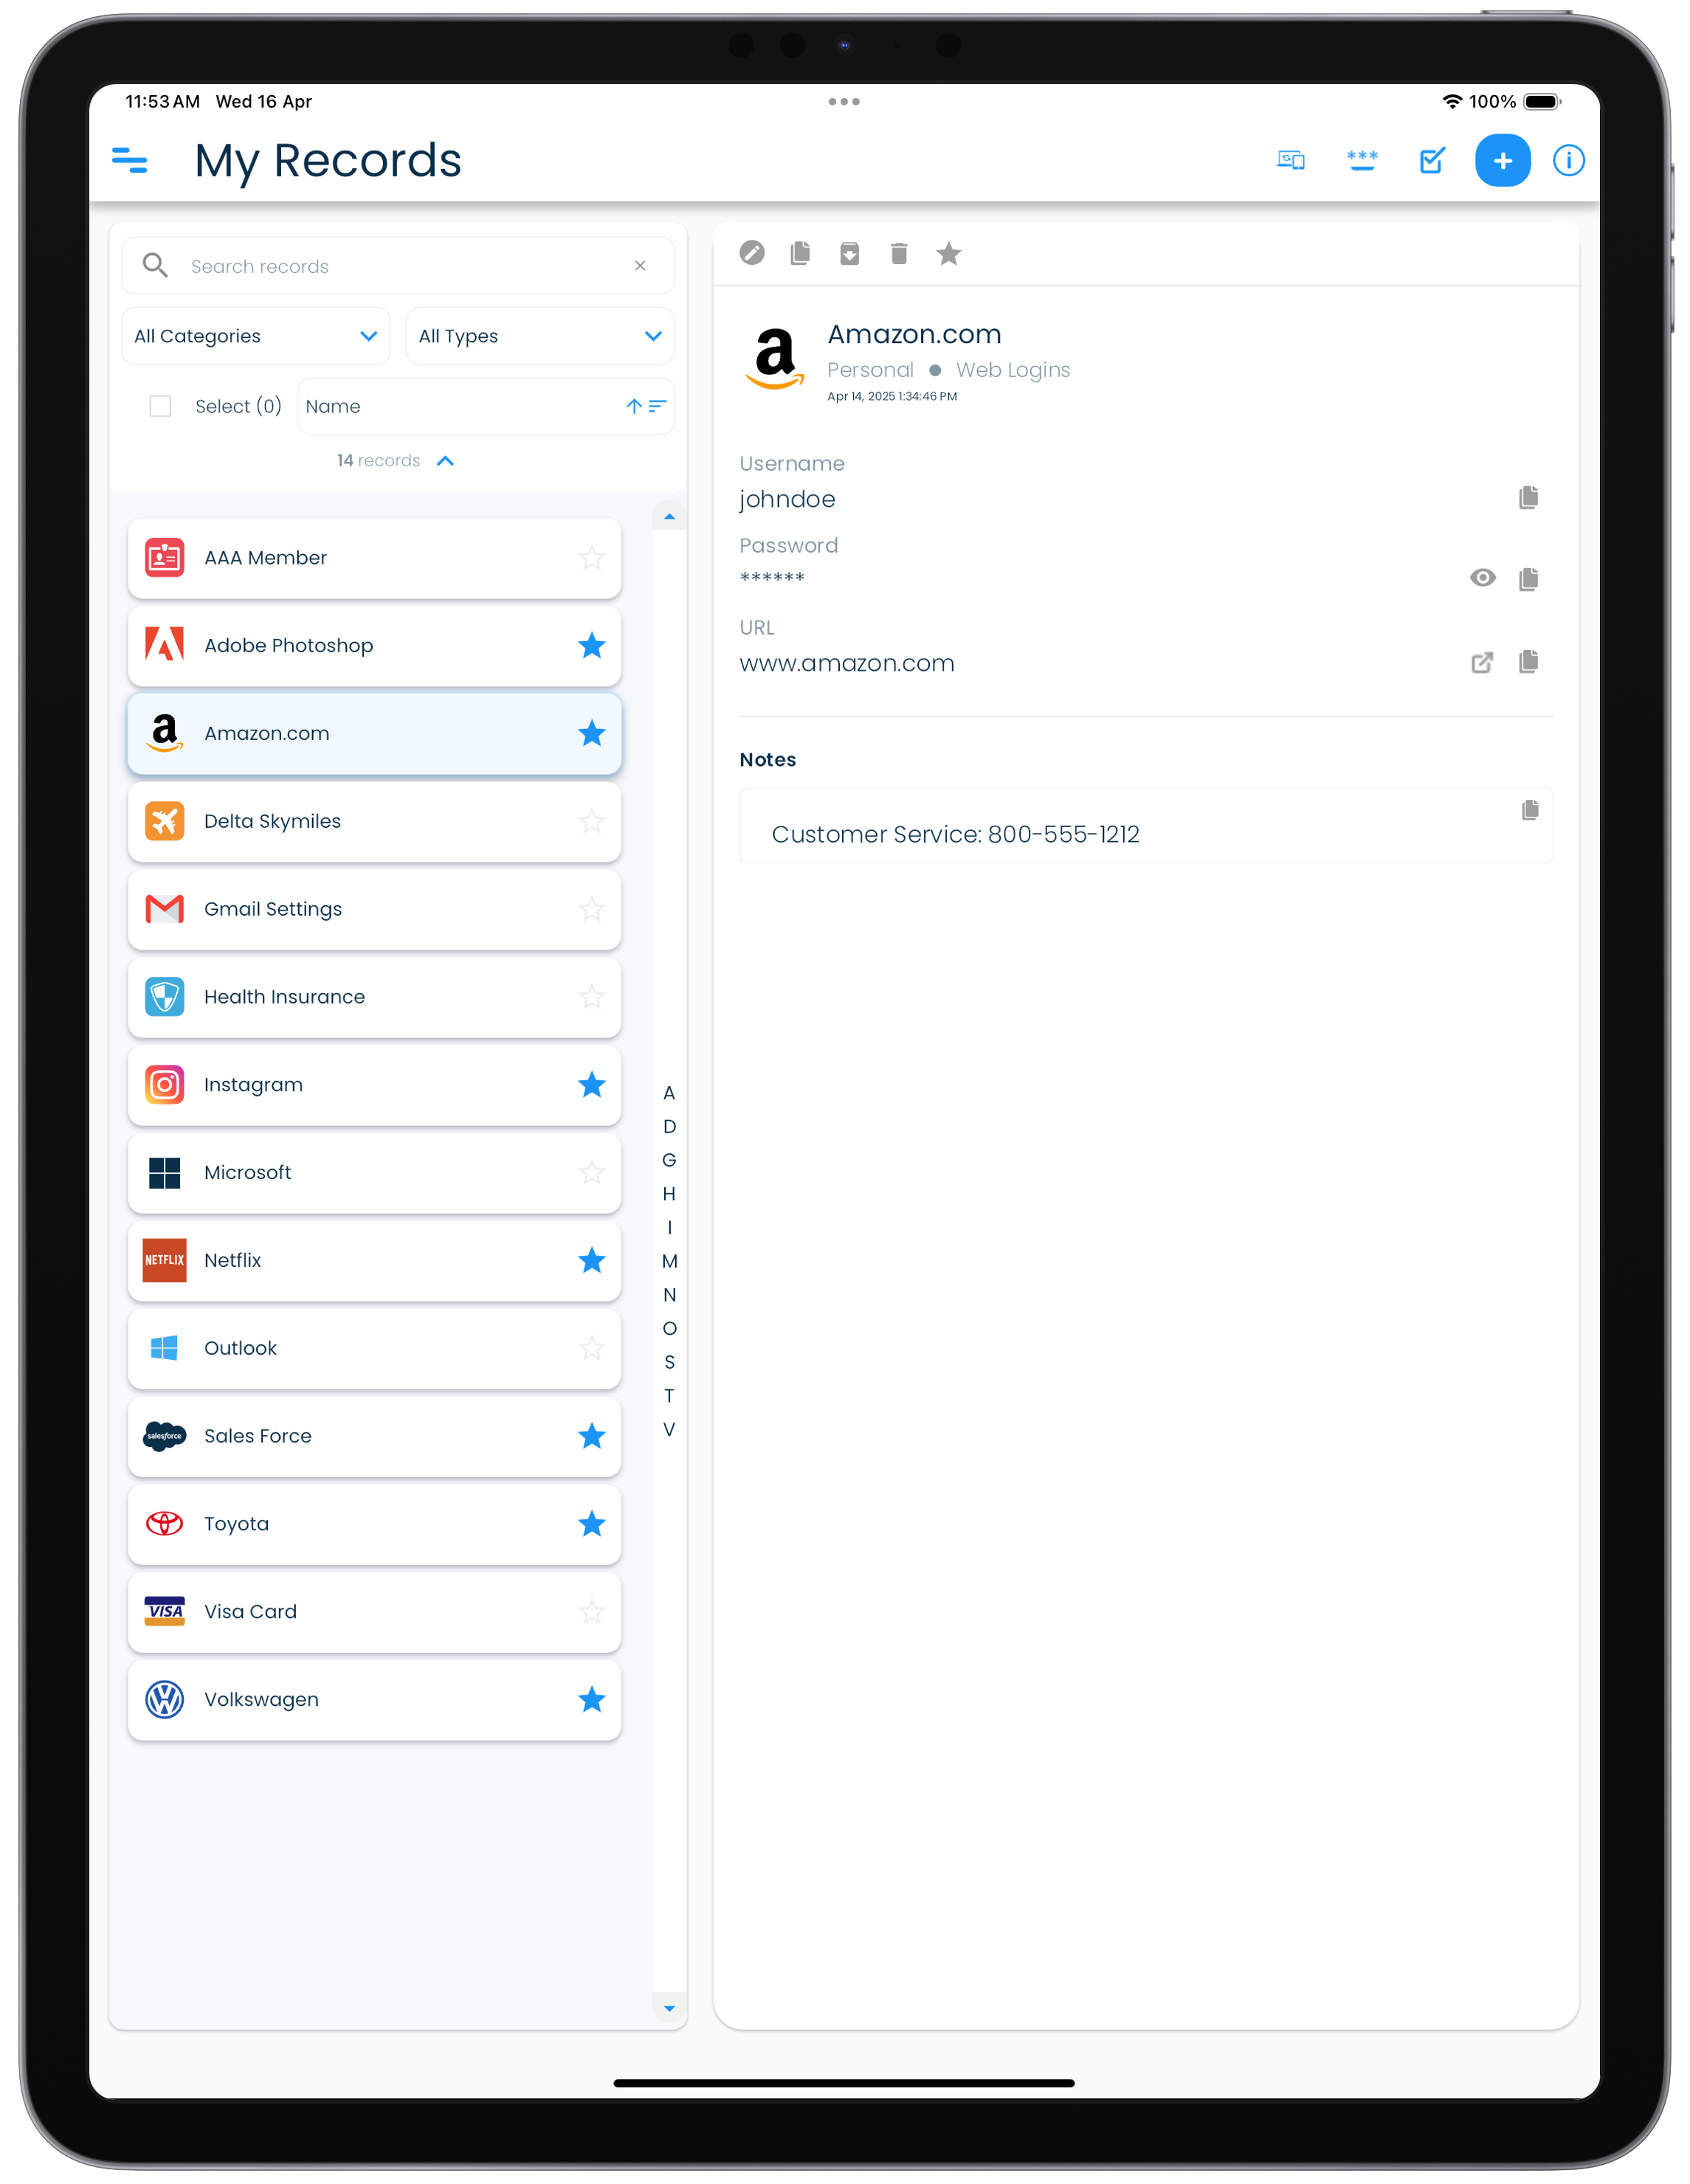
My Records
The My Records screen displays all your records. This is the first entry in your application menu.
The structure of this screen differs on mobiles, tablets and desktops as explained below.
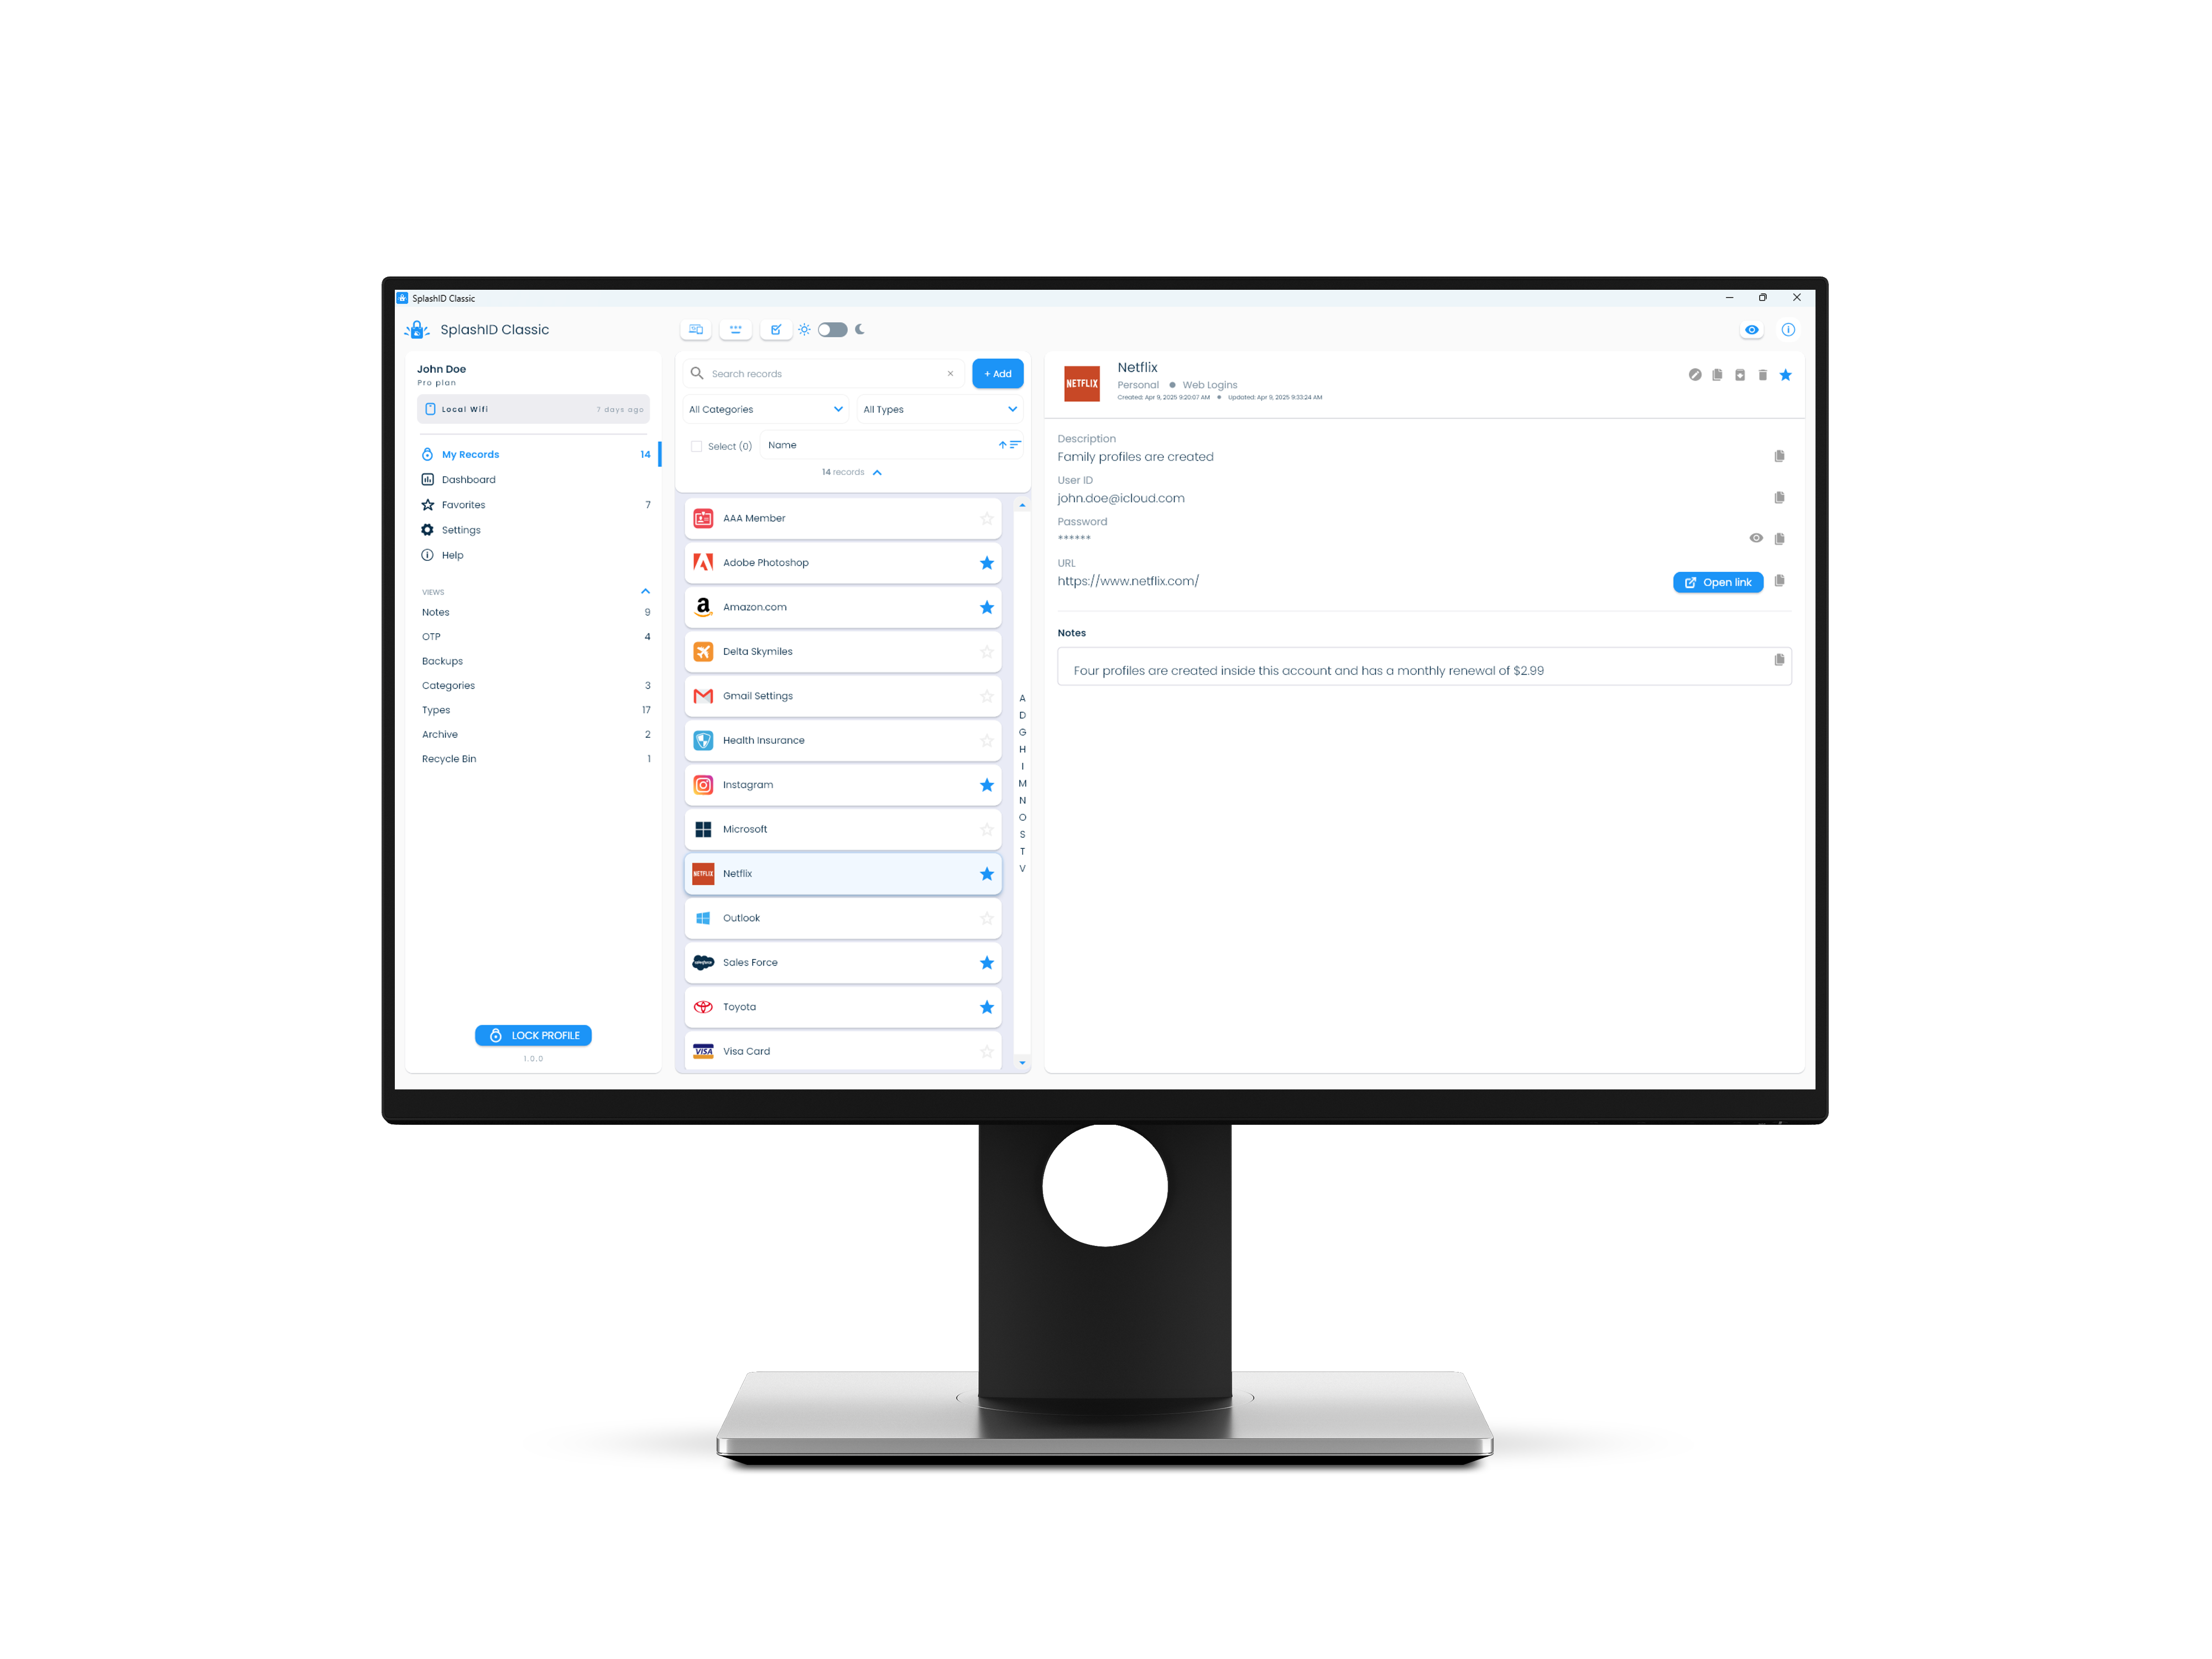
In a desktop, the view consists of 3 parts.
- The application menu in the leftmost panel.
- A list of records displayed in the middle panel.
- Details of a selected record displayed in the right panel.
| Mac | Windows |
|---|---|
 |
|
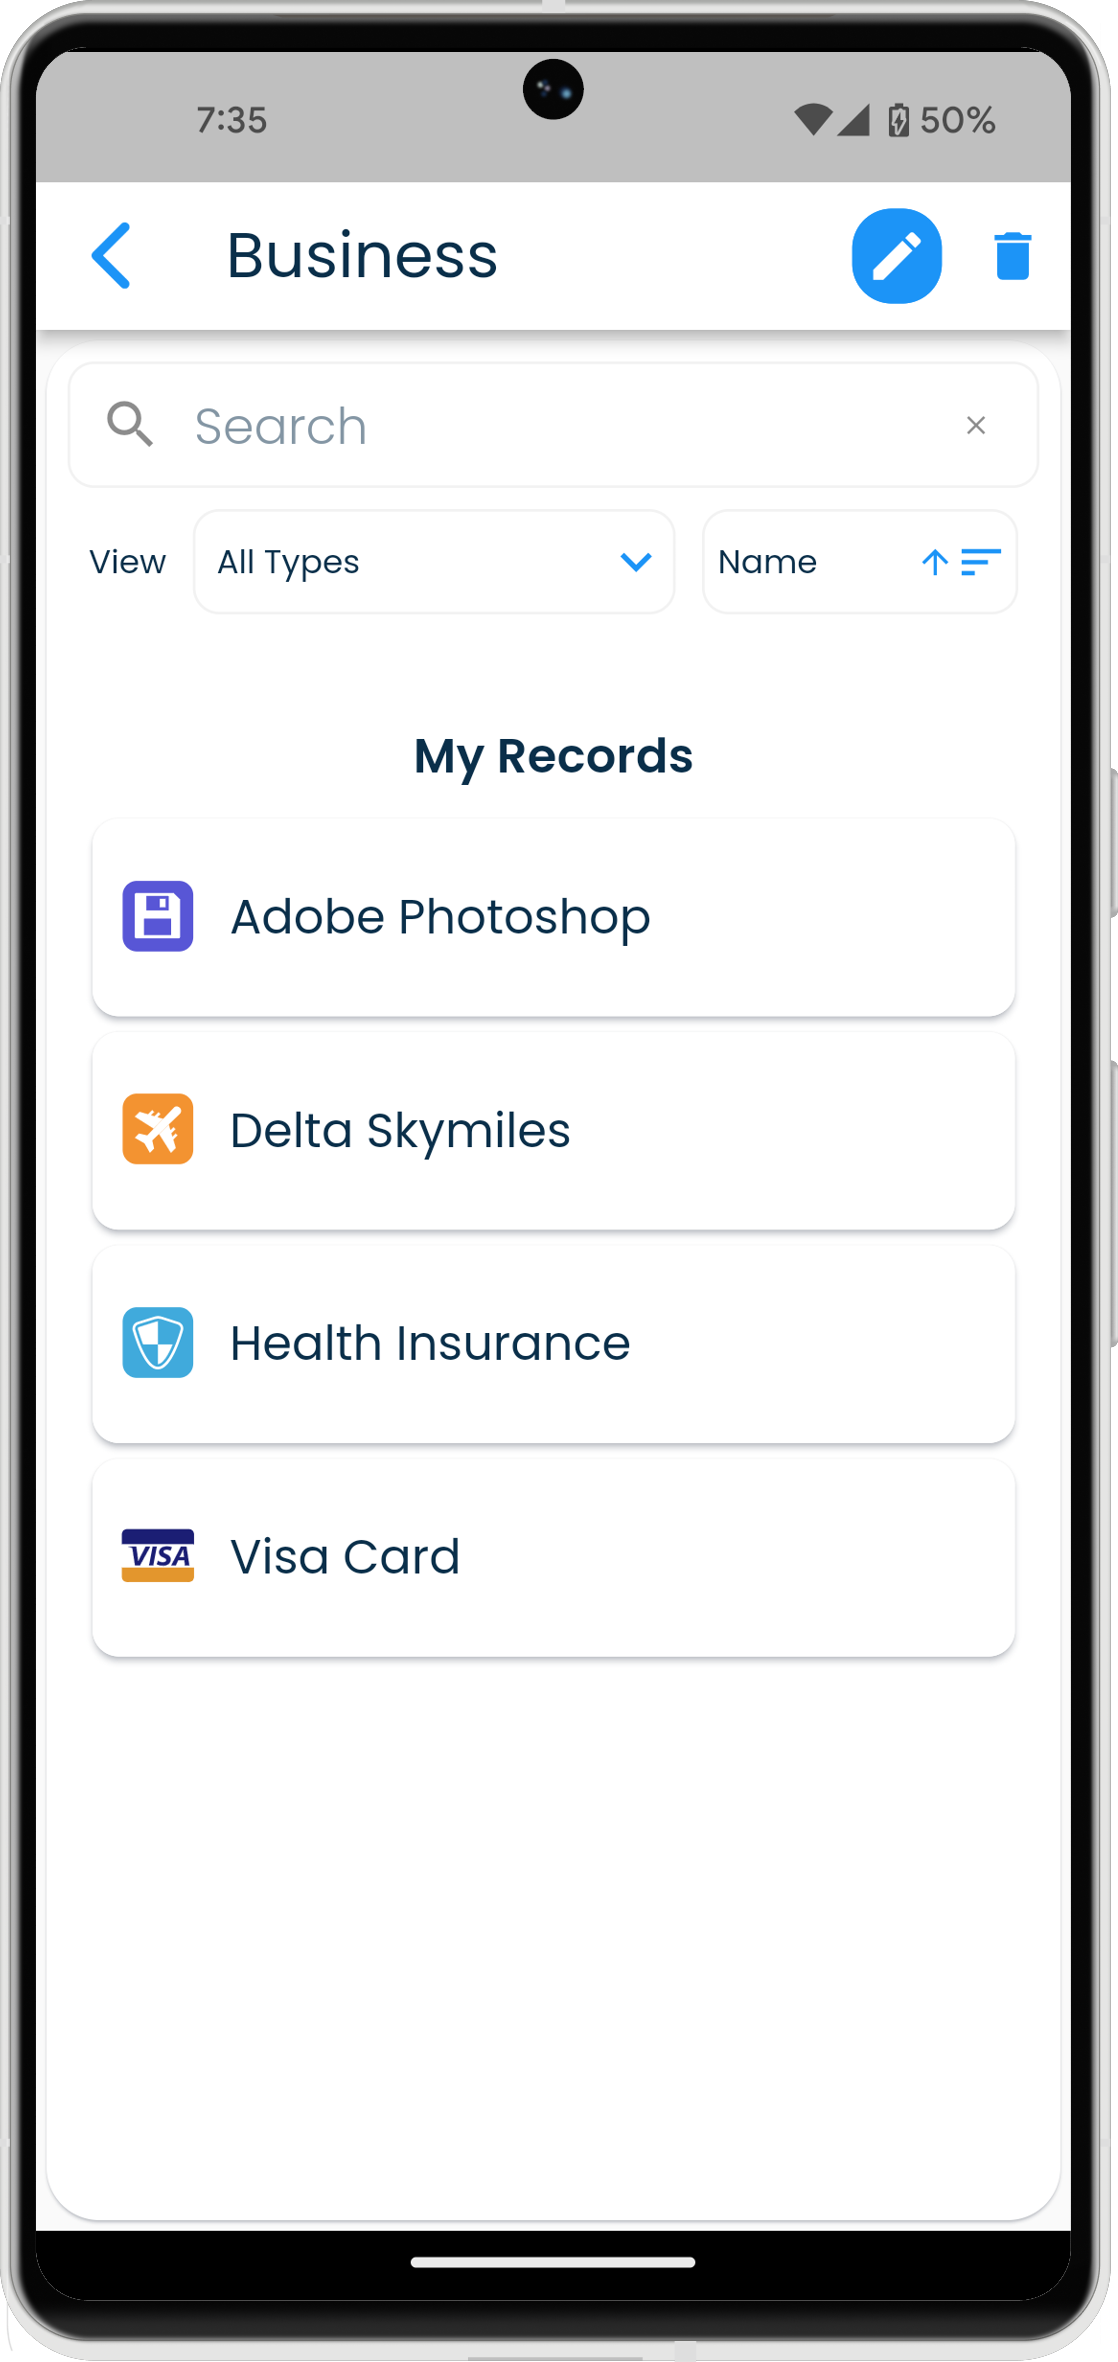
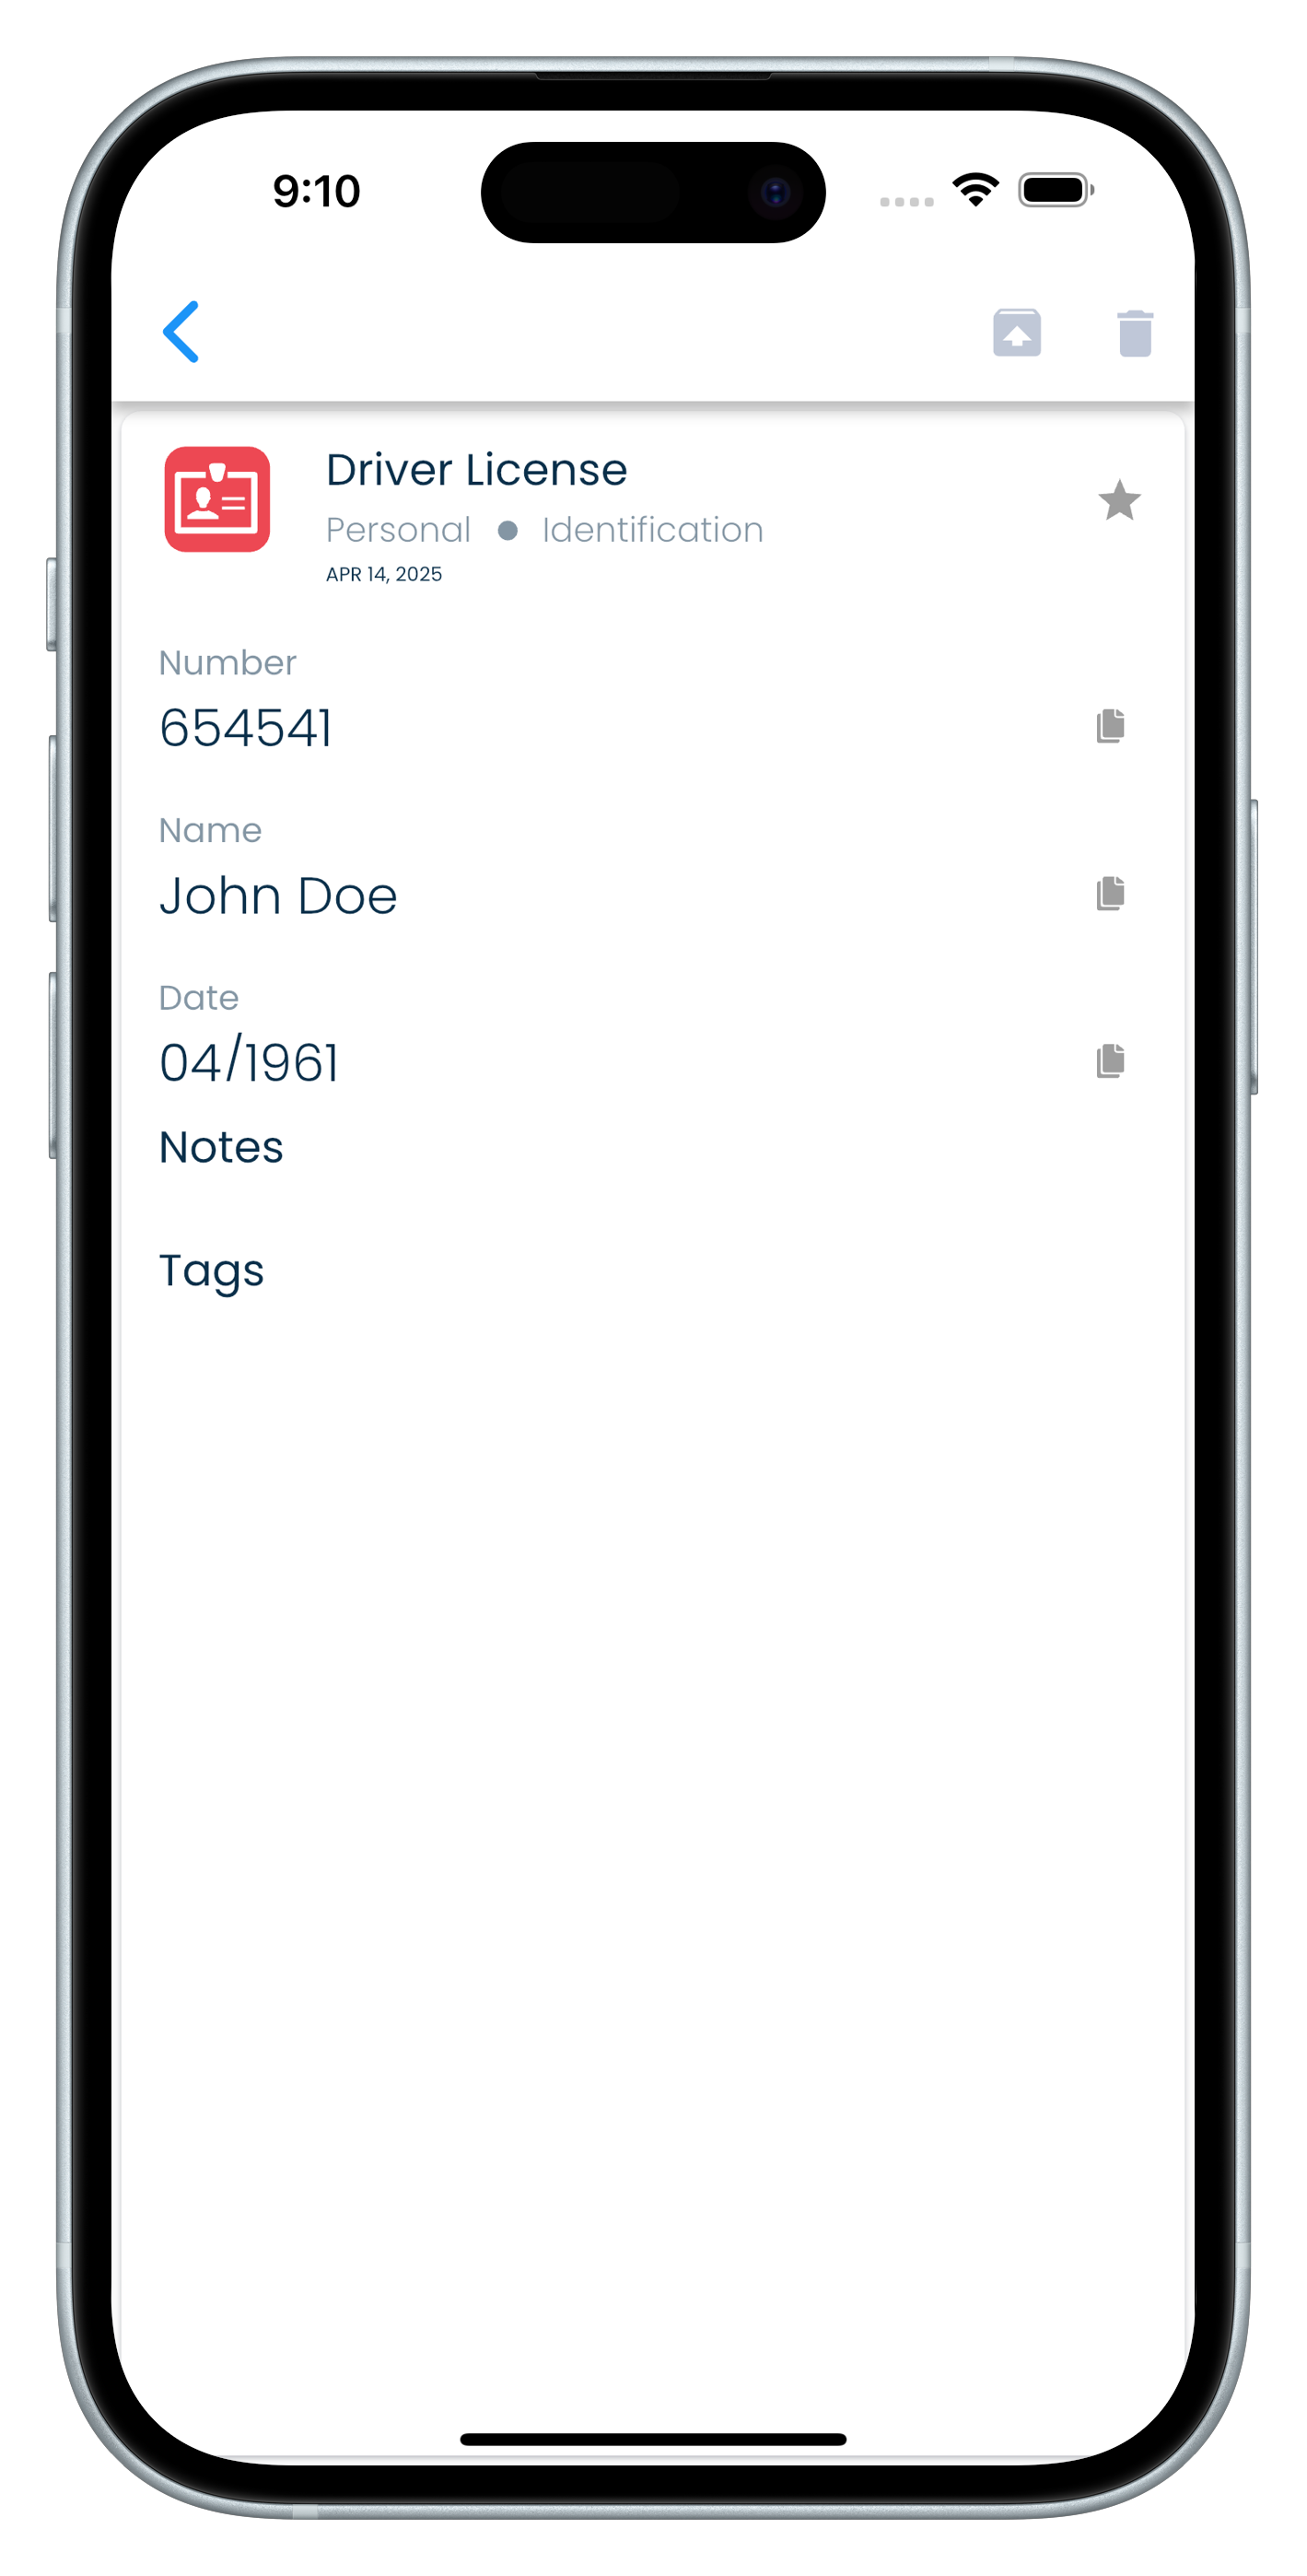
In mobiles, the view is split into individual screens that are displayed one at a time.
- A list of records.
- A view of a selected record's details.
| Android | iPhone |
|---|---|
  |
  |
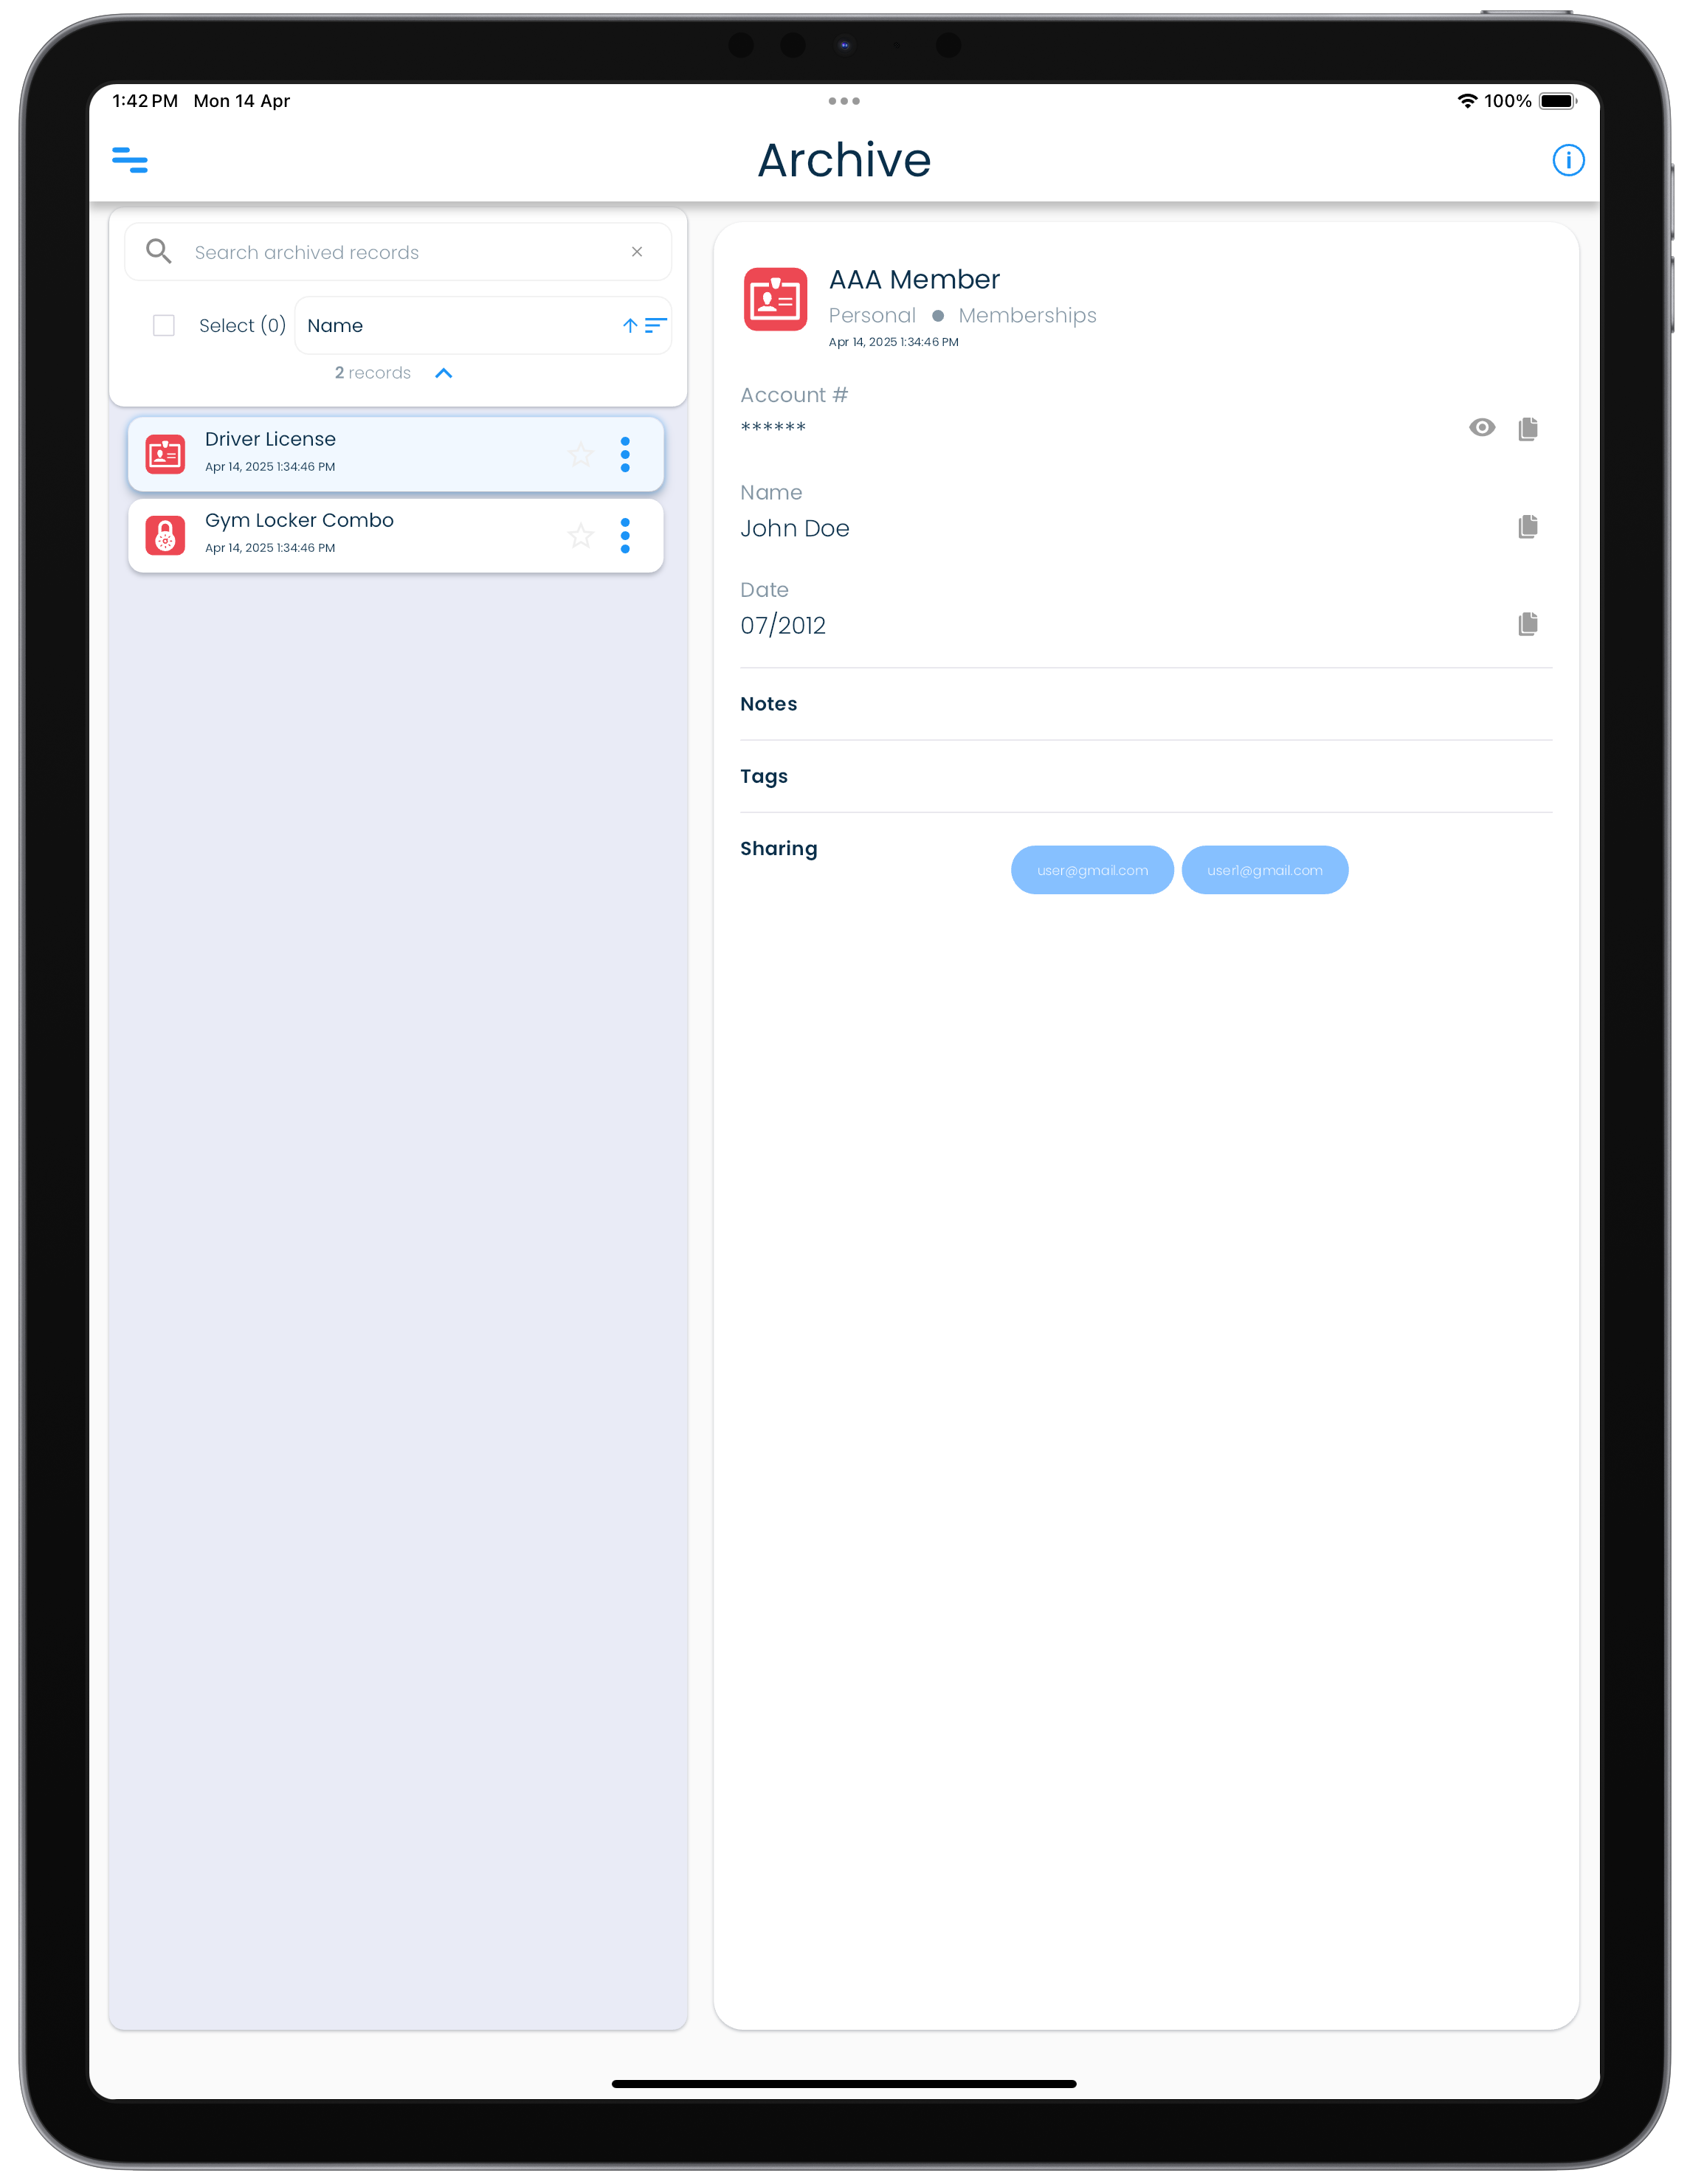
In tablets, the view is split into 2 parts.
- A list of records.
- A view of a selected record's details.
| iPad |
|---|
|
Application menu in mobiles and tablets
In mobiles and tablets, the application menu can be opened by tapping on the list menu icon in the top left part of the screen.
Record fields
A record contains one or more fields that allow you to store information of different types. These can be simple text, pin codes, email addreses, web site addresses, OTP code generators, and passwords among others.
Label and value
Each record field is a pair of values. It contains a label and a value. The field label helps you identify what is the value contained in the field. The labels and values can be edited as per your needs.
Managing fields
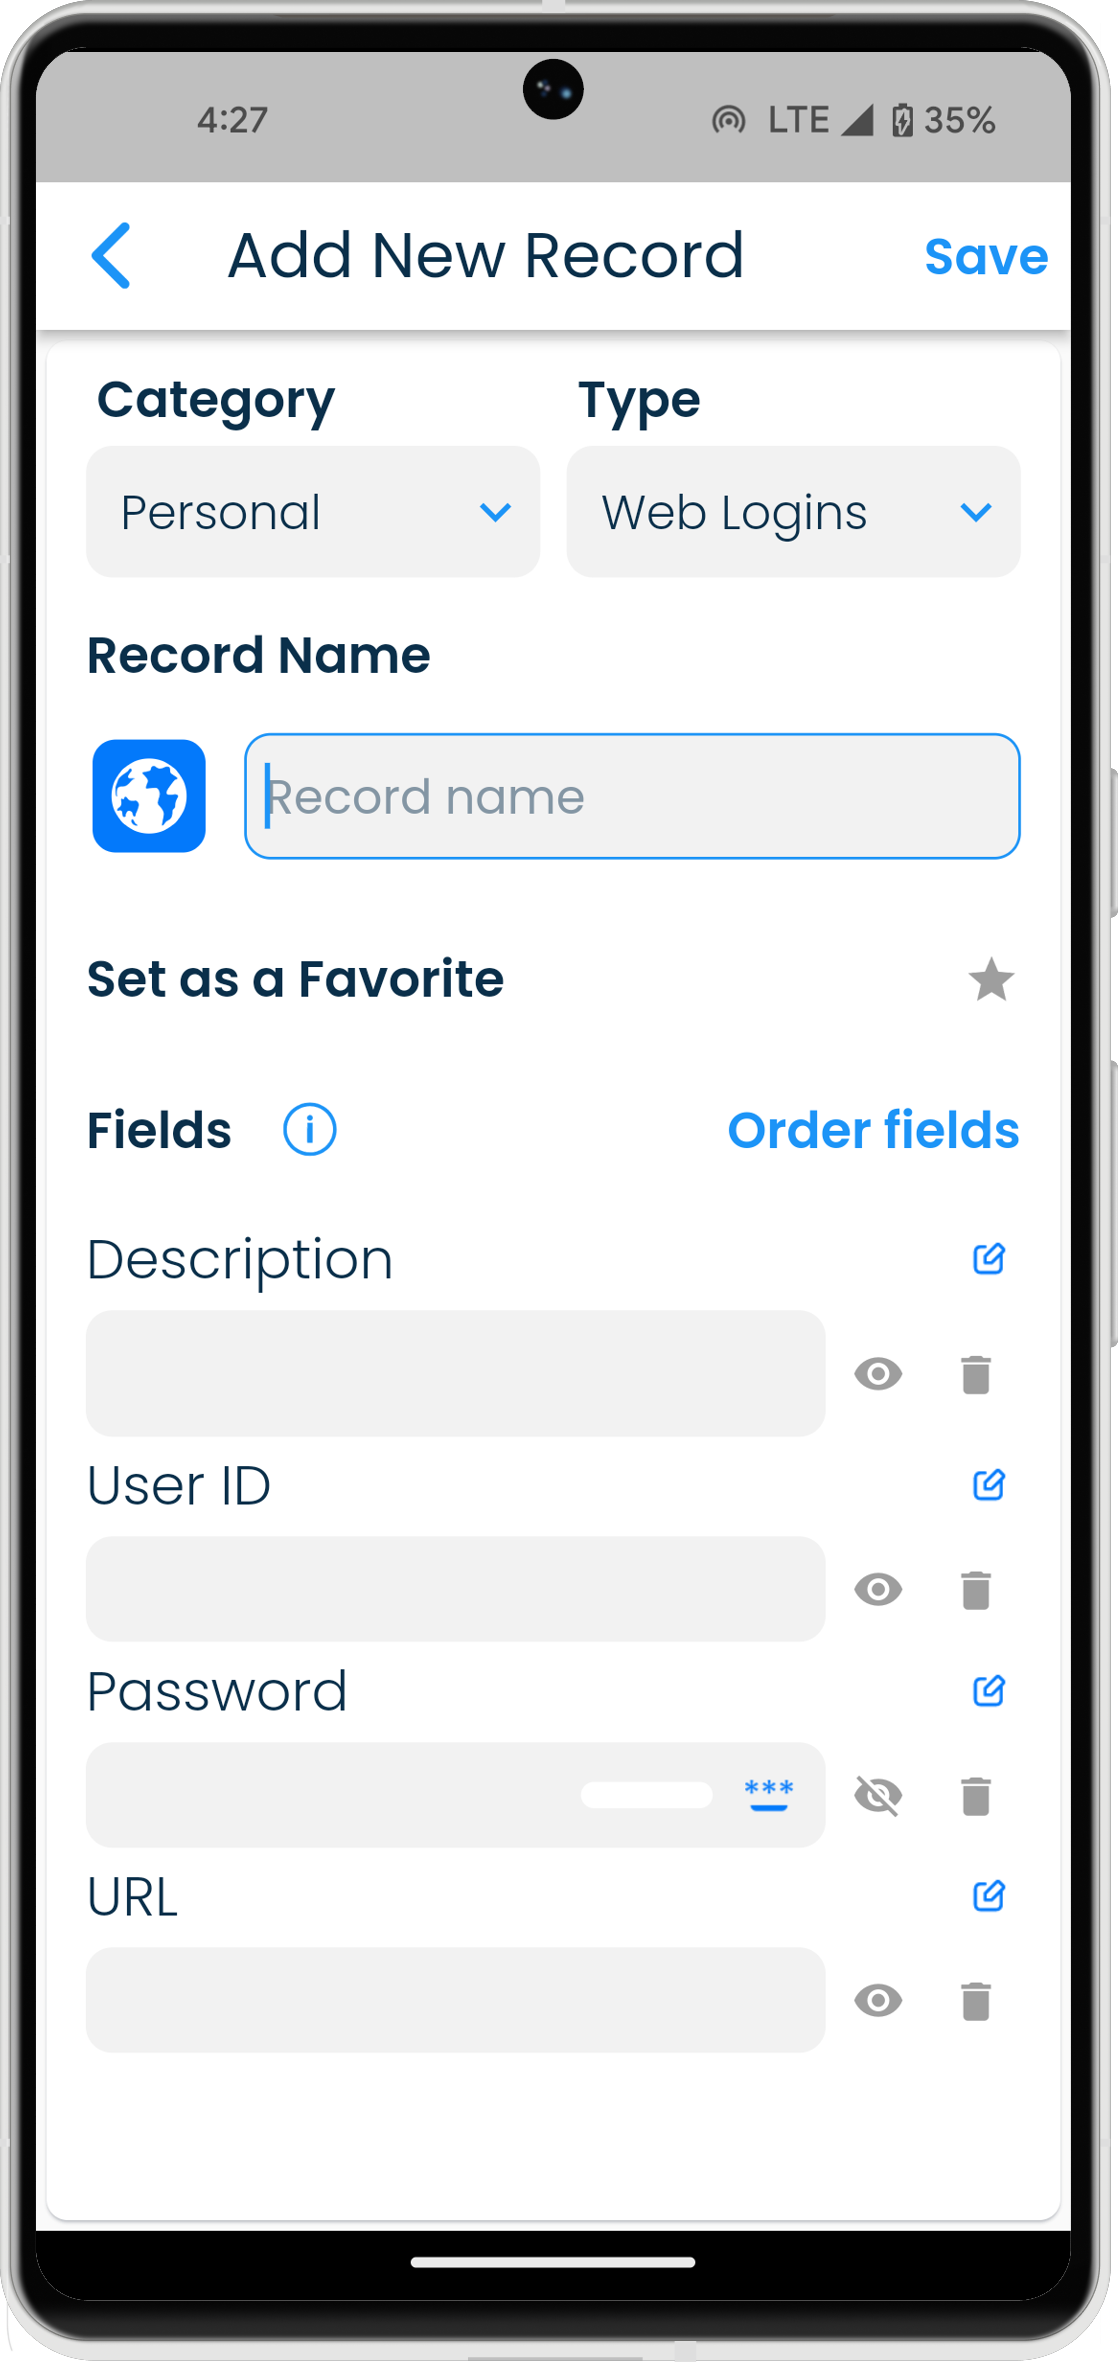
When you add a new record, you can select a type for the record. The type is like a template with predefined fields that will be included in the record.
Type template on record addition
Once a record is added, changing the type will not change the fields in it. The type is then used as an indicator of the record contents.
You can also delete individual fields, or add more fields to the record. There is no limit on the number of fields you can have in a record.
Record fields also have actions associated with them that are useful while accessing the information in them.
Record fields can be ordered in the way you want. By default, when you add a new field it gets added to the end of the list of fields.
Copy to clipboard
Most of the record fields will have a copy to clipboard button that is displayed to the right of the field when the record is being viewed. Click or tap on the copy to clipboard button to copy the field content to the clipboard on the device.
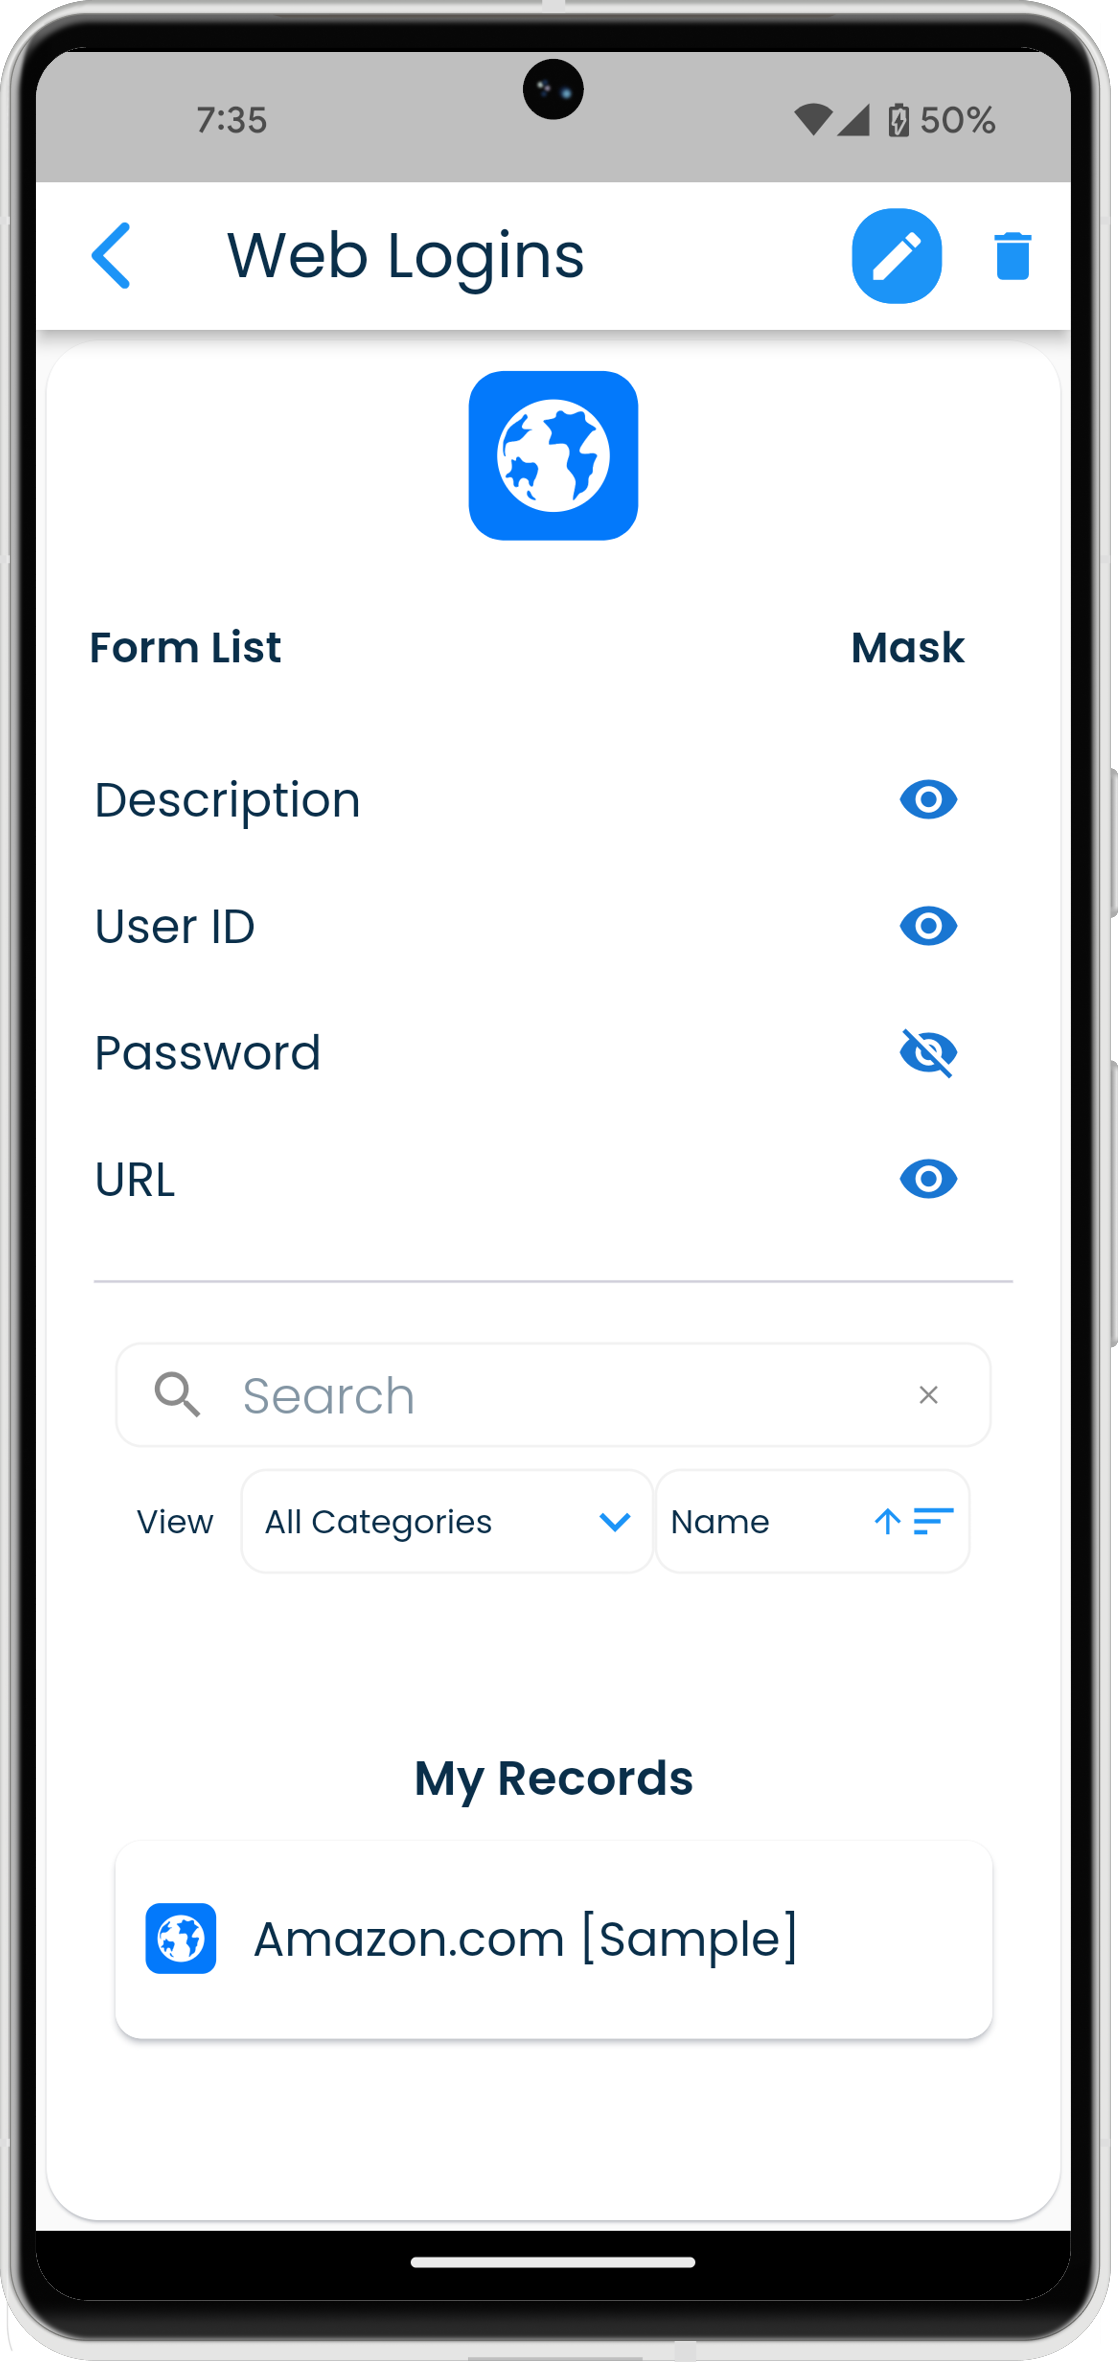
Masked fields
Masking hides the display of the field content in the record views for fields that need to be secure. You can unmask the field and see the actual content by clicking or tapping on the eye icon to the right of the masked field.
Password fields are masked by default when records are viewed.
You can also mask any other fields that you want to. To do this, edit a record, and click or tap on the eye icon to the right of the field to mask or unmask it.
URL fields
These fields can contain web site addresses. They display an Open link button to the right of the field that will open the web site in your browser.
OTP fields
OTP fields can hold one time code generators. They display a 6 digit code when unmasked in the record details view. These fields can be used to add authenticator keys that generate codes for second factor verification in other websites and applications.
Records
You can manage your records by performing the following operations.
Adding a record
Click on the + Add button in the record list panel to open up the record addition view.
| Mac | Windows |
|---|---|
 |
 |
Tap on the + button in the record list screen to open up the record addition screen.
| Android | iPhone |
|---|---|
 |
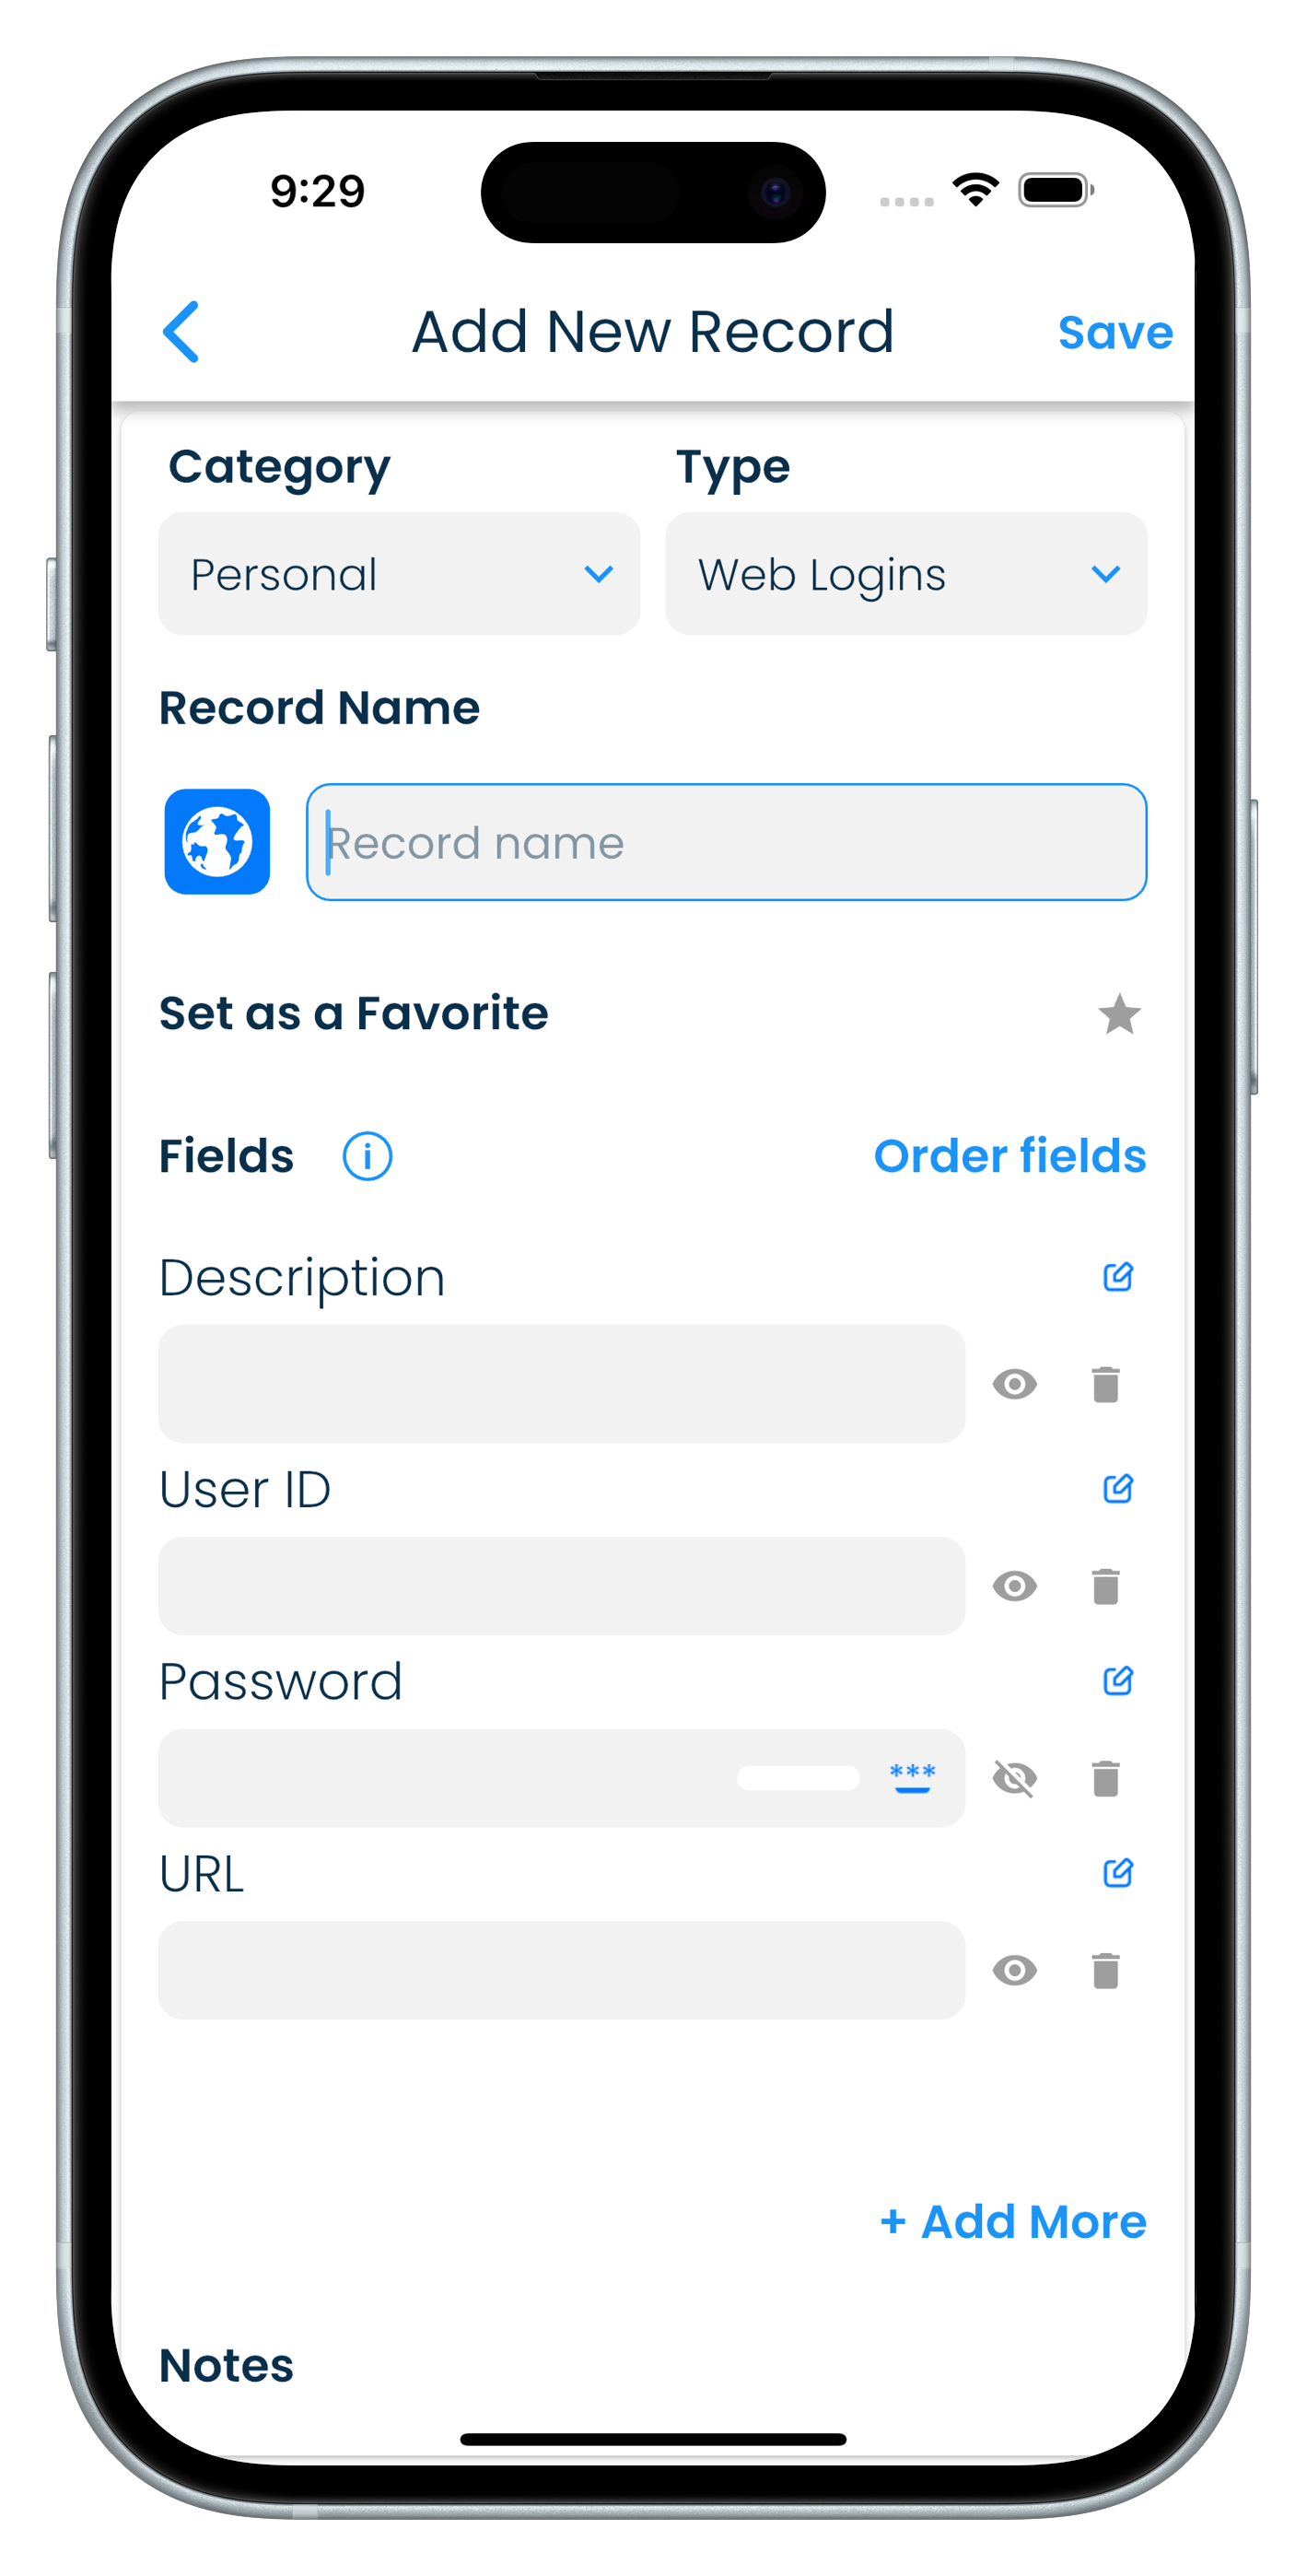 |
Tap on the + button in the header in the record list screen to open up the record addition screen.
| iPad |
|---|
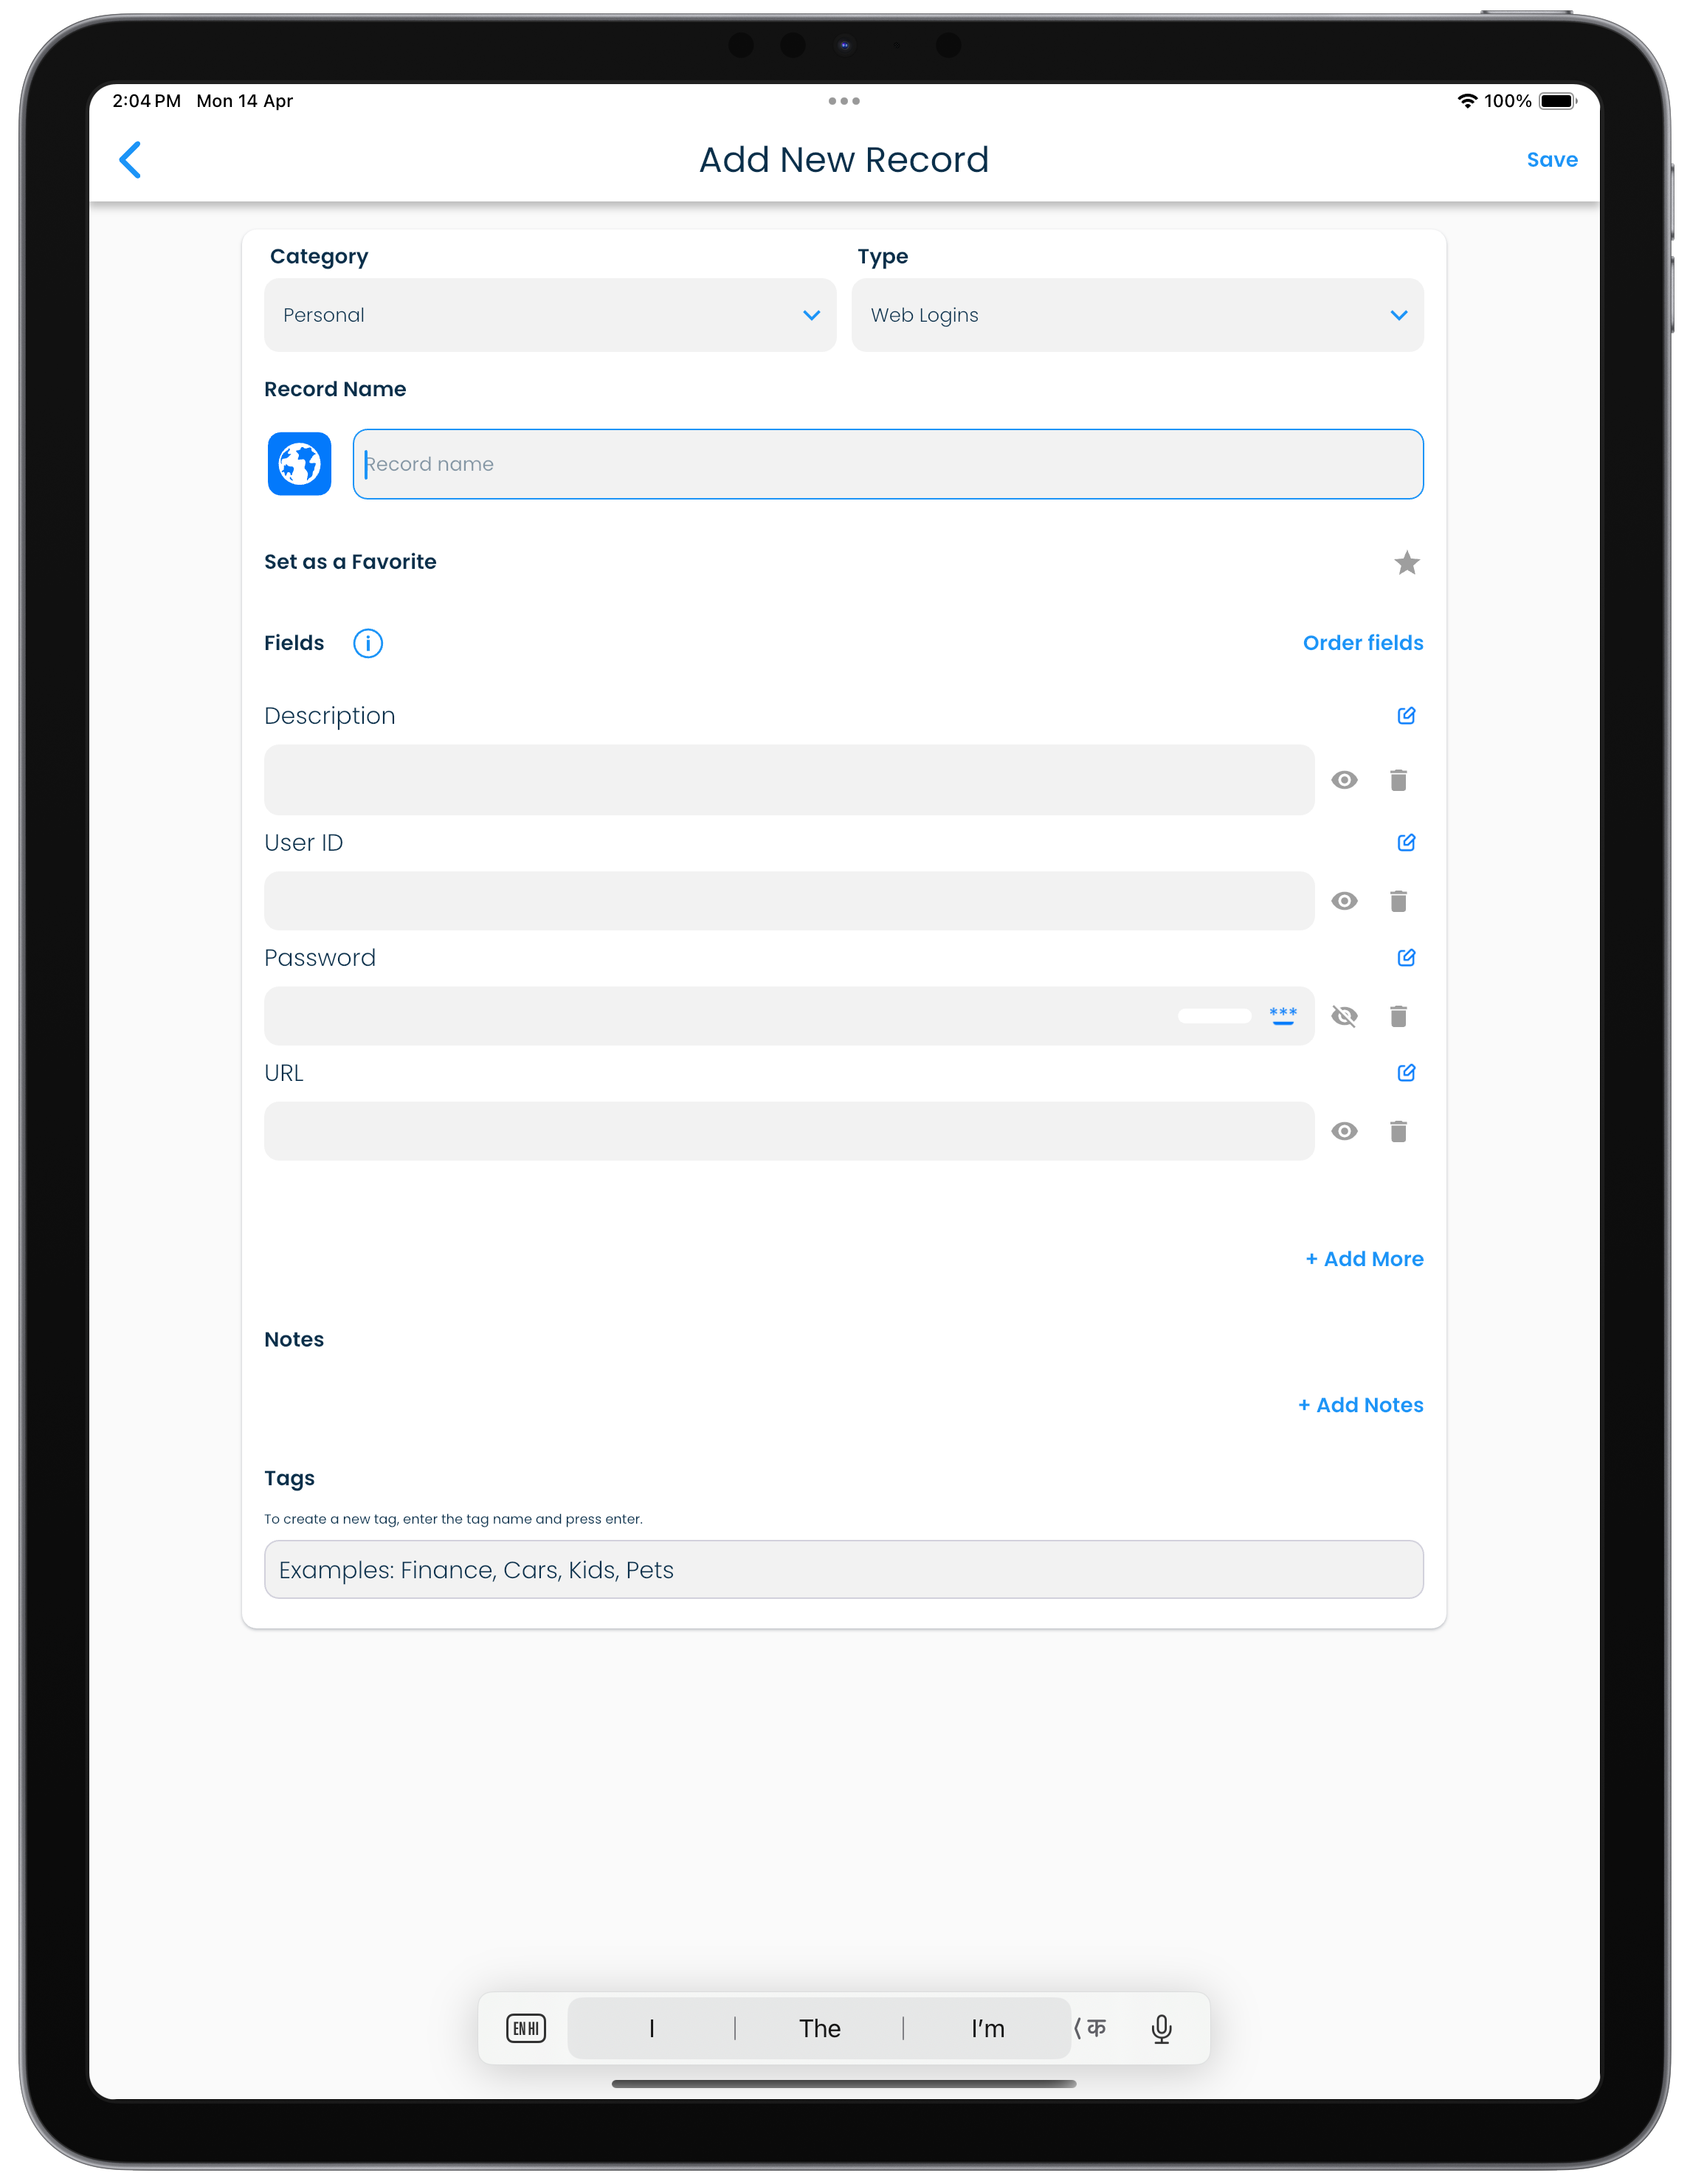 |
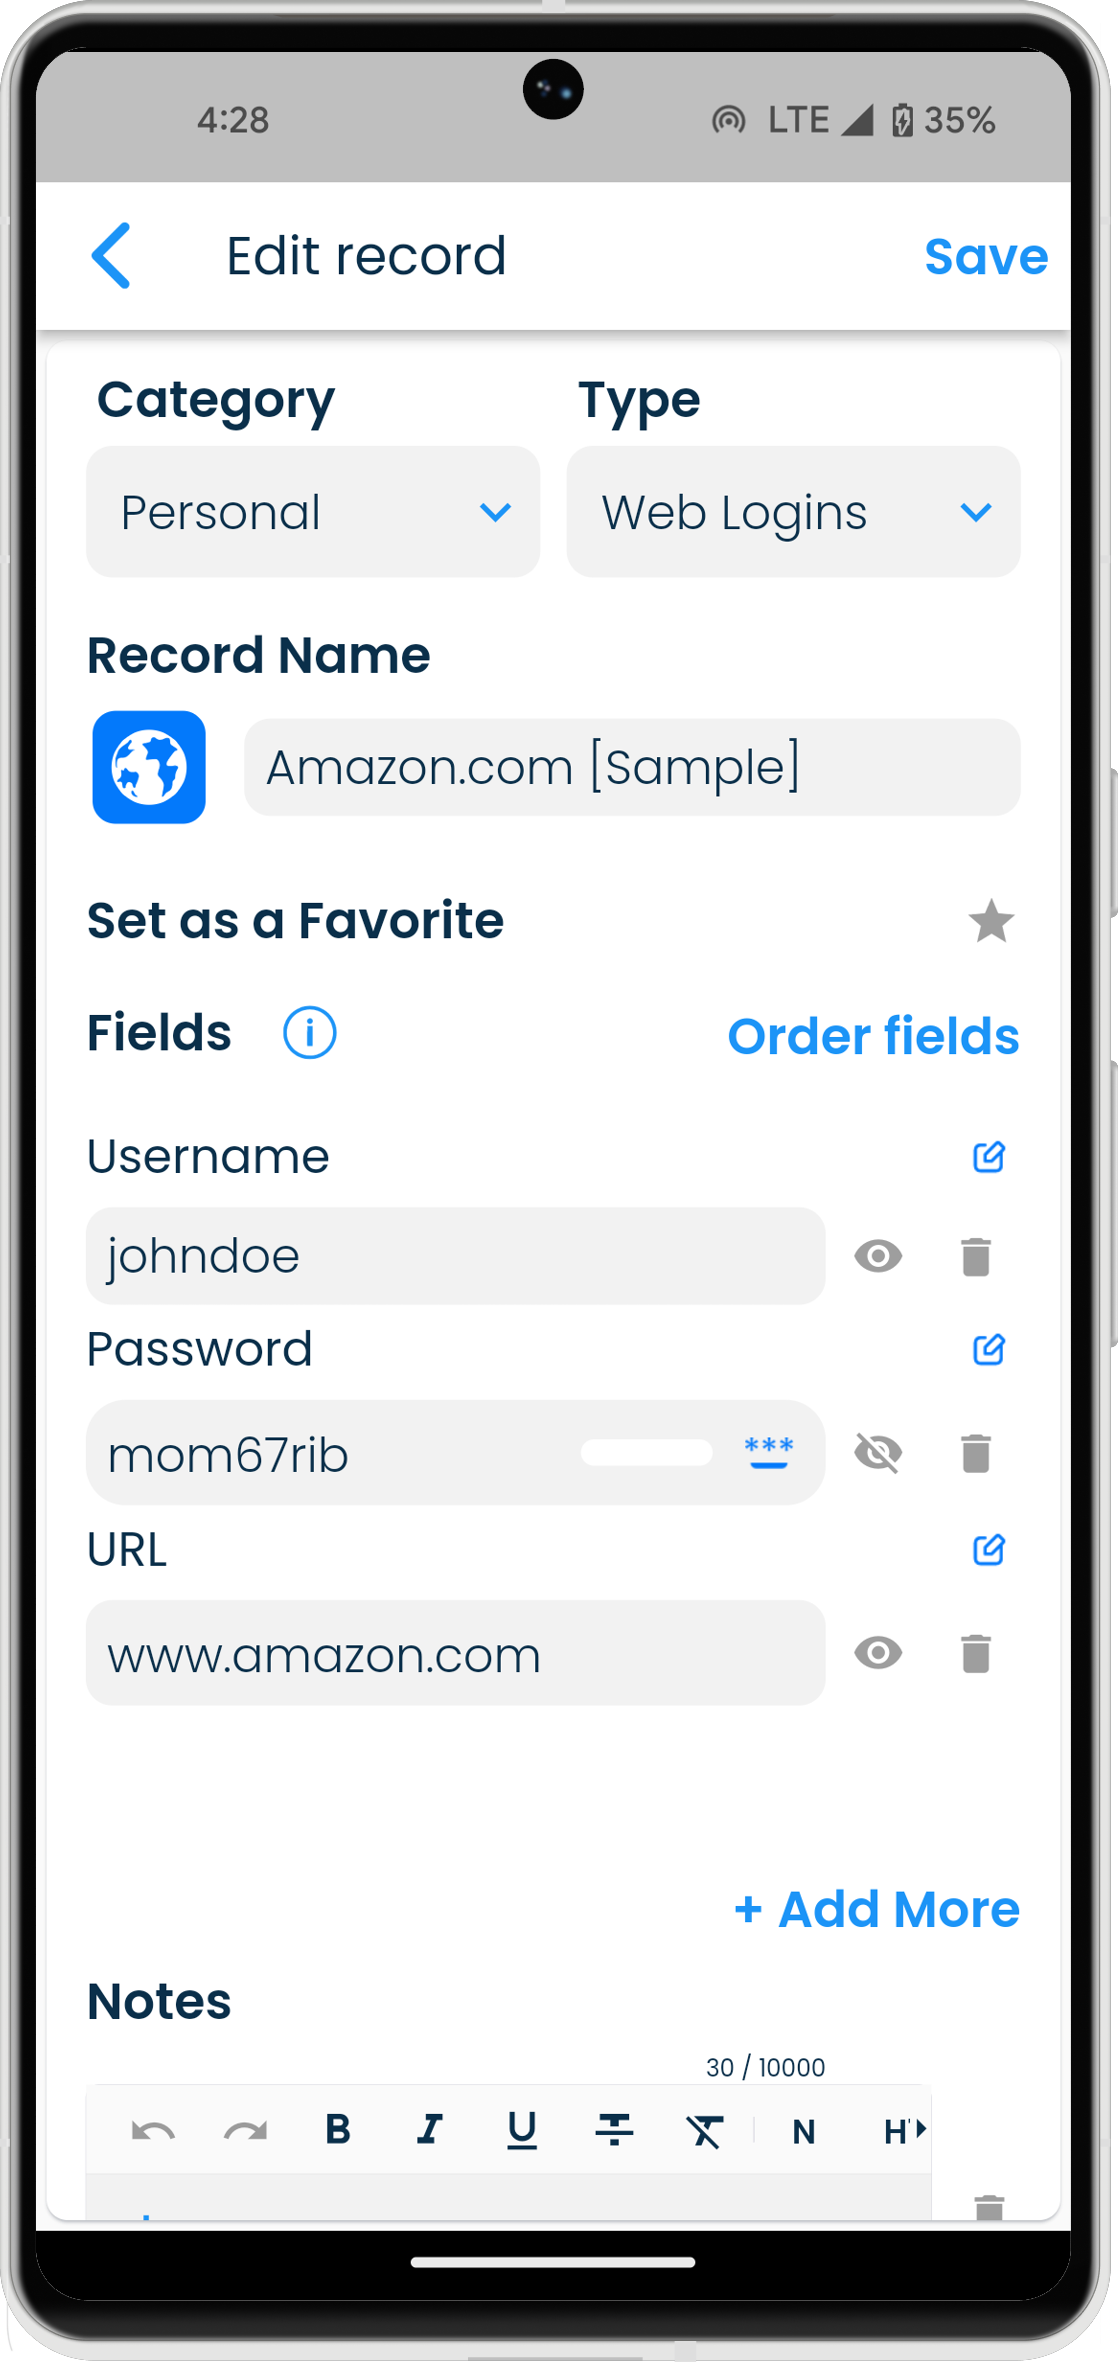
Editing a record
Click on the edit button in the record header to open the record for updating it.
| Mac | Windows |
|---|---|
  |
  |
Click on the edit button in the record header to open the record for updating it.
| Android | iPhone |
|---|---|
 |
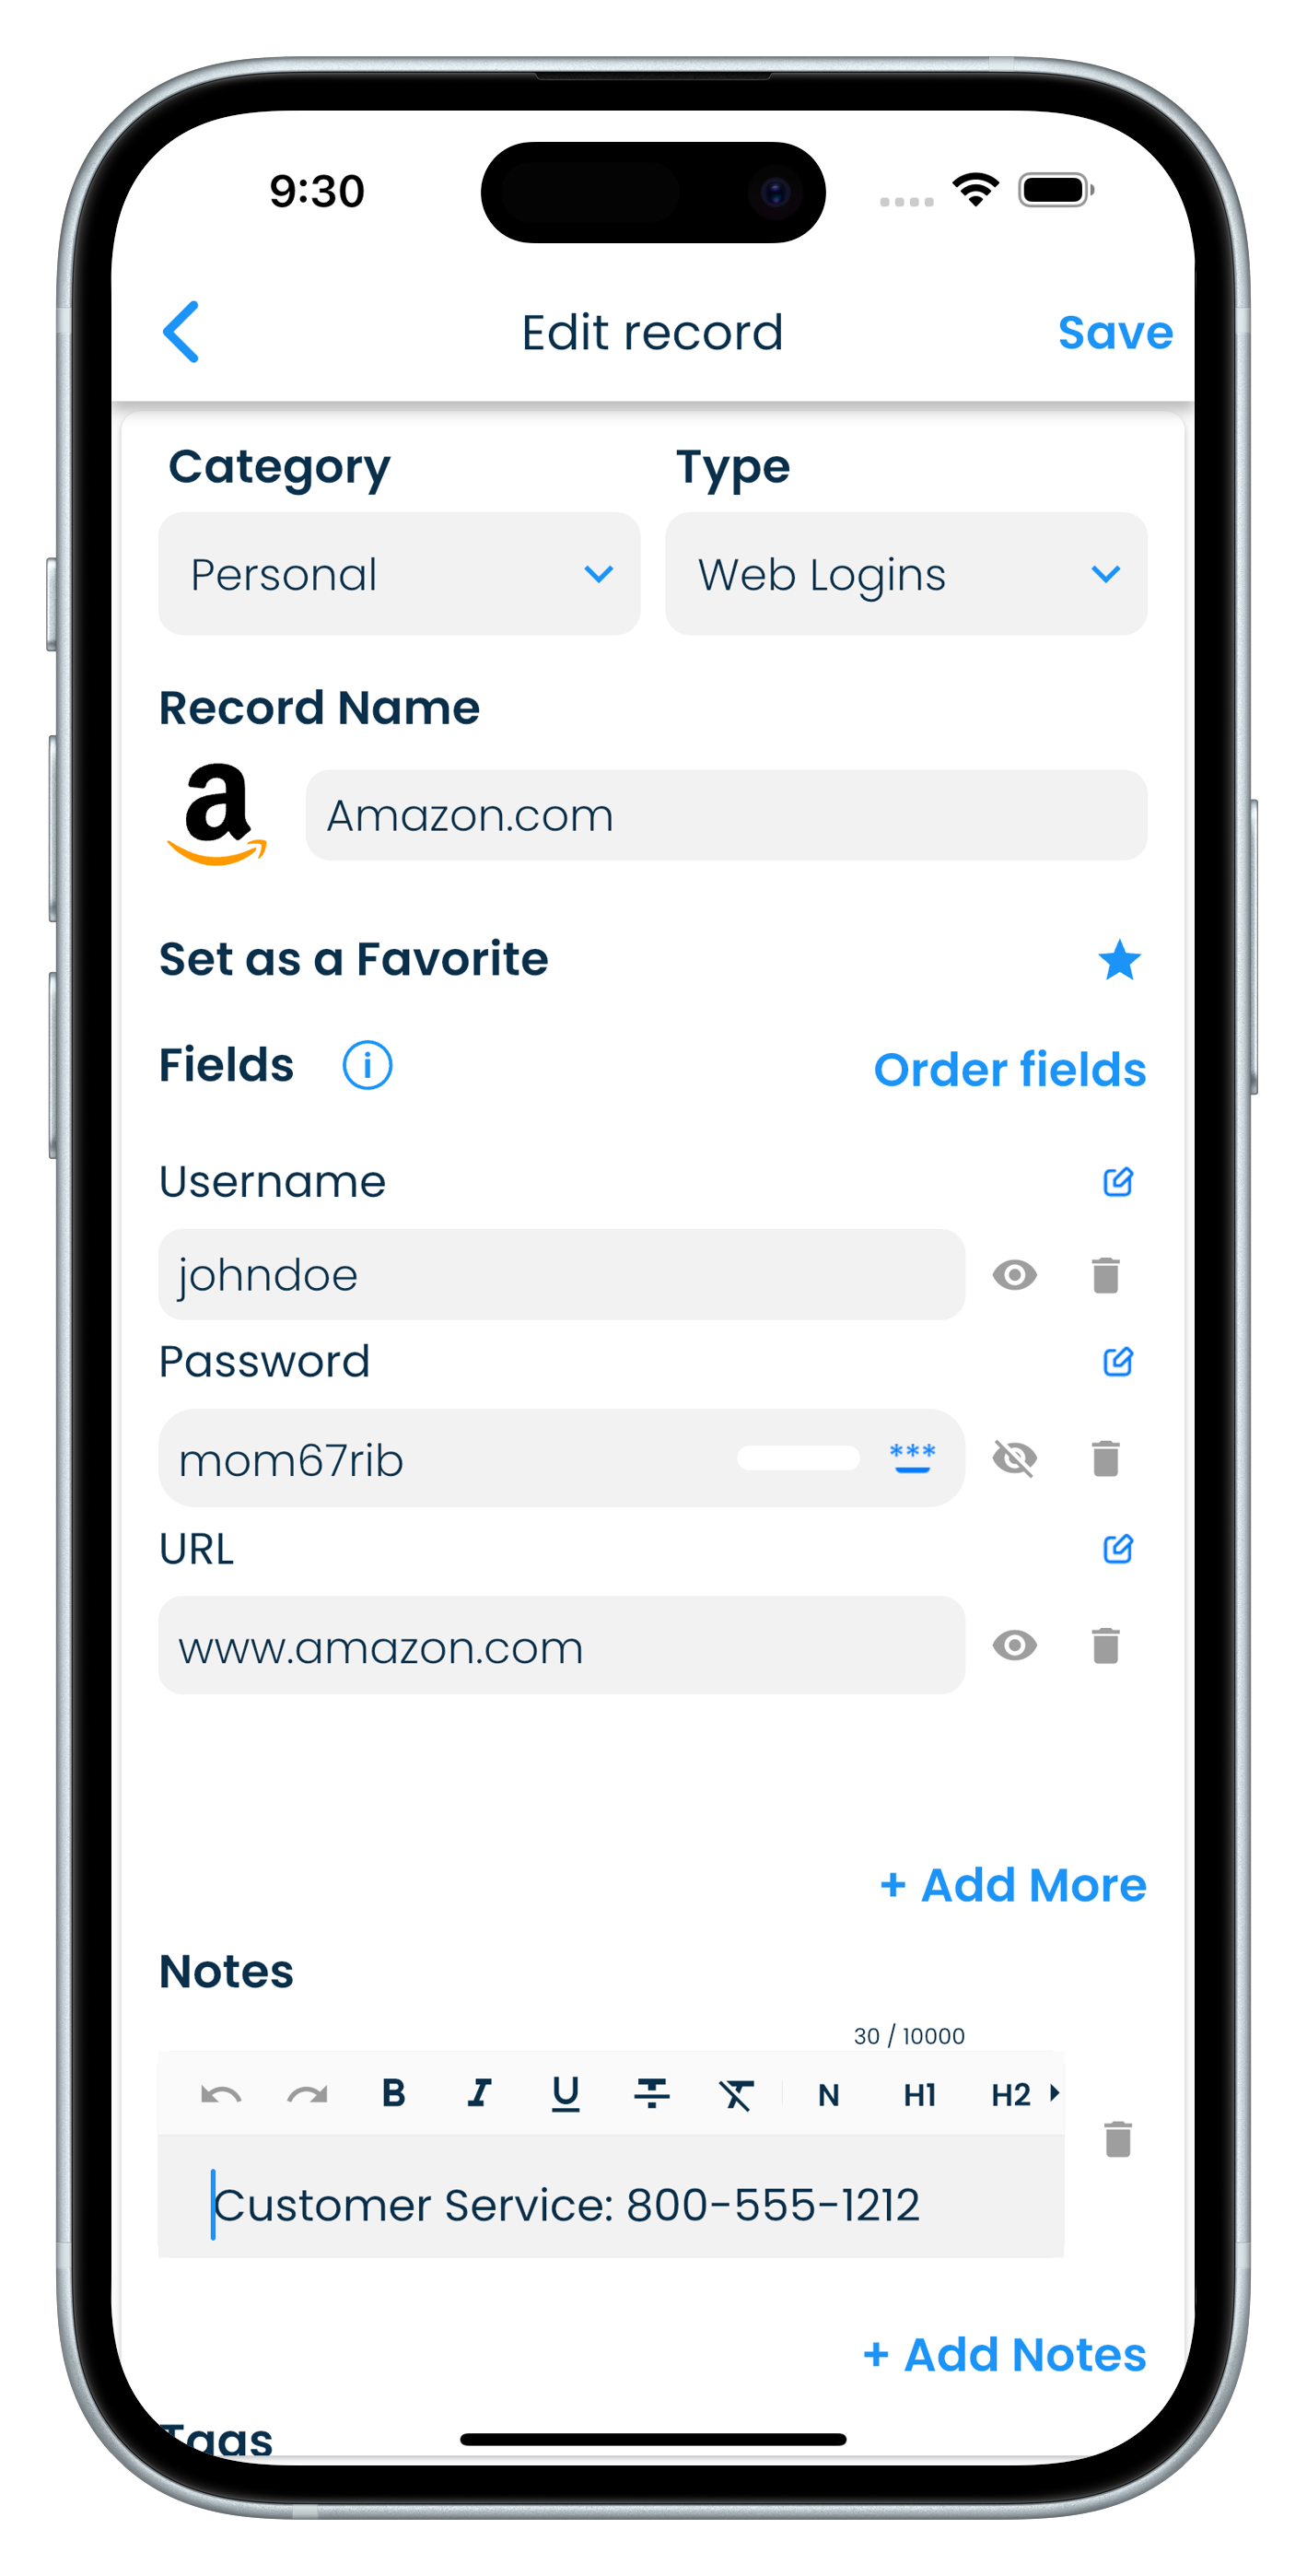 |
Click on the edit button in the record header to open the record for updating it.
| iPad |
|---|
 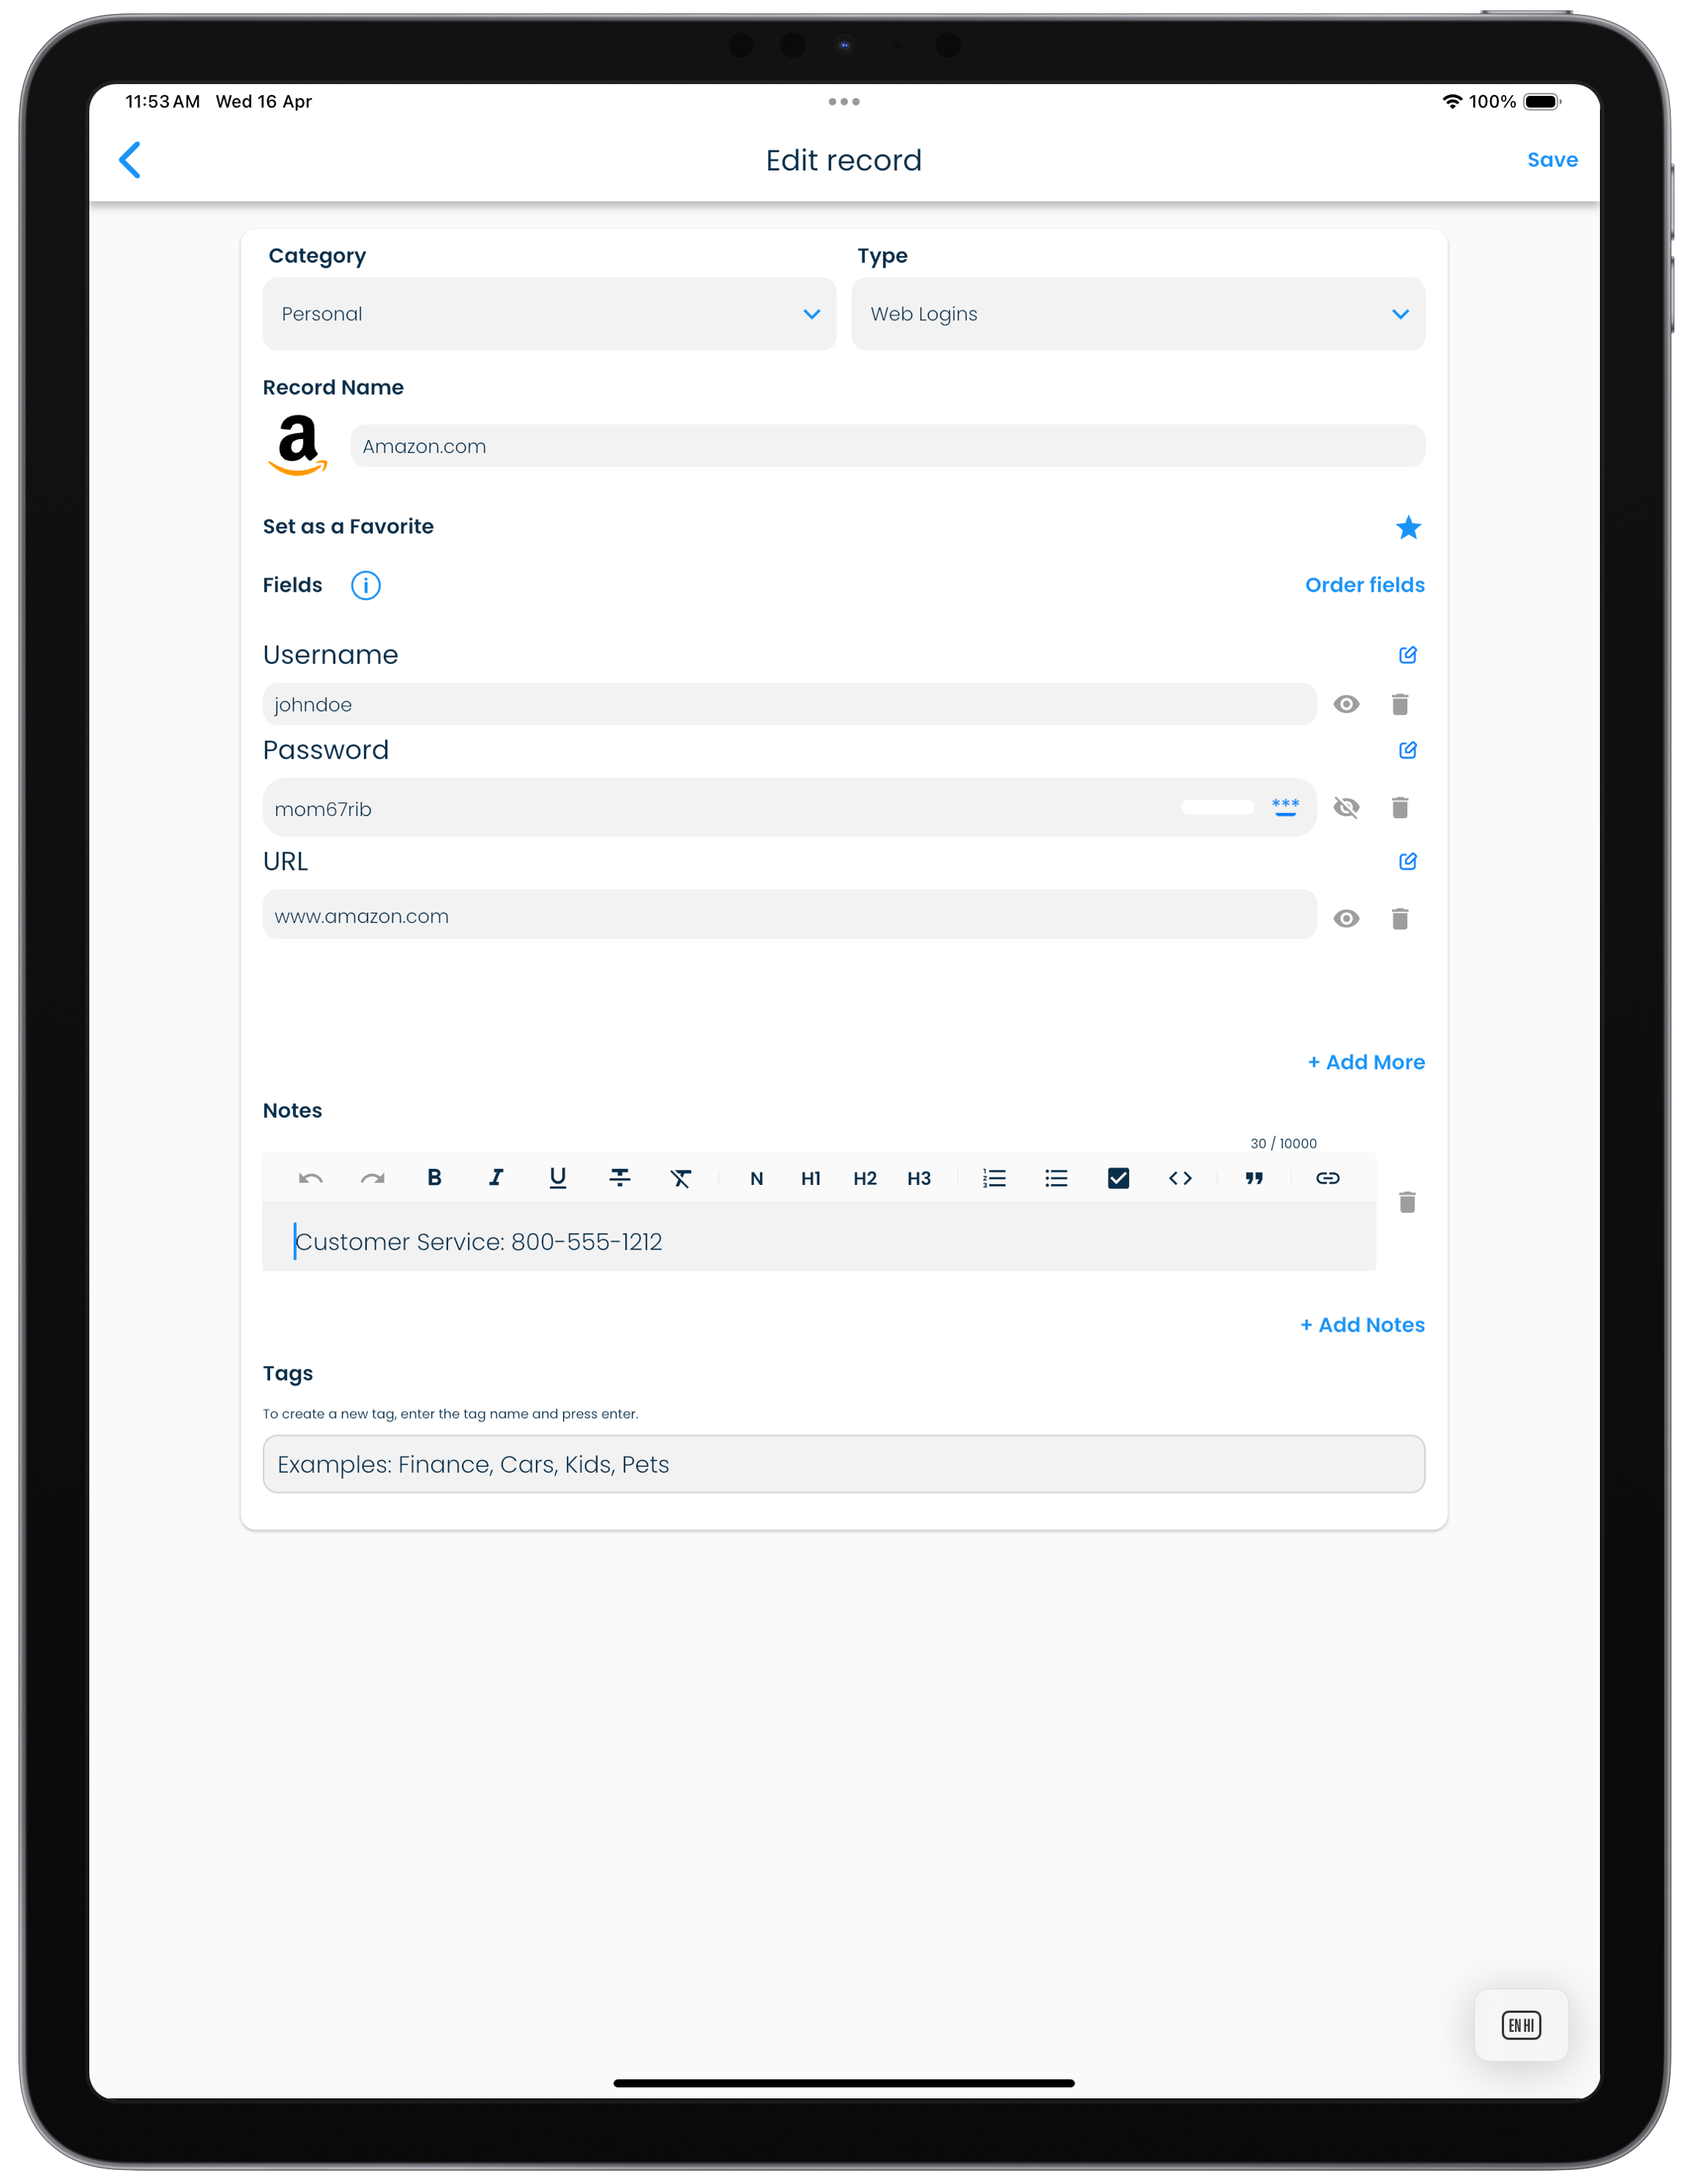 |
Archiving a record
Archiving a record can be used to organize infrequently accessed records. It moves the archived records to a different view that can be accessed from the application menu.
Archived records can also be unarchived back to the personal record list.
Click on the Archive icon in the record details header to archive a record.
| Mac | Windows |
|---|---|
|
|
Tap on the Archive icon in the record details header to archive a record.
| Android | iPhone |
|---|---|
|
|
Tap on the Archive icon in the record details header to archive a record.
| iPad |
|---|
|
Deleting a record
Deleting a record sends it to a Recycle Bin. You can permanently delete them from the Recycle Bin if you are sure that you no longer need them.
Alternatively, you can restore a deleted record in the Recycle Bin to the personal record list.
Click on the Delete icon in the record details header to send a record to the Recycle Bin.
| Mac | Windows |
|---|---|
|
|
Tap on the Delete icon in the record details header to send a record to the Recycle Bin.
| Android | iPhone |
|---|---|
|
|
Tap on the Delete icon in the record details header to send a record to the Recycle Bin.
| iPad |
|---|
|
Mark a record as a Favorite
You can mark frequently accessed or important records as favorites. All the favorite records can be viewed in the Favorites view from the side menu.
Click on the Favorite icon in the record details header to mark a record as a Favorite.
| Mac | Windows |
|---|---|
|
|
Tap on the Favorite icon in the record details header to mark a record as a Favorite.
| Android | iPhone |
|---|---|
|
|
Tap on the Favorite icon in the record details header to mark a record as a Favorite.
| iPad |
|---|
|
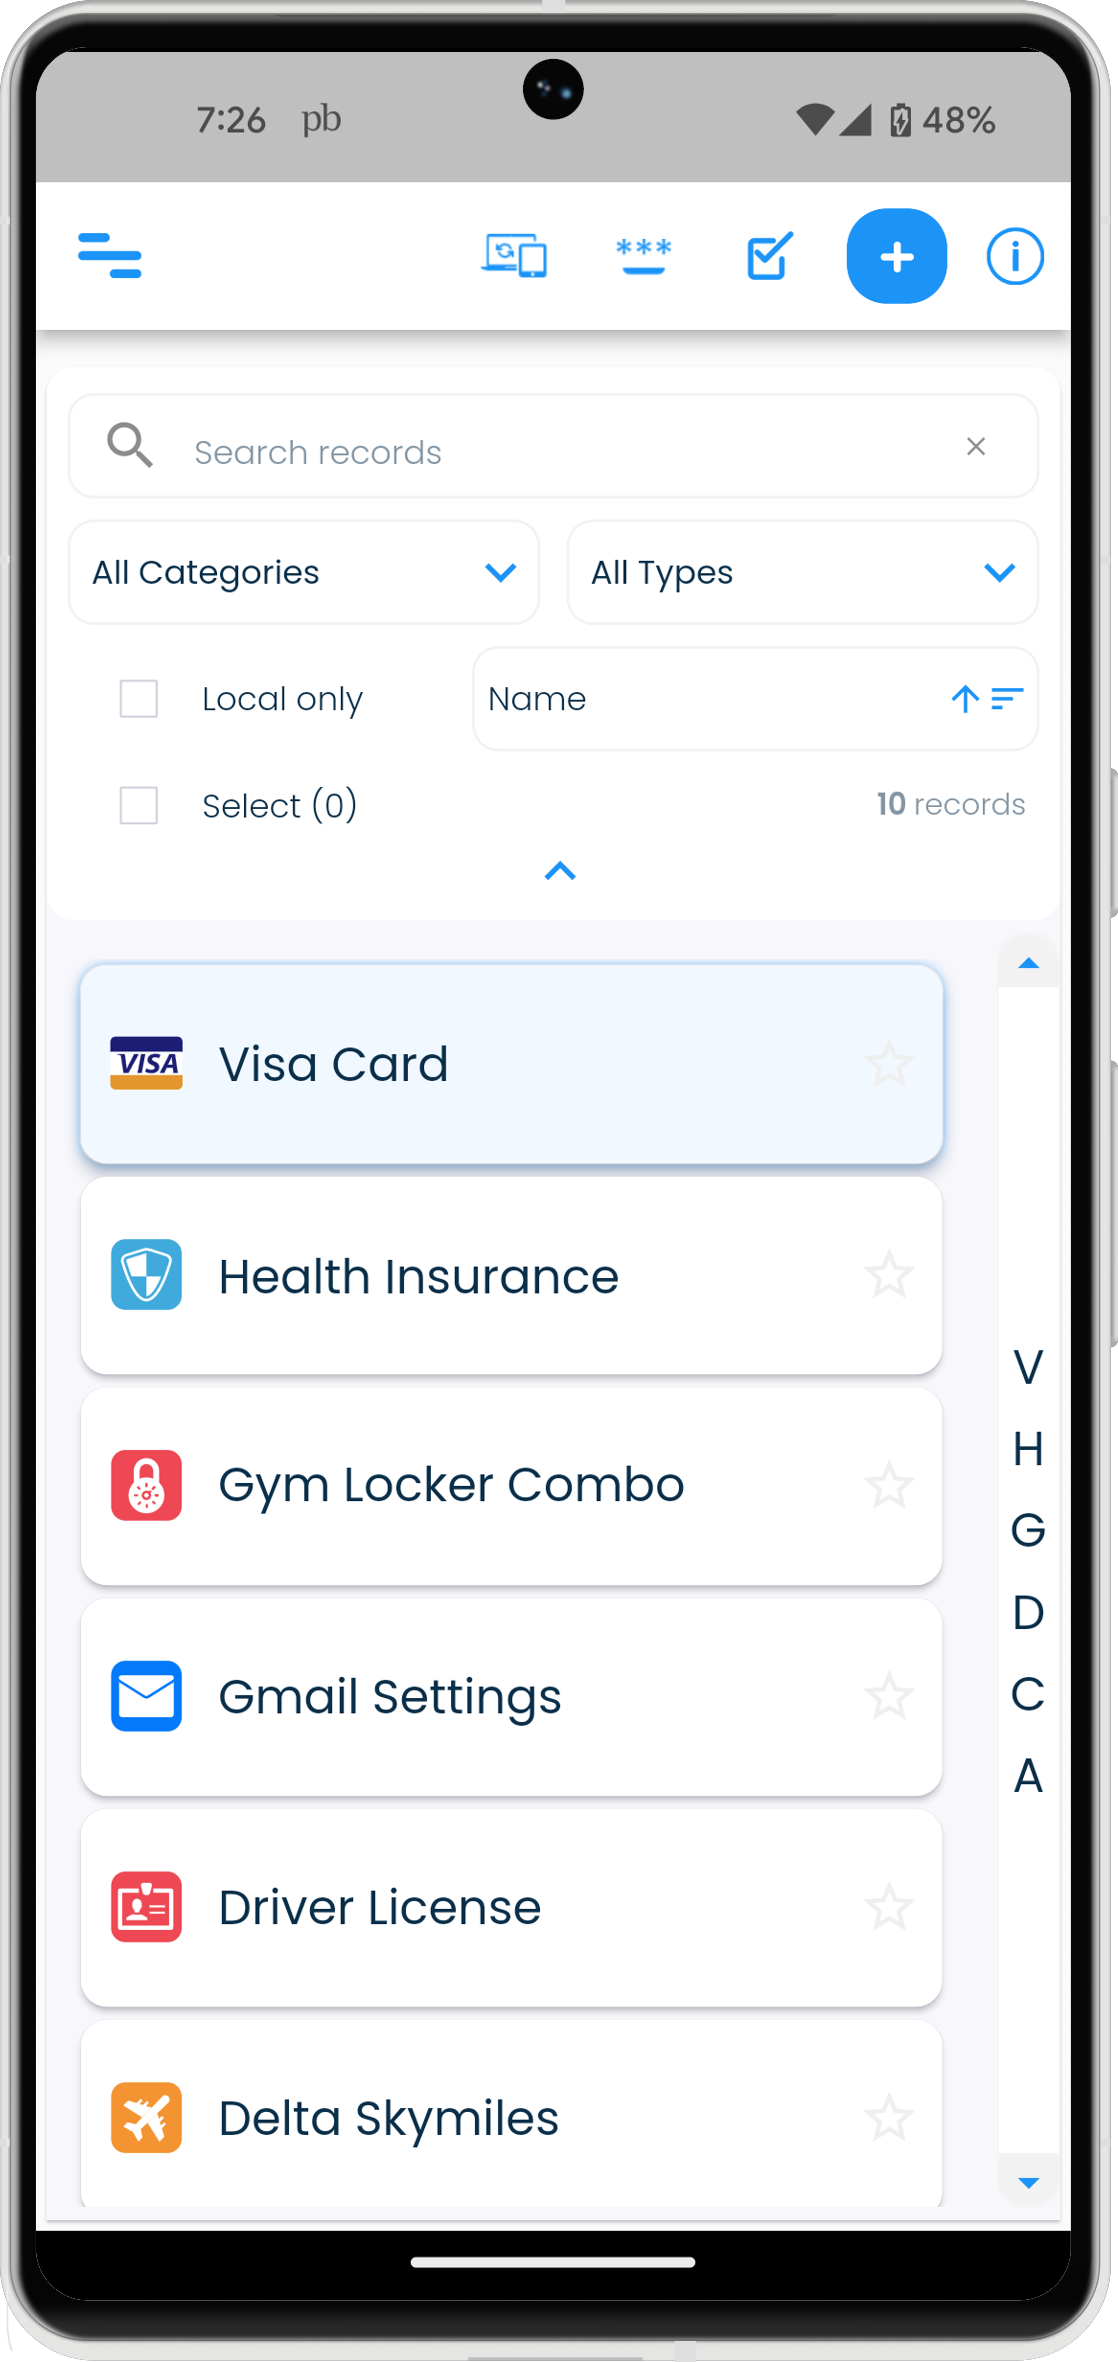
Filtering and sorting
The records displayed in the list can be filtered using multiple criteria, and then sorted to suit your needs.
The filtering criteria available include
- Searching in record names and fields.
- By selecting specific categories and/or types assigned to records.
- Showing Local only records i.e. records that exist only on one device.
Sorting of the records can be done by
- Record name
- Recently modified time
- Recently added time
Filter panel
The filter panel is available in the top portion of the record list section in different views.
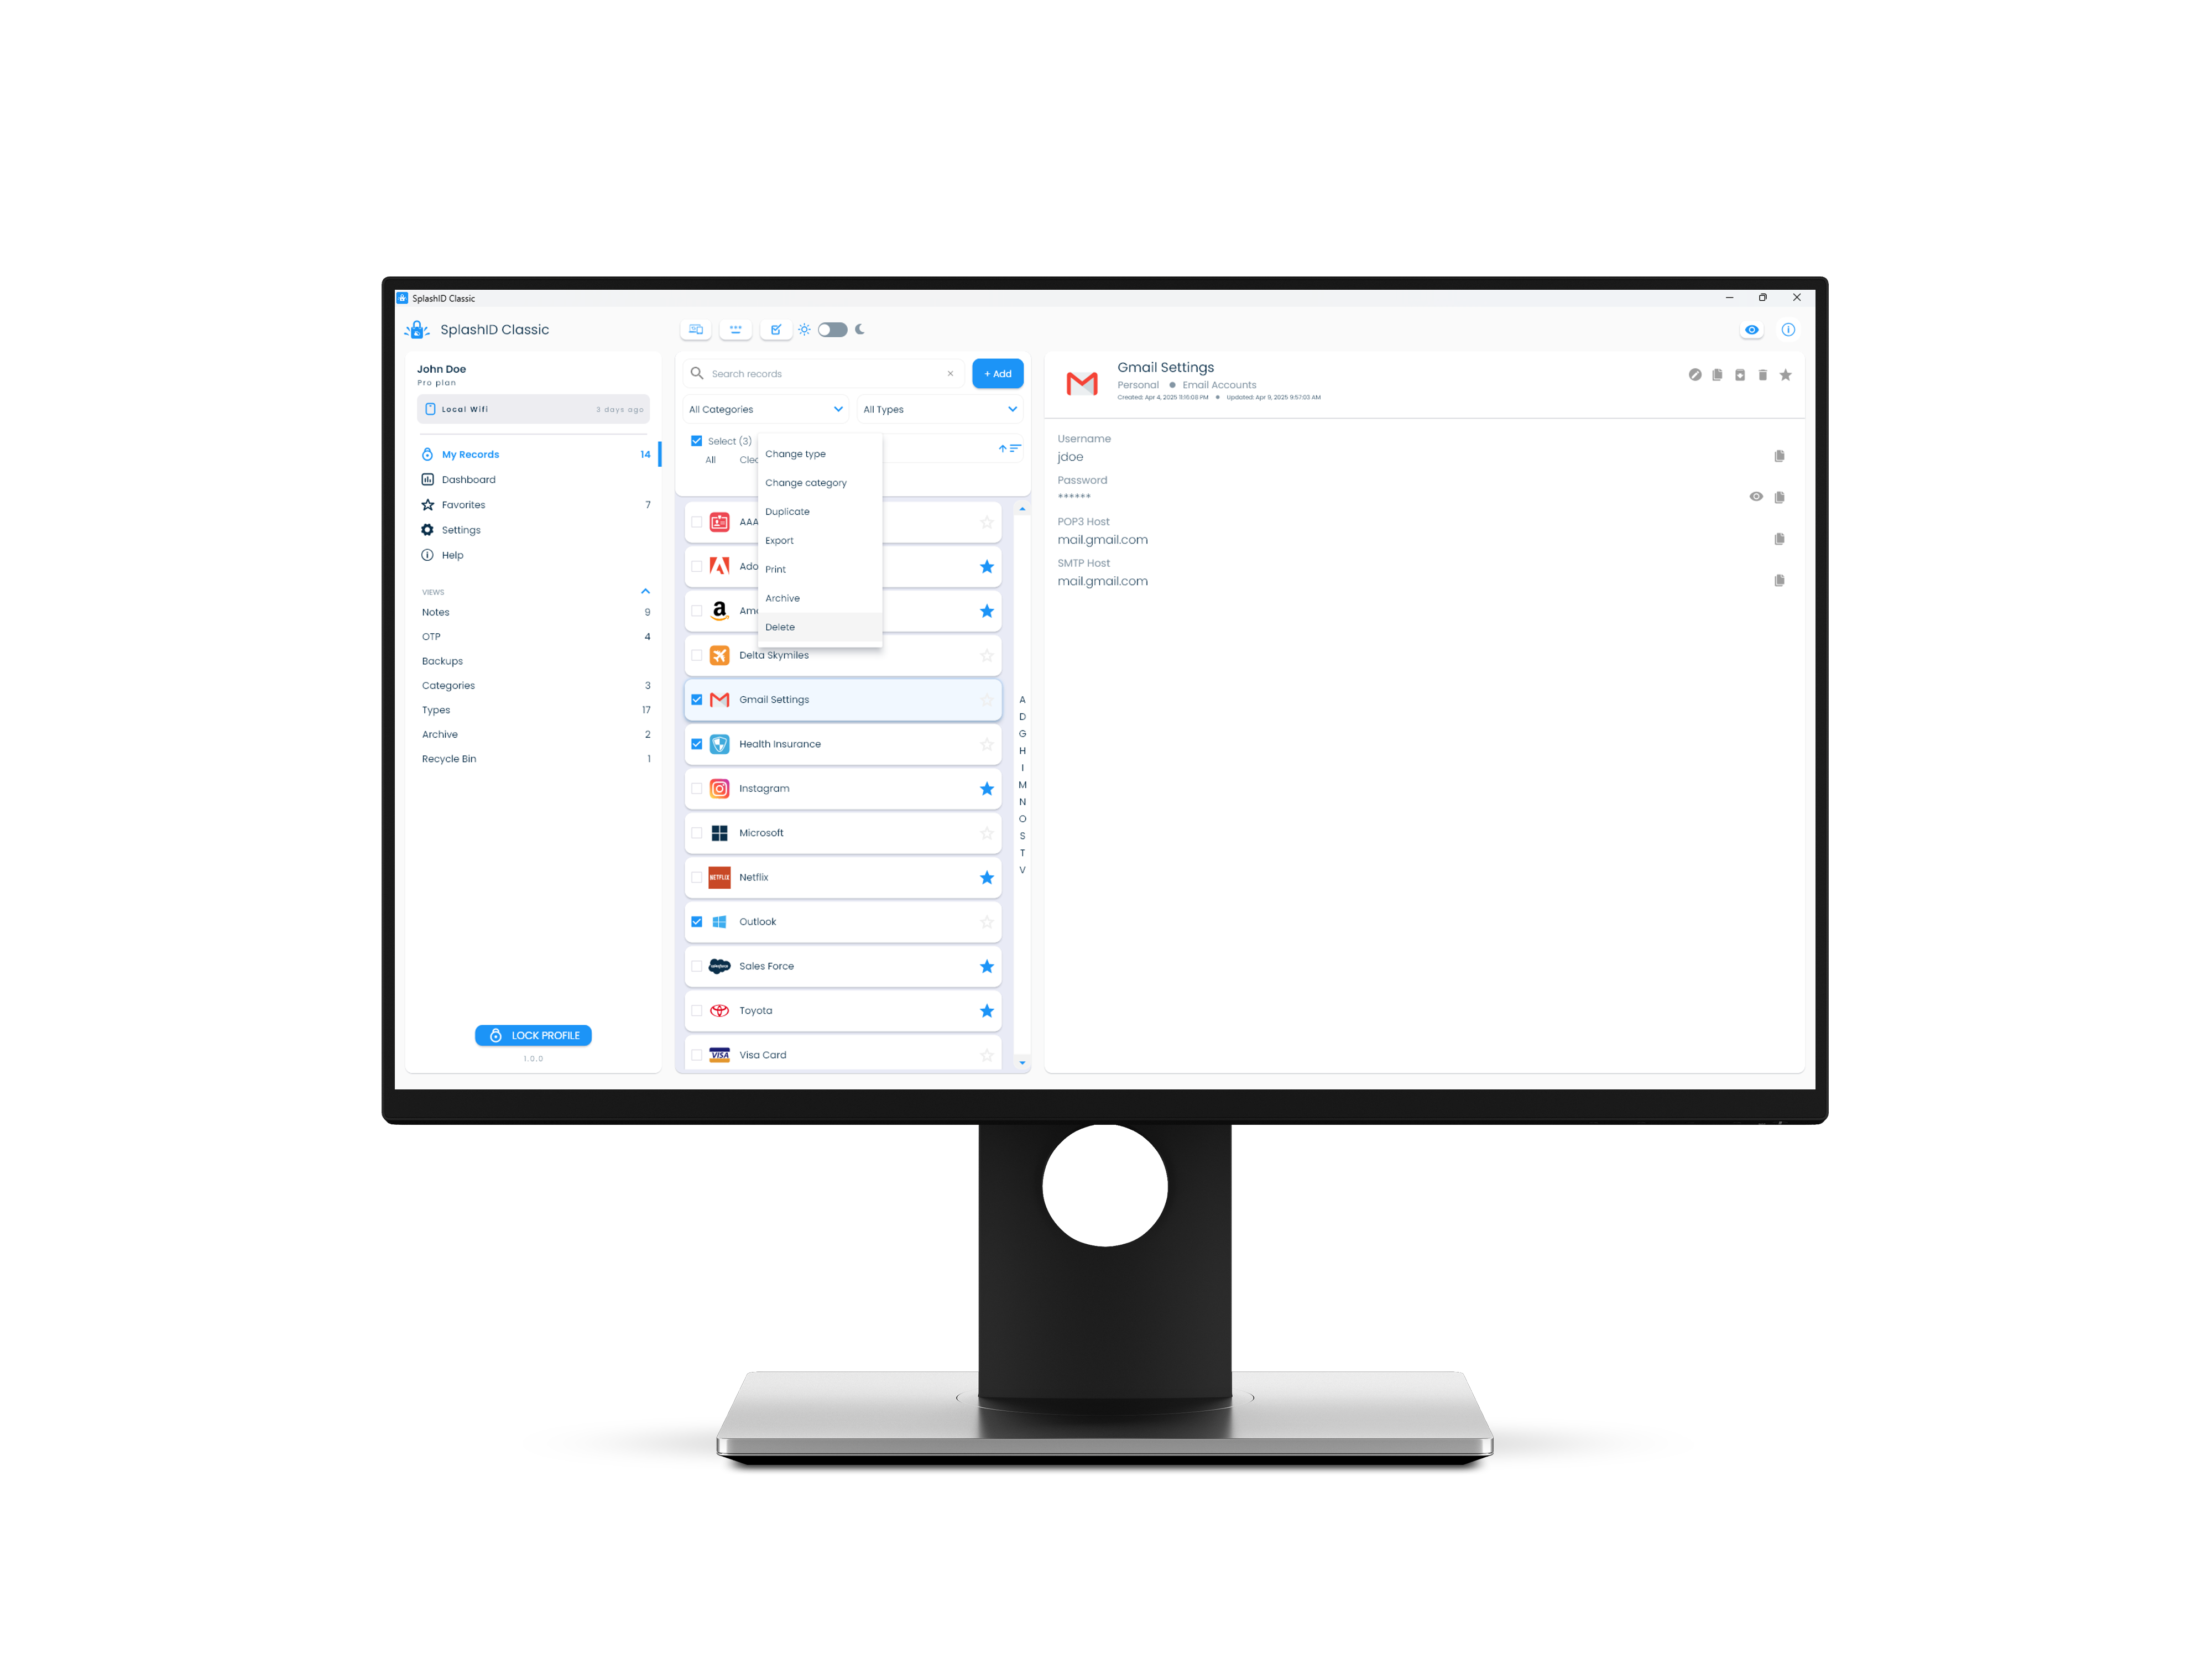
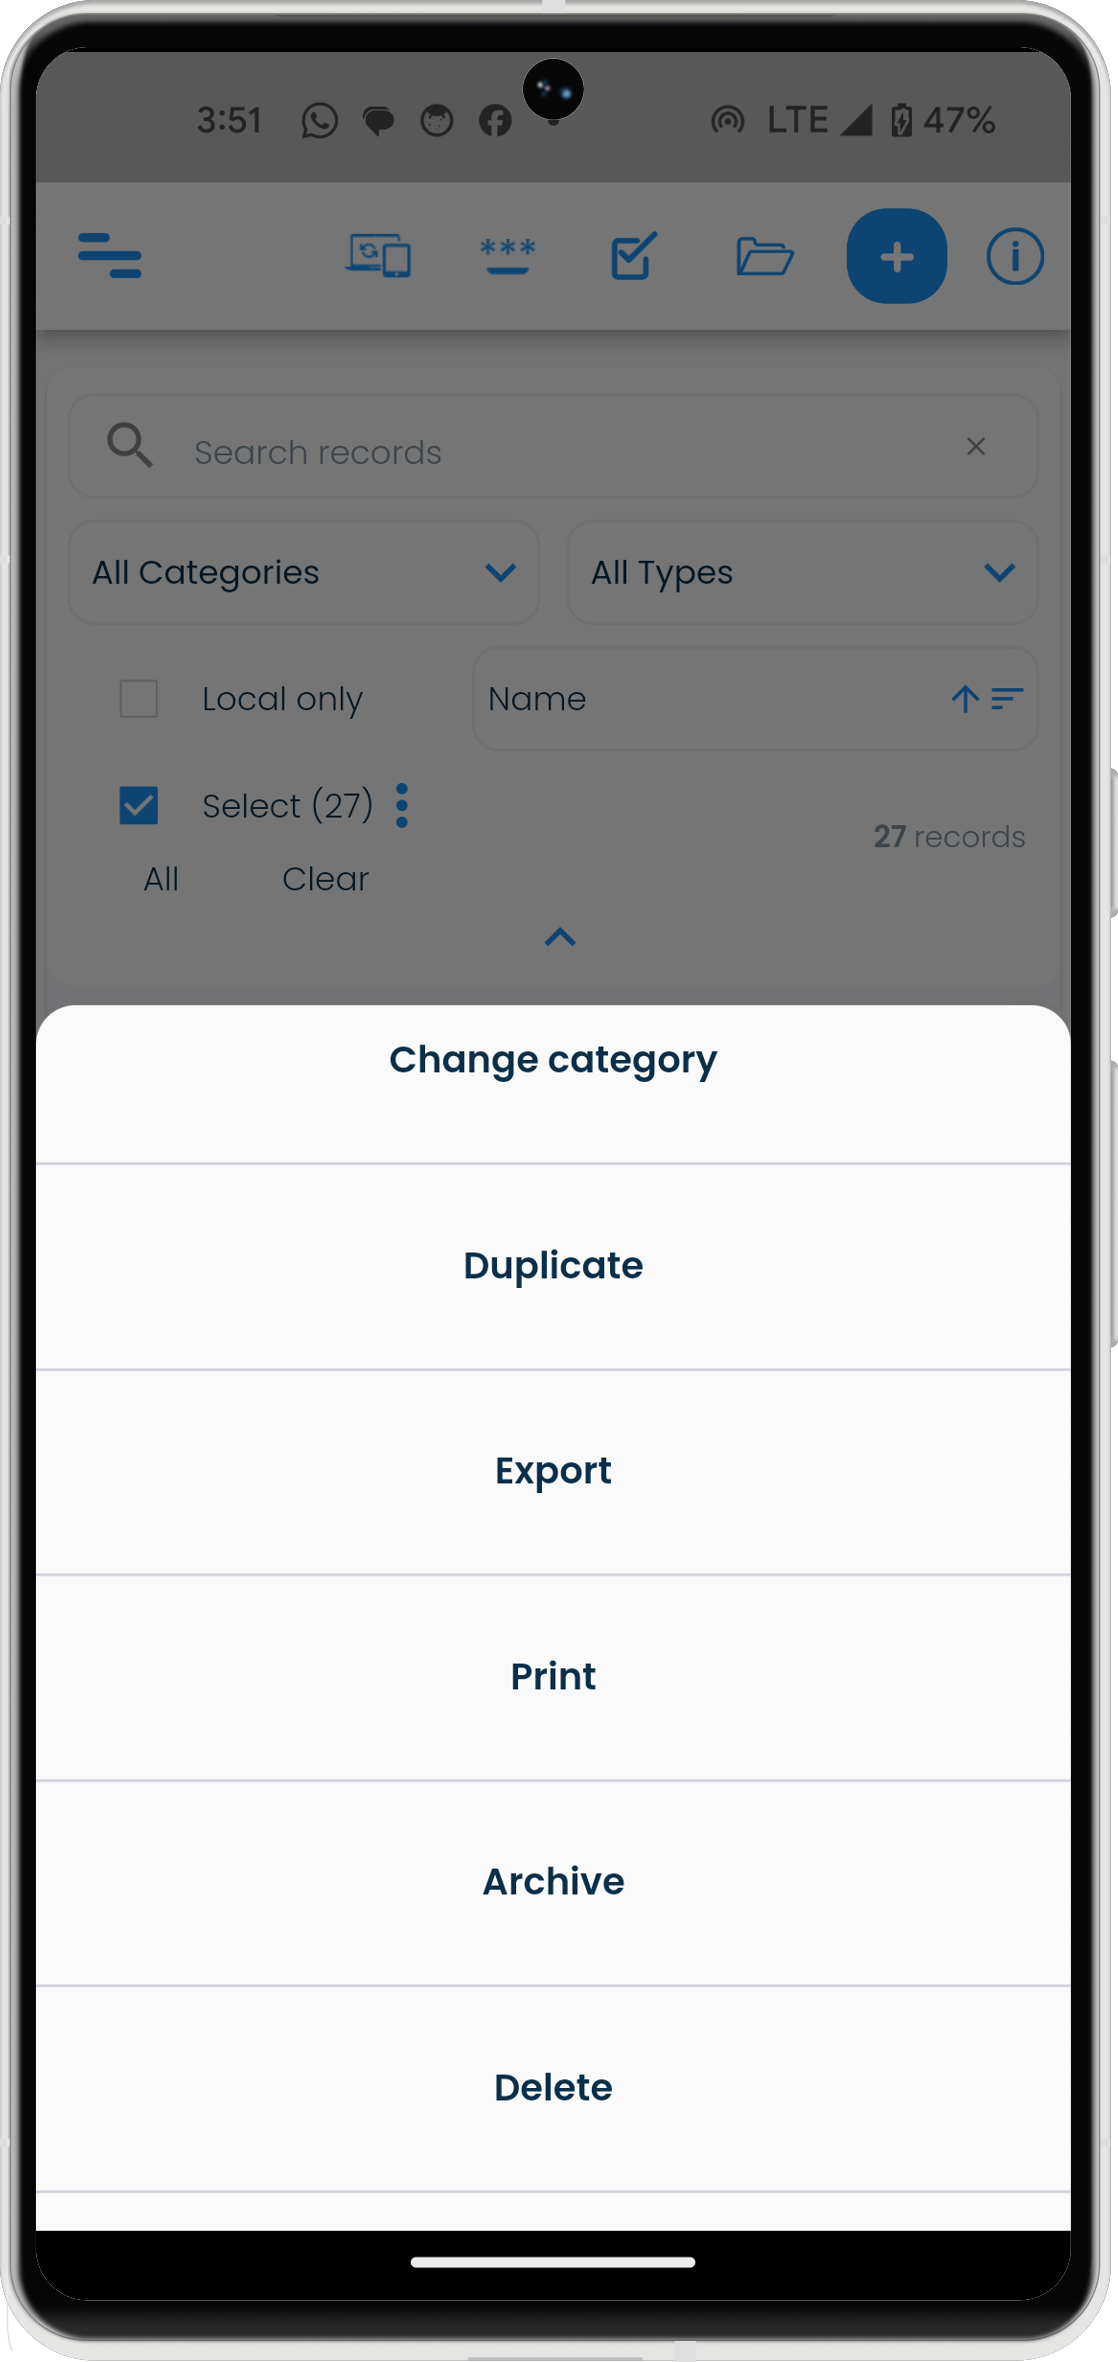
Multiple selection of records and actions
You can select multiple records by checking the Select check box, and then perform actions on them. These actions include
- Change Type
- Change Category
- Duplicate
- Export
- Archive
- Delete
| Mac | Windows |
|---|---|
 |
 |
| Android | iPhone |
|---|---|
 |
 |
| iPad |
|---|
 |
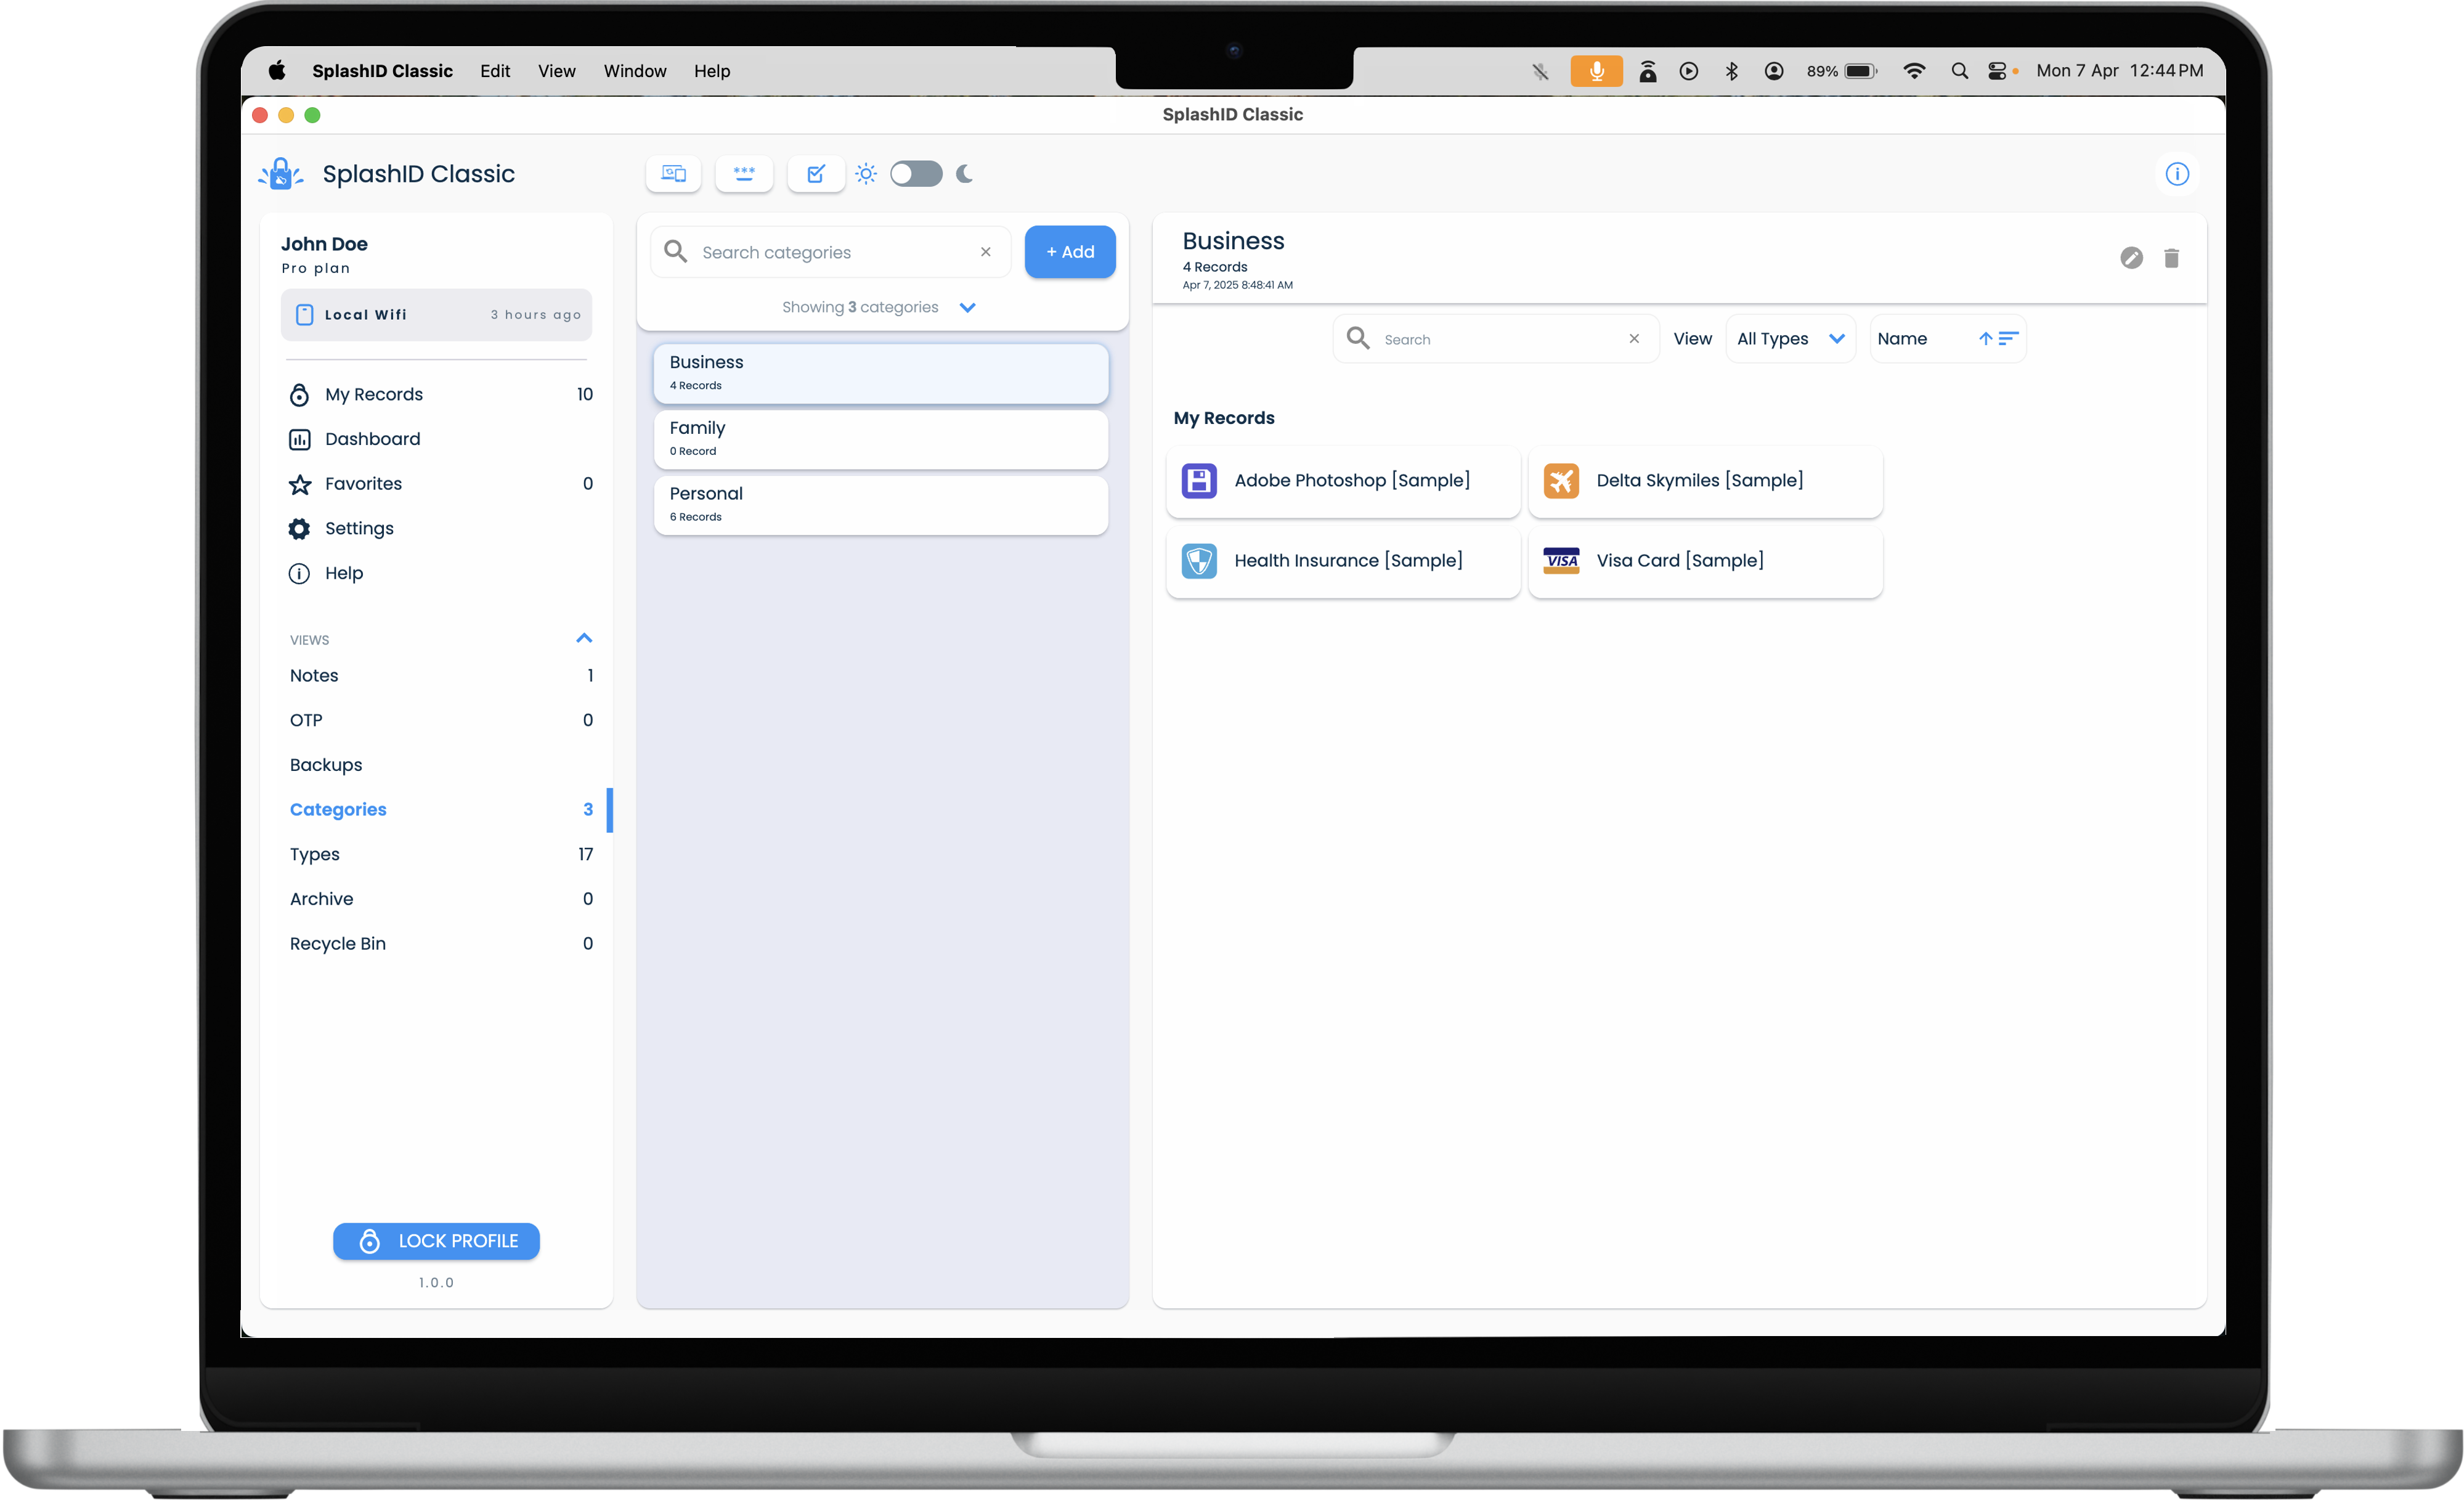
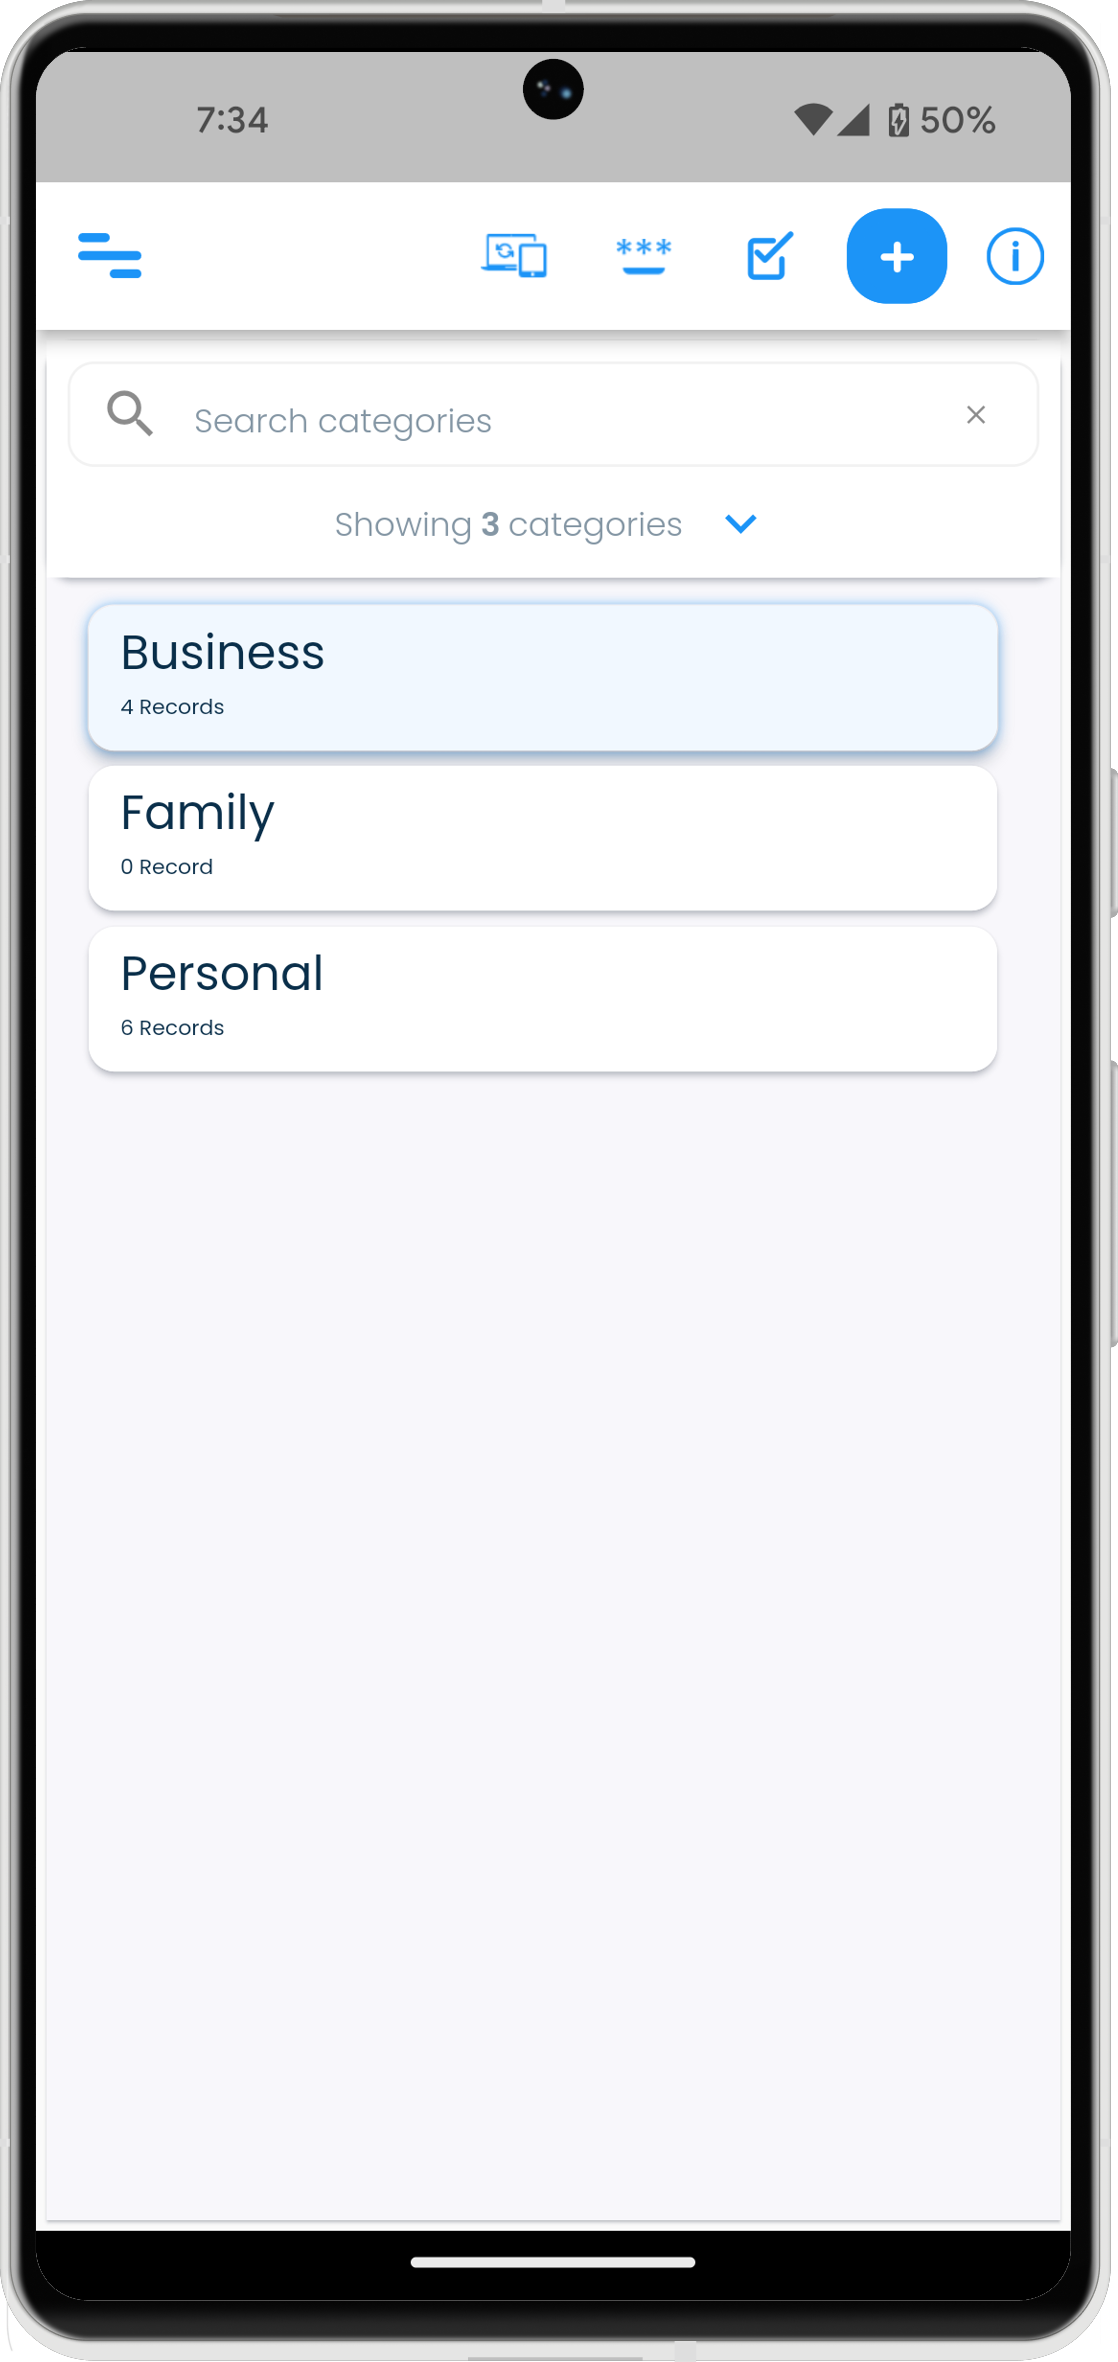
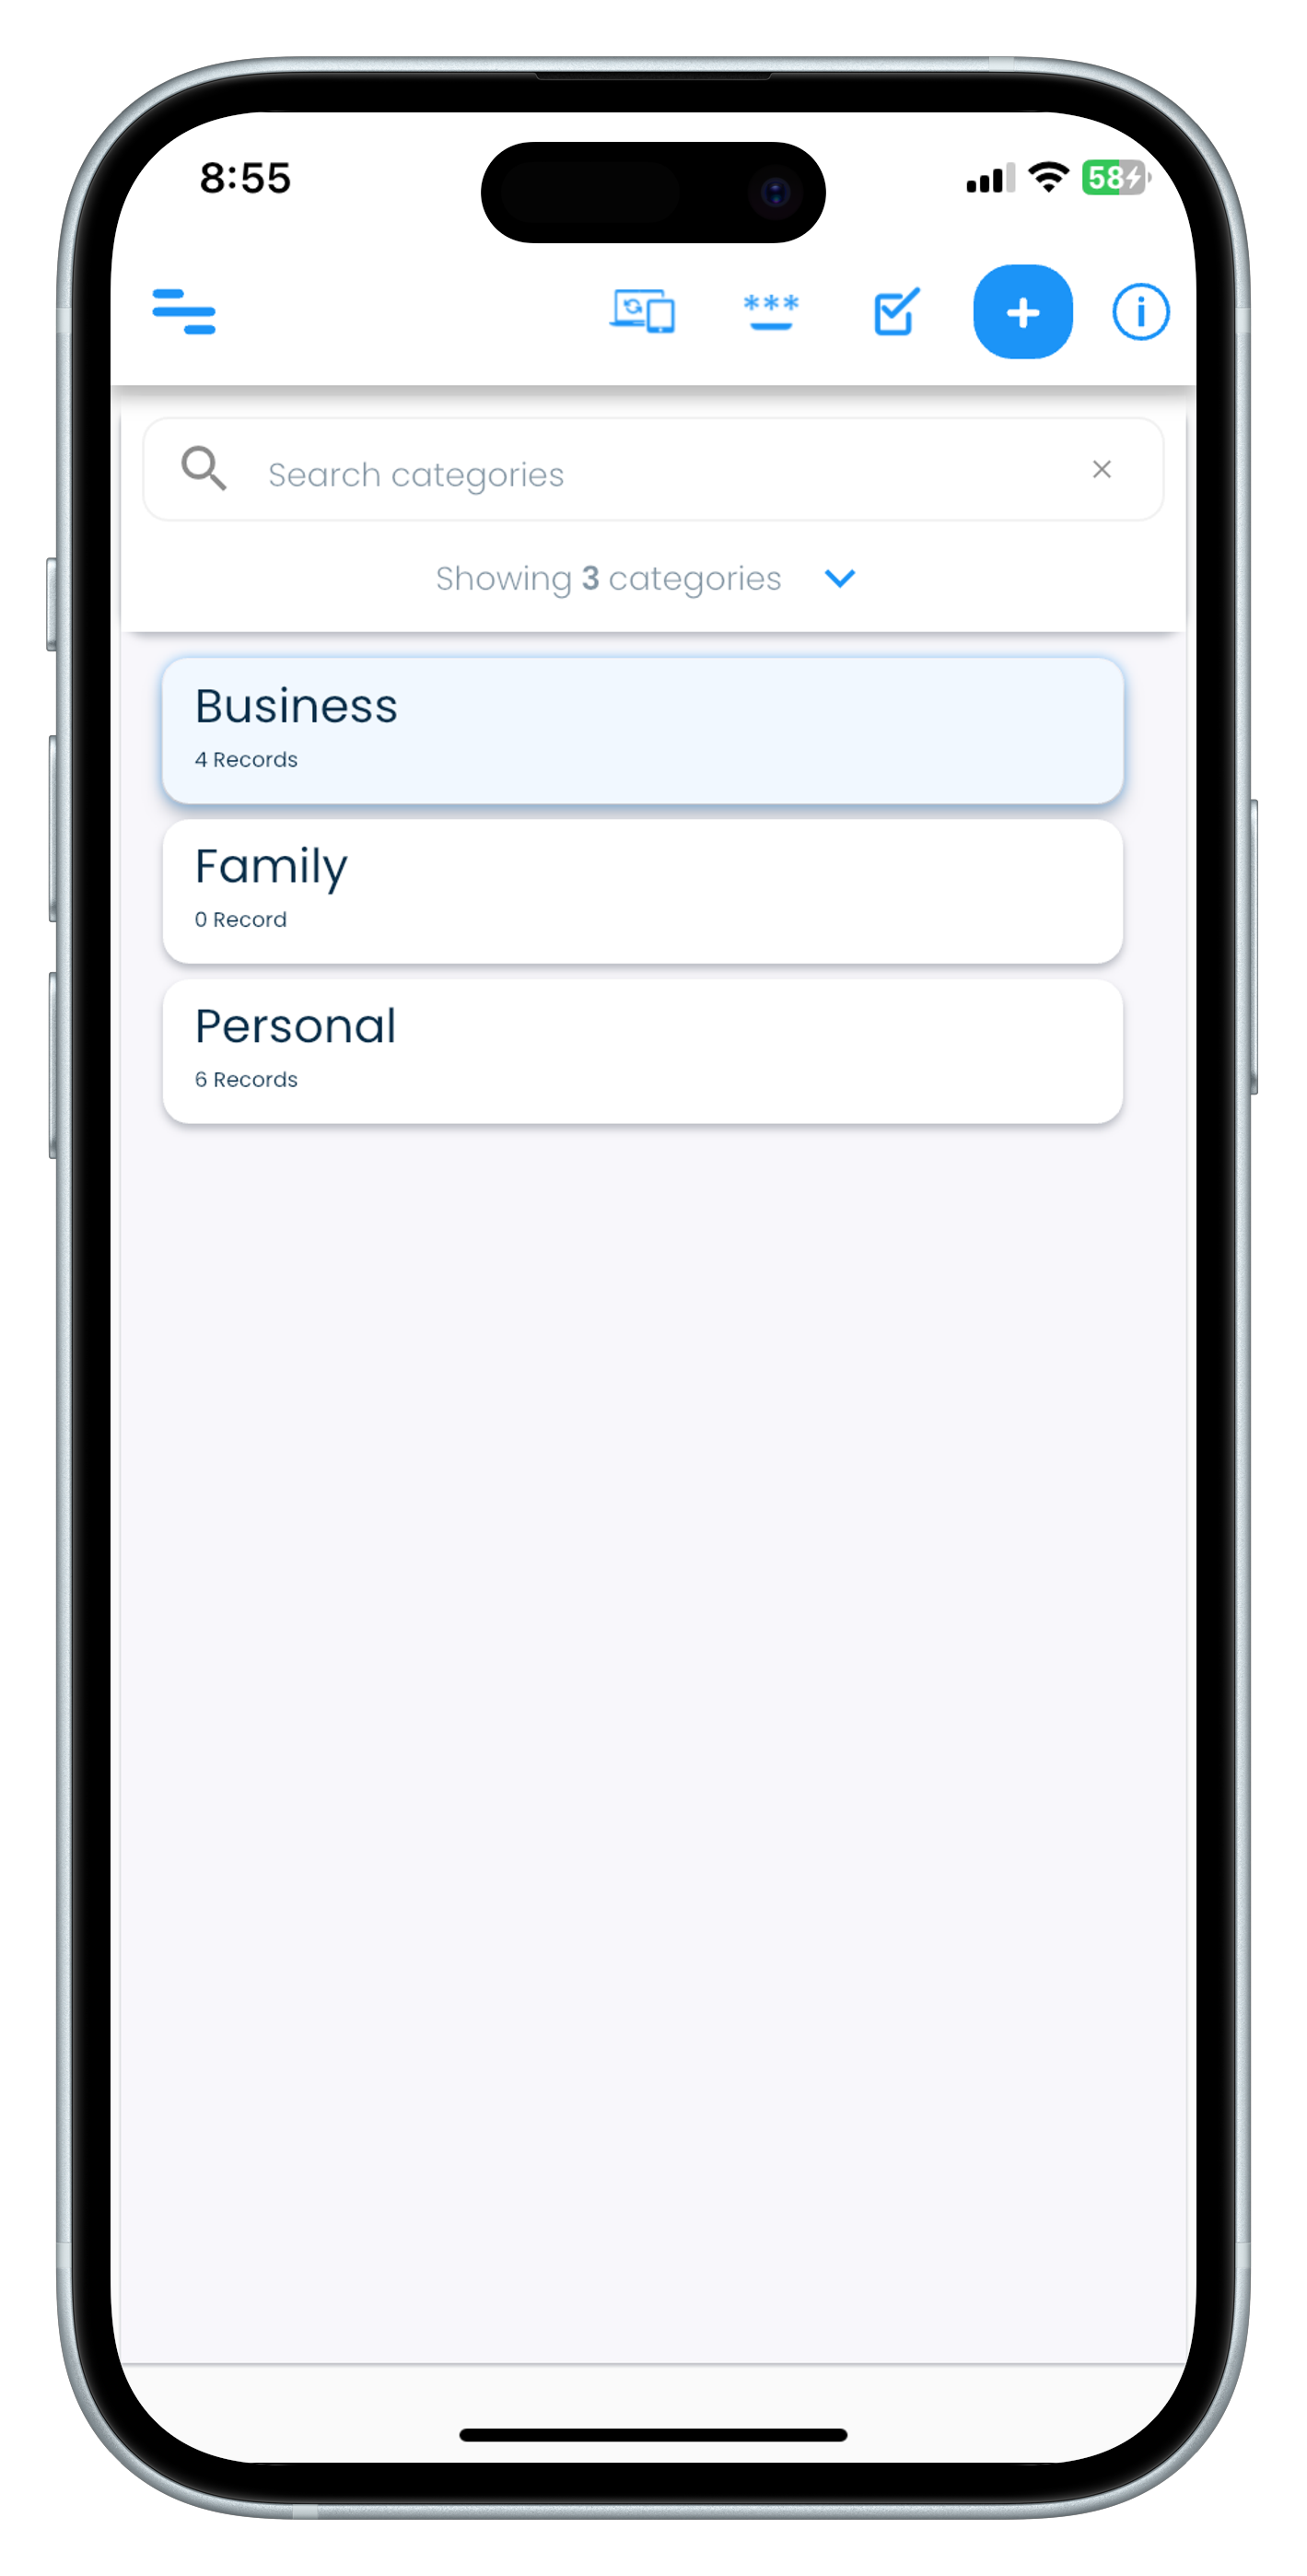
Categories
Categories are used to organise your records into high level groups.
| Mac | Windows |
|---|---|
 |
 |
| Android | iPhone |
|---|---|
  |
  |
| iPad |
|---|
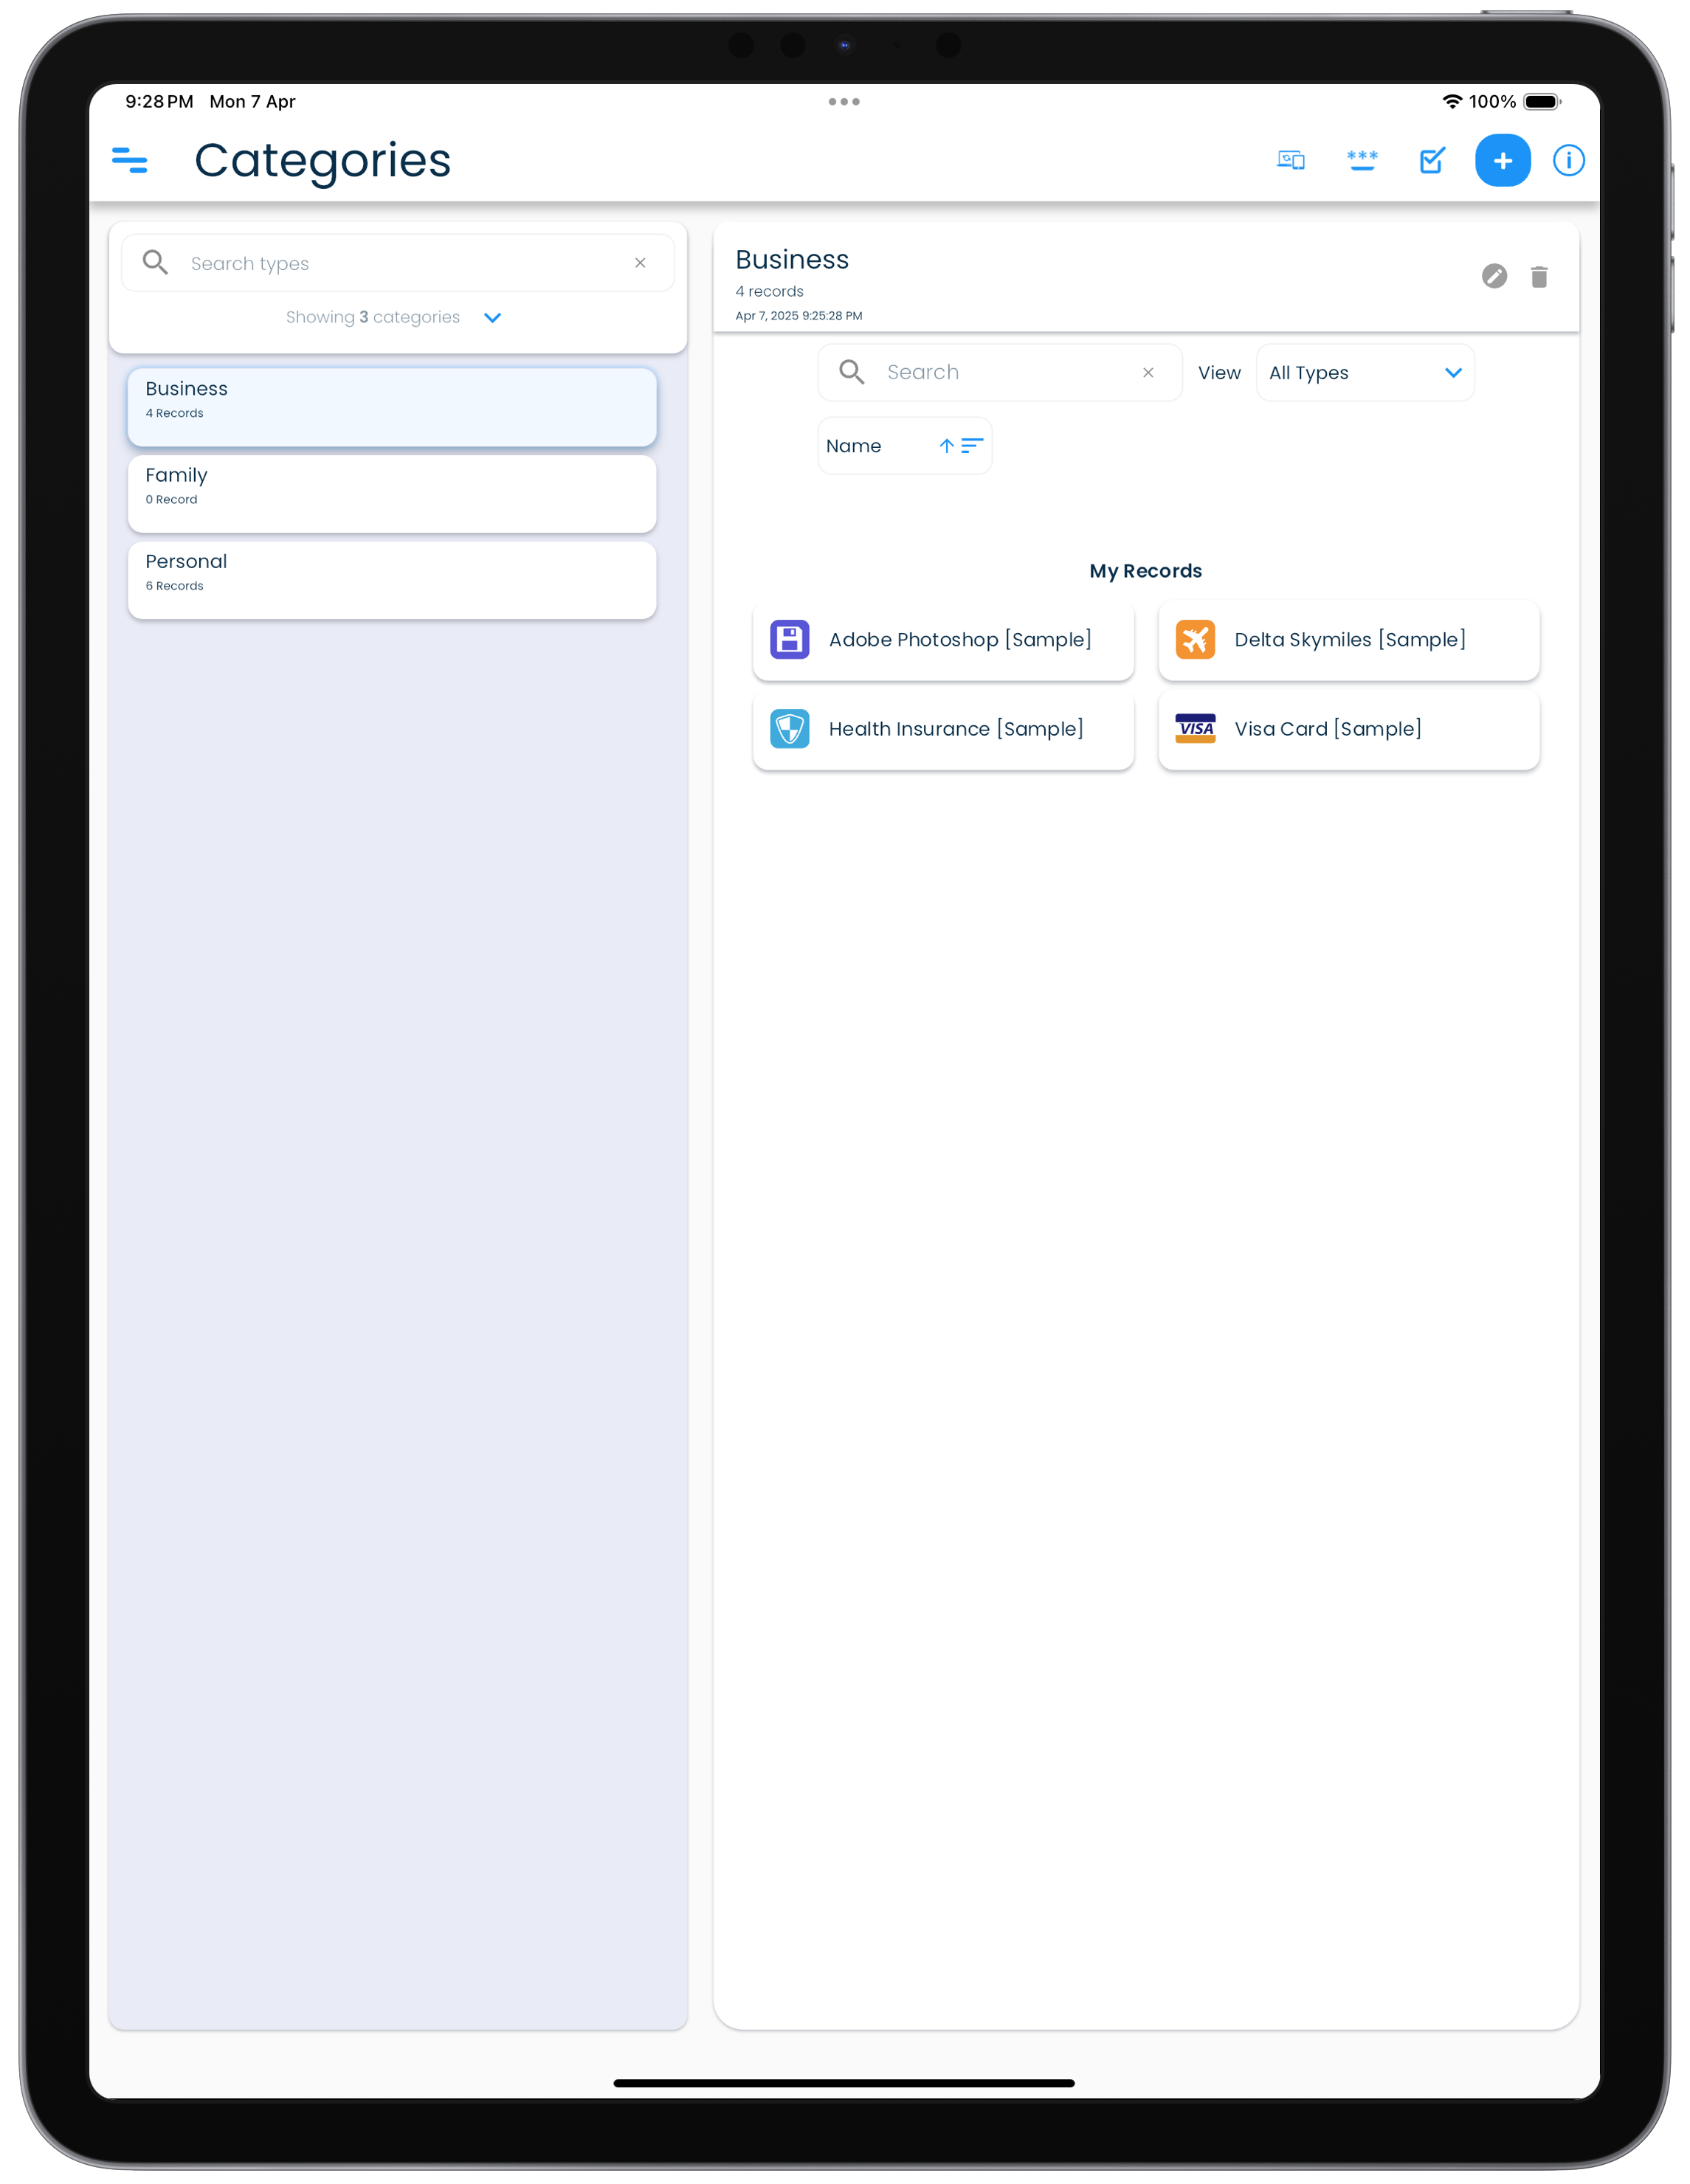 |
SplashID Classic comes with three categories out of the box. These are
- Personal
- Business
- Family
In addition a virtual category called Unfiled will be used to hold records with a category that is not yet available on the device.
Adding a category
You can create any number of categories to help you organise your records in a folder like way. This can be done in the Categories screen.
Click or tap on the Categories item in the application navigation menu to go to the Categories screen.
Modifying a category
An existing category can be renamed. This can be done in the Categories screen.
Click or tap on the Categories item in the application navigation menu to go to the Categories screen.
Deleting a category
Categories can be deleted if they are not used in any of the records. This can be done in the Categories screen.
Click or tap on the Categories item in the application navigation menu to go to the Categories screen.
WiFi sync and category deletion
For WiFi sync users, it is recommended that all the devices are synced properly before the deletion of a category is attempted on a device. This will prevent the category from being deleted if it was assigned to records on other devices, but was not synced on the current device where it was being deleted from.
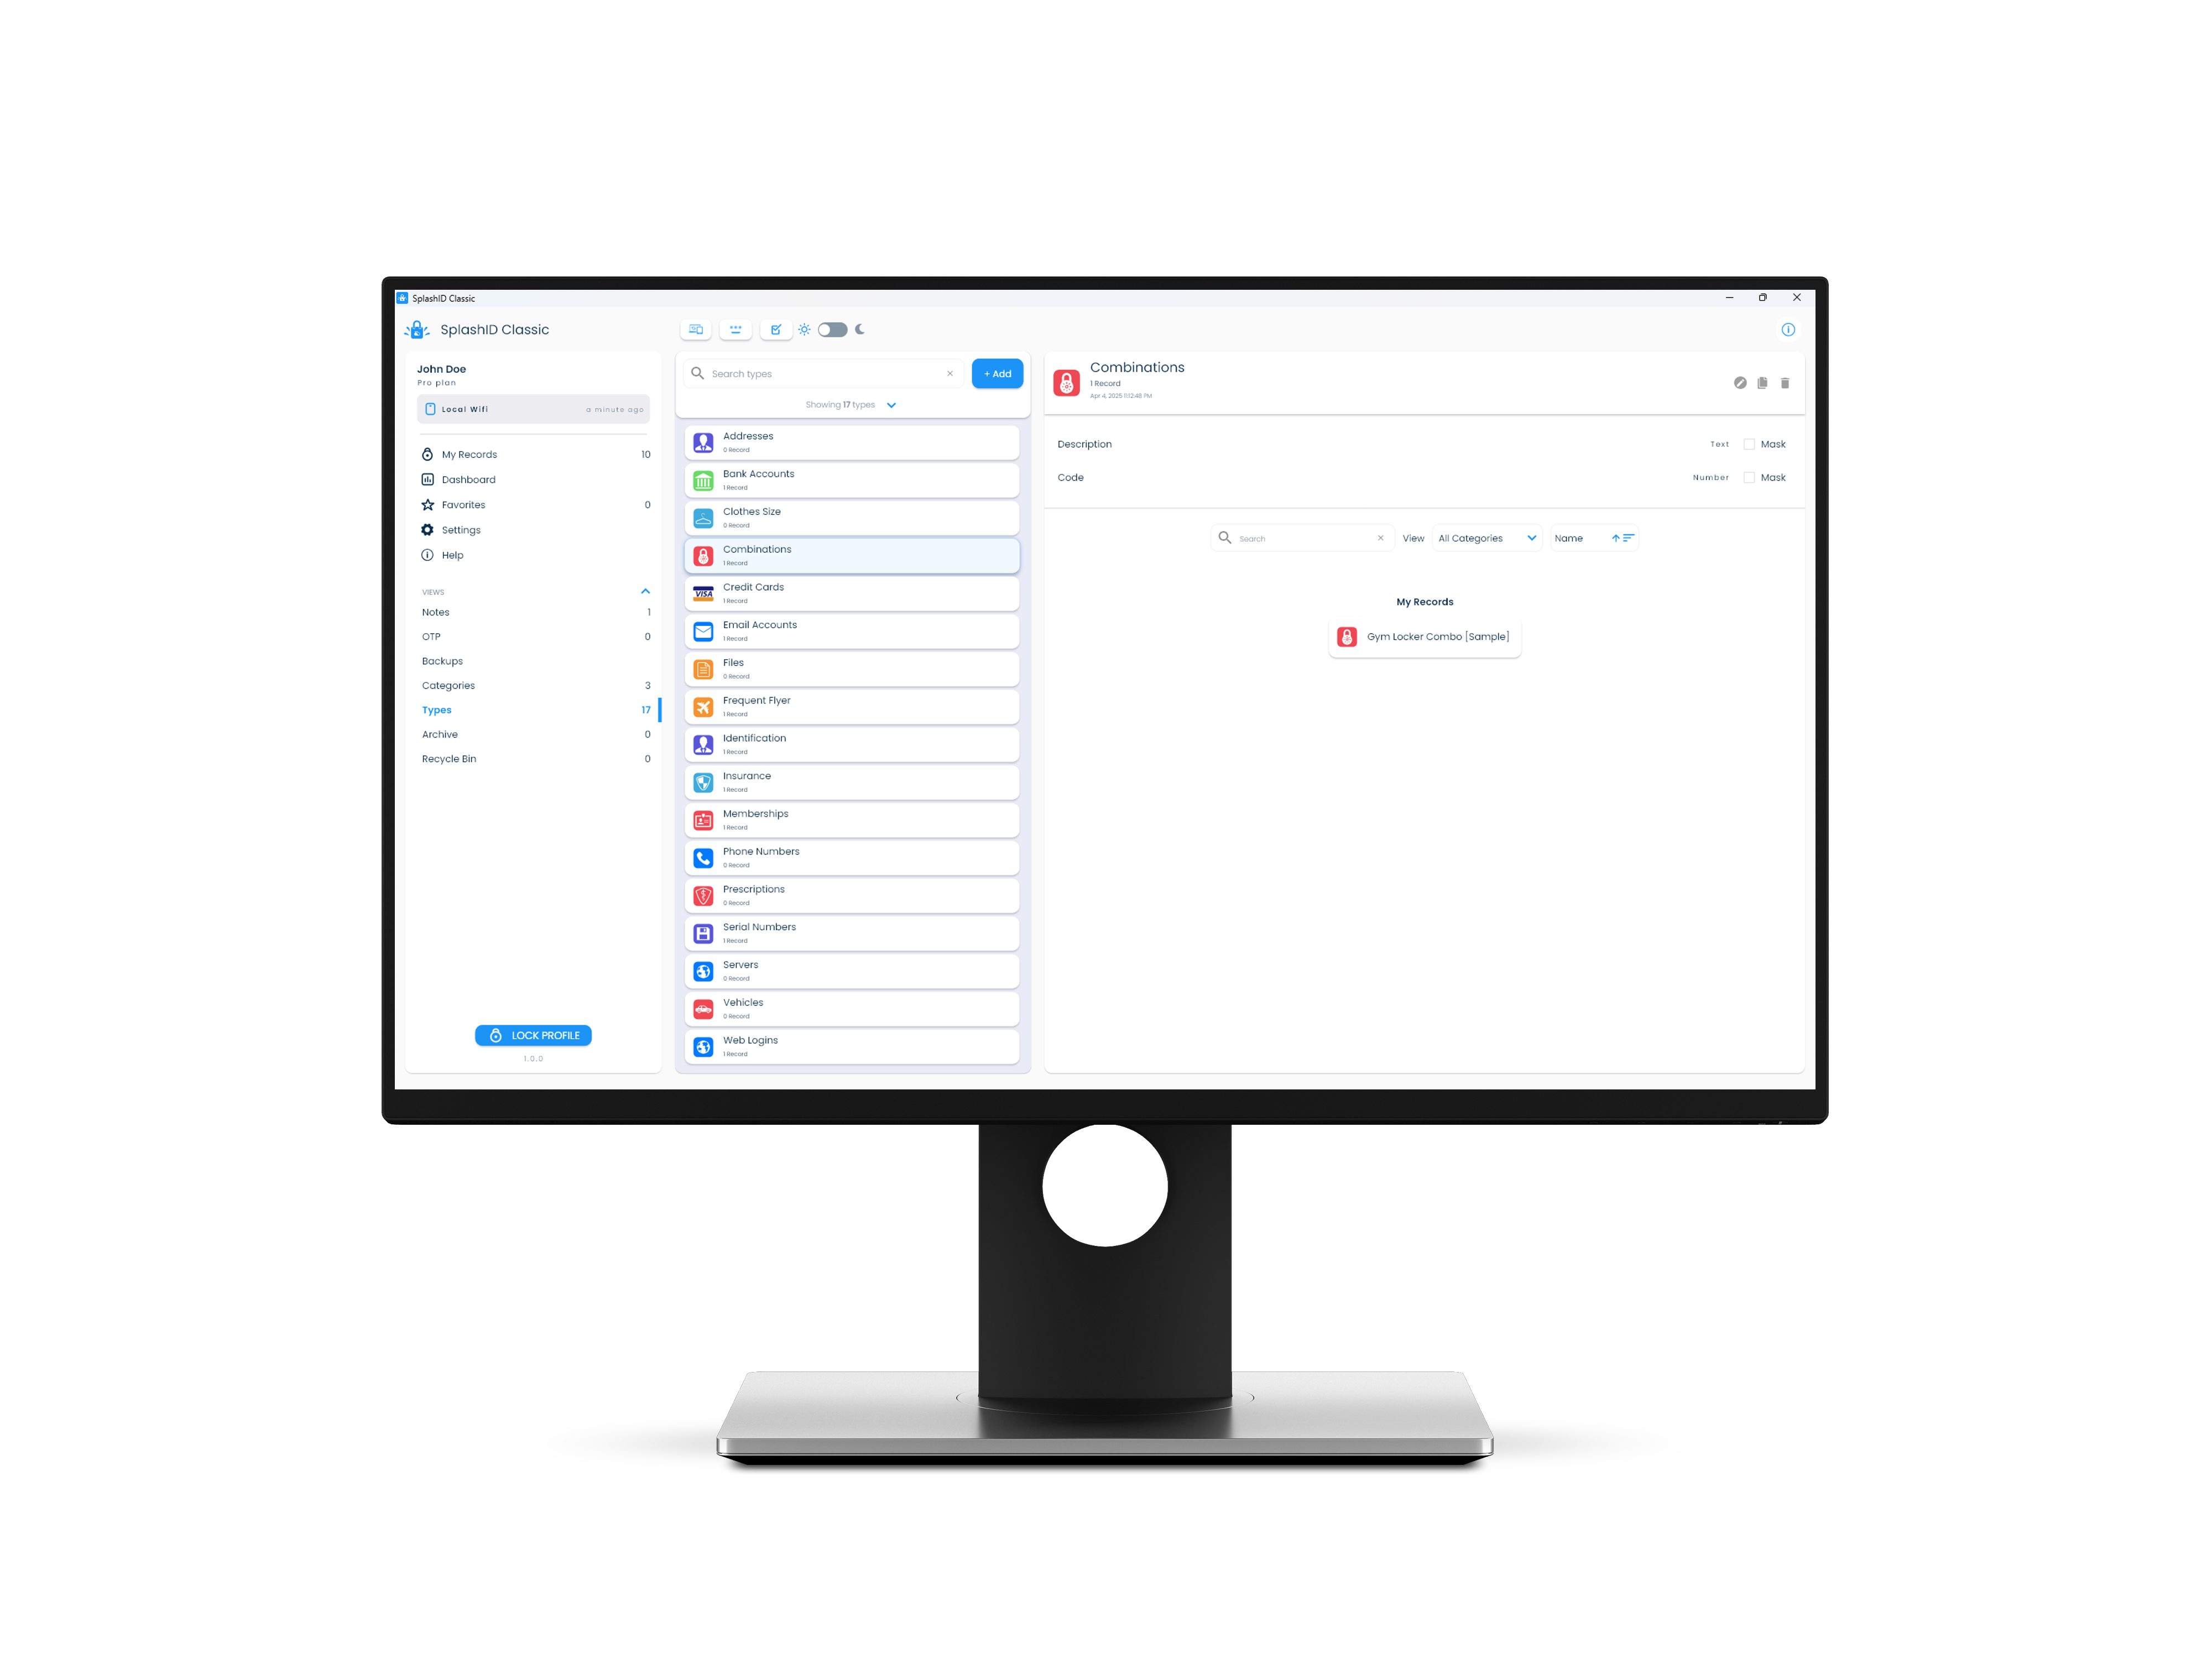
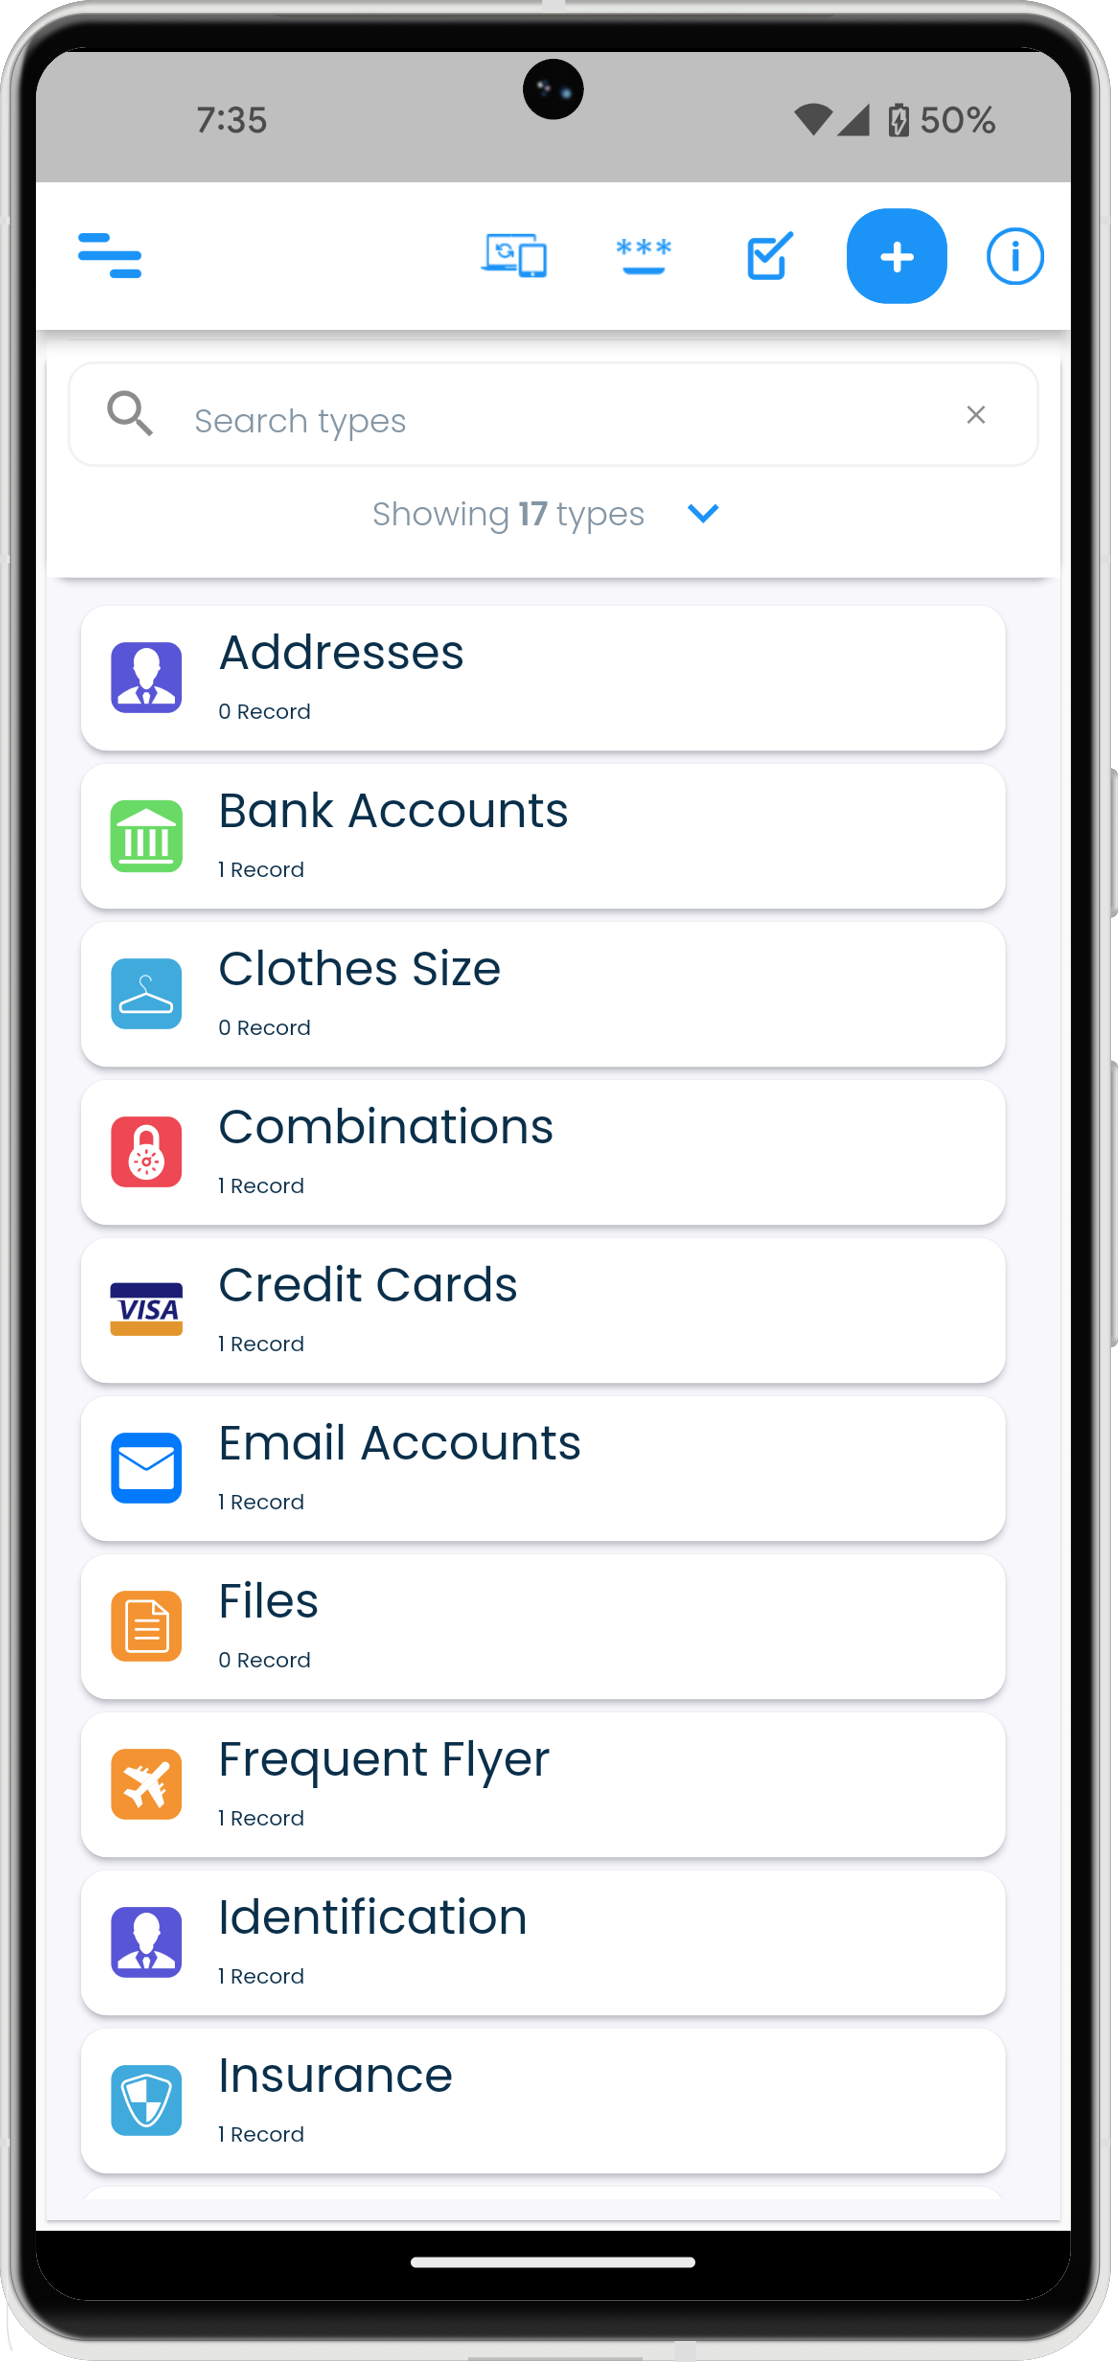
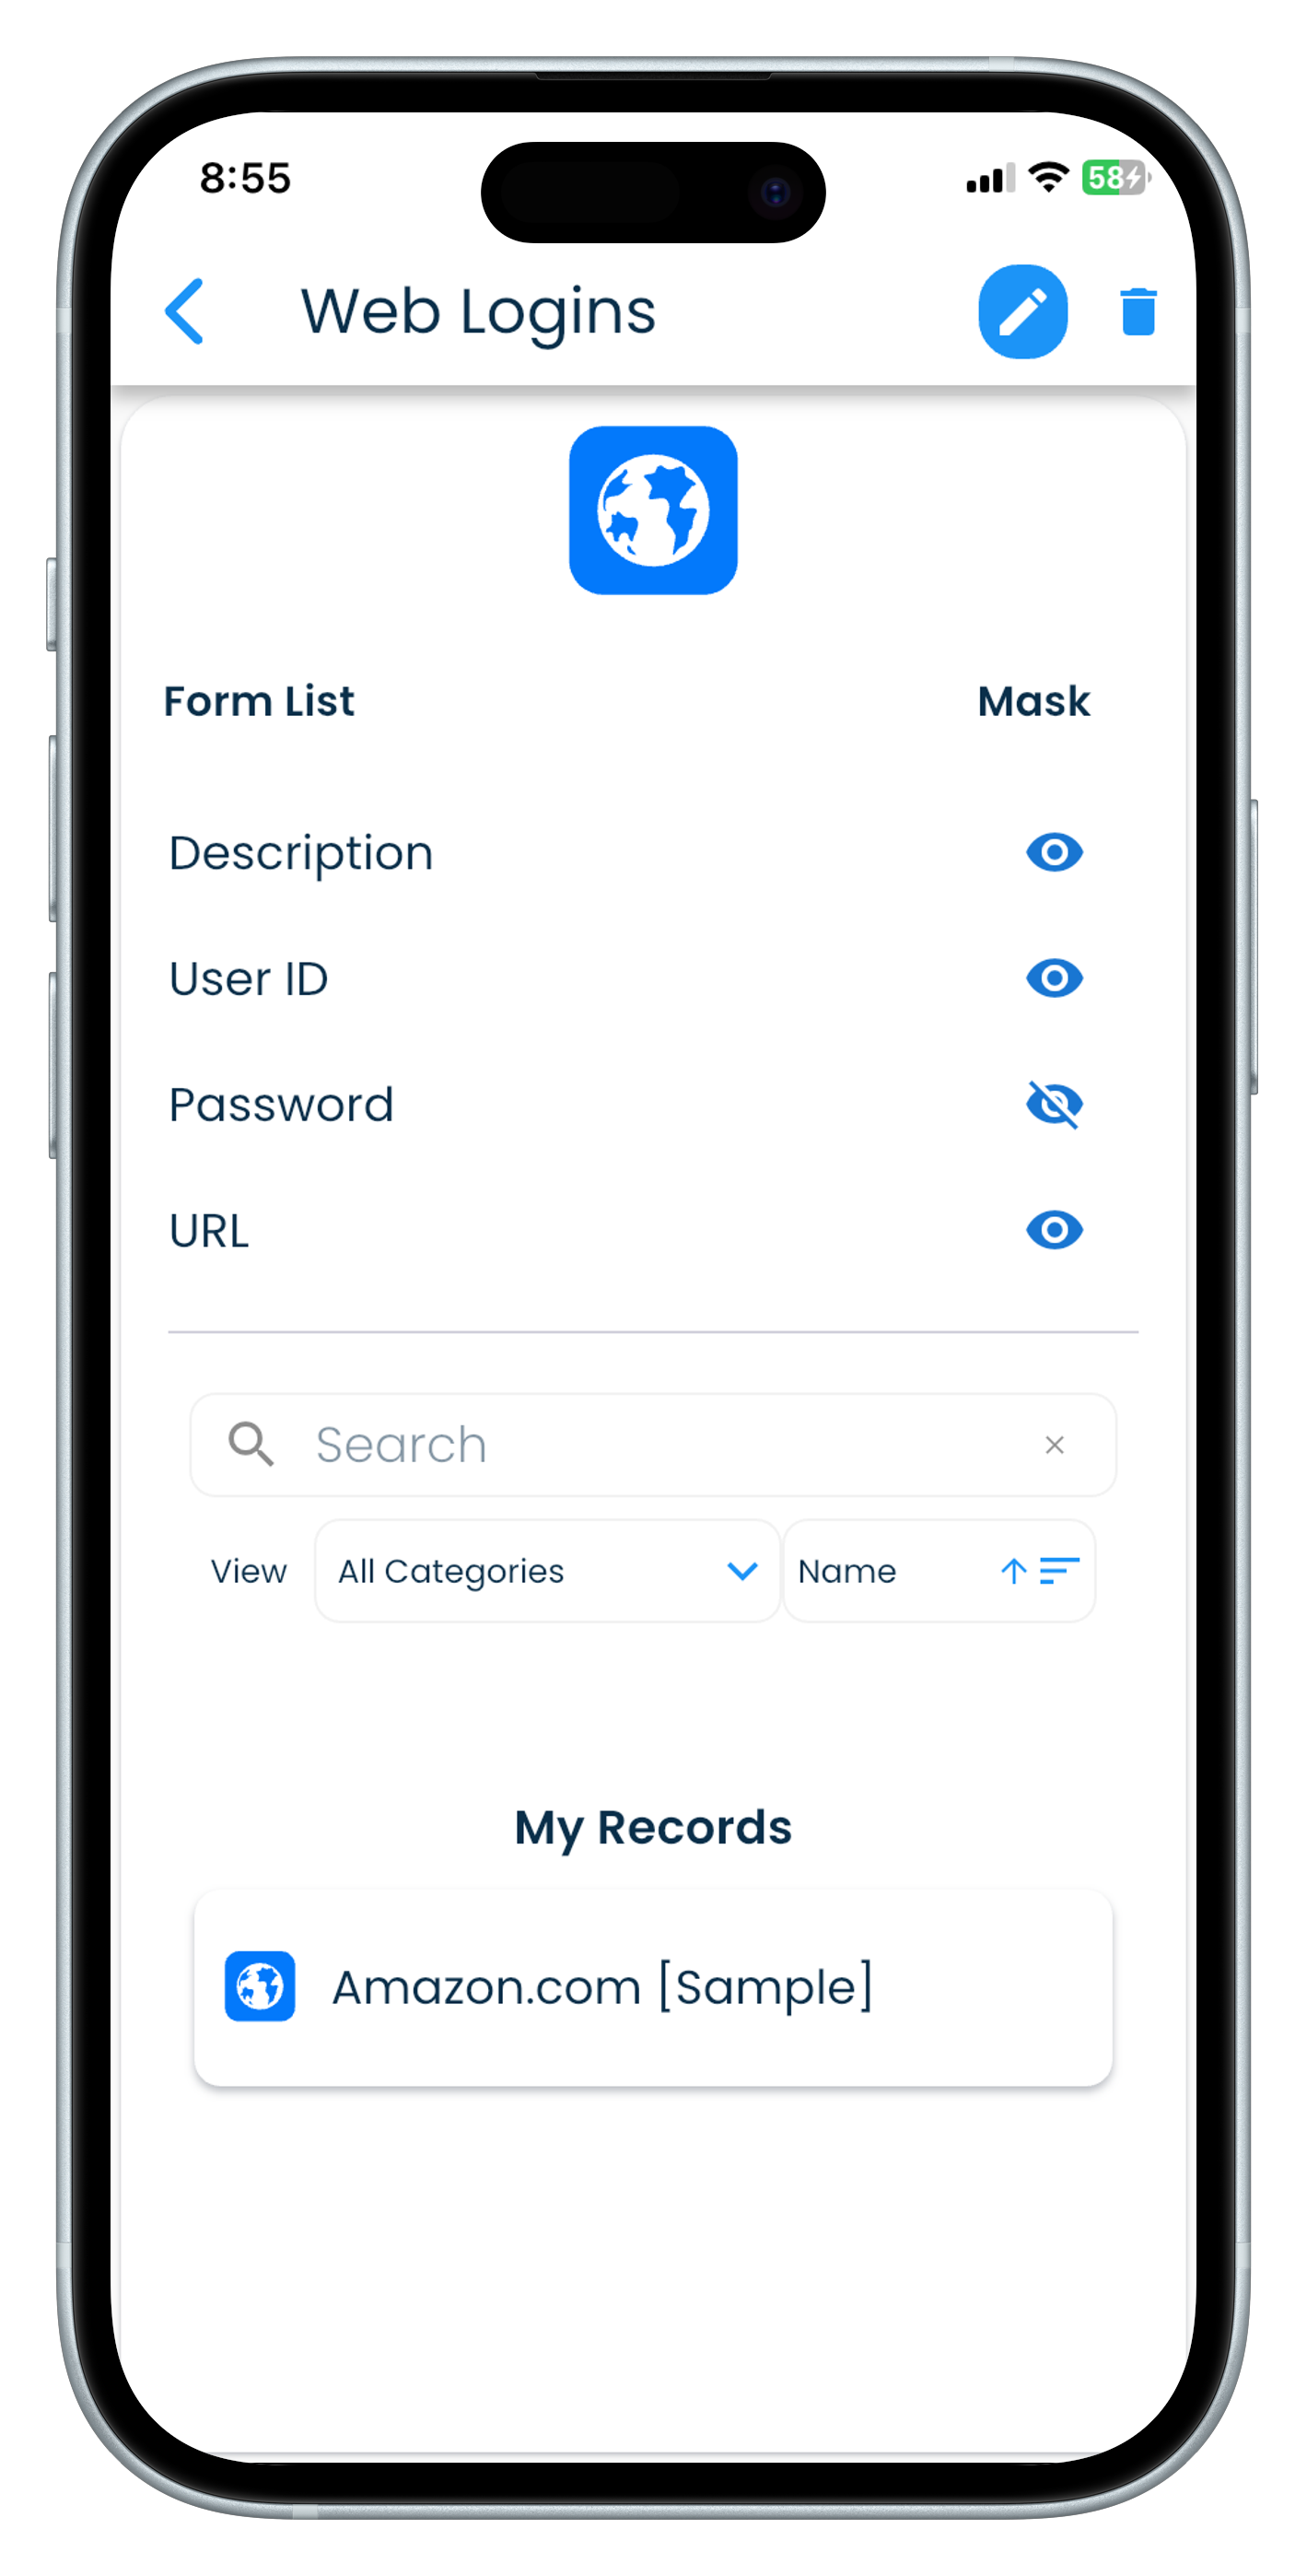
Types
Types can be used to indicate the purpose of a record. Types can also be thought of as record templates used at the time of the record creation.
| Mac | Windows |
|---|---|
 |
 |
| Android | iPhone |
|---|---|
  |
  |
| iPad |
|---|
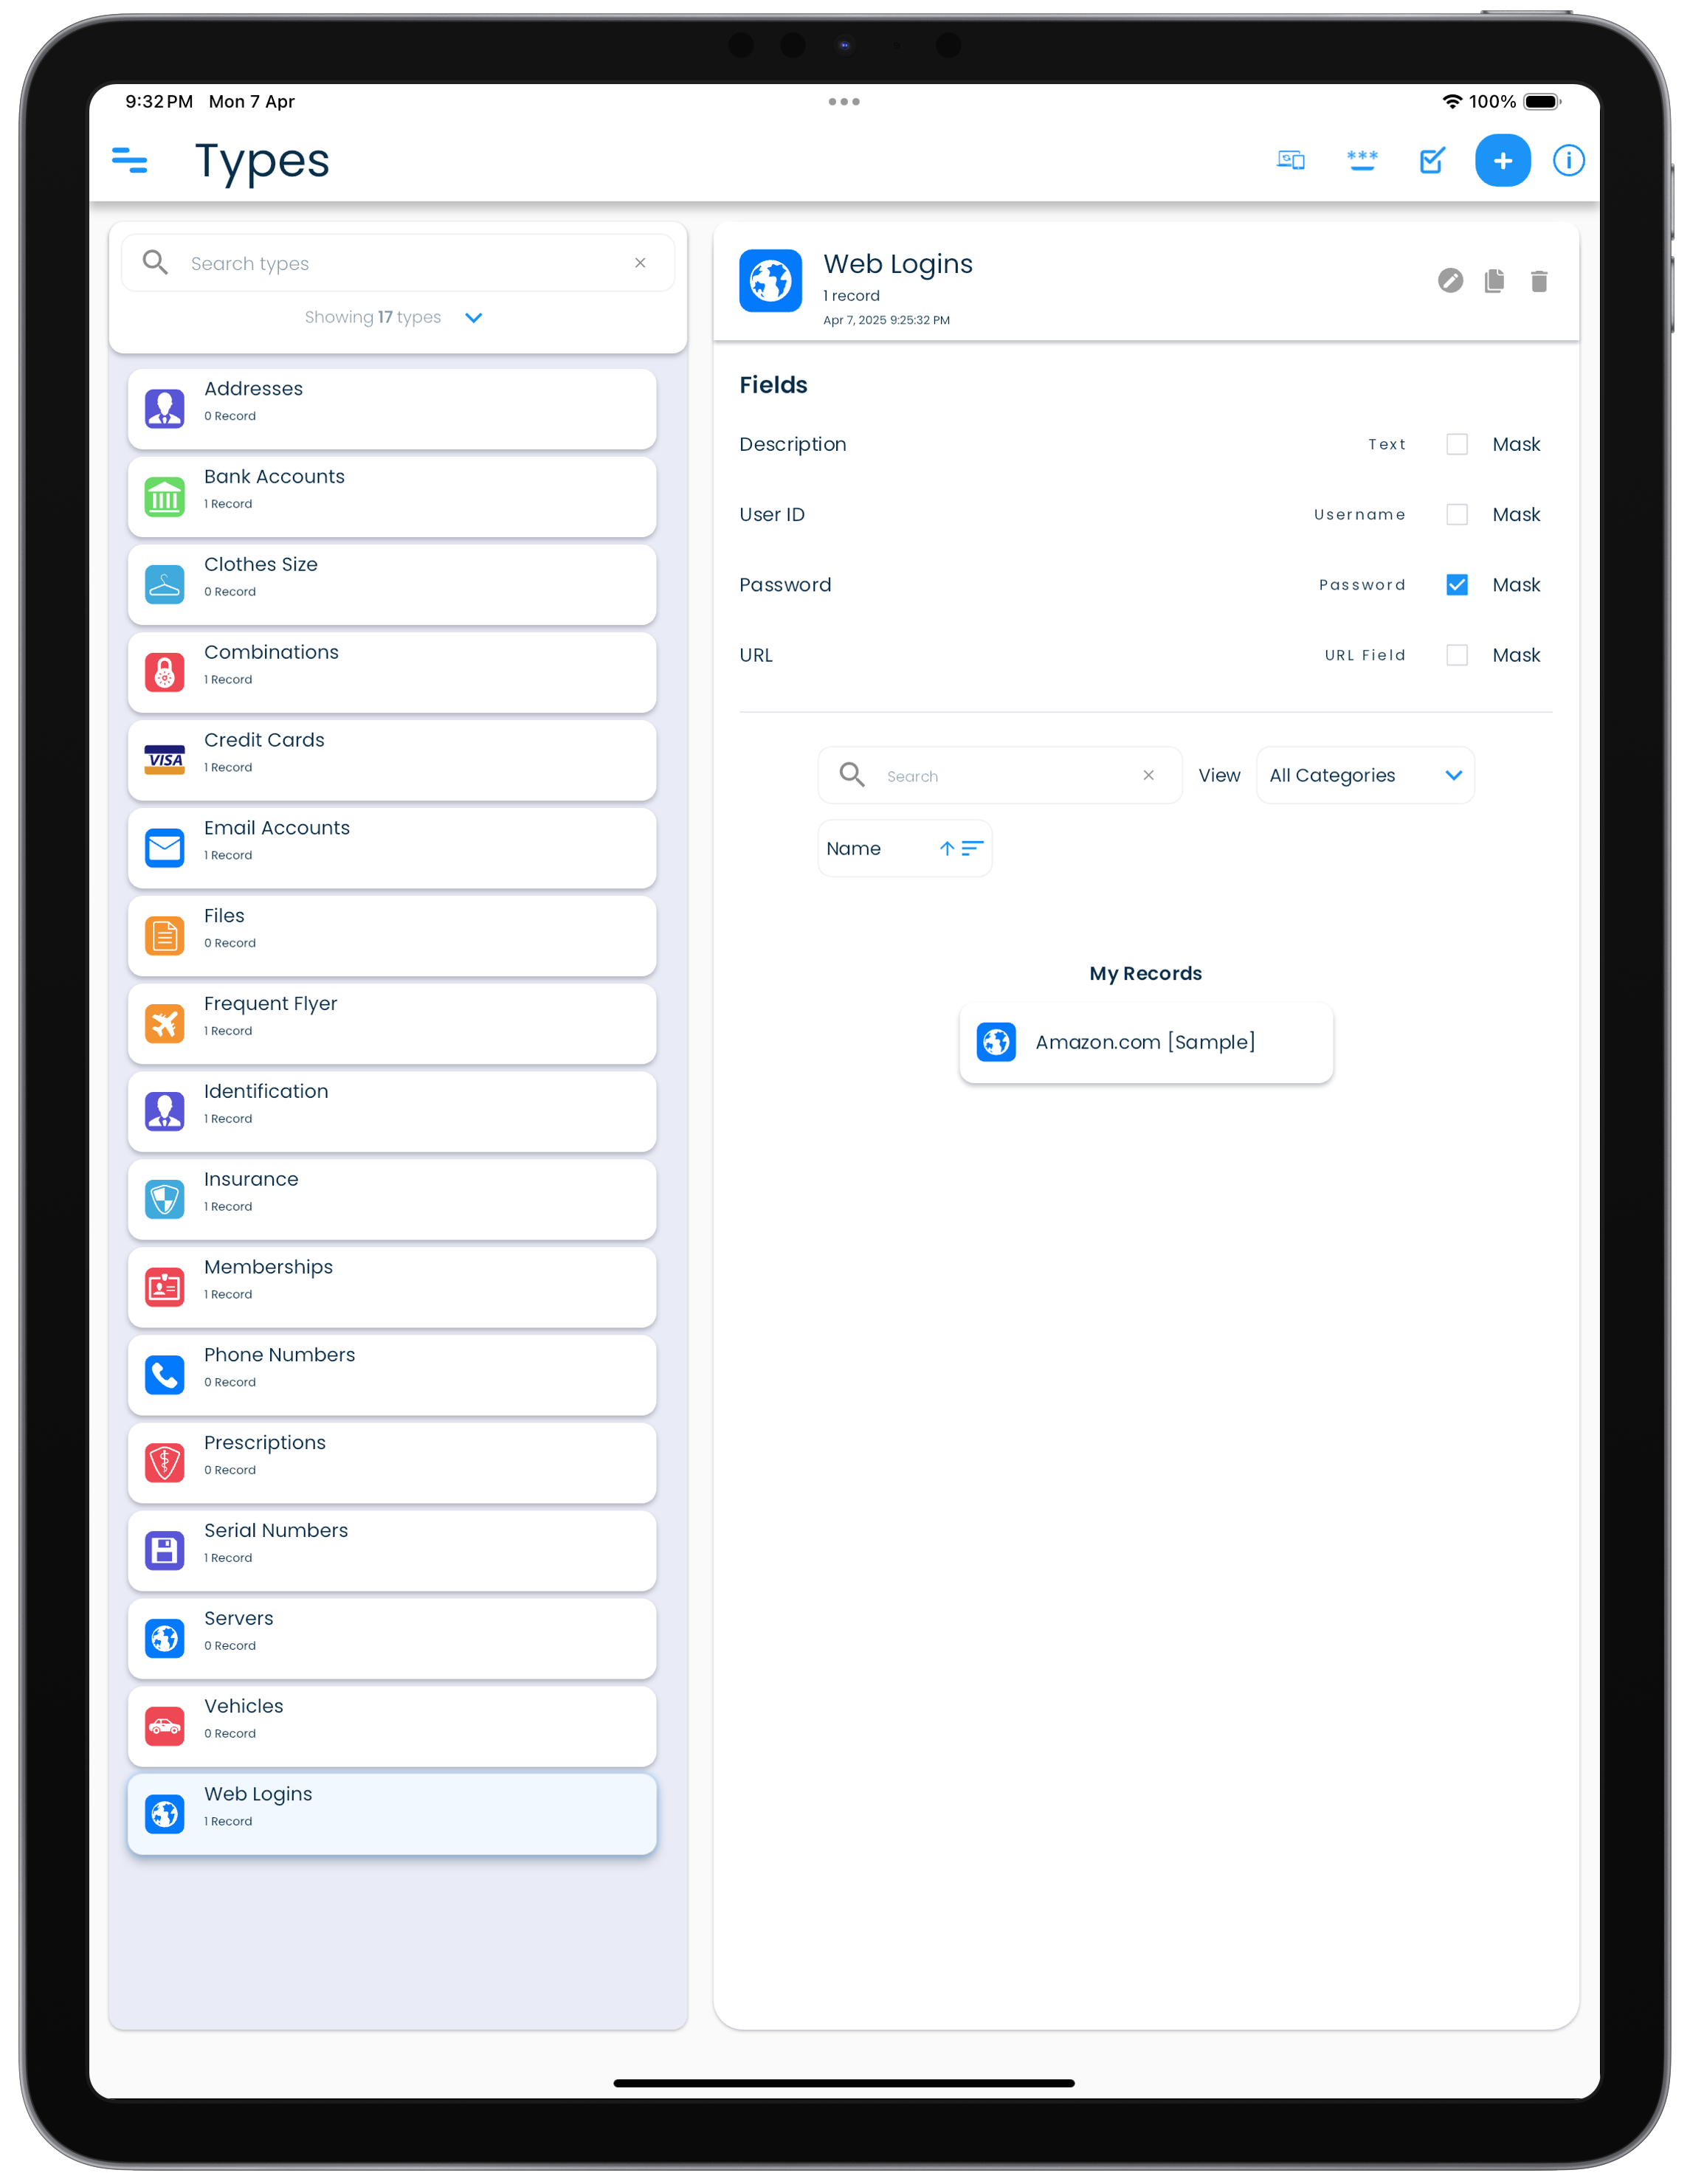 |
Each type has a predefined set of fields that are used to populate a record when a record is being created for the first time.
For existing records, subsequently changing the type of the record will redefine its purpose, but will not change the fields that were already populated in the record with the fields from the previous type.
Changing type of a record does not change its fields
The fields in an existing record will not change when the type is changed during editing of the record.
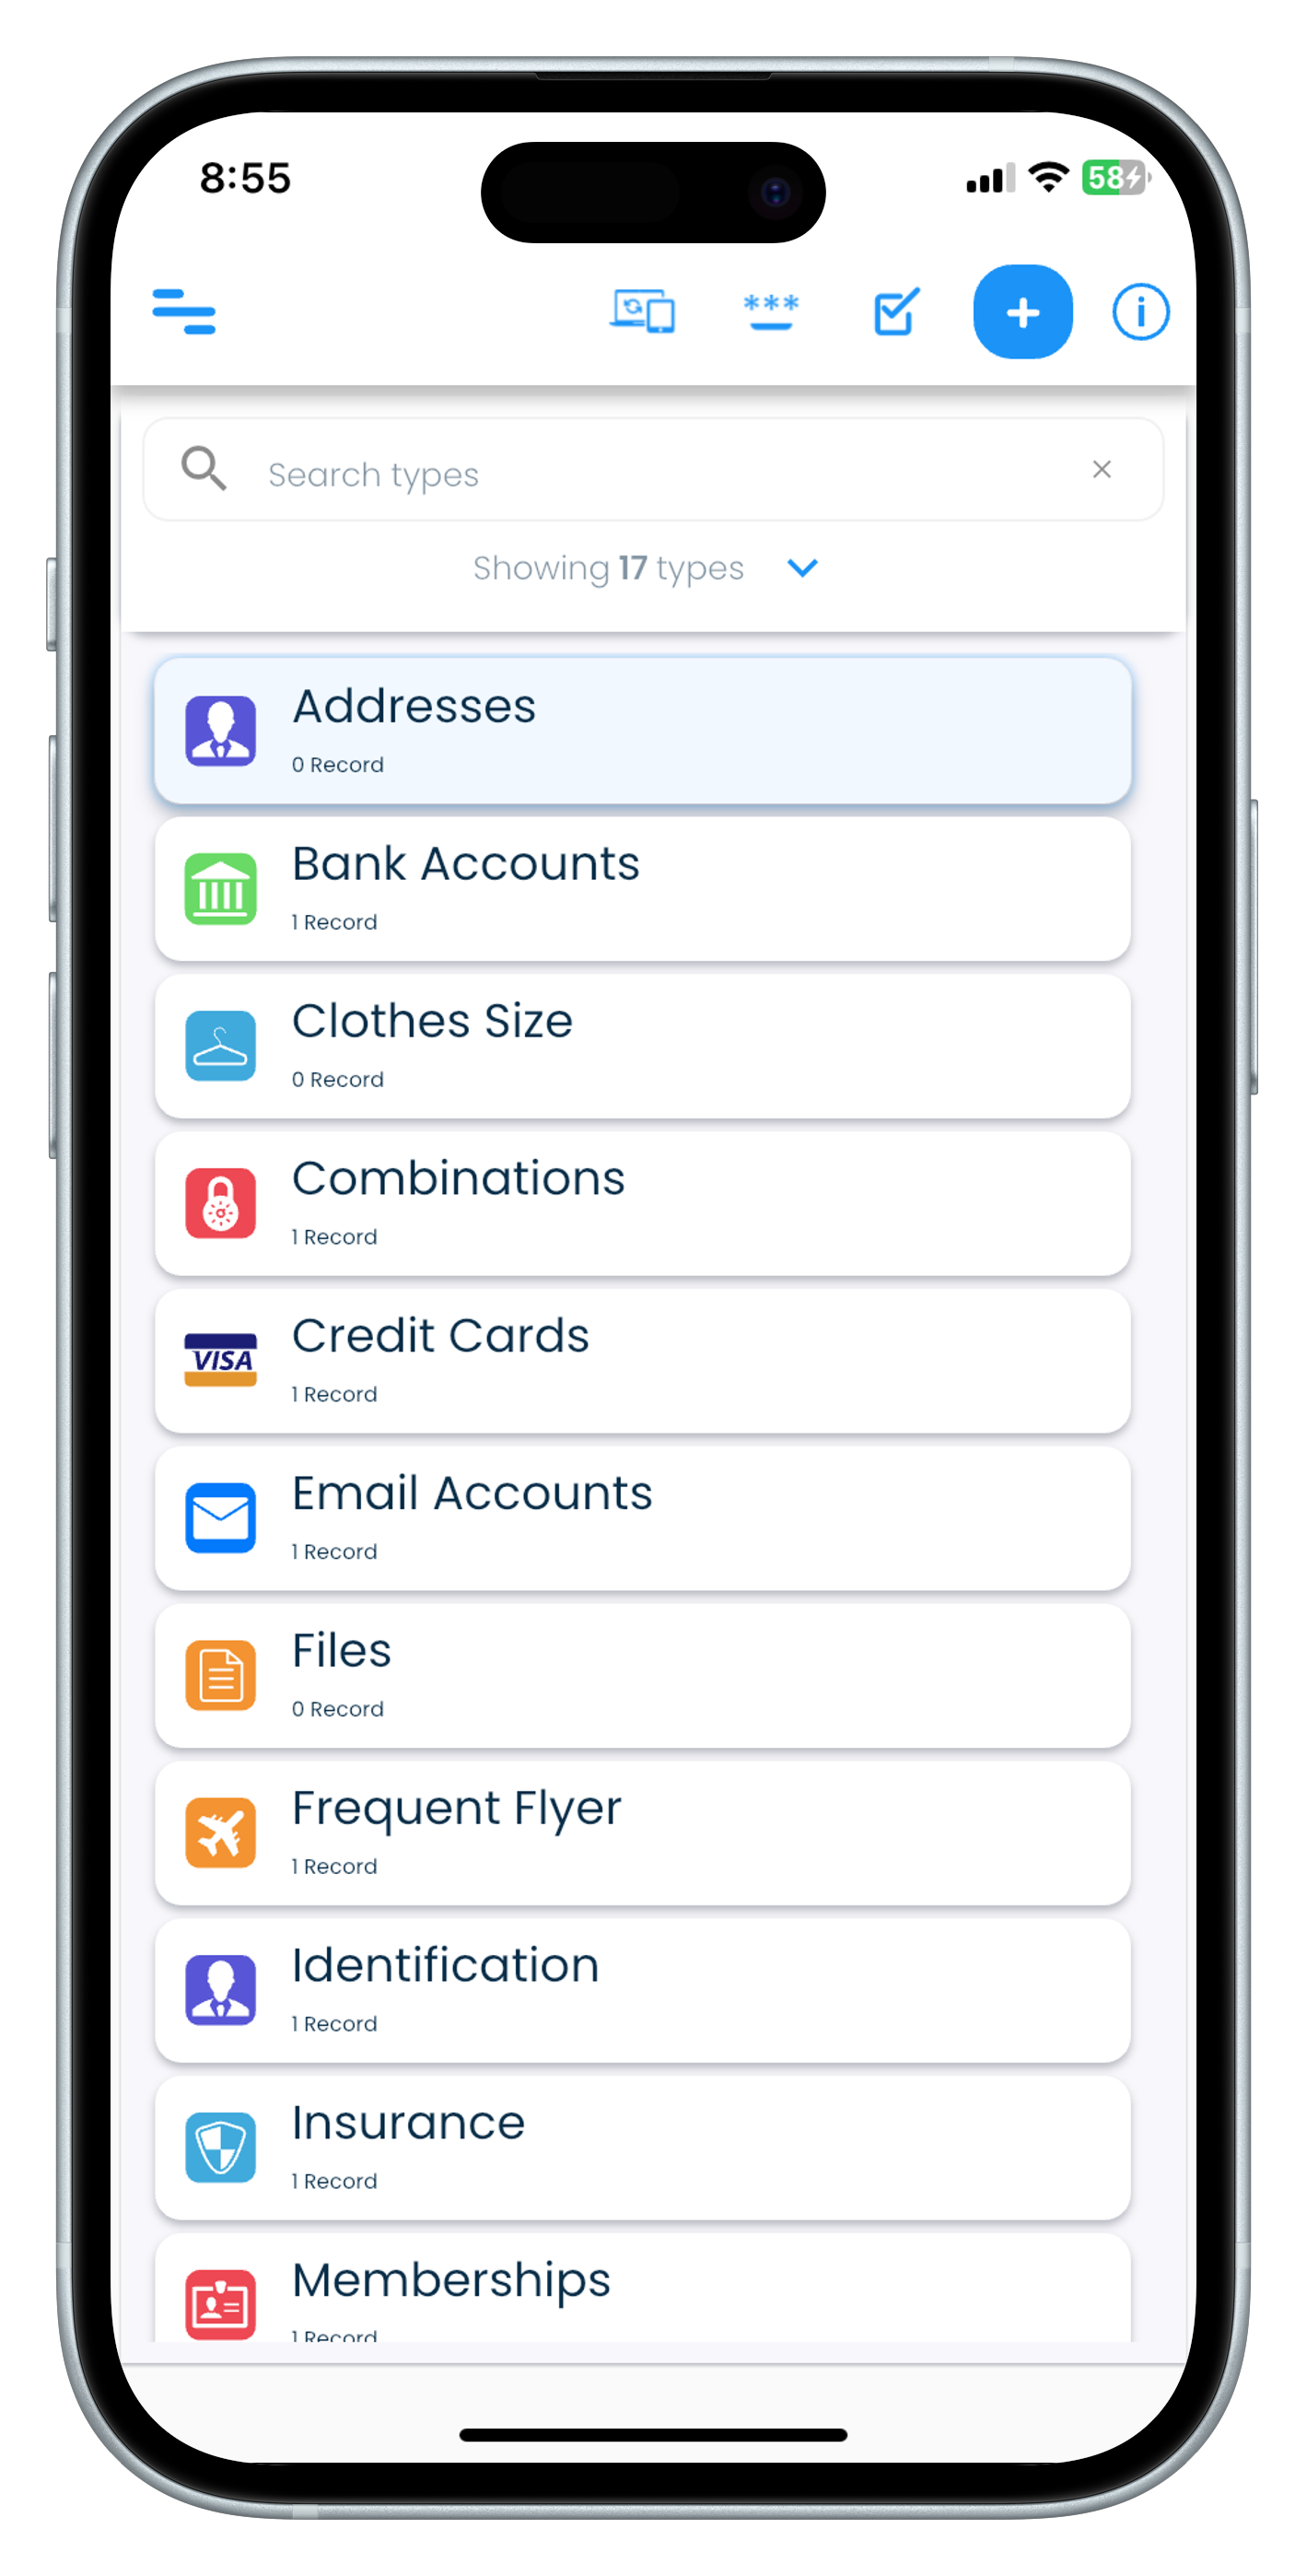
There are 17 predefined types available in SplashID.
- Addresses
- Bank Accounts
- Clothes Size
- Combinations
- Credit Cards
- Email Accounts
- Files
- Frequent Flyer
- Identification
- Insurance
- Memberships
- Phone Numbers
- Prescriptions
- Serial Numbers
- Servers
- Vehicles
- Web Logins
In addition a virtual type called Unfiled will be used to hold records with a type that is not yet available on the device.
Adding a type
You can create your own types if you want to. This can be done in the Types screen.
Click or tap on the Types item in the application navigation menu to go to the Types screen.
Modifying a type
An existing type can be renamed, or their fields changed. This can be done in the Types screen.
Click or tap on the Types item in the application navigation menu to go to the Types screen.
Deleting a type
Types can be deleted if they are not used in any of the records. This can be done in the Types screen.
Click or tap on the Types item in the application navigation menu to go to the Types screen.
WiFi sync and type deletion
For WiFi sync users, it is recommended that all the devices are synced properly before the deletion of a type is attempted on a device. This will prevent the type from being deleted if it was assigned to records on other devices, but was not synced on the current device where it was being deleted from.
Attachments
Attachments are not supported in SplashID Classic.
Icons
Icons help you visually identify records and distinguish between them.
A record gets an icon from the type it is created from initially. Later, if required, you can change the icon in a record.
Changing an icon in a record
To change the icon on a record you need to open the icon editor as explained below.
- Open a record for editing.
- Click or tap on the icon displayed on the left of the record name in the details header to show the icon editor.
- Filter out the available icons by using some search words, or scroll and select the desired icon from the list of icons displayed.
- The chosen icon will be displayed in the bottom left part of the icon editor screen.
- Click or tap on Save to set the icon in the record.
Using your own icons
SplashID Classic does not support uploading your own icons for use in the records.
Record views
Records created by you can be accessed in different ways. These views can be accessed from the application menu.
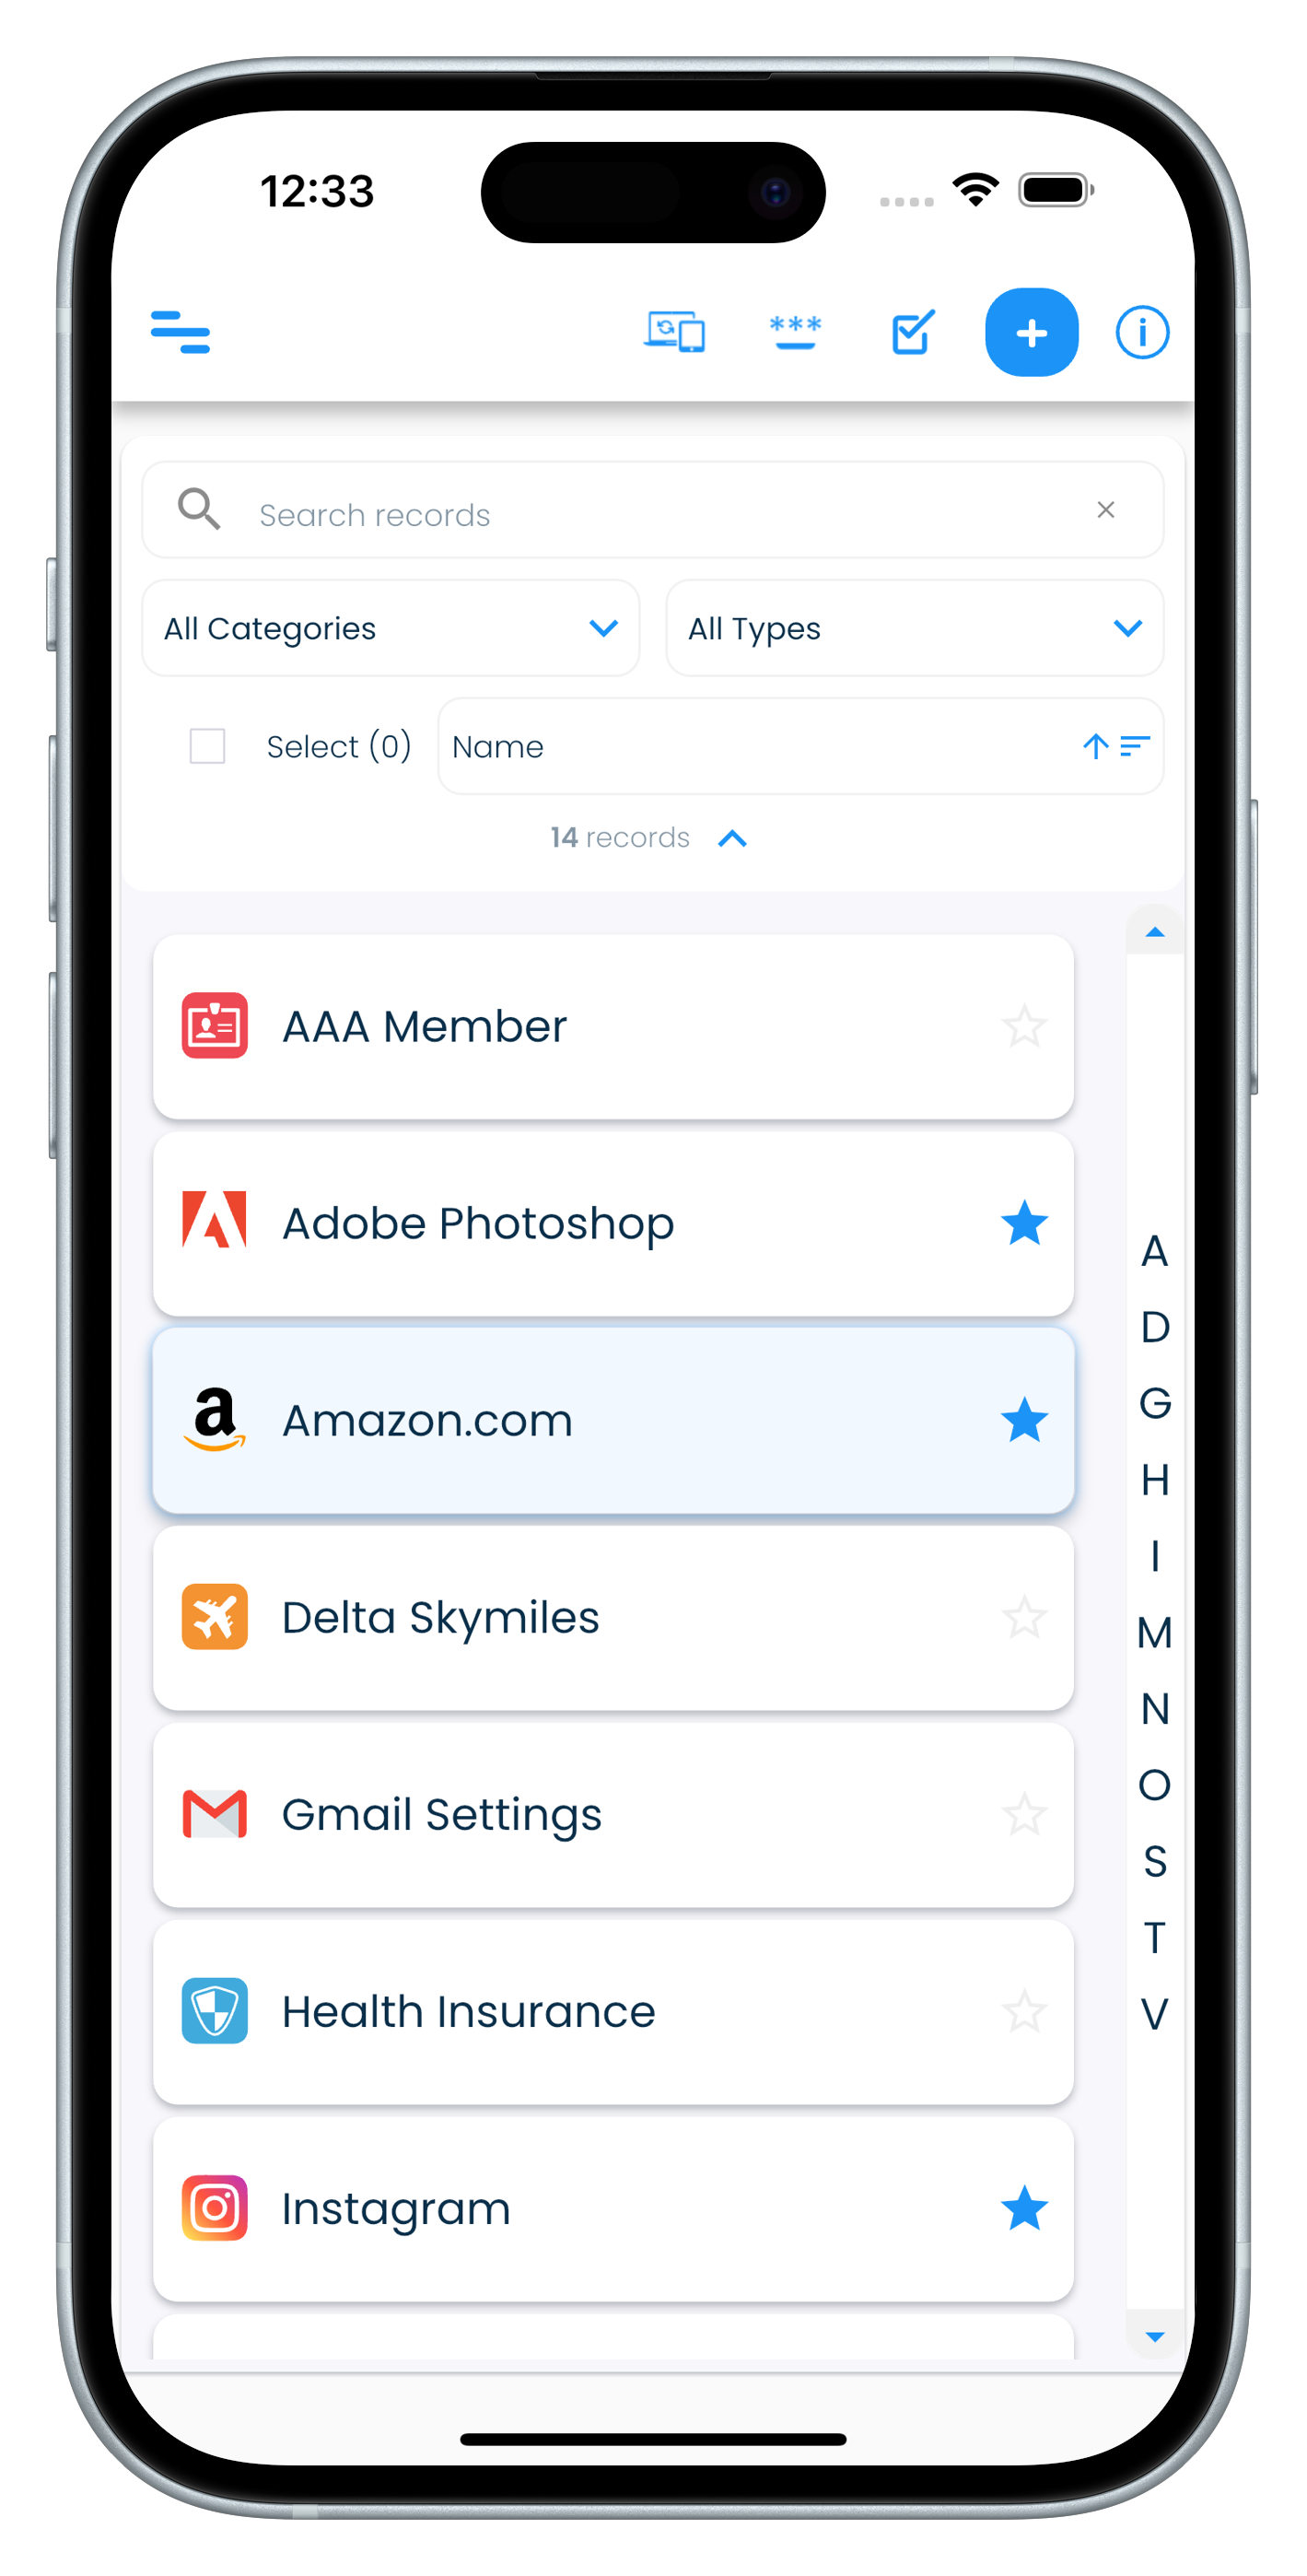
My Records
All your records can be viewed in the My Records view.
These records can be searched, filtered and sorted as per your needs.
| Mac | Windows |
|---|---|
|
|
| Android | iPhone |
|---|---|
| |
|
| iPad |
|---|
|
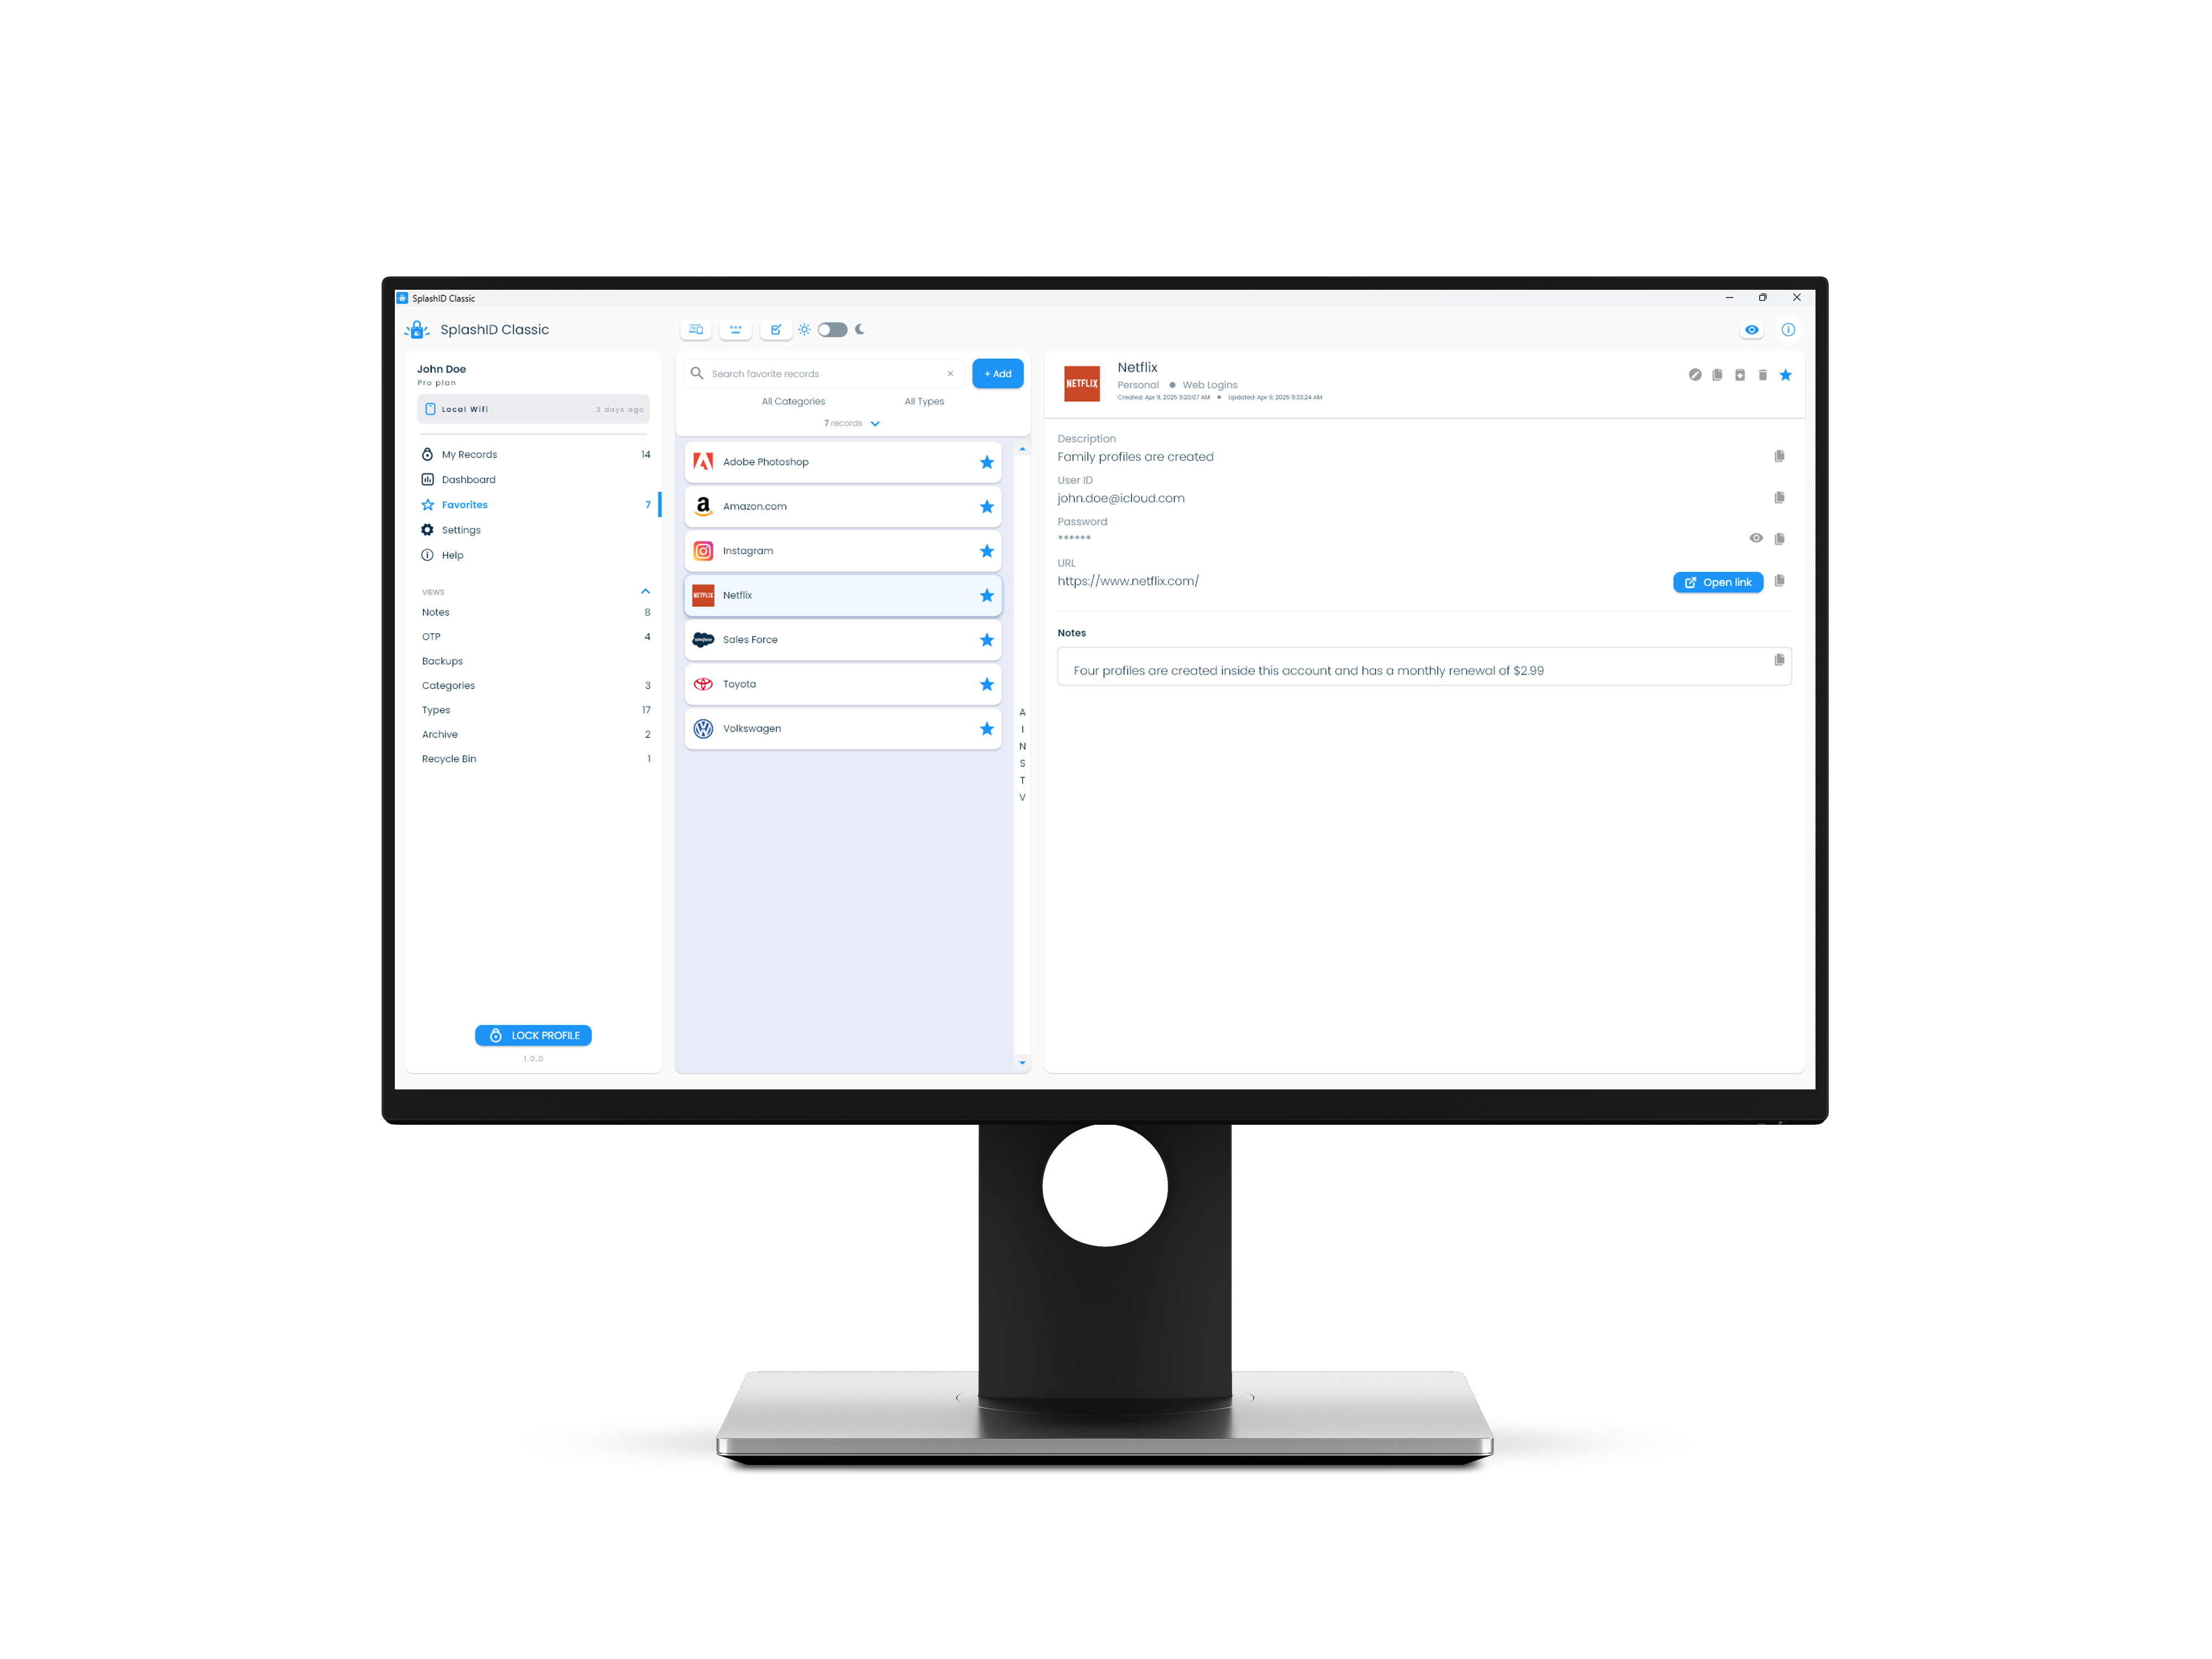
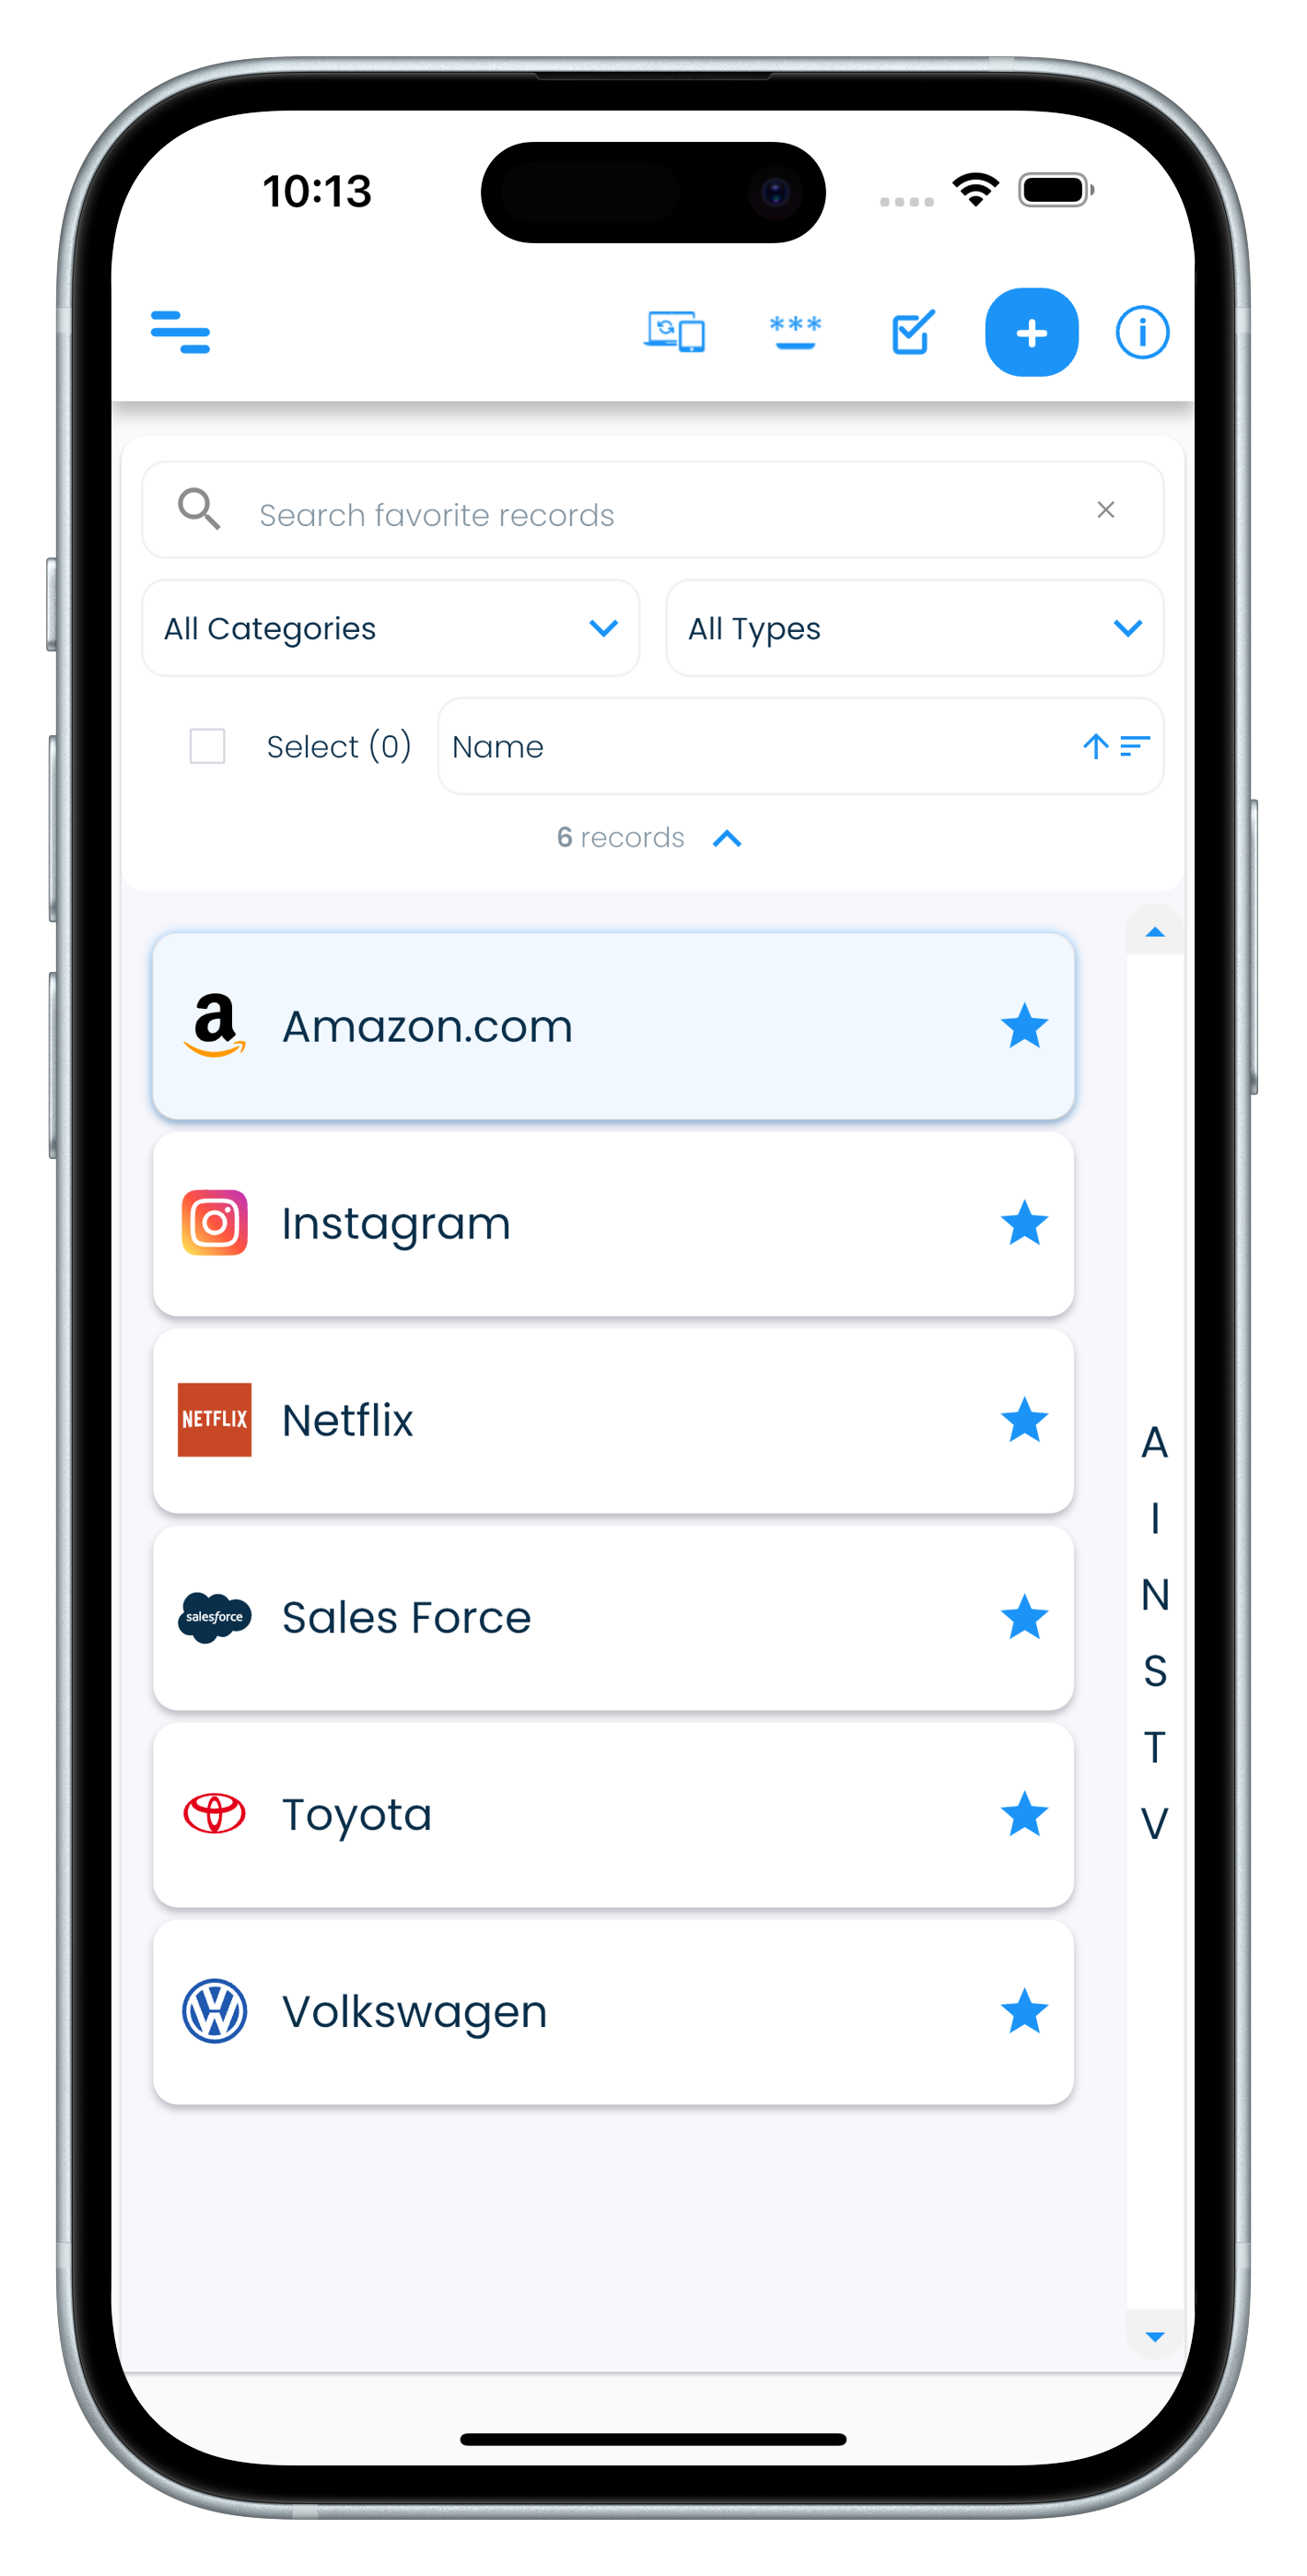
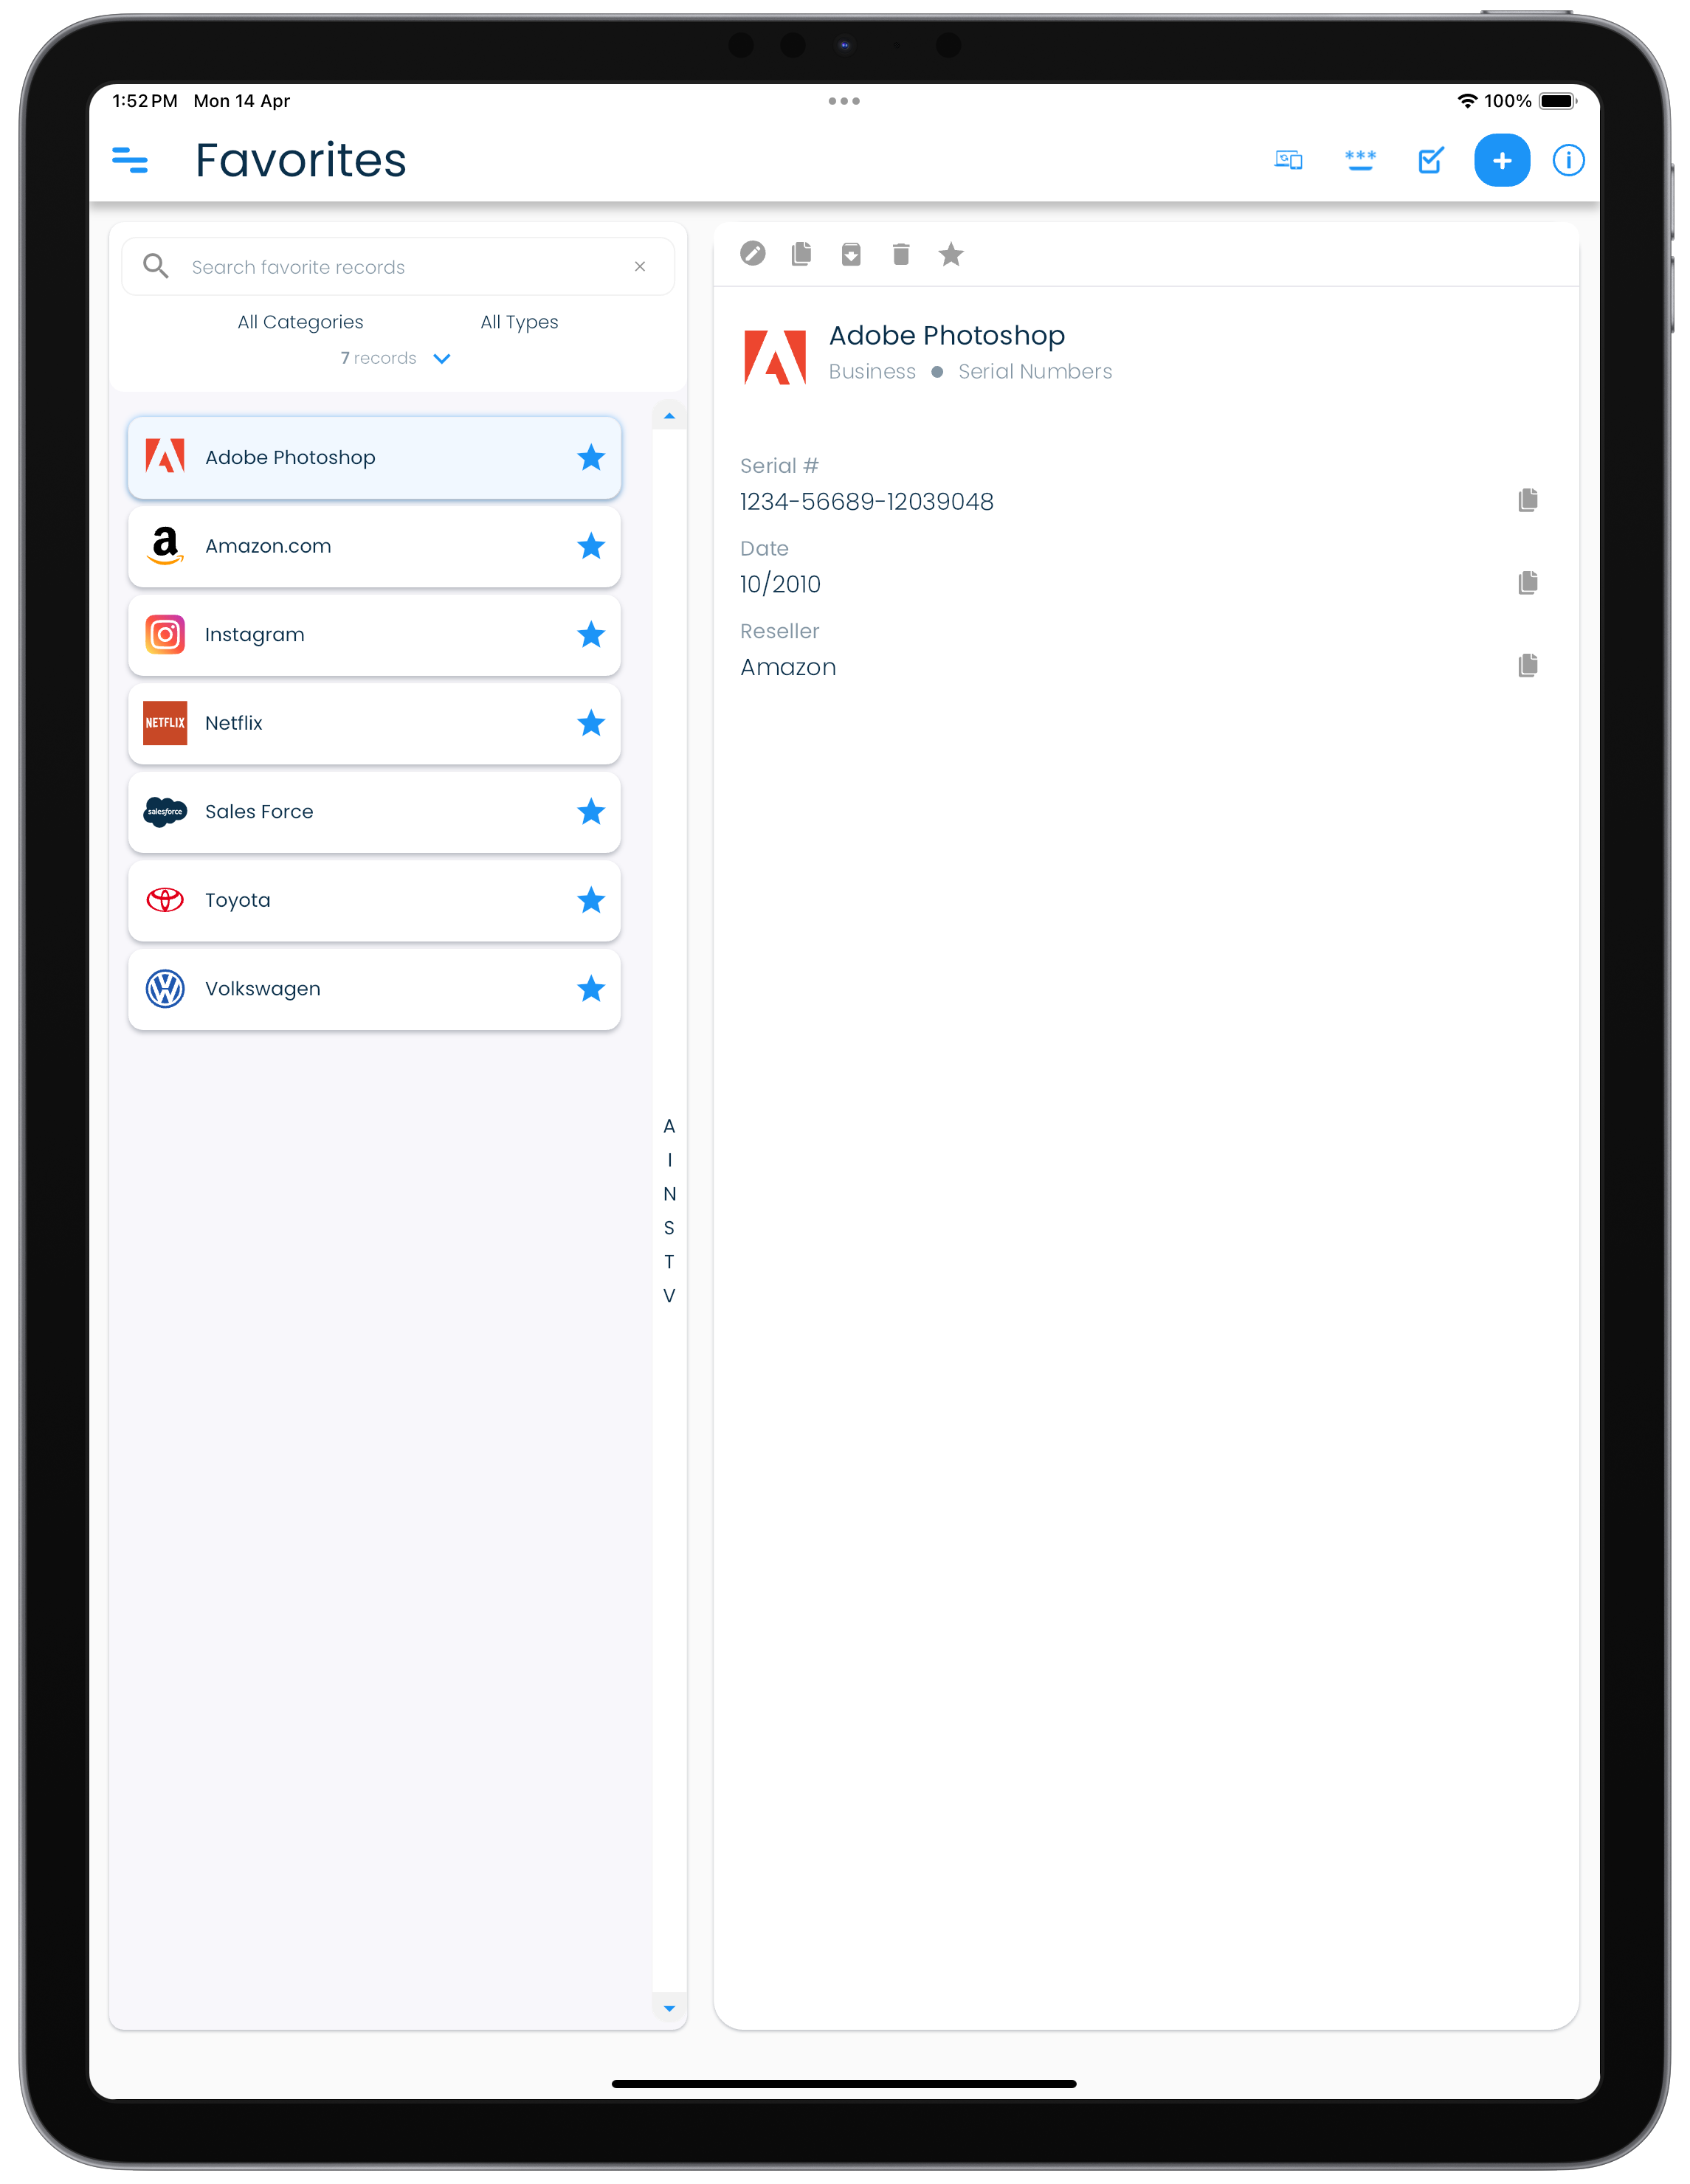
Favorites
The Favorites view shows all your records that you have marked as a favorite in one place.
| Mac | Windows |
|---|---|
 |
 |
| Android | iPhone |
|---|---|
 |
 |
| iPad |
|---|
 |
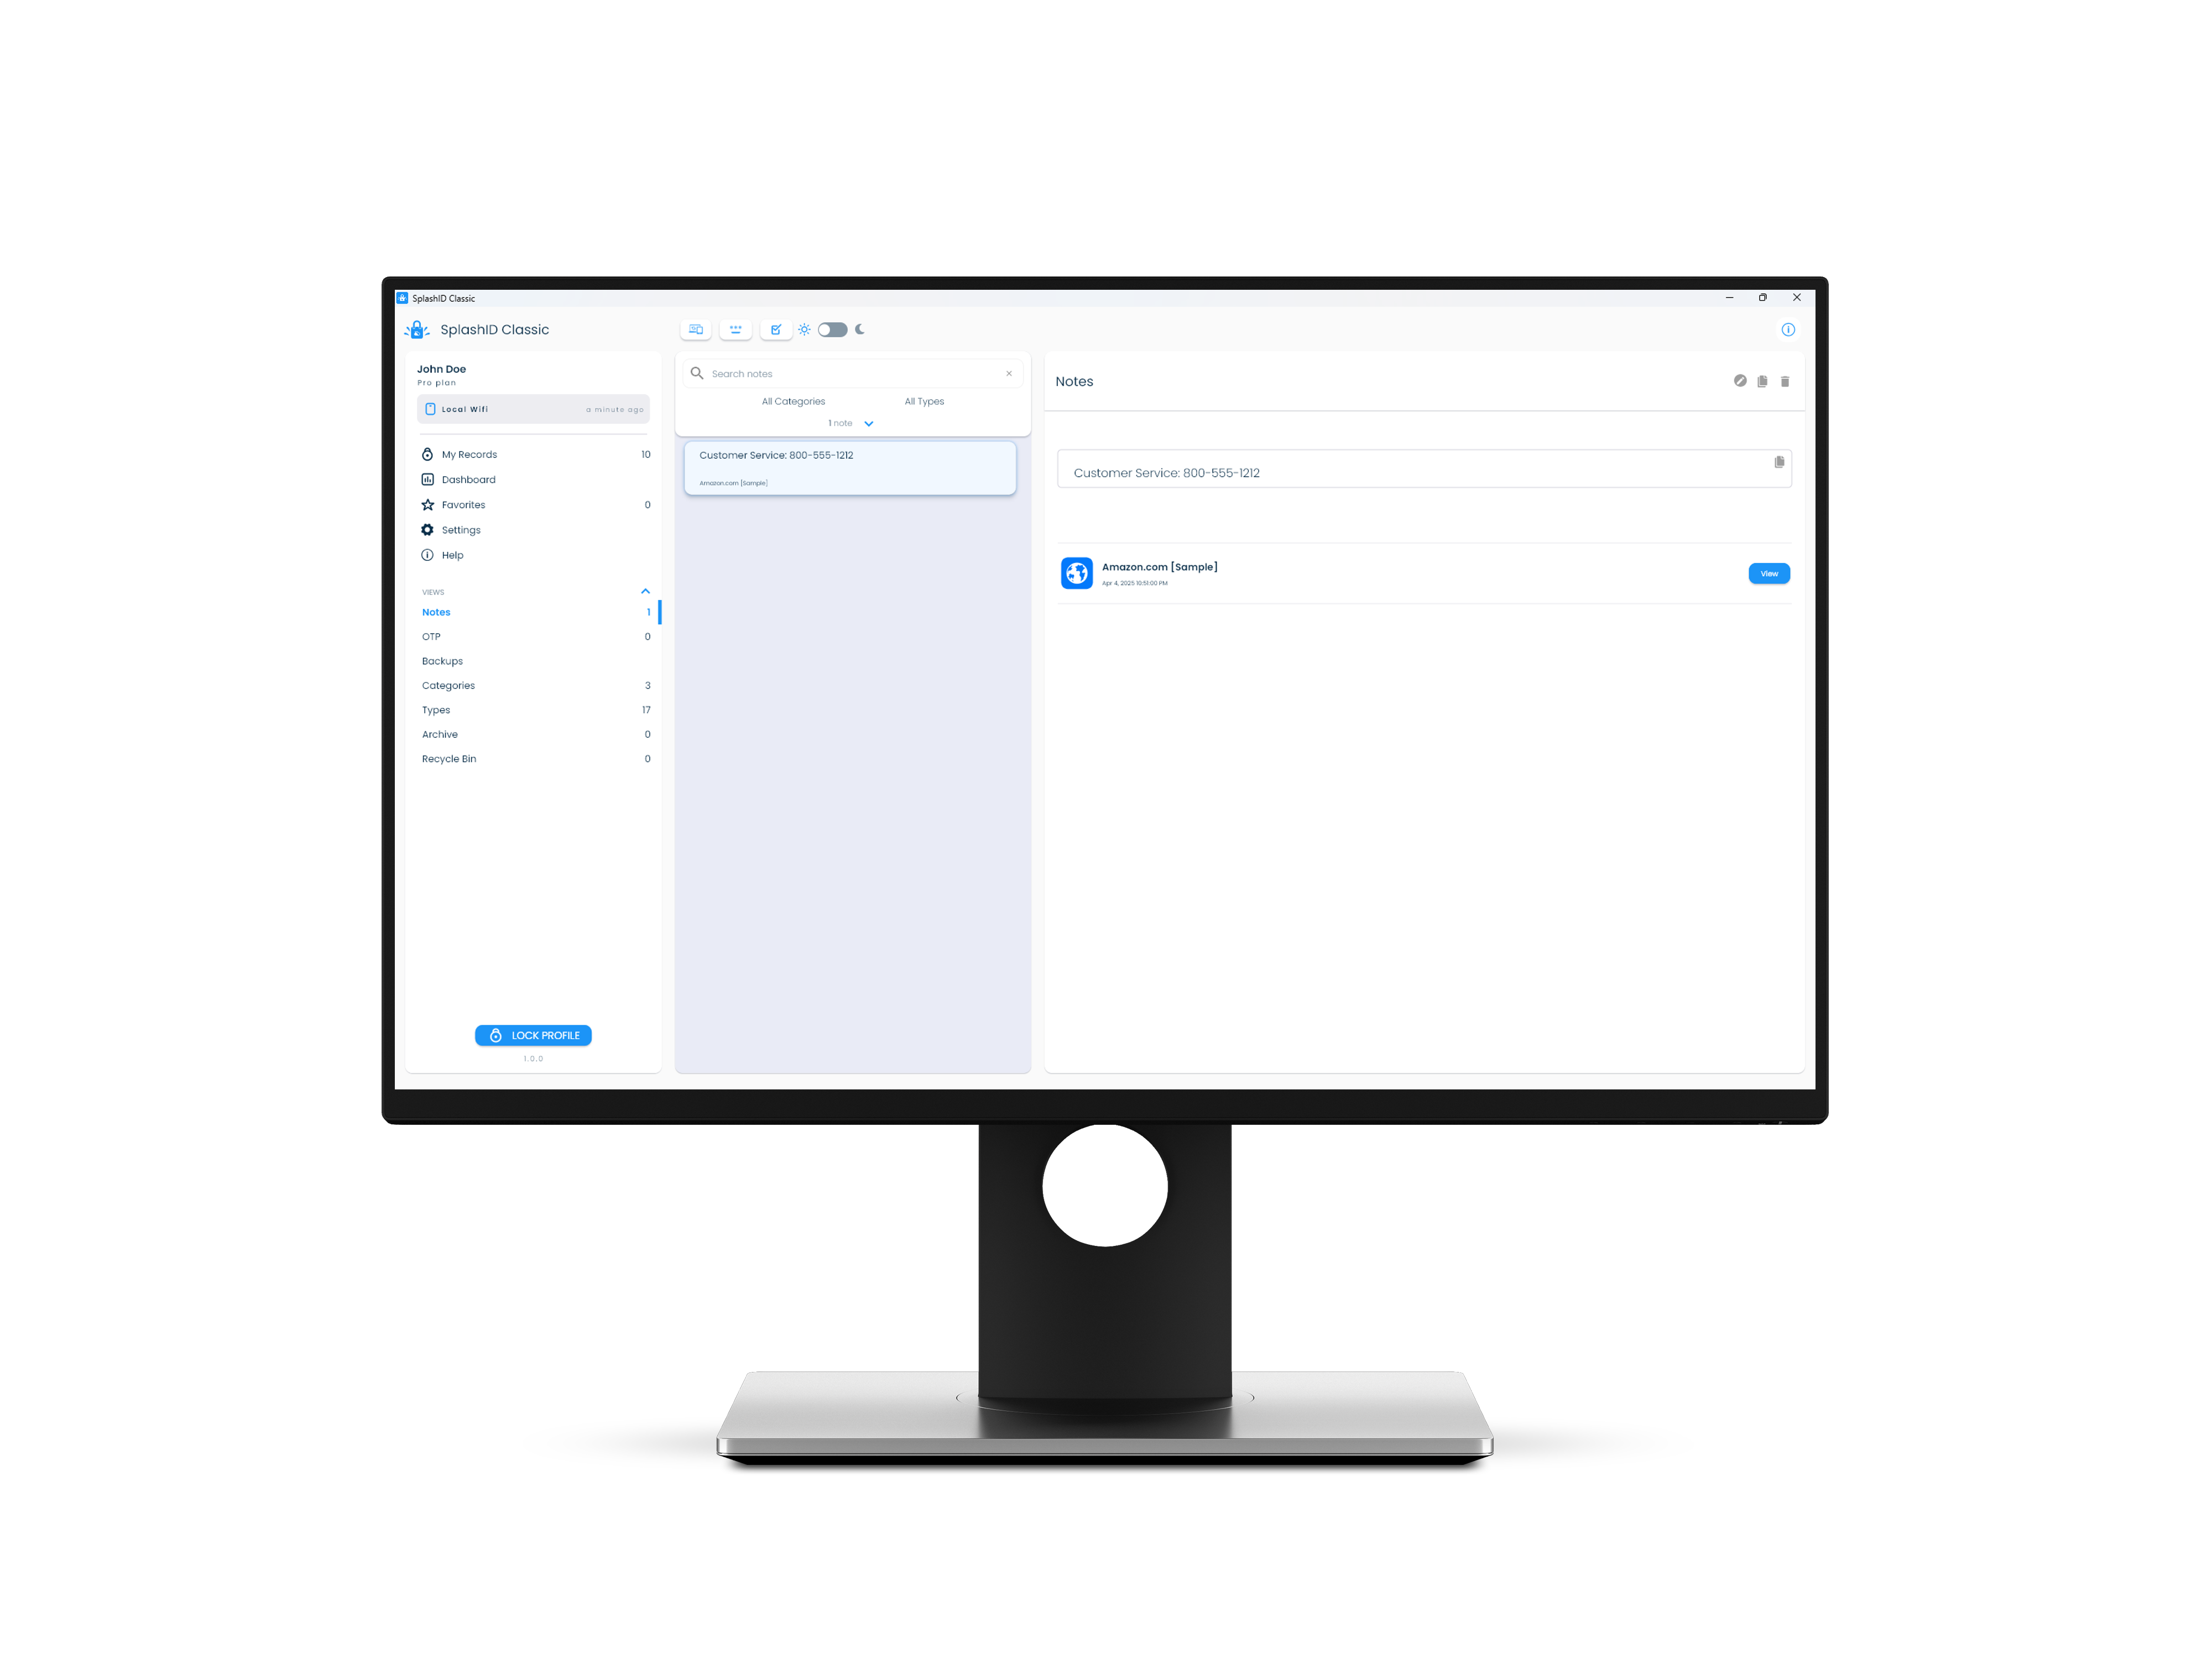
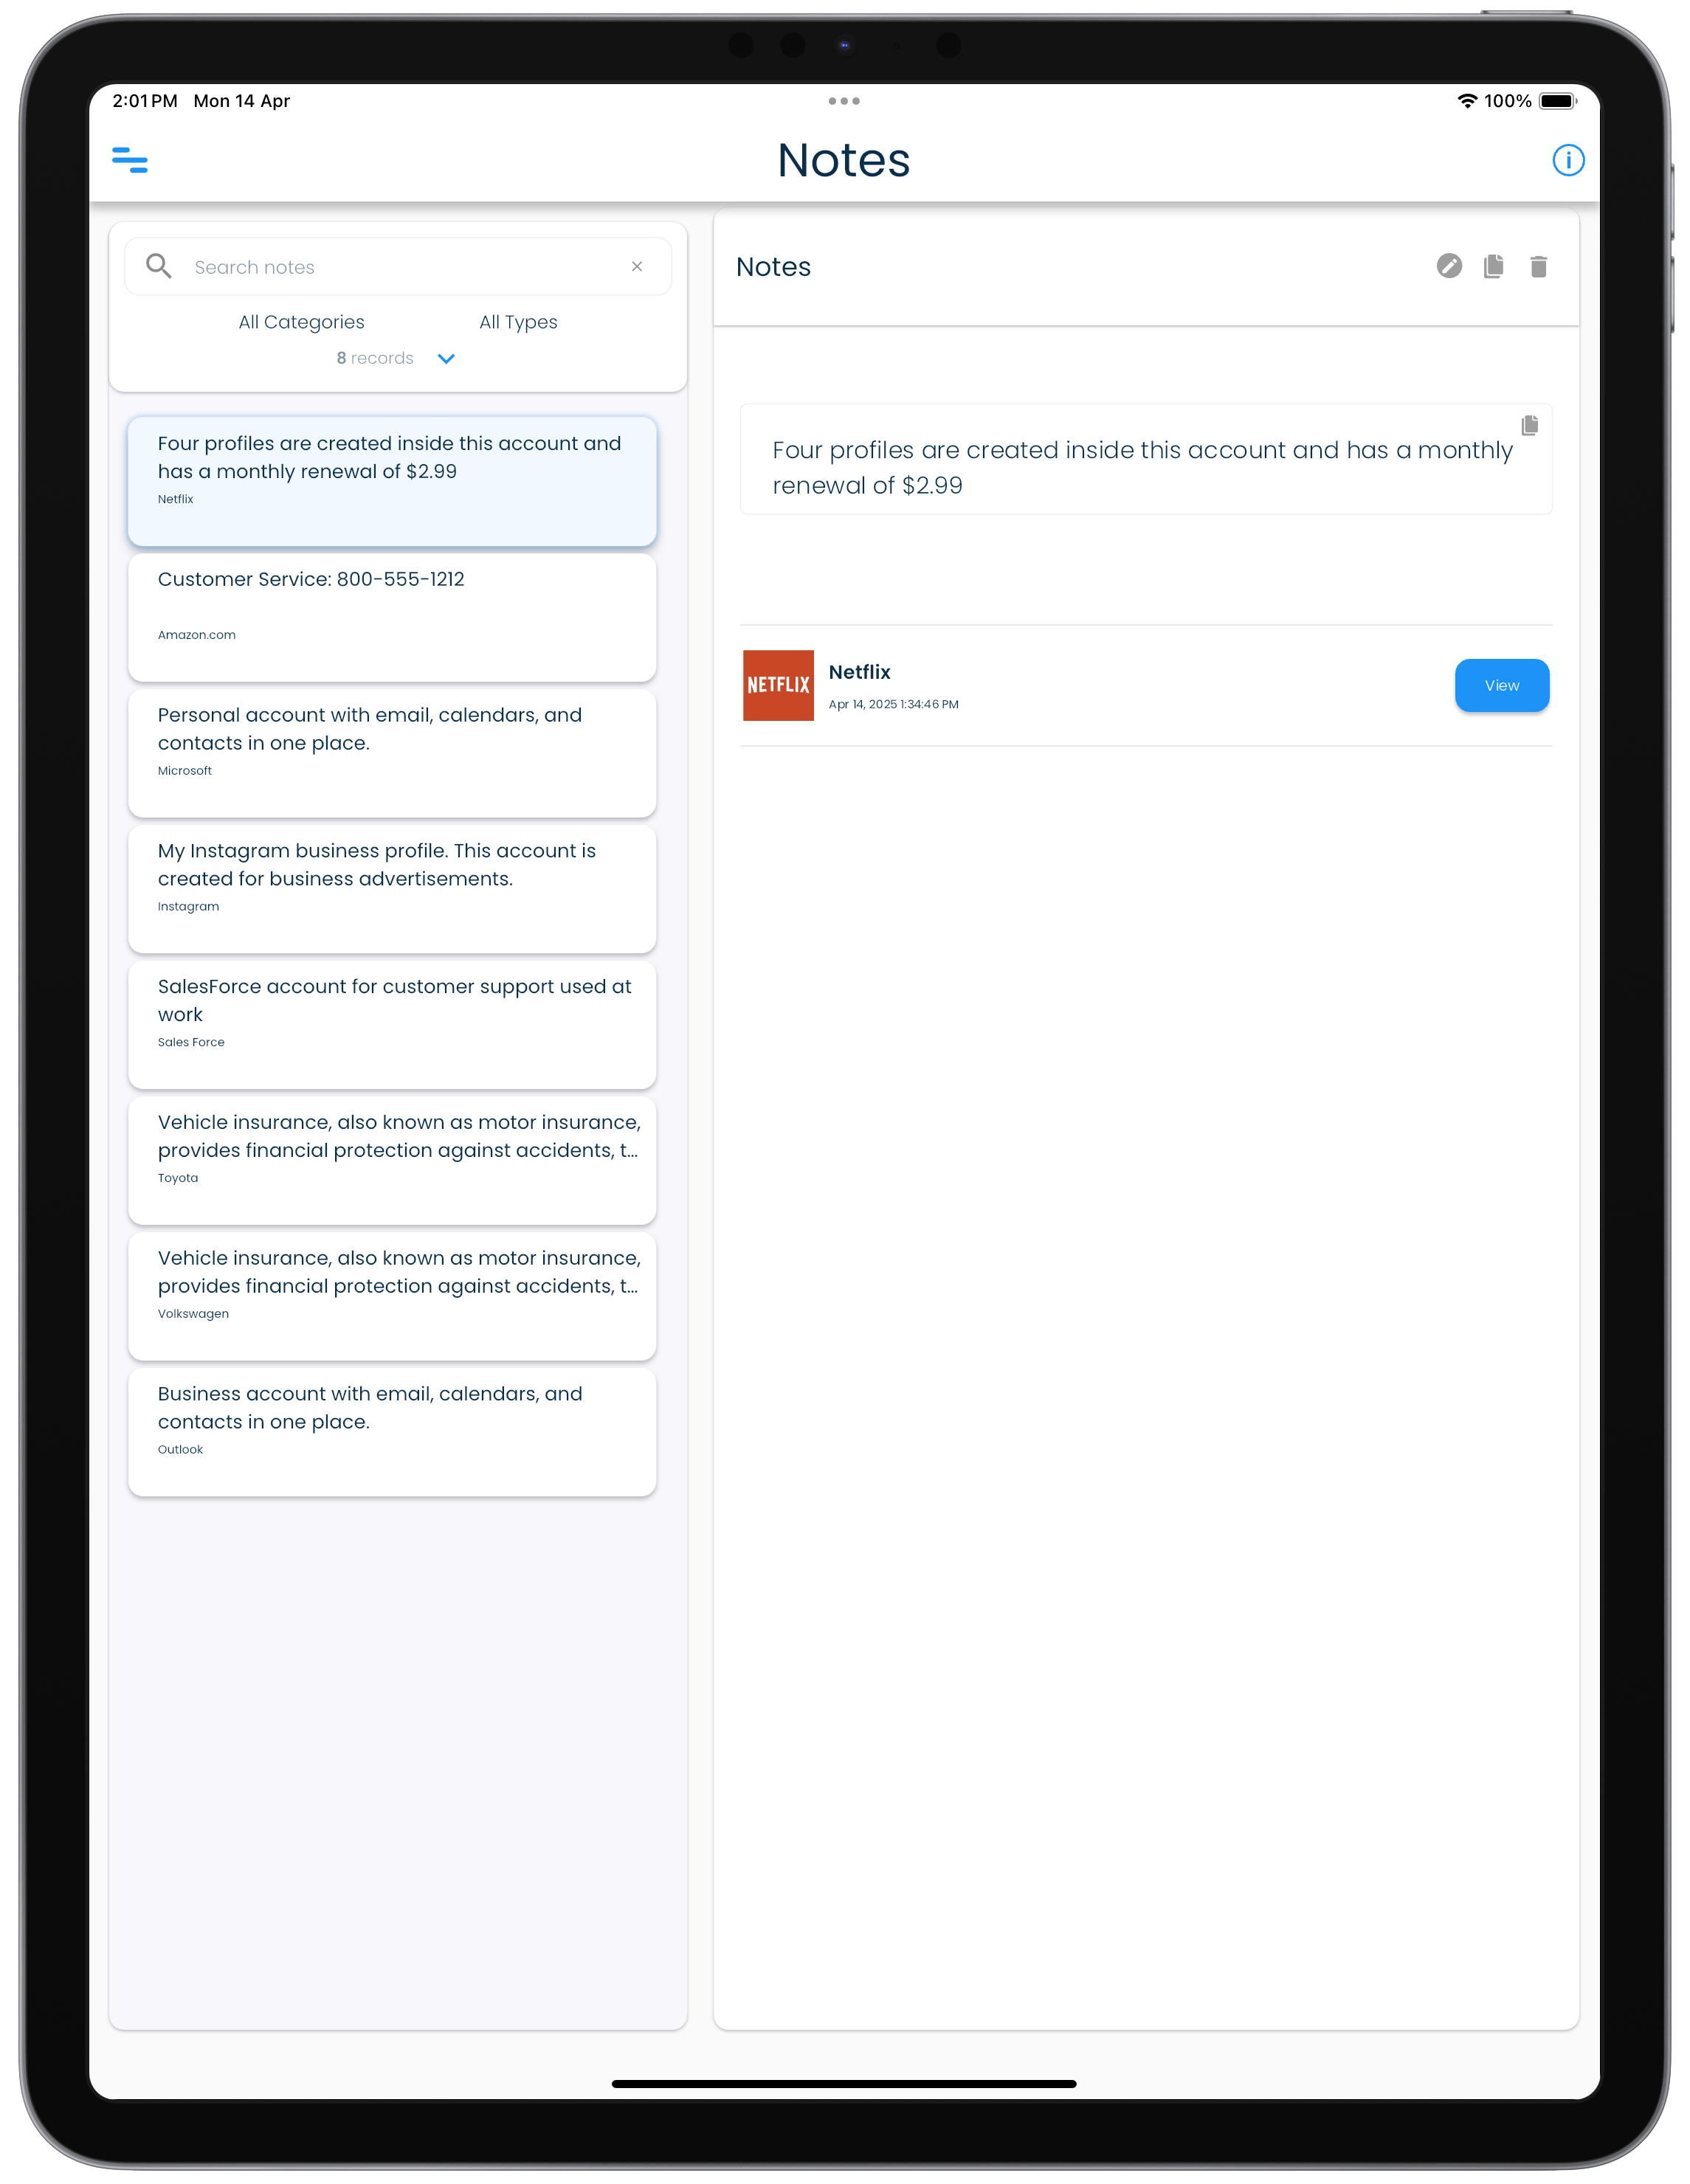
Notes
The Notes screen displays all the notes that you have in your records in a single view.
Use this screen to manage your notes across records and to access them quickly.
| Mac | Windows |
|---|---|
 |
 |
| Android | iPhone |
|---|---|
  |
  |
| iPad |
|---|
 |
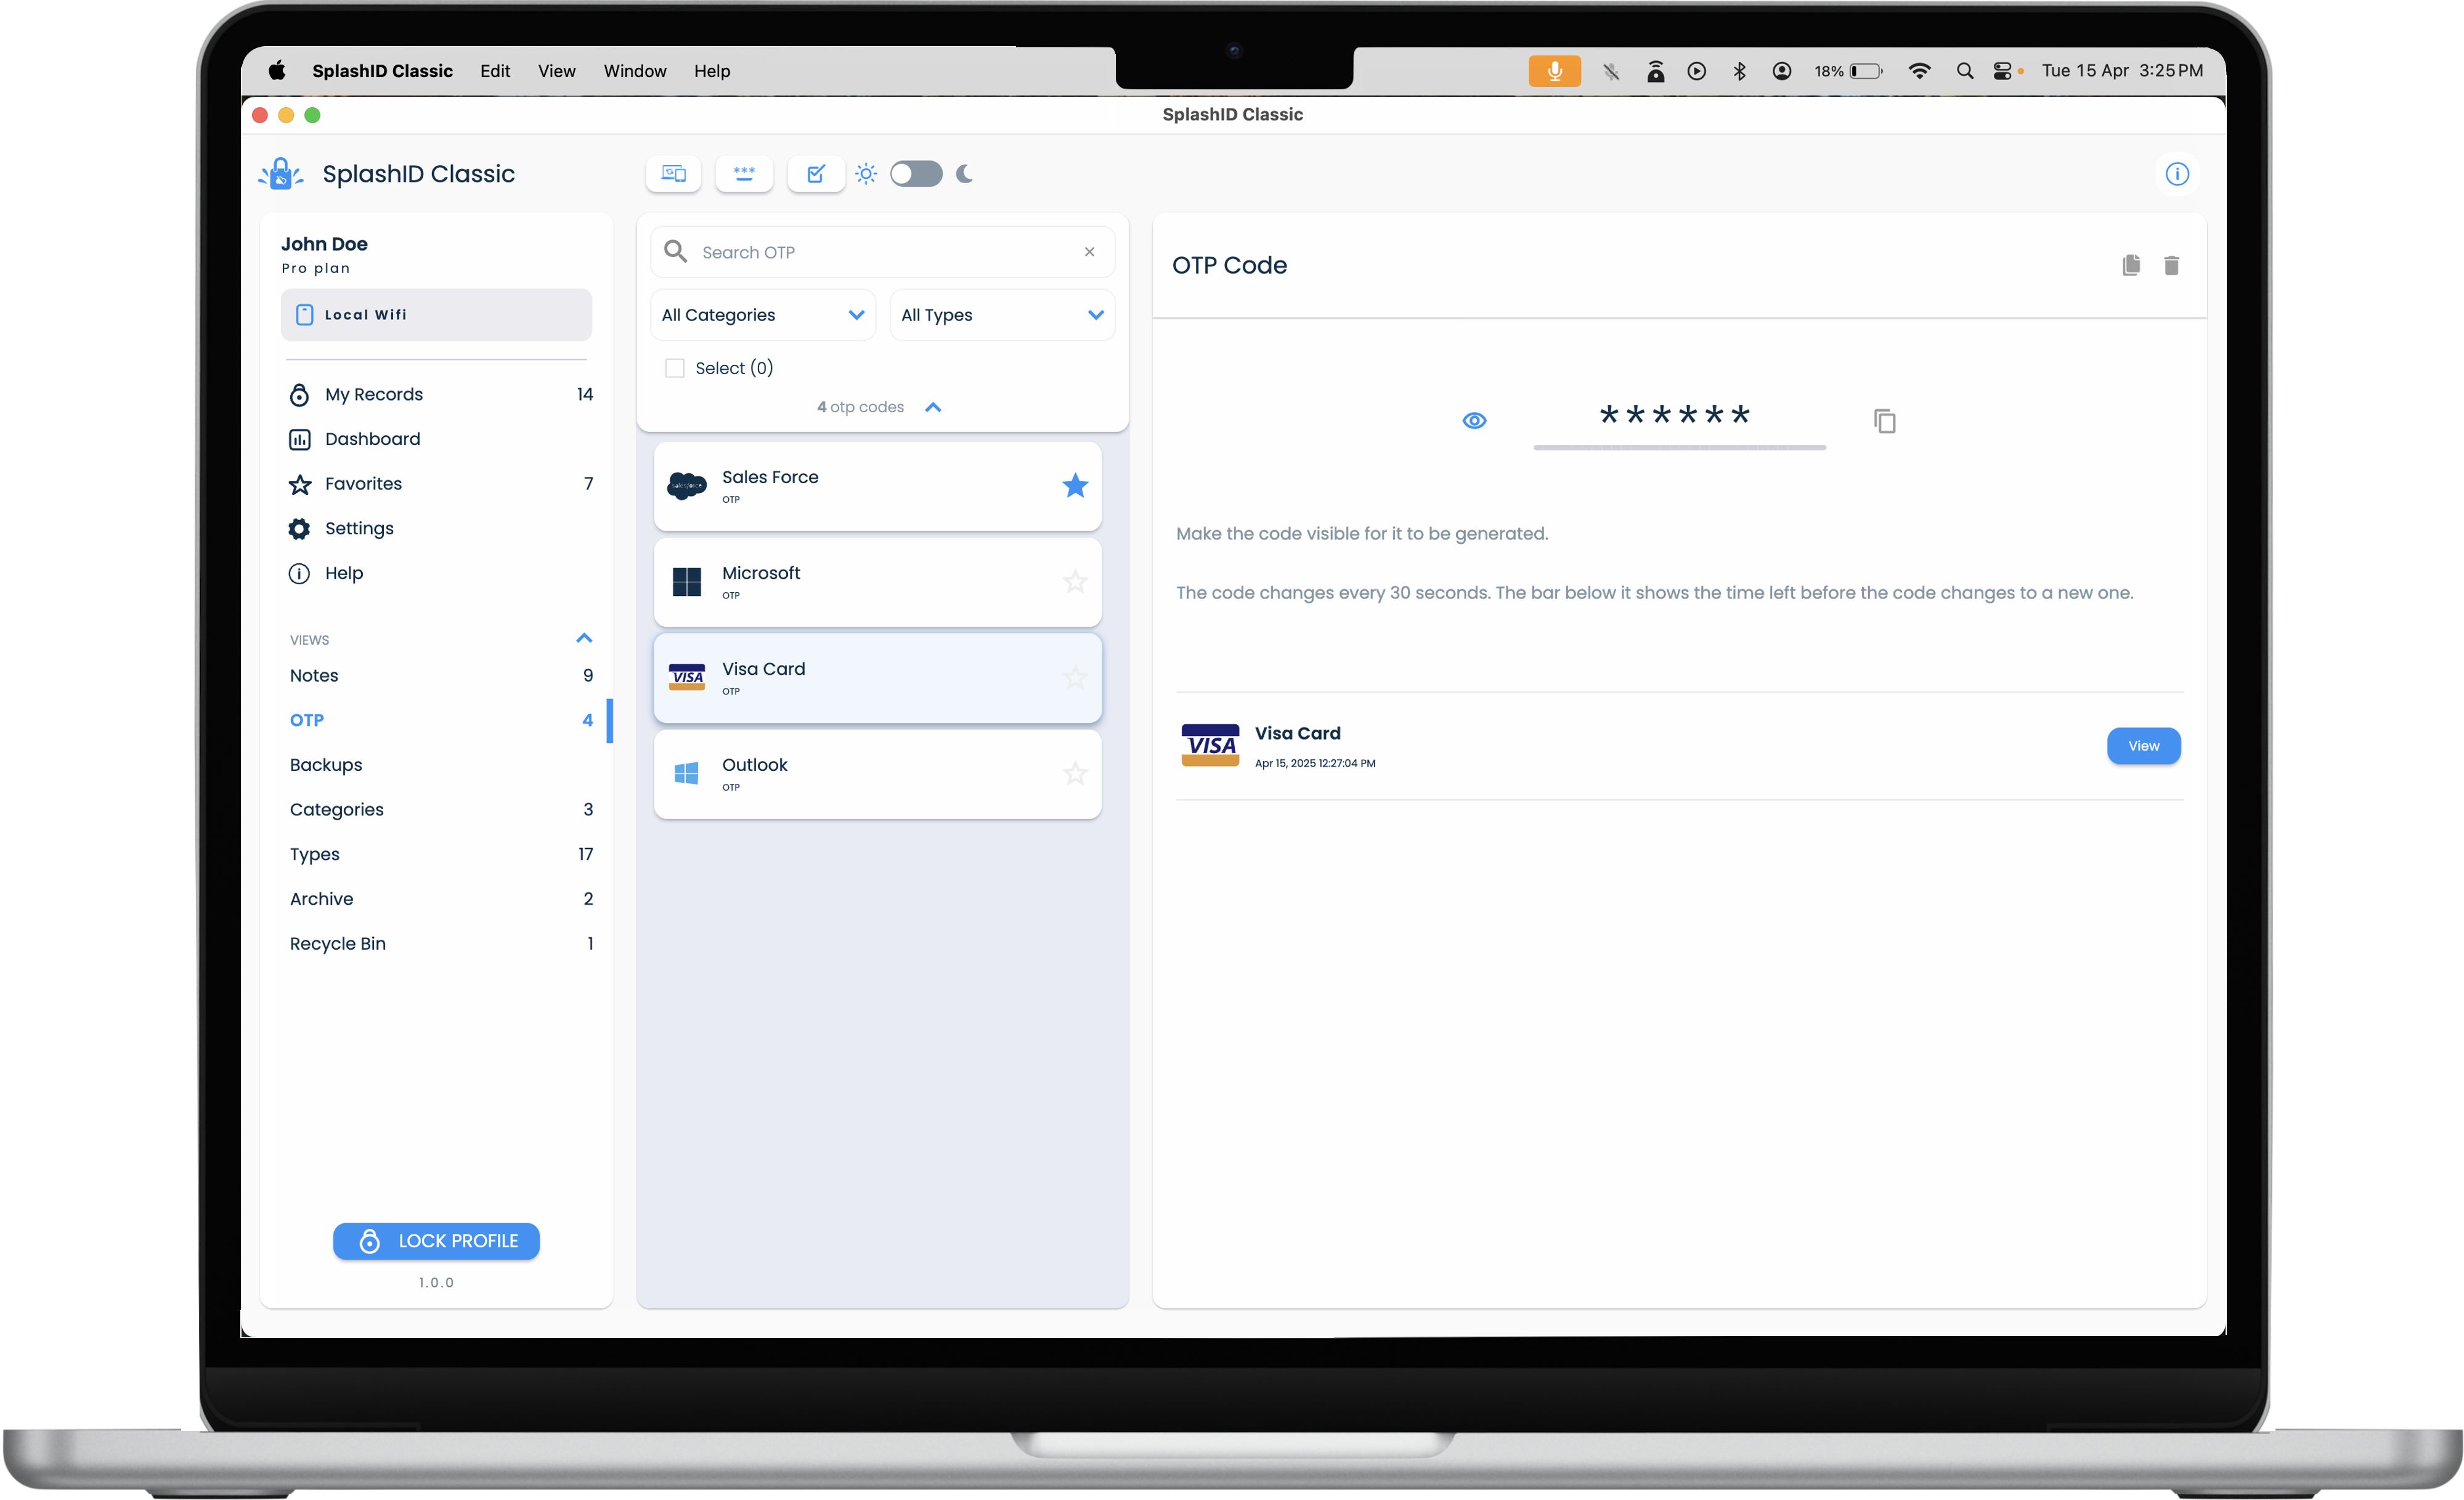
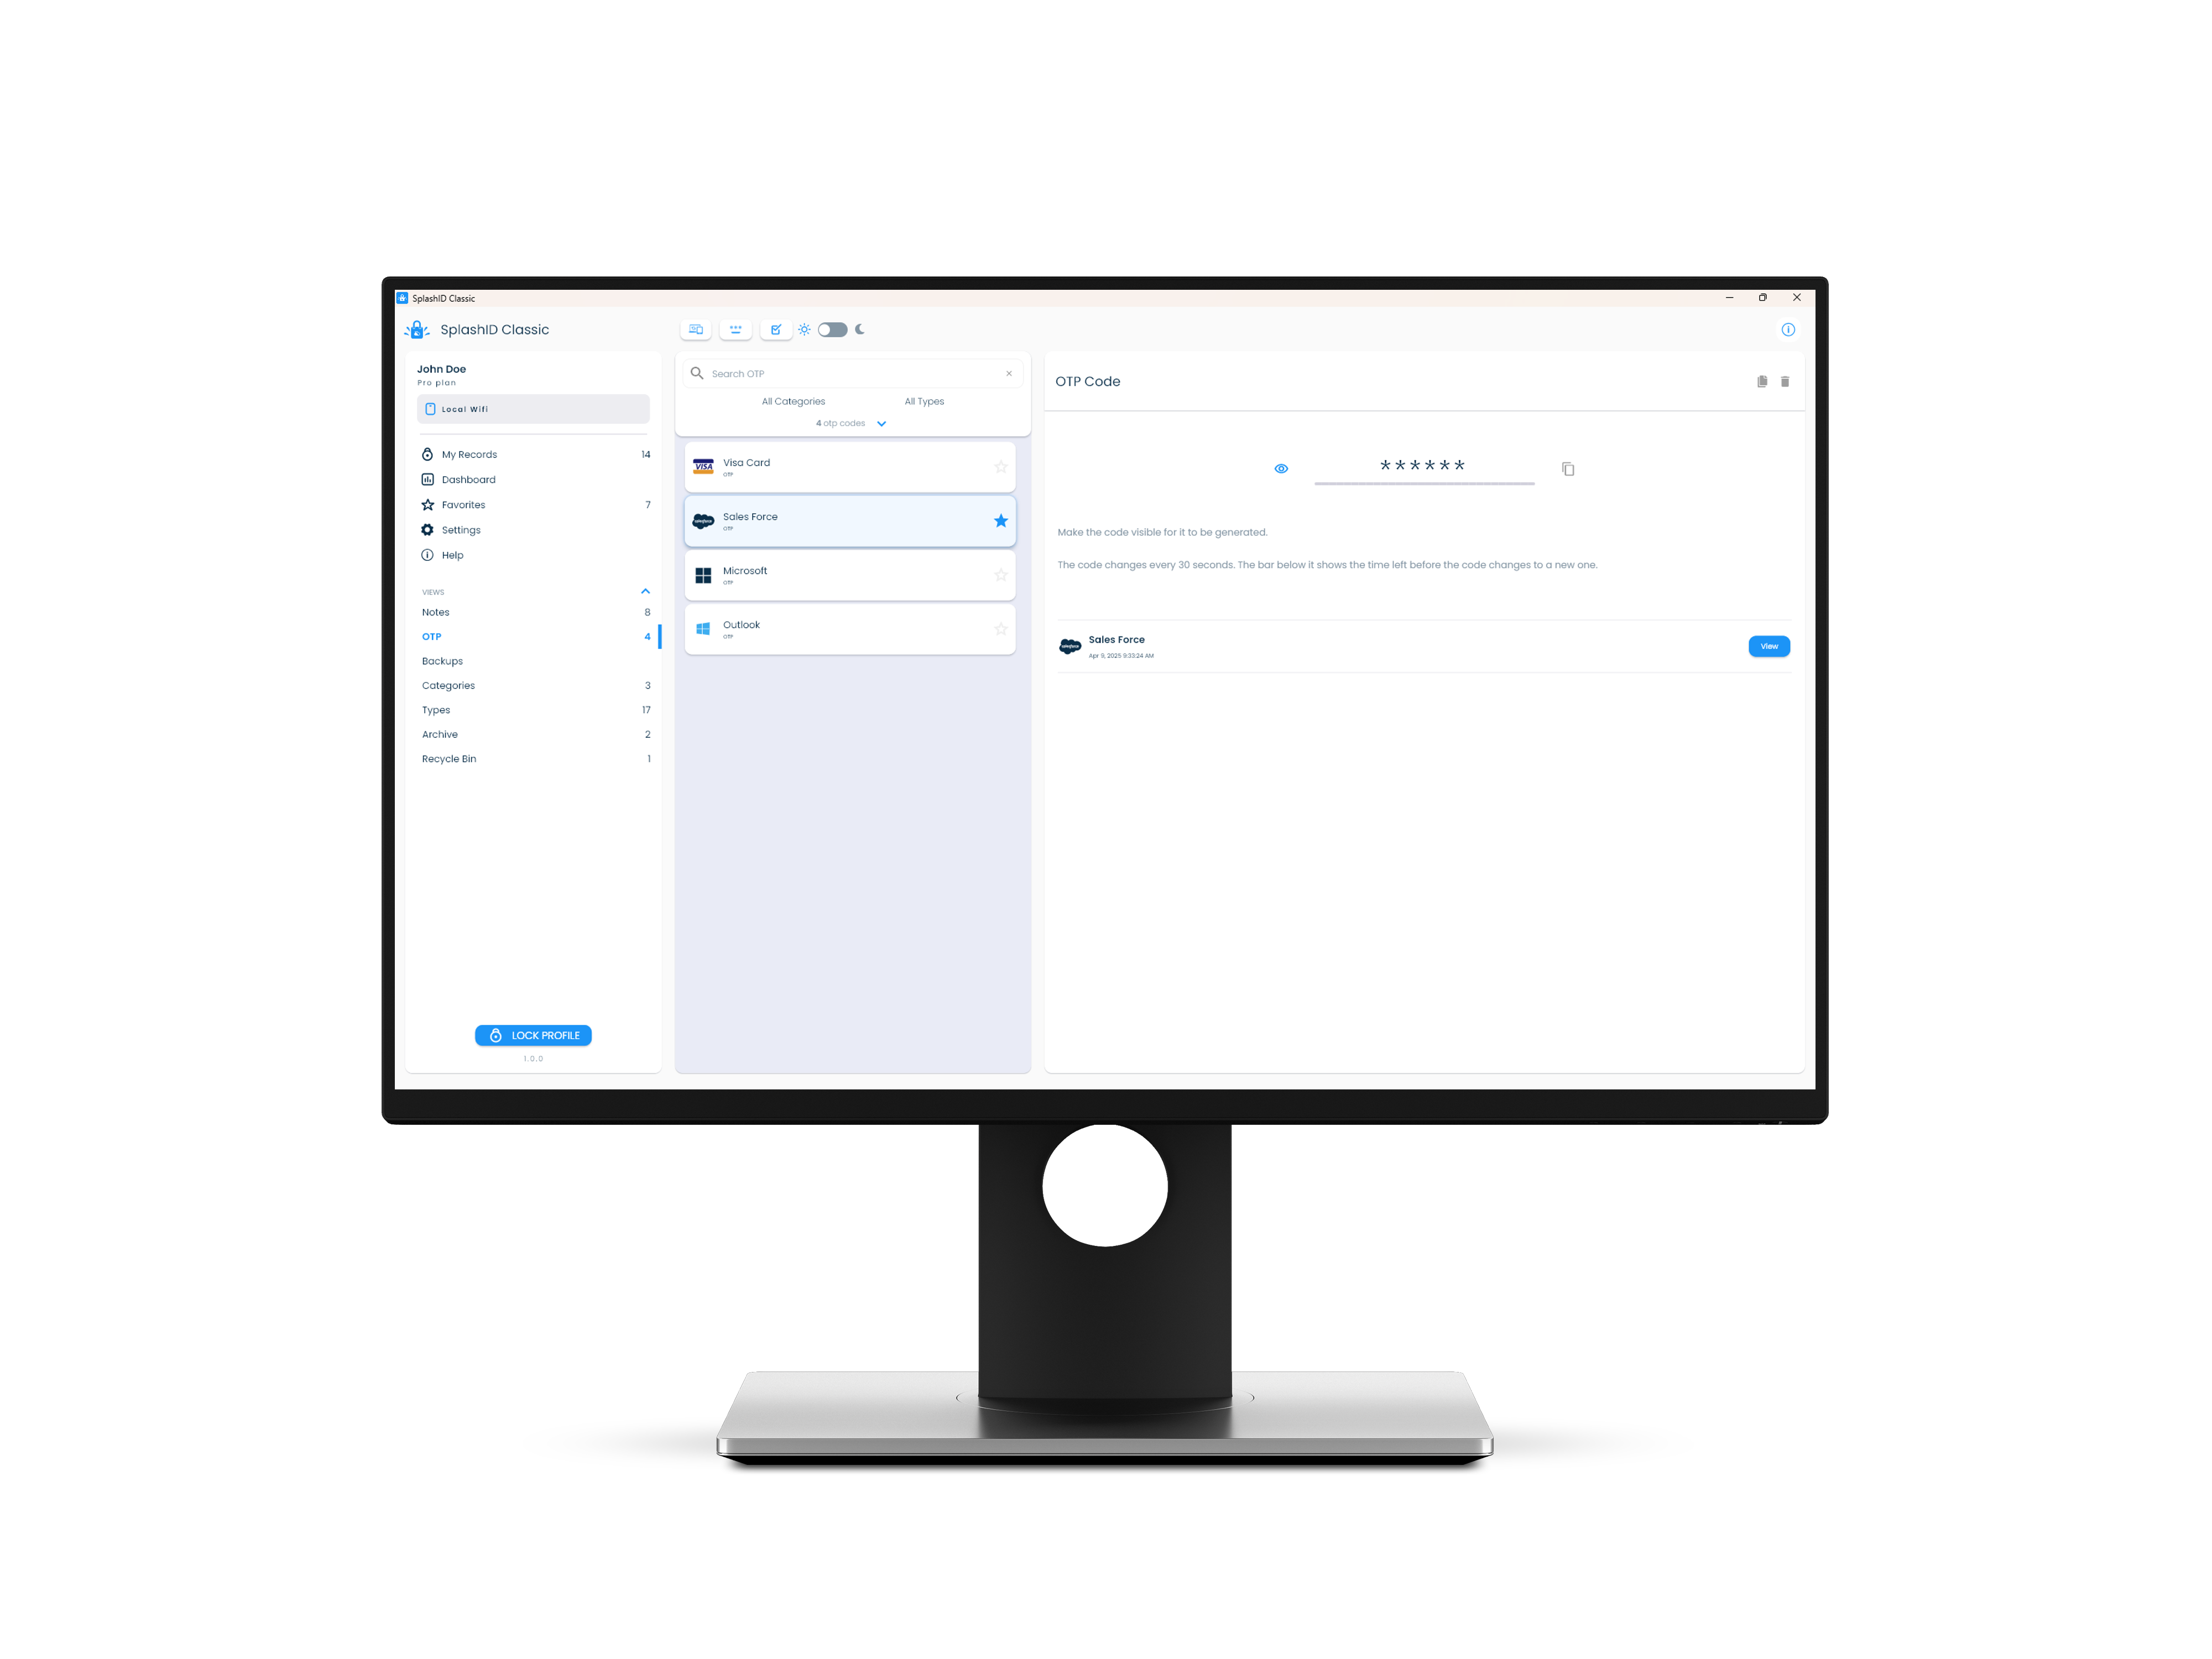
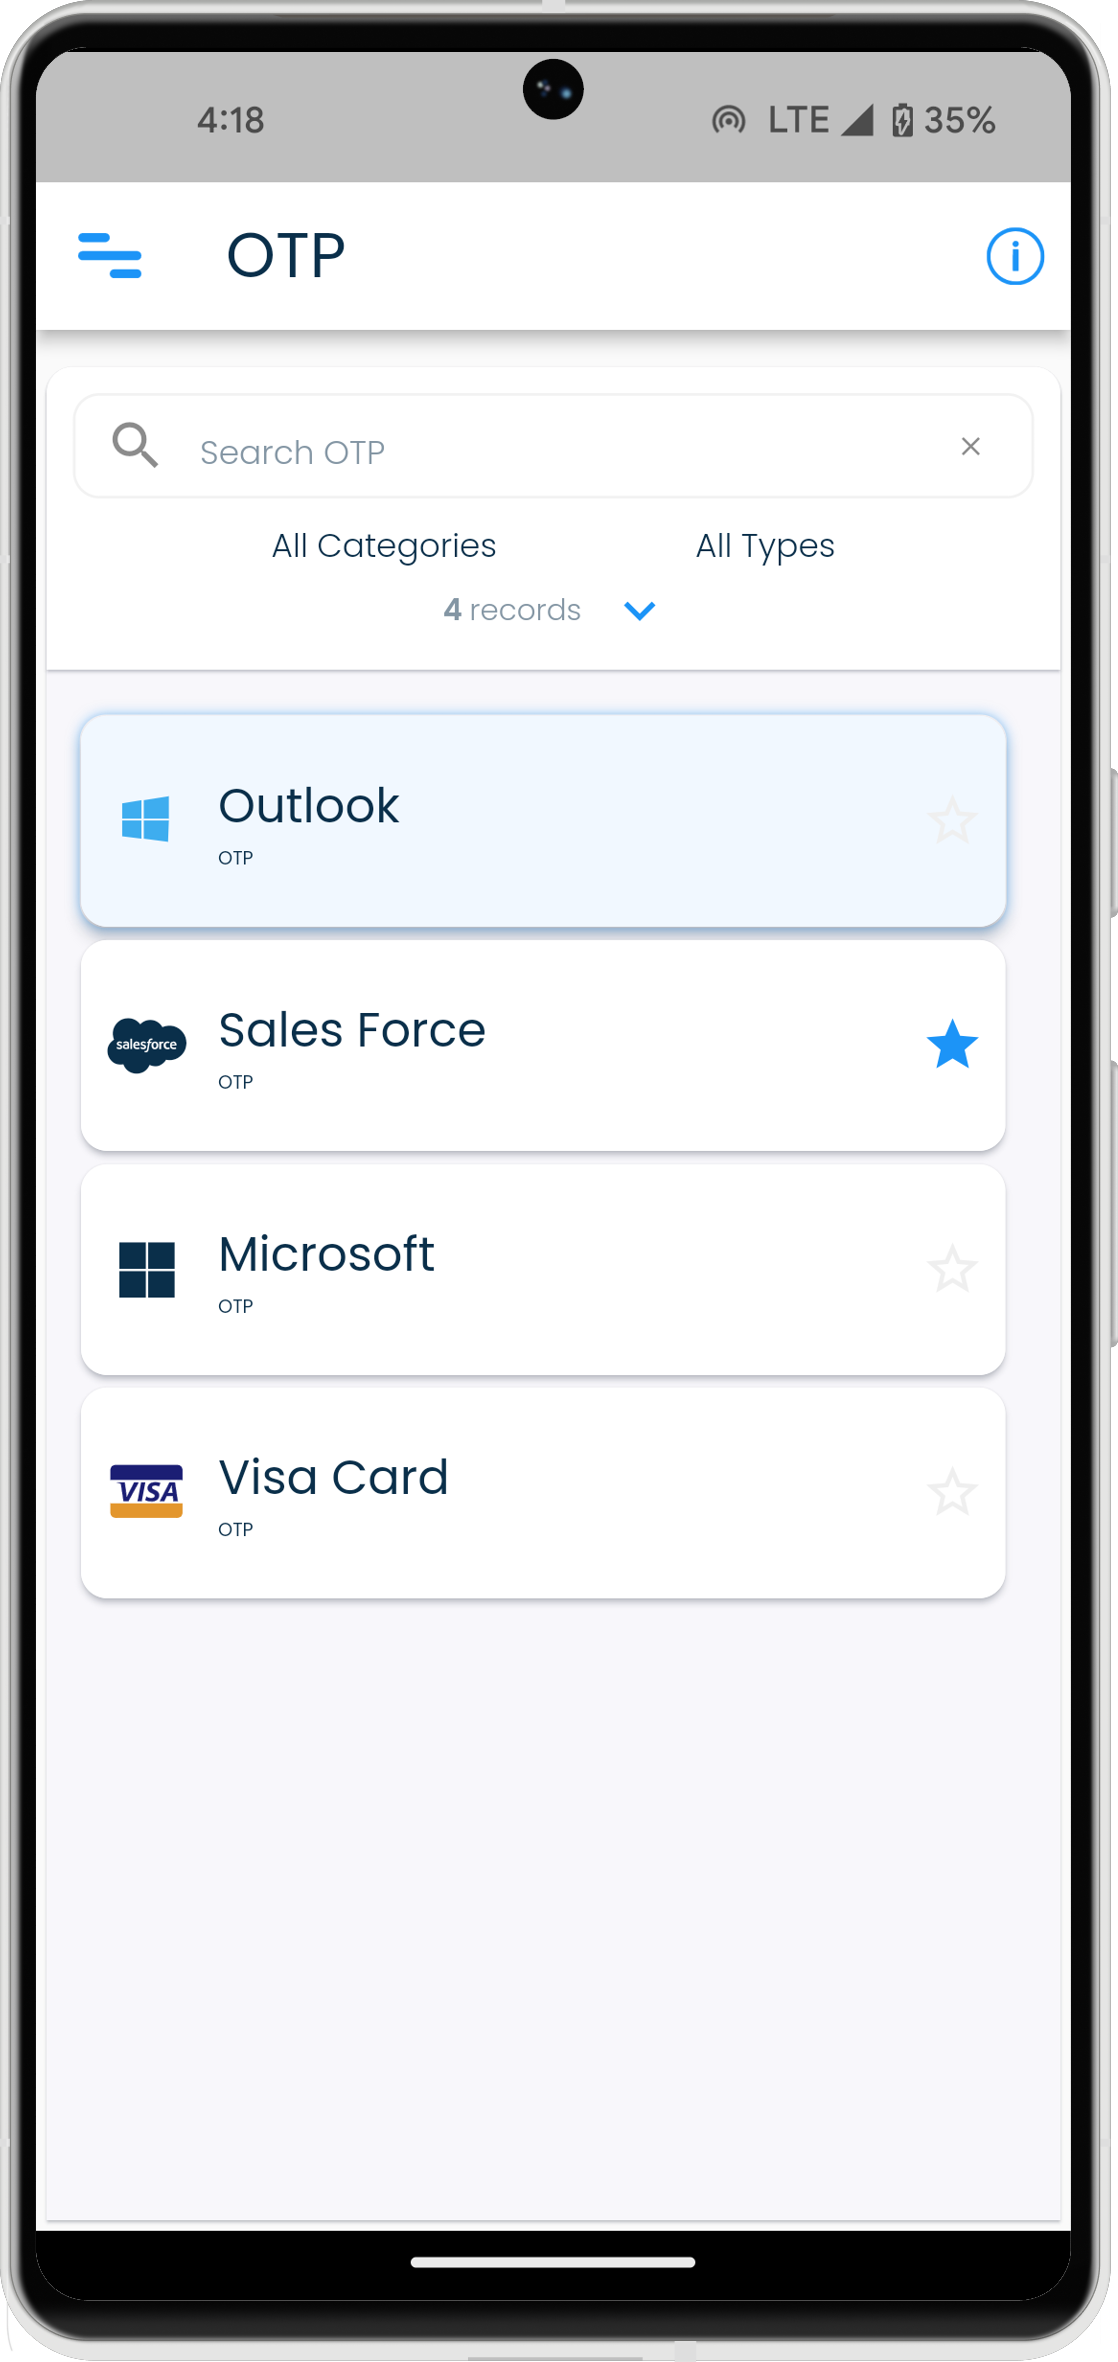
OTP
The OTP screen shows all the OTP fields that you have in all your records in a single view.
It can be used to quickly locate authenticator OTP codes for sites and applications you use without having to go through a record.
| Mac | Windows |
|---|---|
 |
 |
| Android | iPhone |
|---|---|
  |
  |
| iPad |
|---|
 |
Next steps
- Learn how to sync your records.
Archiving and Deleting
Overview
Over time it is possible that some of the records you had used previously are no longer needed. You can then decide to move them out of the record views to keep your record lists concise and clean. Archiving and deletion of records help you to do this.
Archiving
Archiving of records in SplashID Classic allows you to move records that are not needed to a separate area that can be accessed from the application menu. This helps in keeping your most relevant records in your main views.
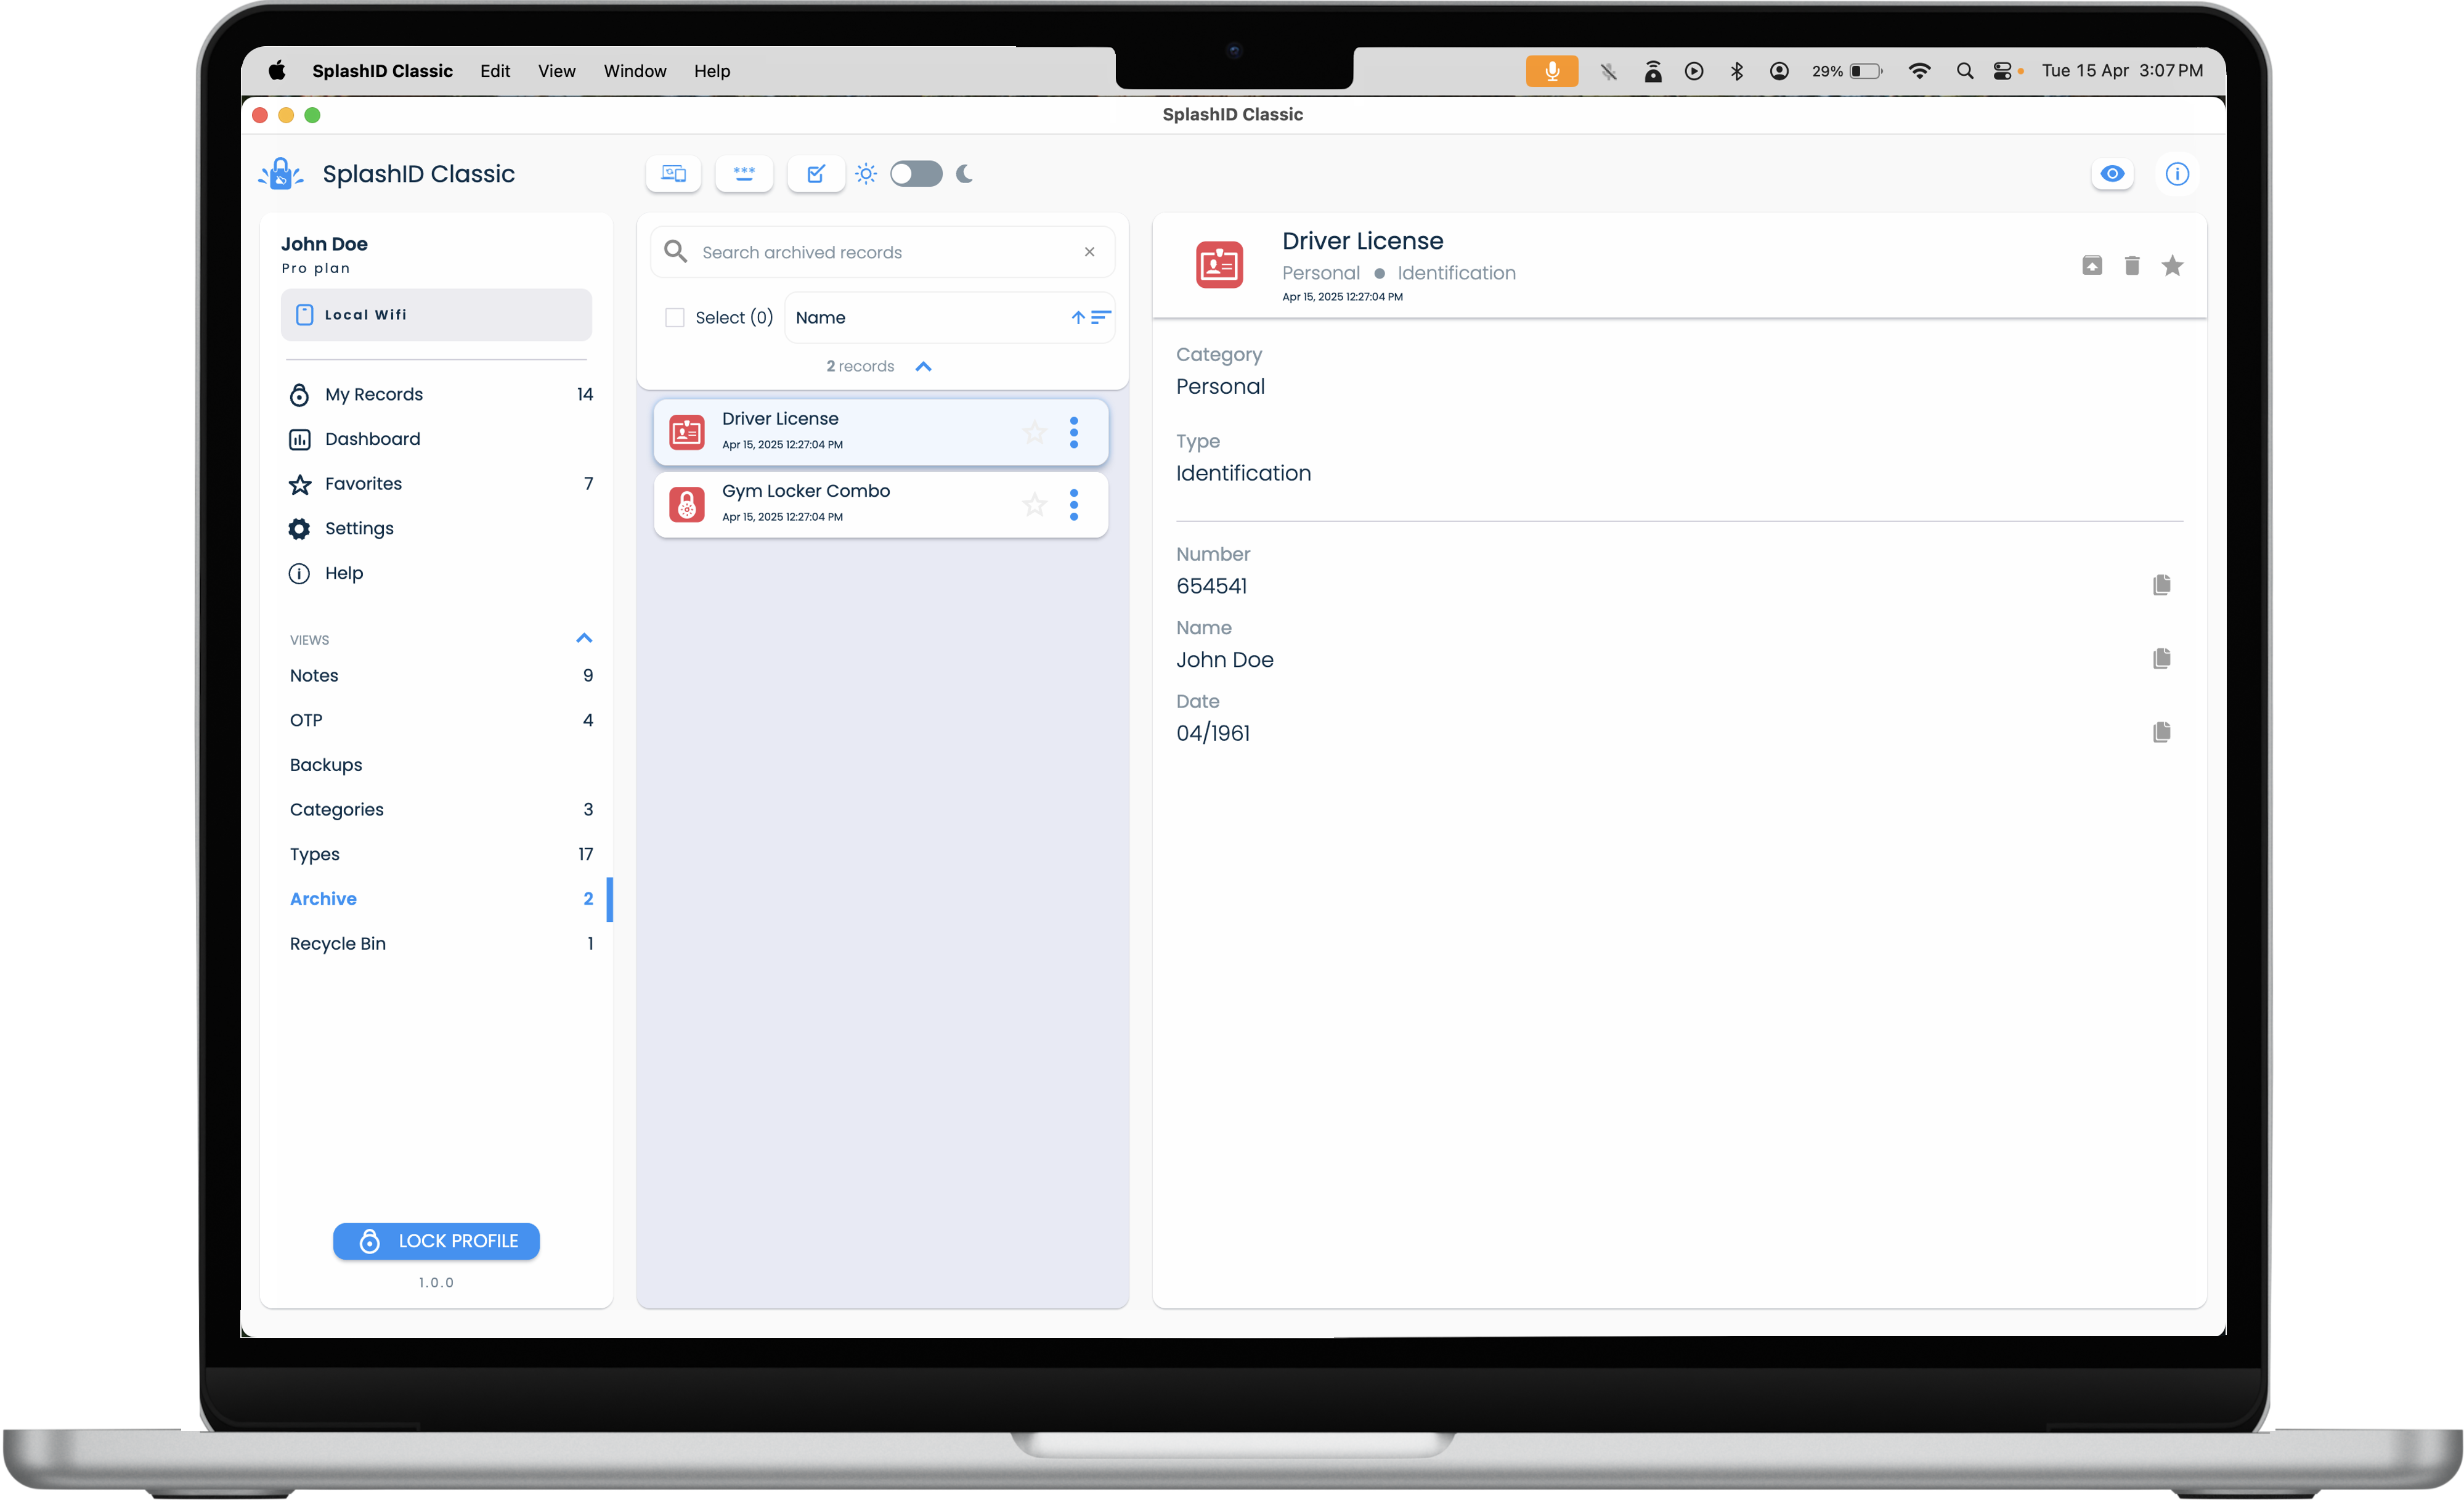
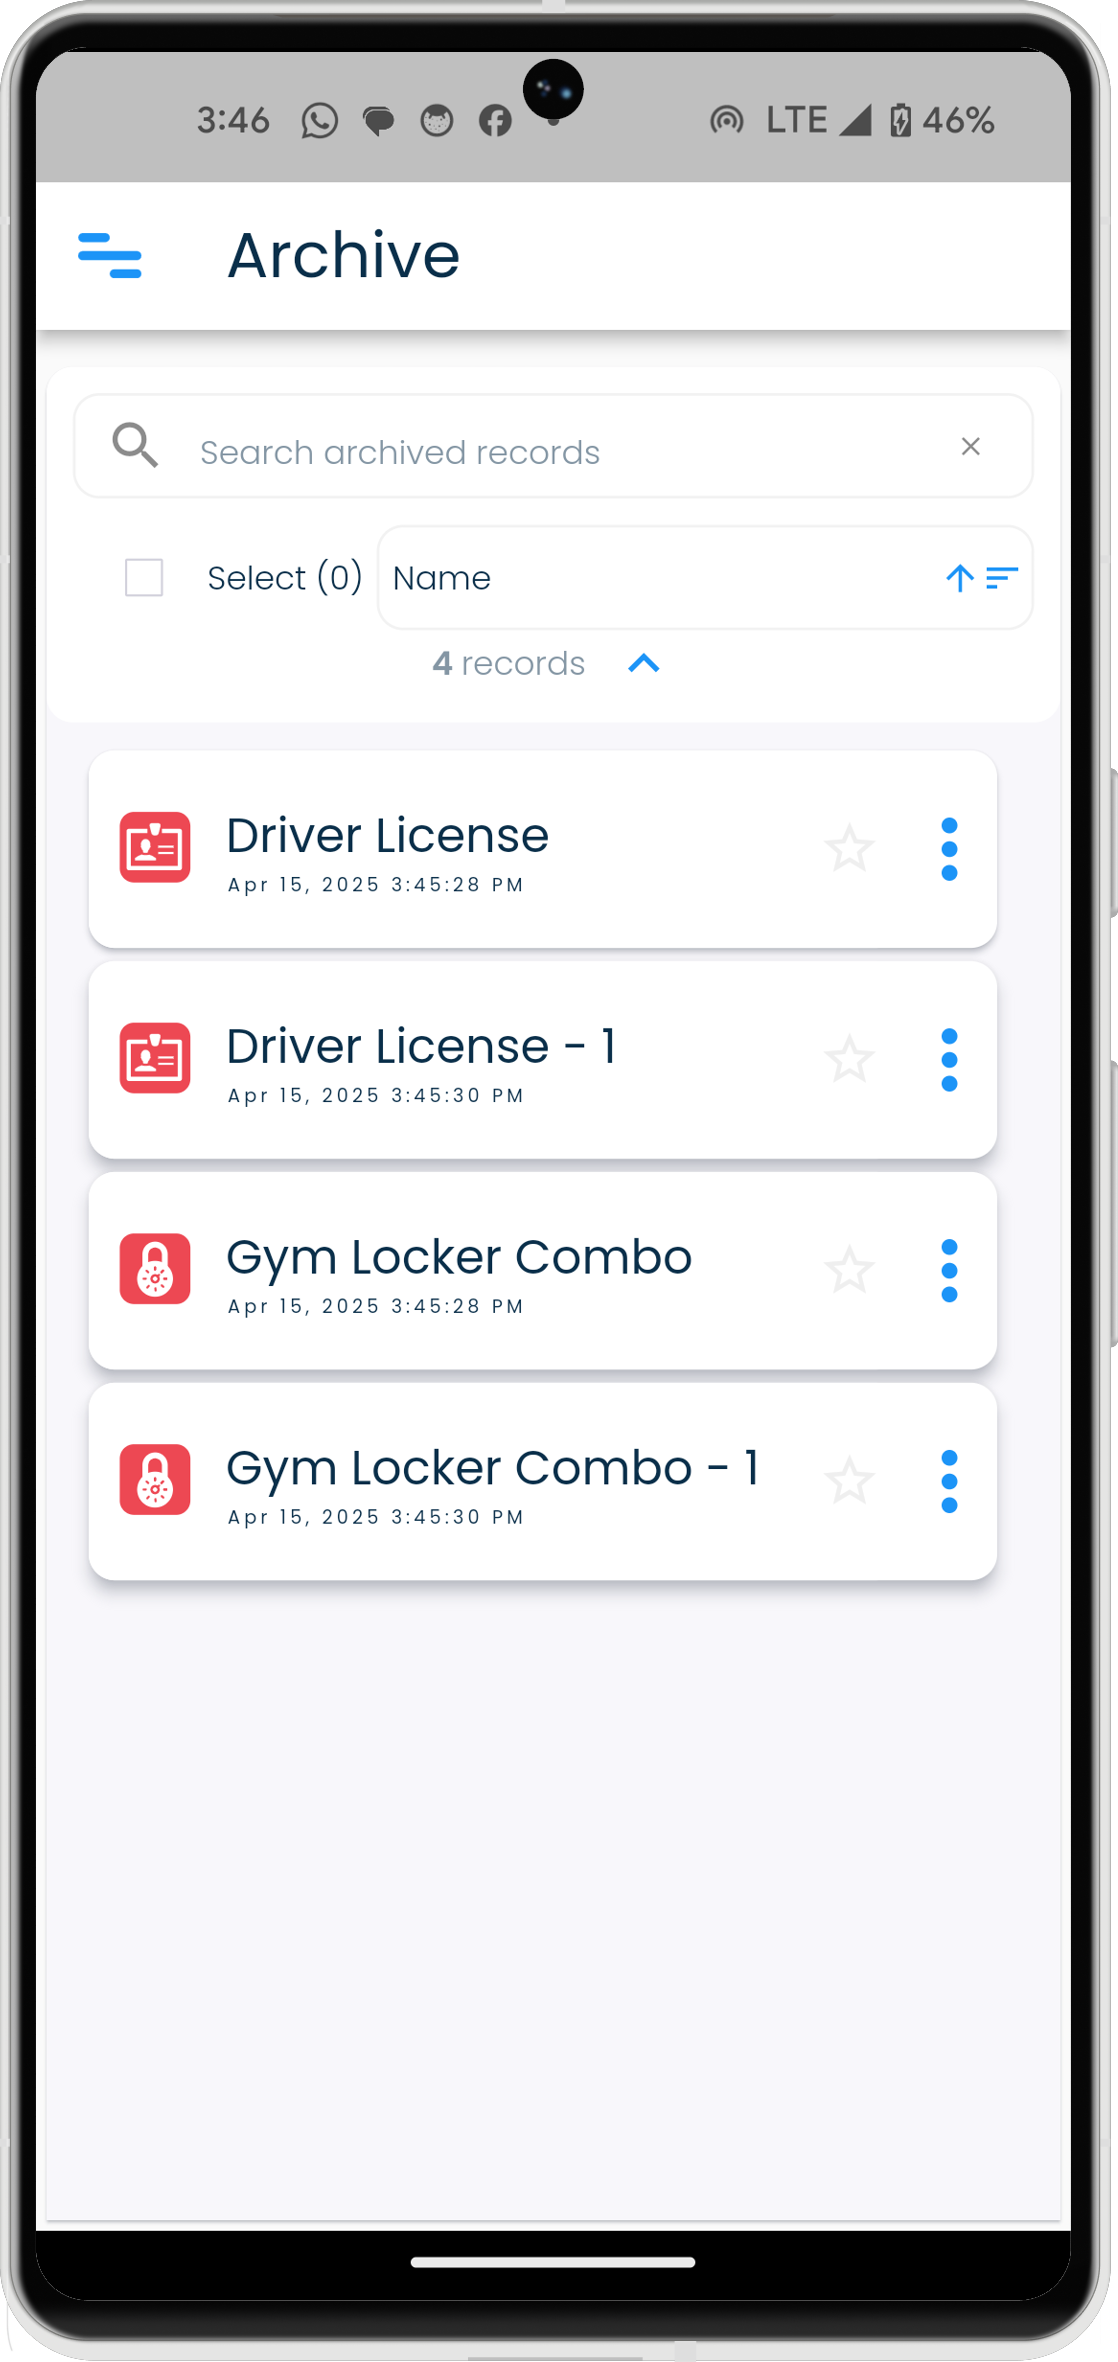
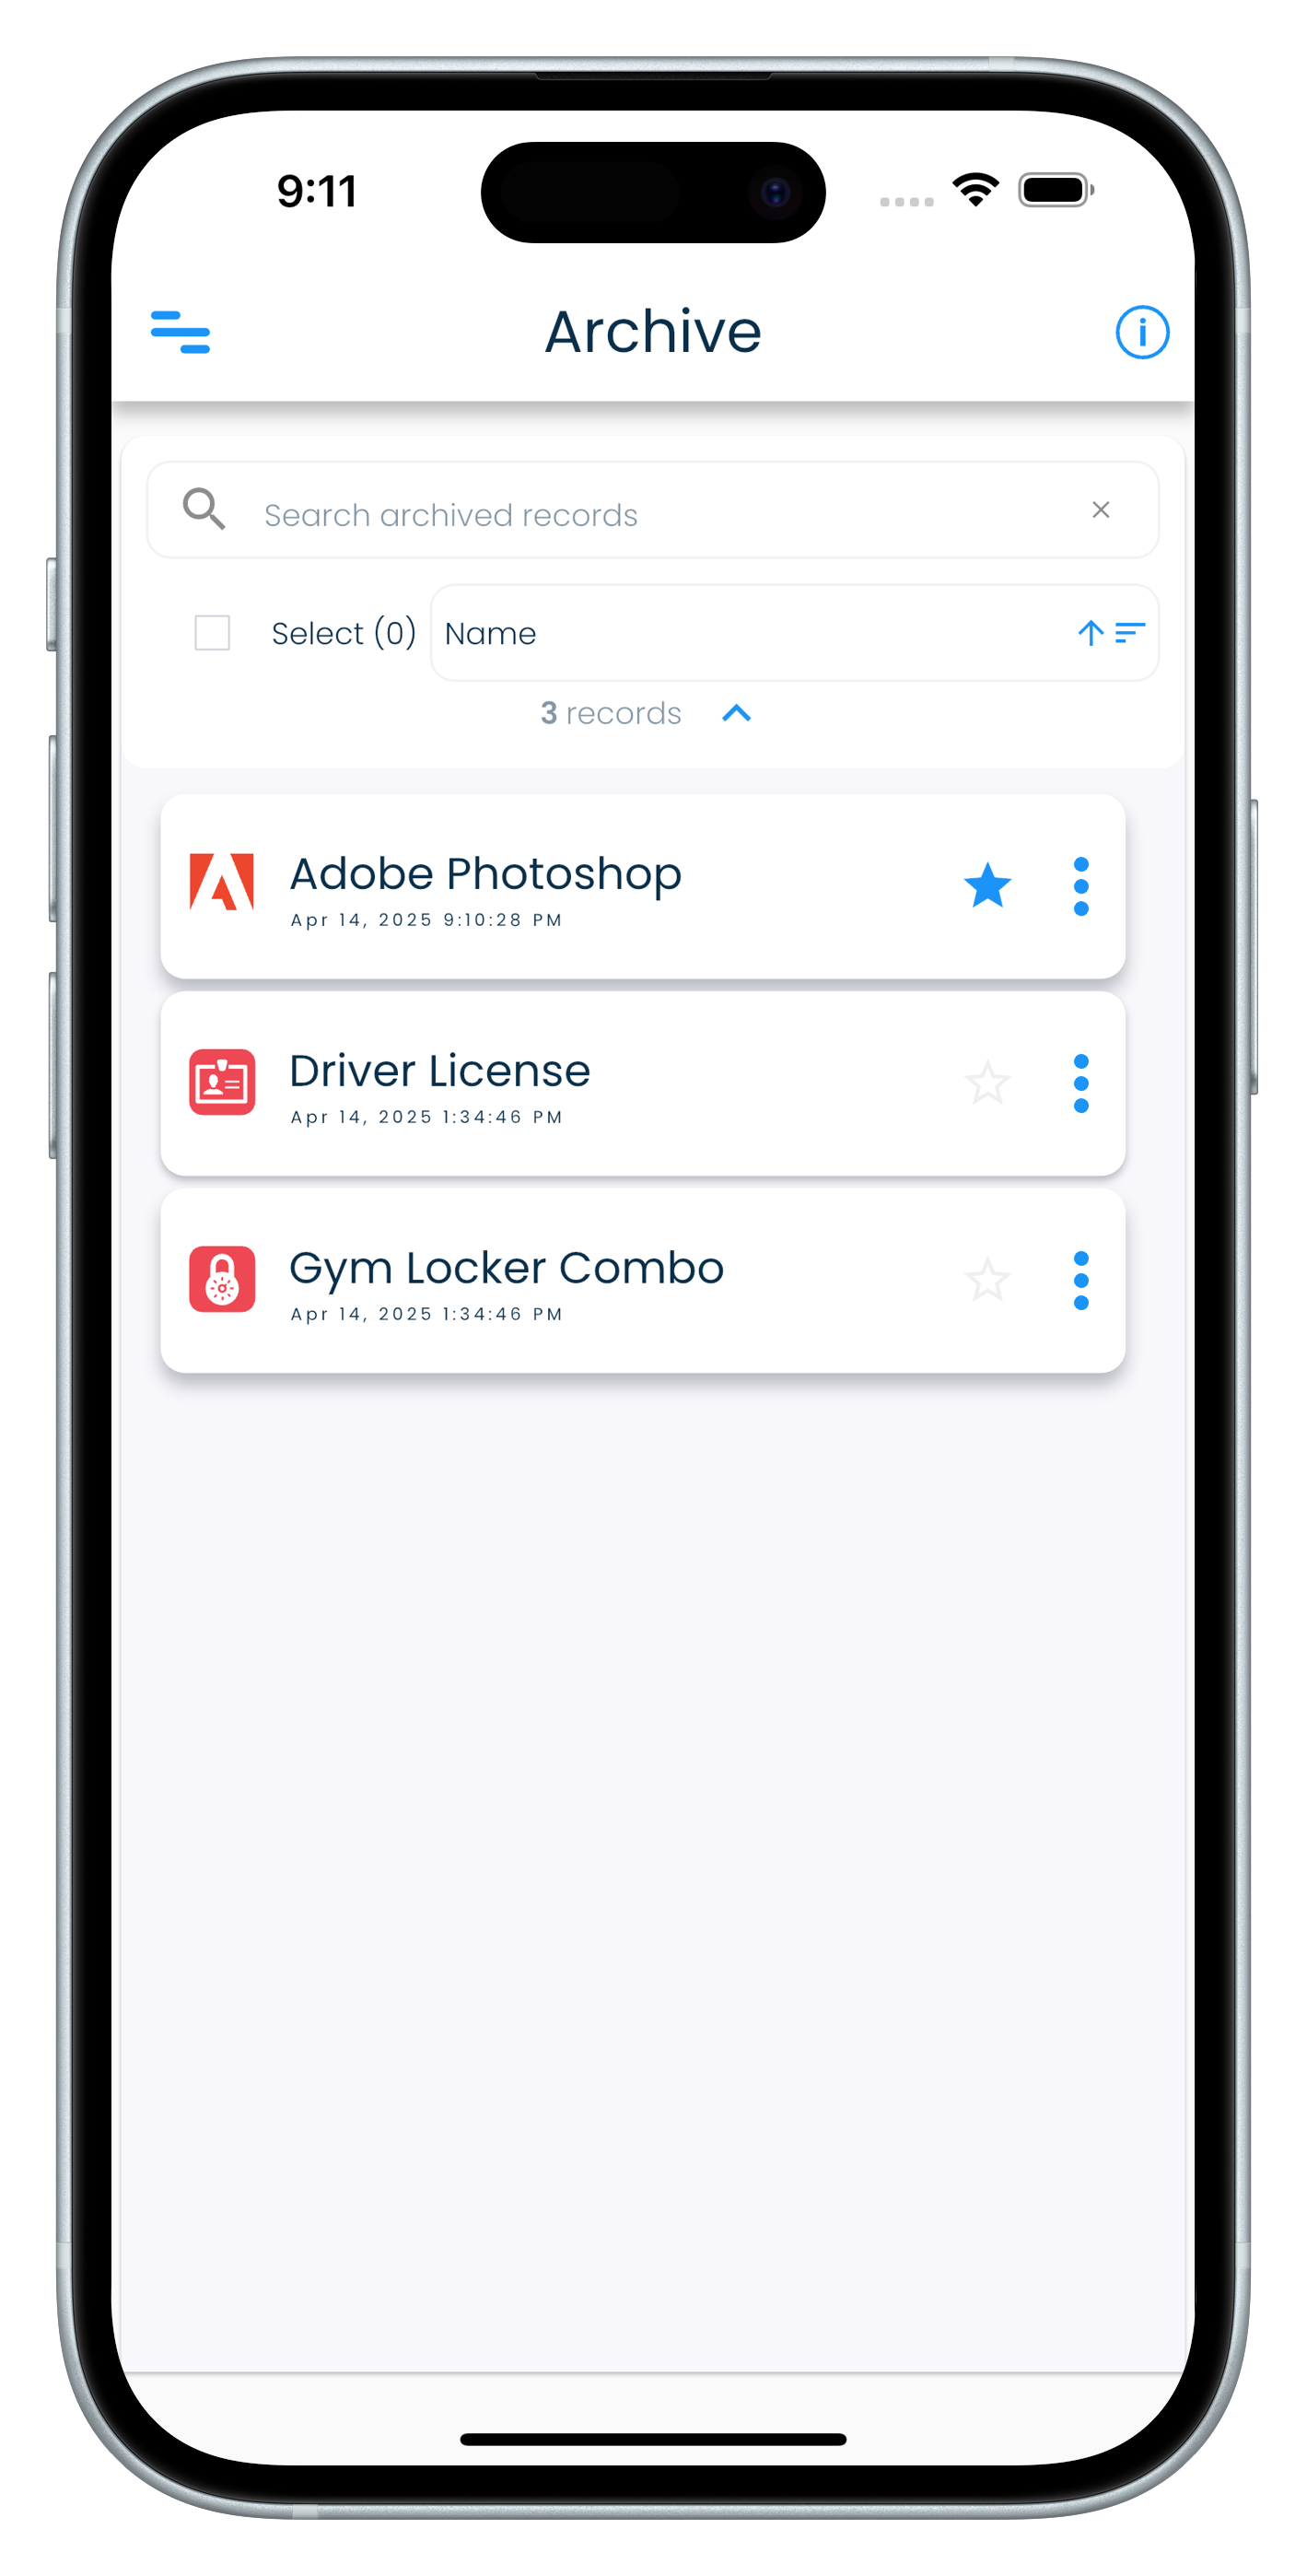
Archive screen
All your archived records can be viewed in the Archive screen. The Archive screen can be reached by clicking or tapping on the Archive link in the application menu.
Archived records sync across devices, and can be unarchived back to the personal record list if they are needed to be accessed regularly again.
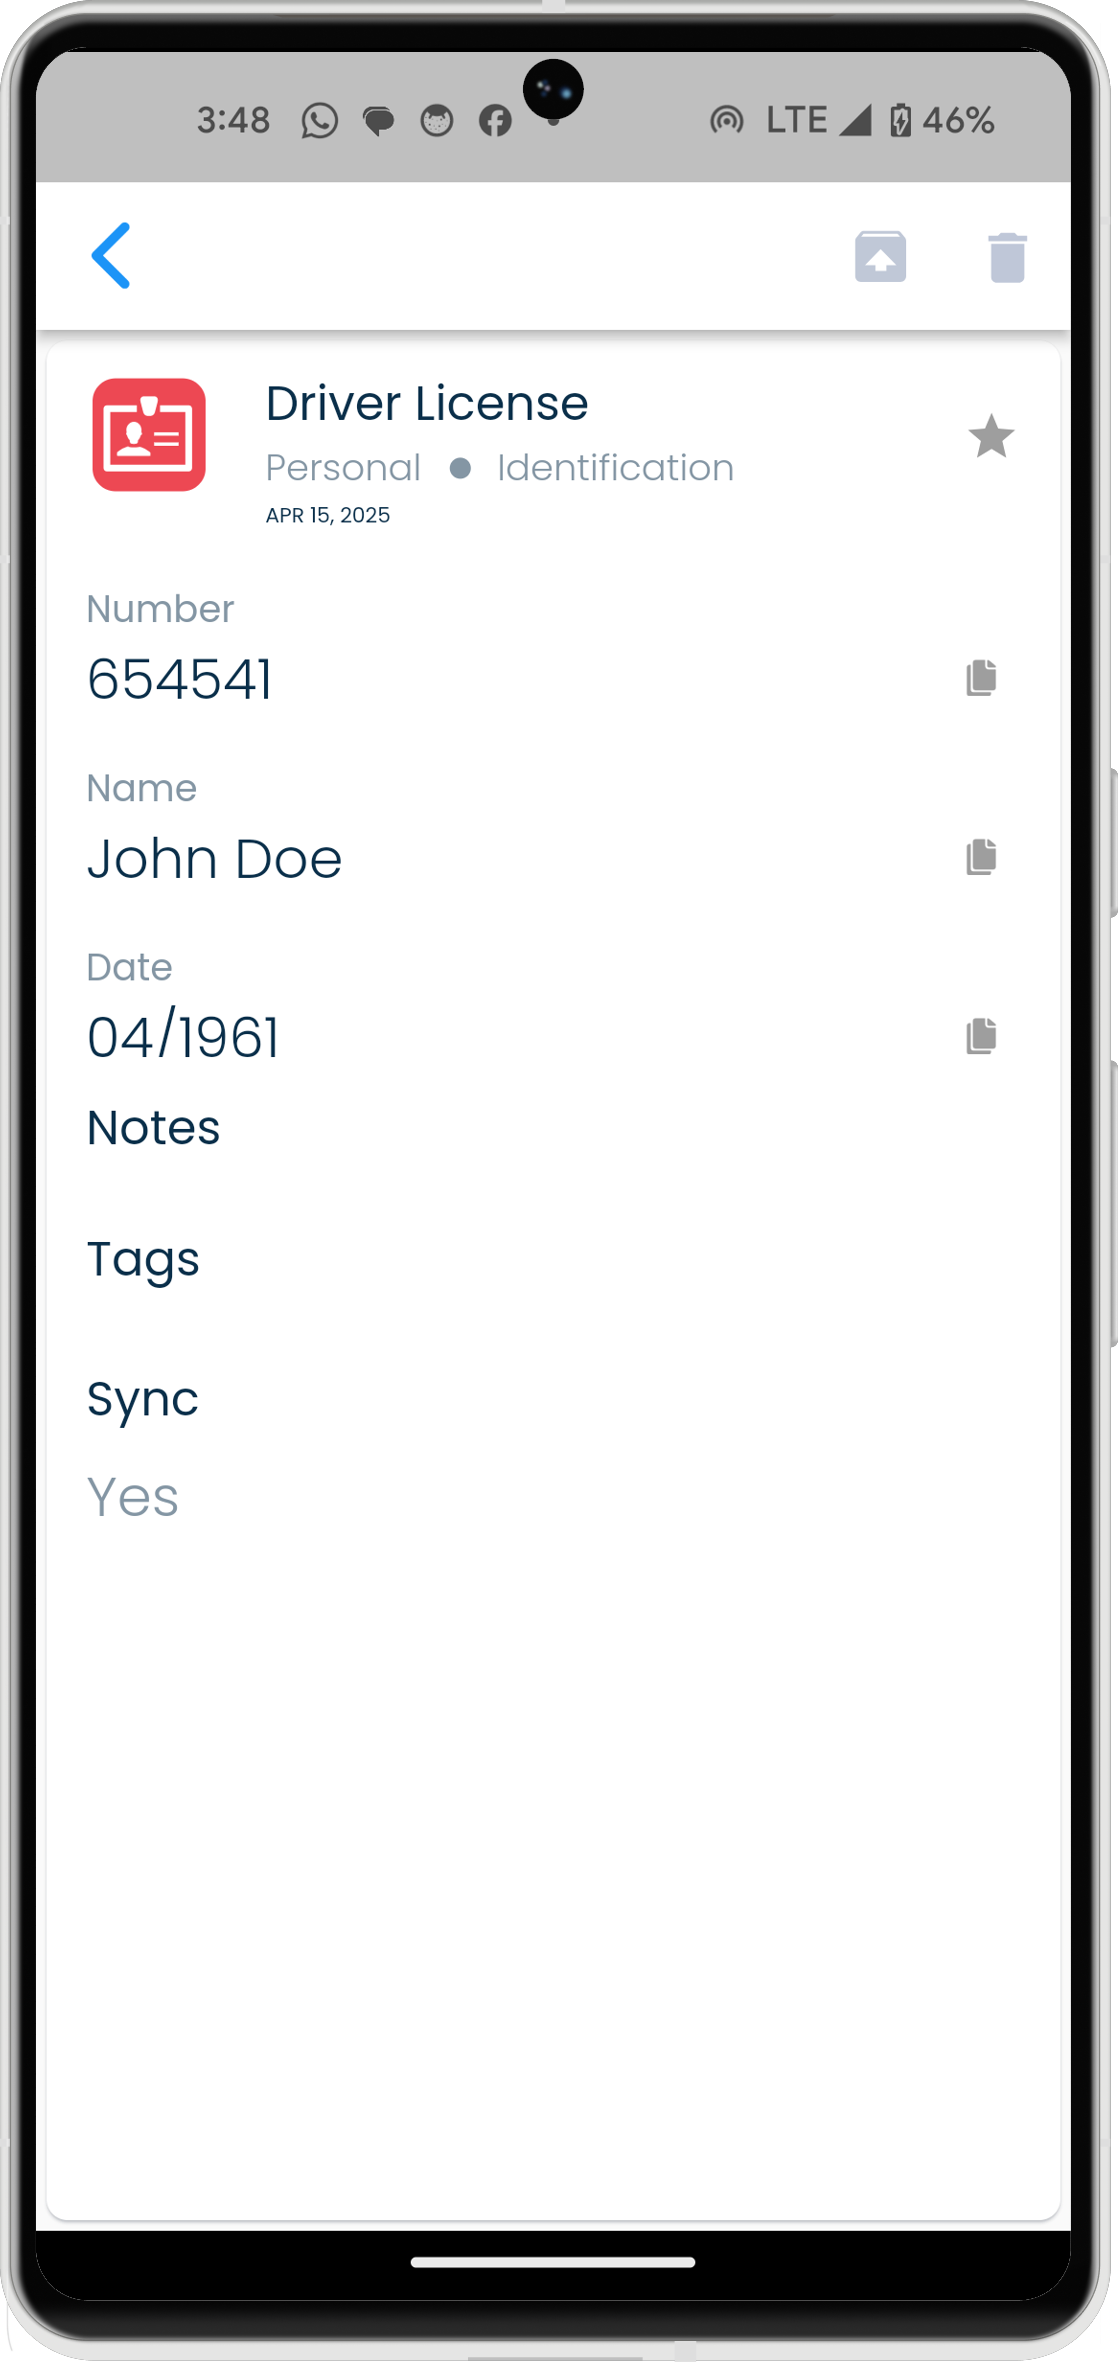
Archived records cannot be edited. They will need to be unarchived first and then edited as regular records.
Archive a record
- Visit the My Records screen from the application menu.
- Select a record in the record list.
- Click or tap on the Archive icon in the record details header to archive the record.
- Confirm by clicking or tapping on the Archive button to proceed with archiving the record.
| Mac | Windows |
|---|---|
|
|
| Android | iPhone |
|---|---|
| |
|
| iPad |
|---|
|
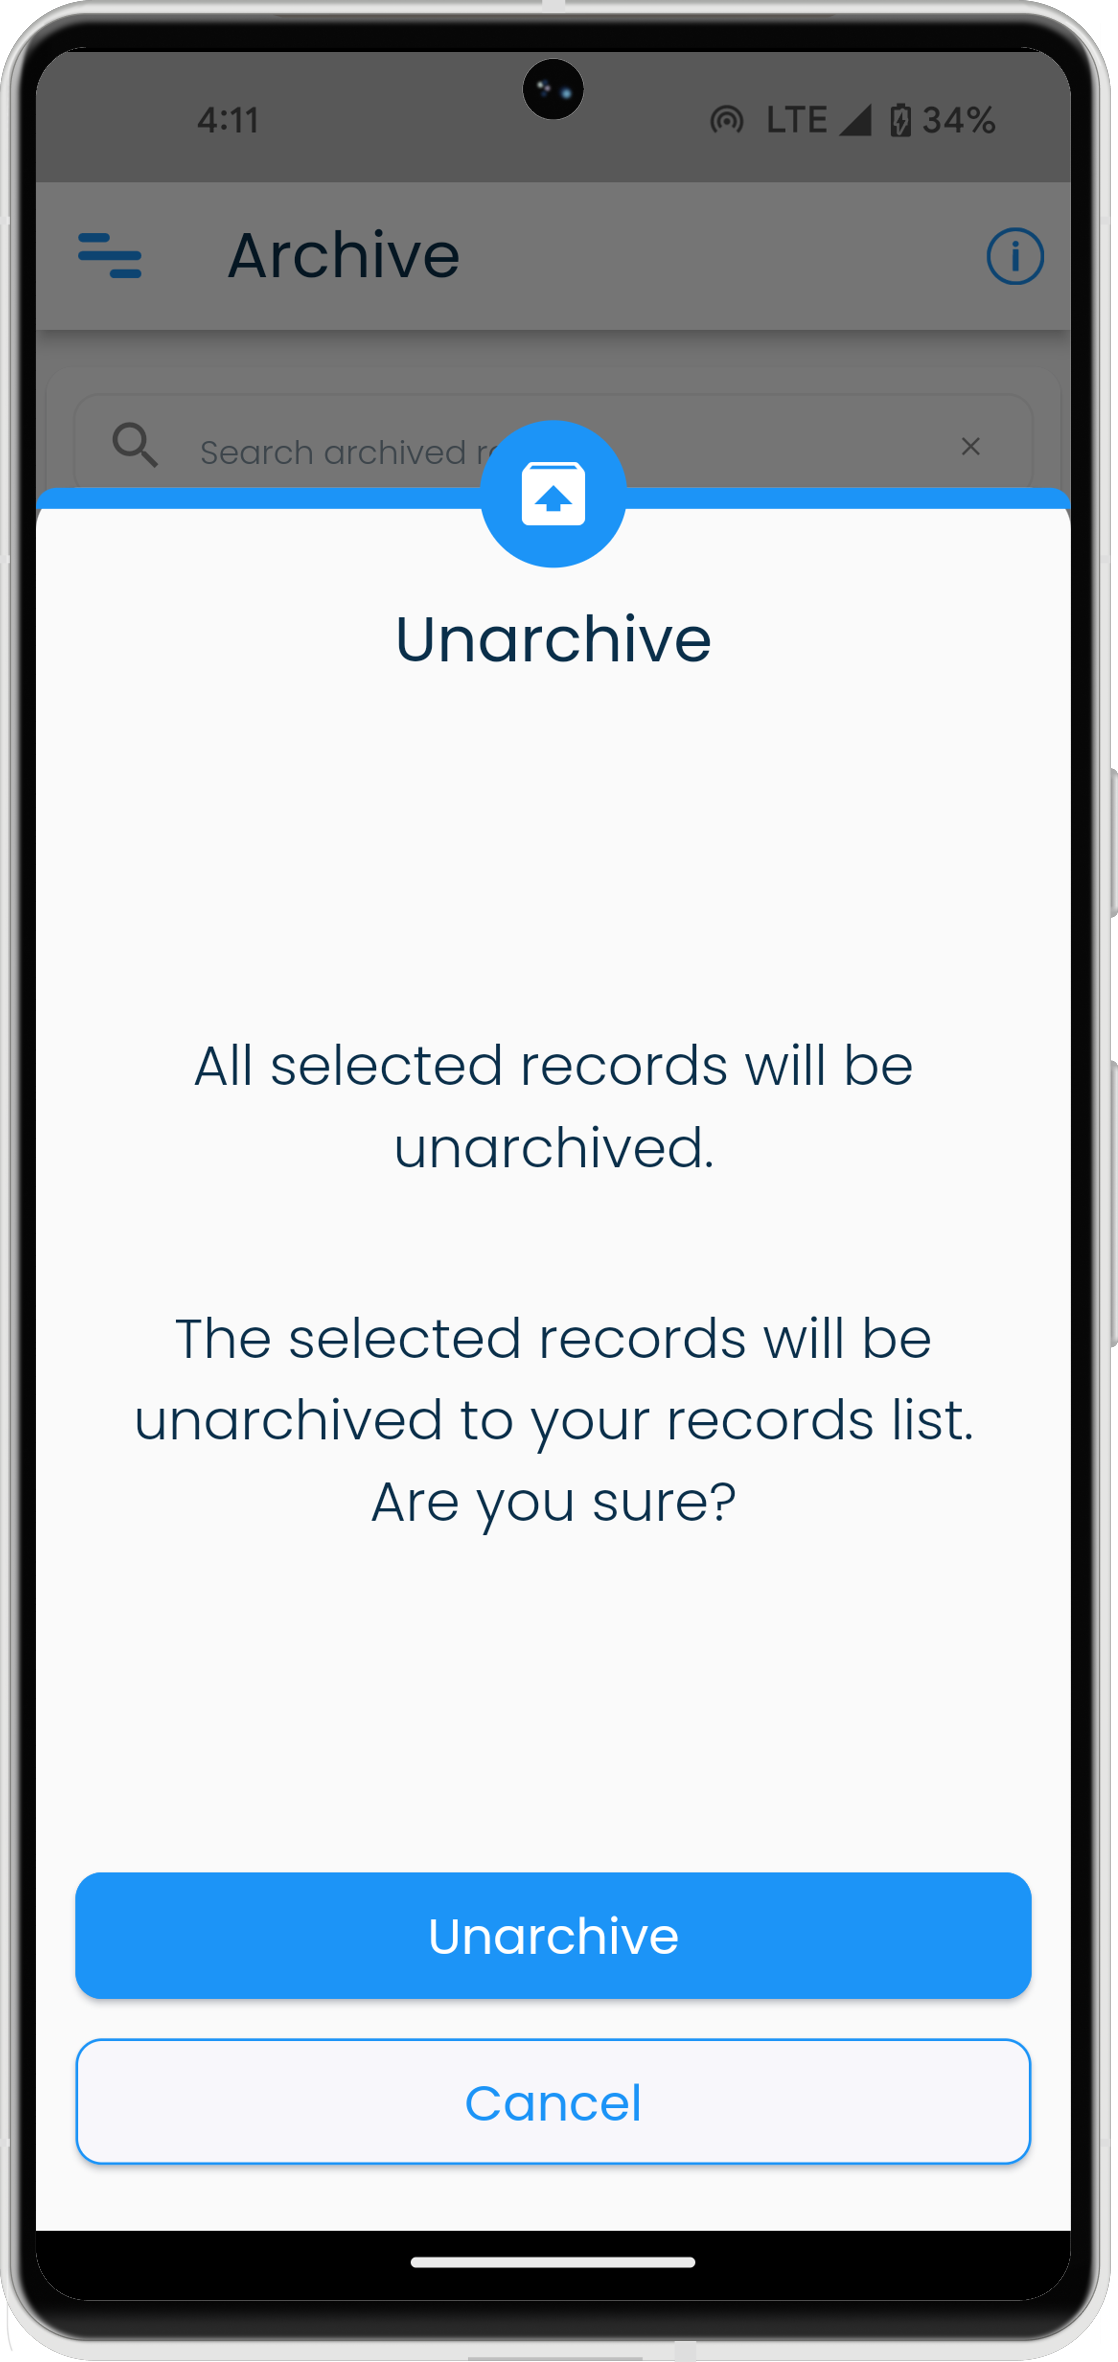
Unarchive a record
- Visit the Archive screen from the application menu.
- Select a record in the archived record list.
- Click or tap on the Unarchive icon in the record details header to unarchive the record.
- Confirm by clicking or tapping on the Unarchive button to proceed with archiving the record.
| Mac | Windows |
|---|---|
 |
 |
| Android | iPhone |
|---|---|
  |
  |
| iPad |
|---|
 |
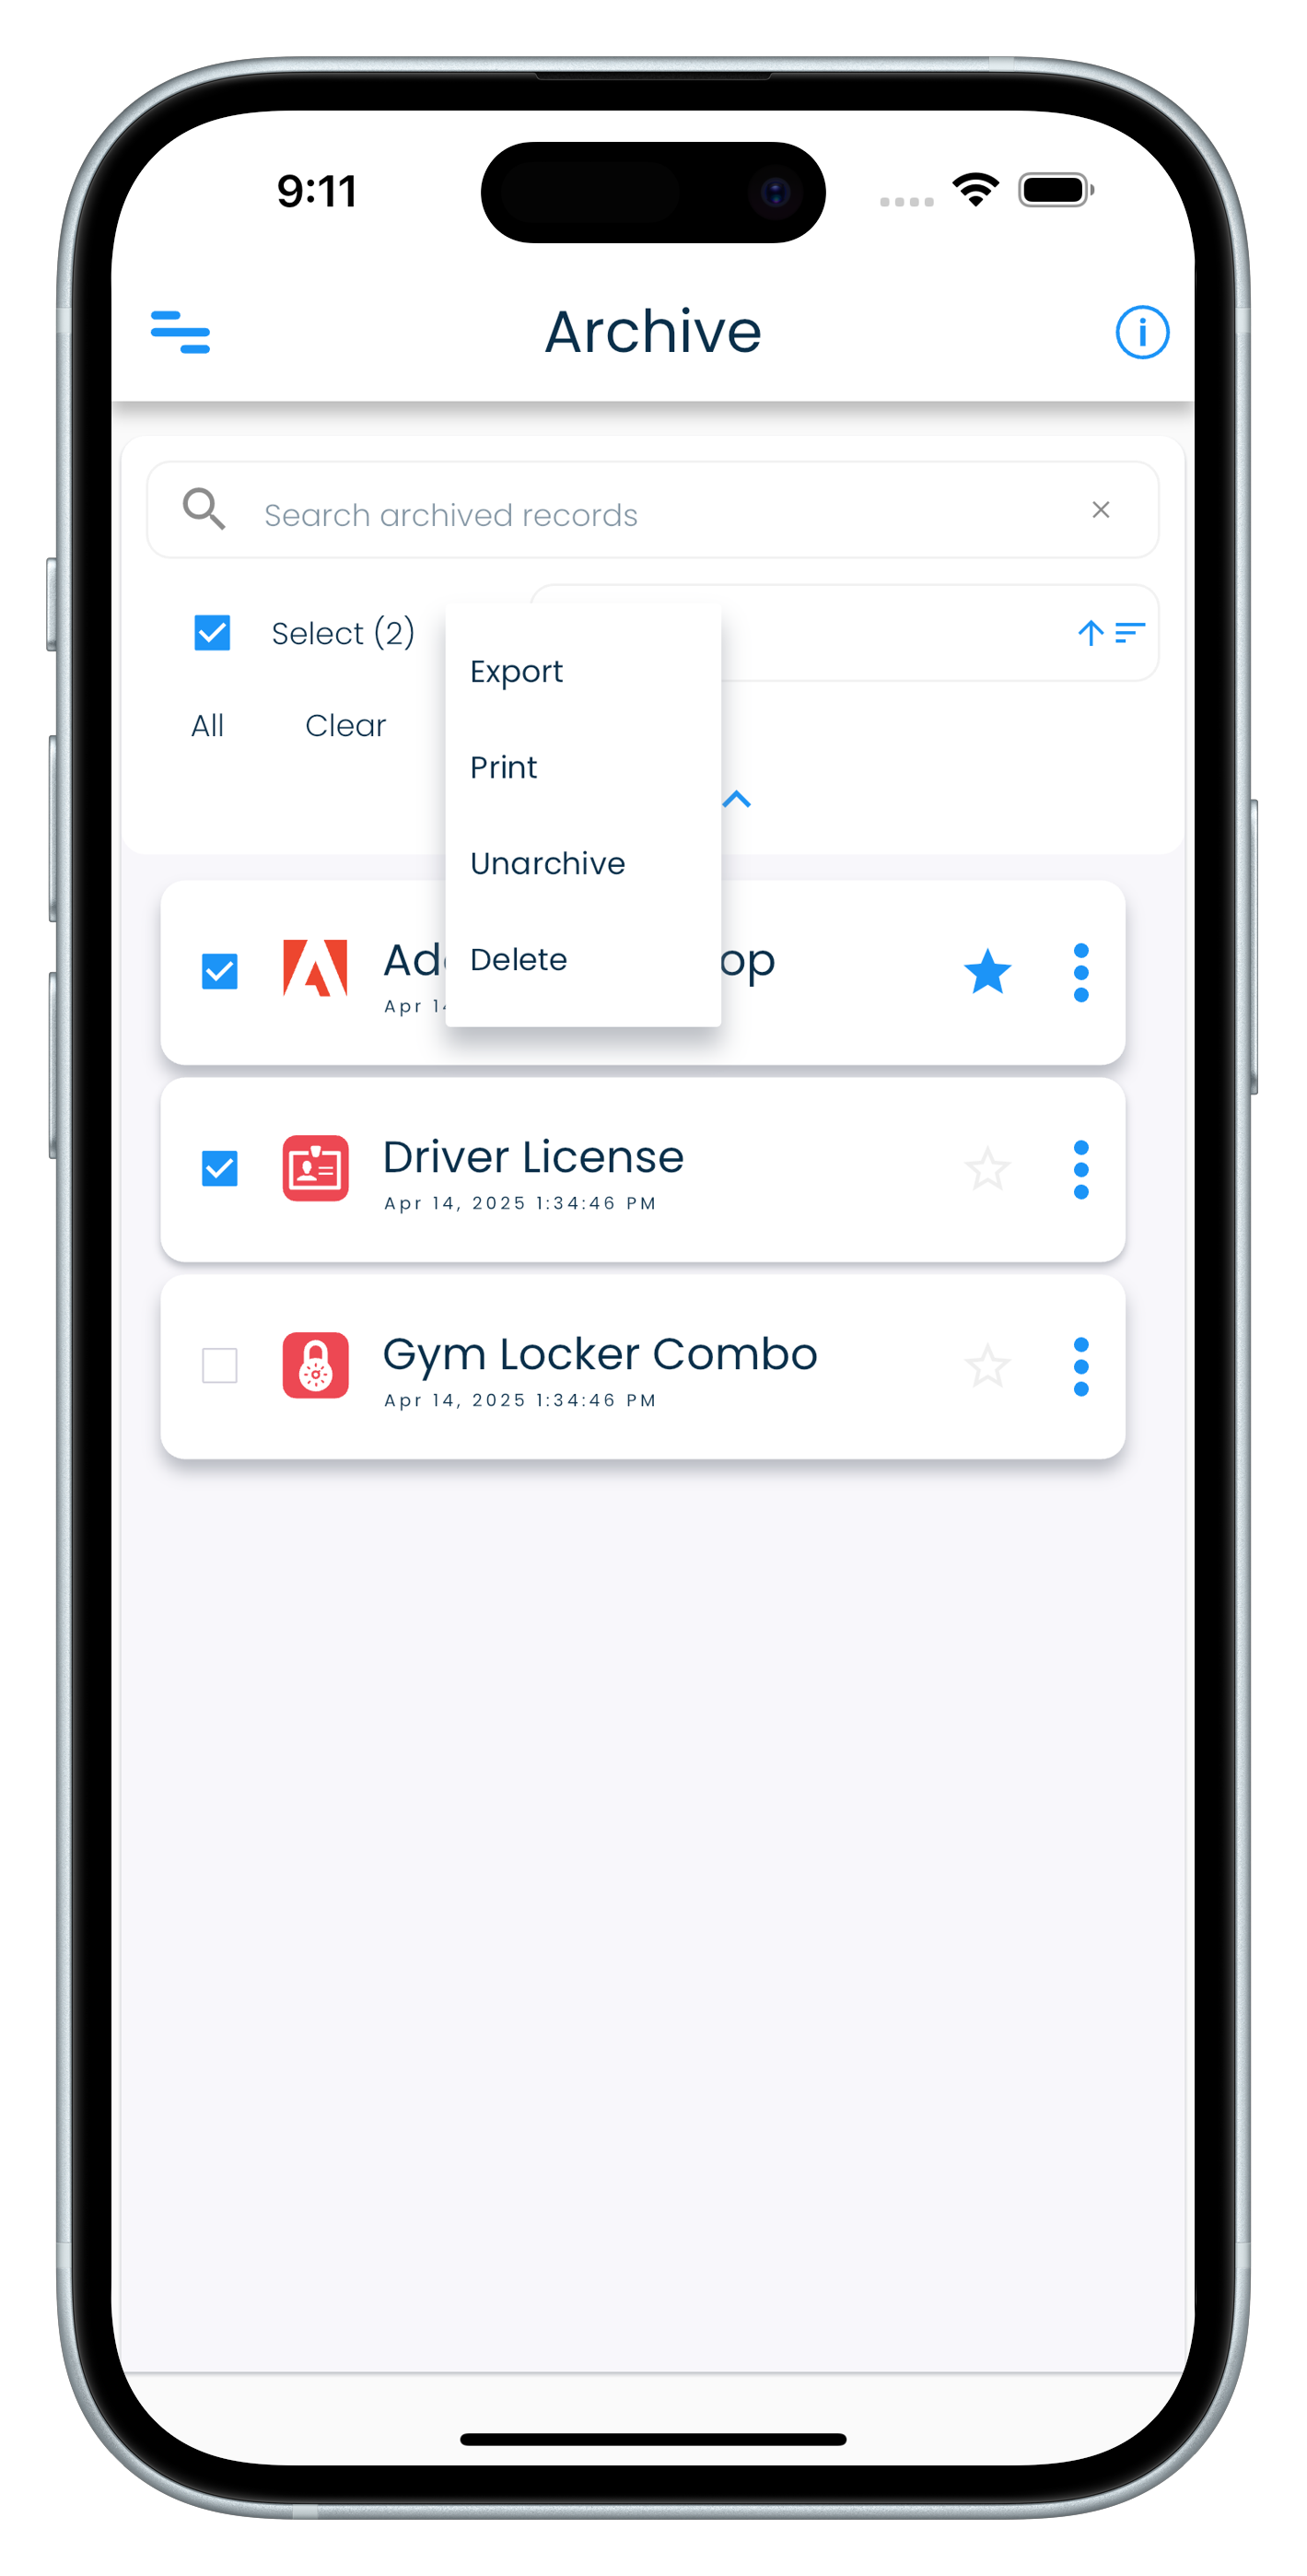
Another way to unarchive a record
- Visit the Archive screen from the application menu.
- Locate the record in the archived record list.
- Click or tap on the three dots icon to bring up the list of actions.
- Click or tap on Unarchive option.
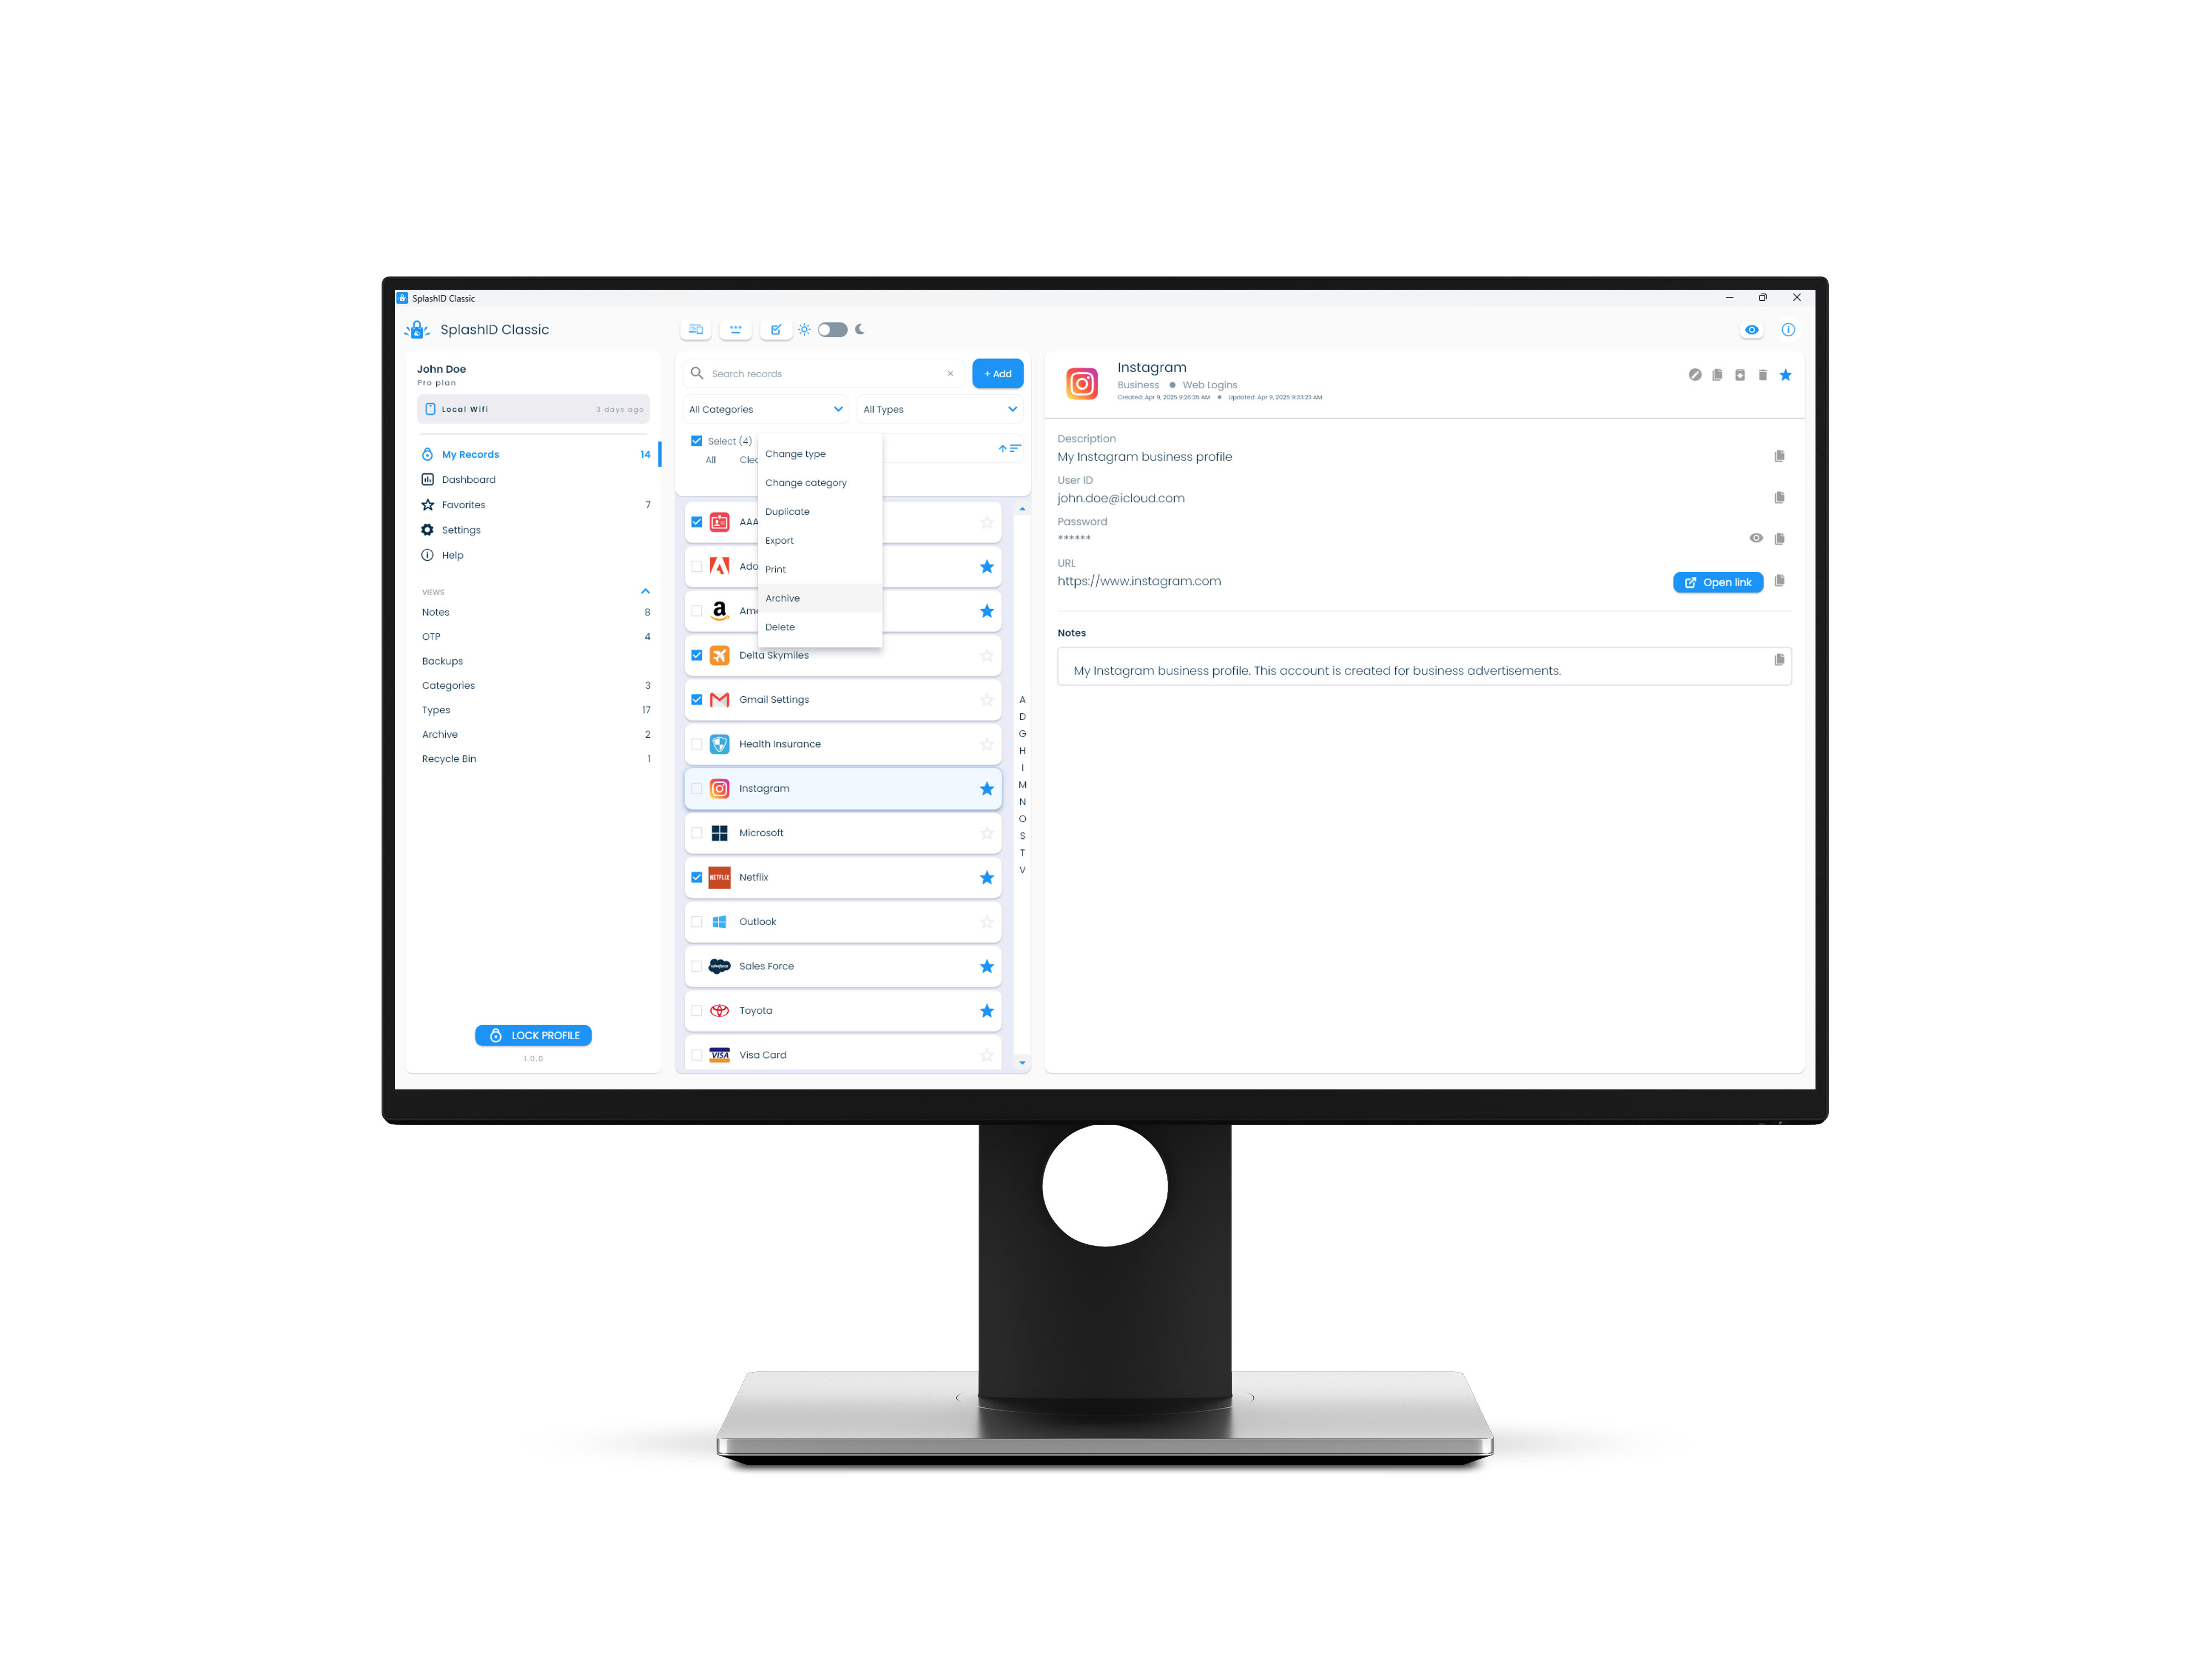
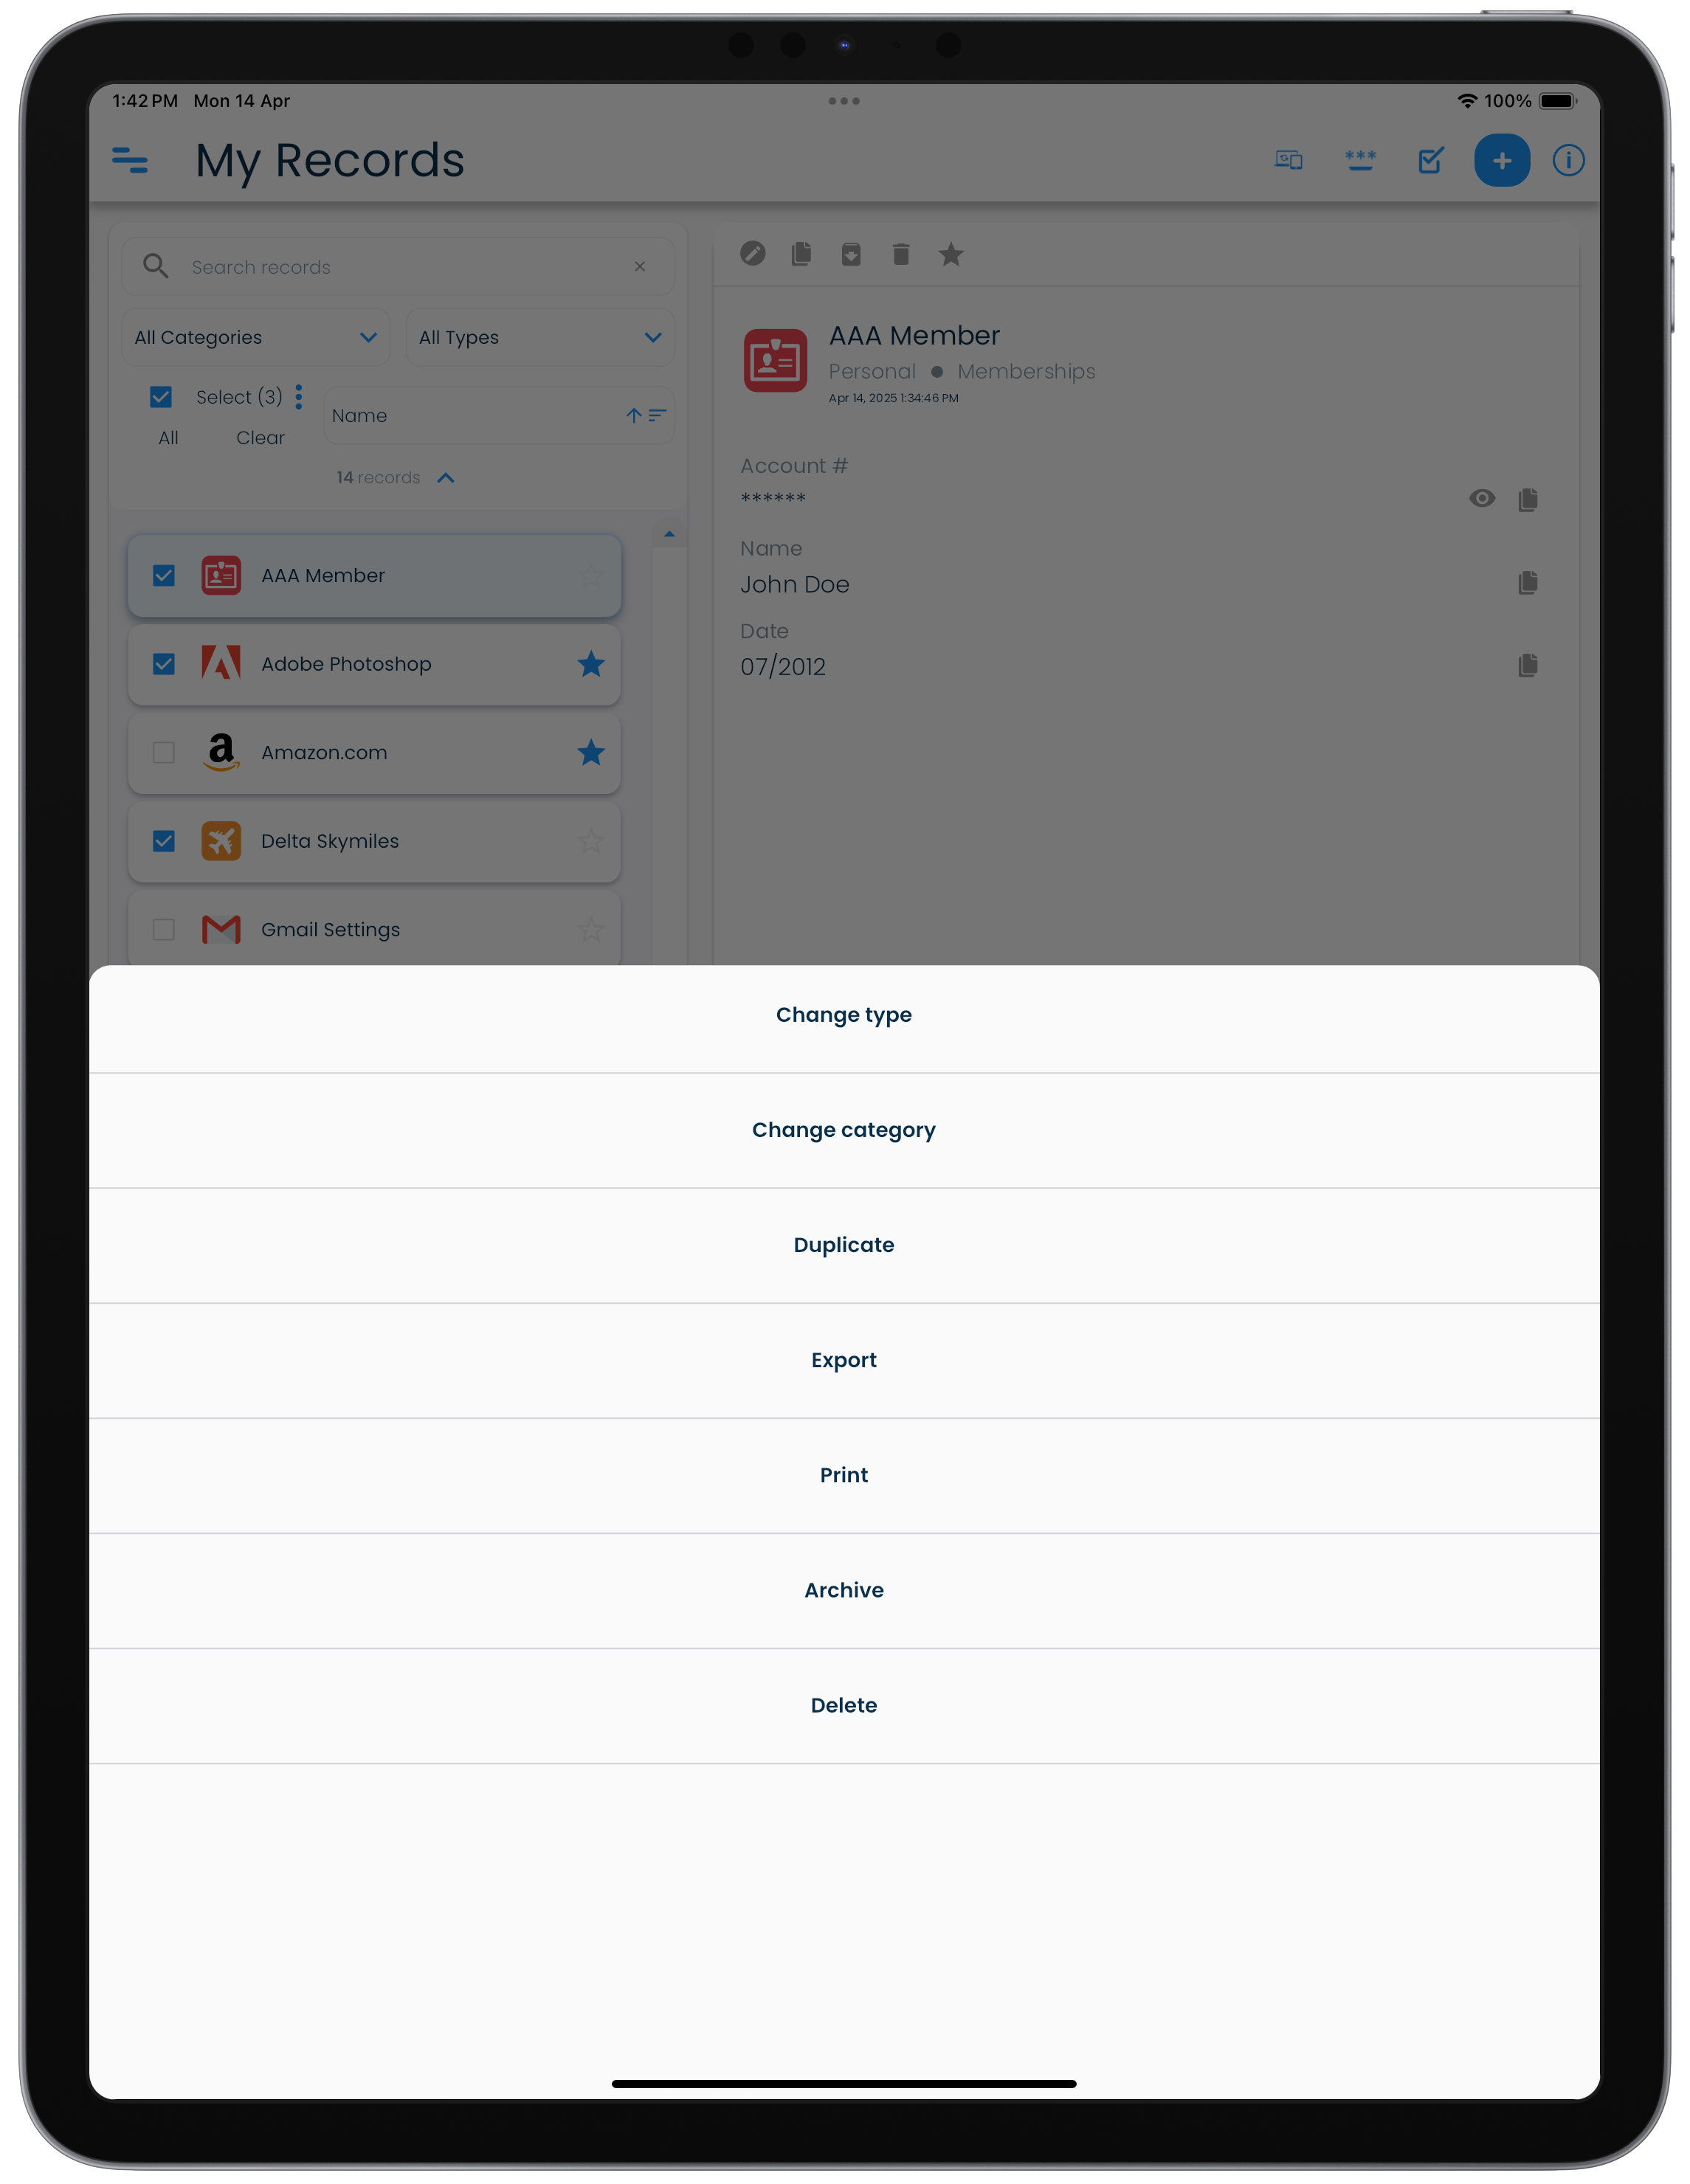
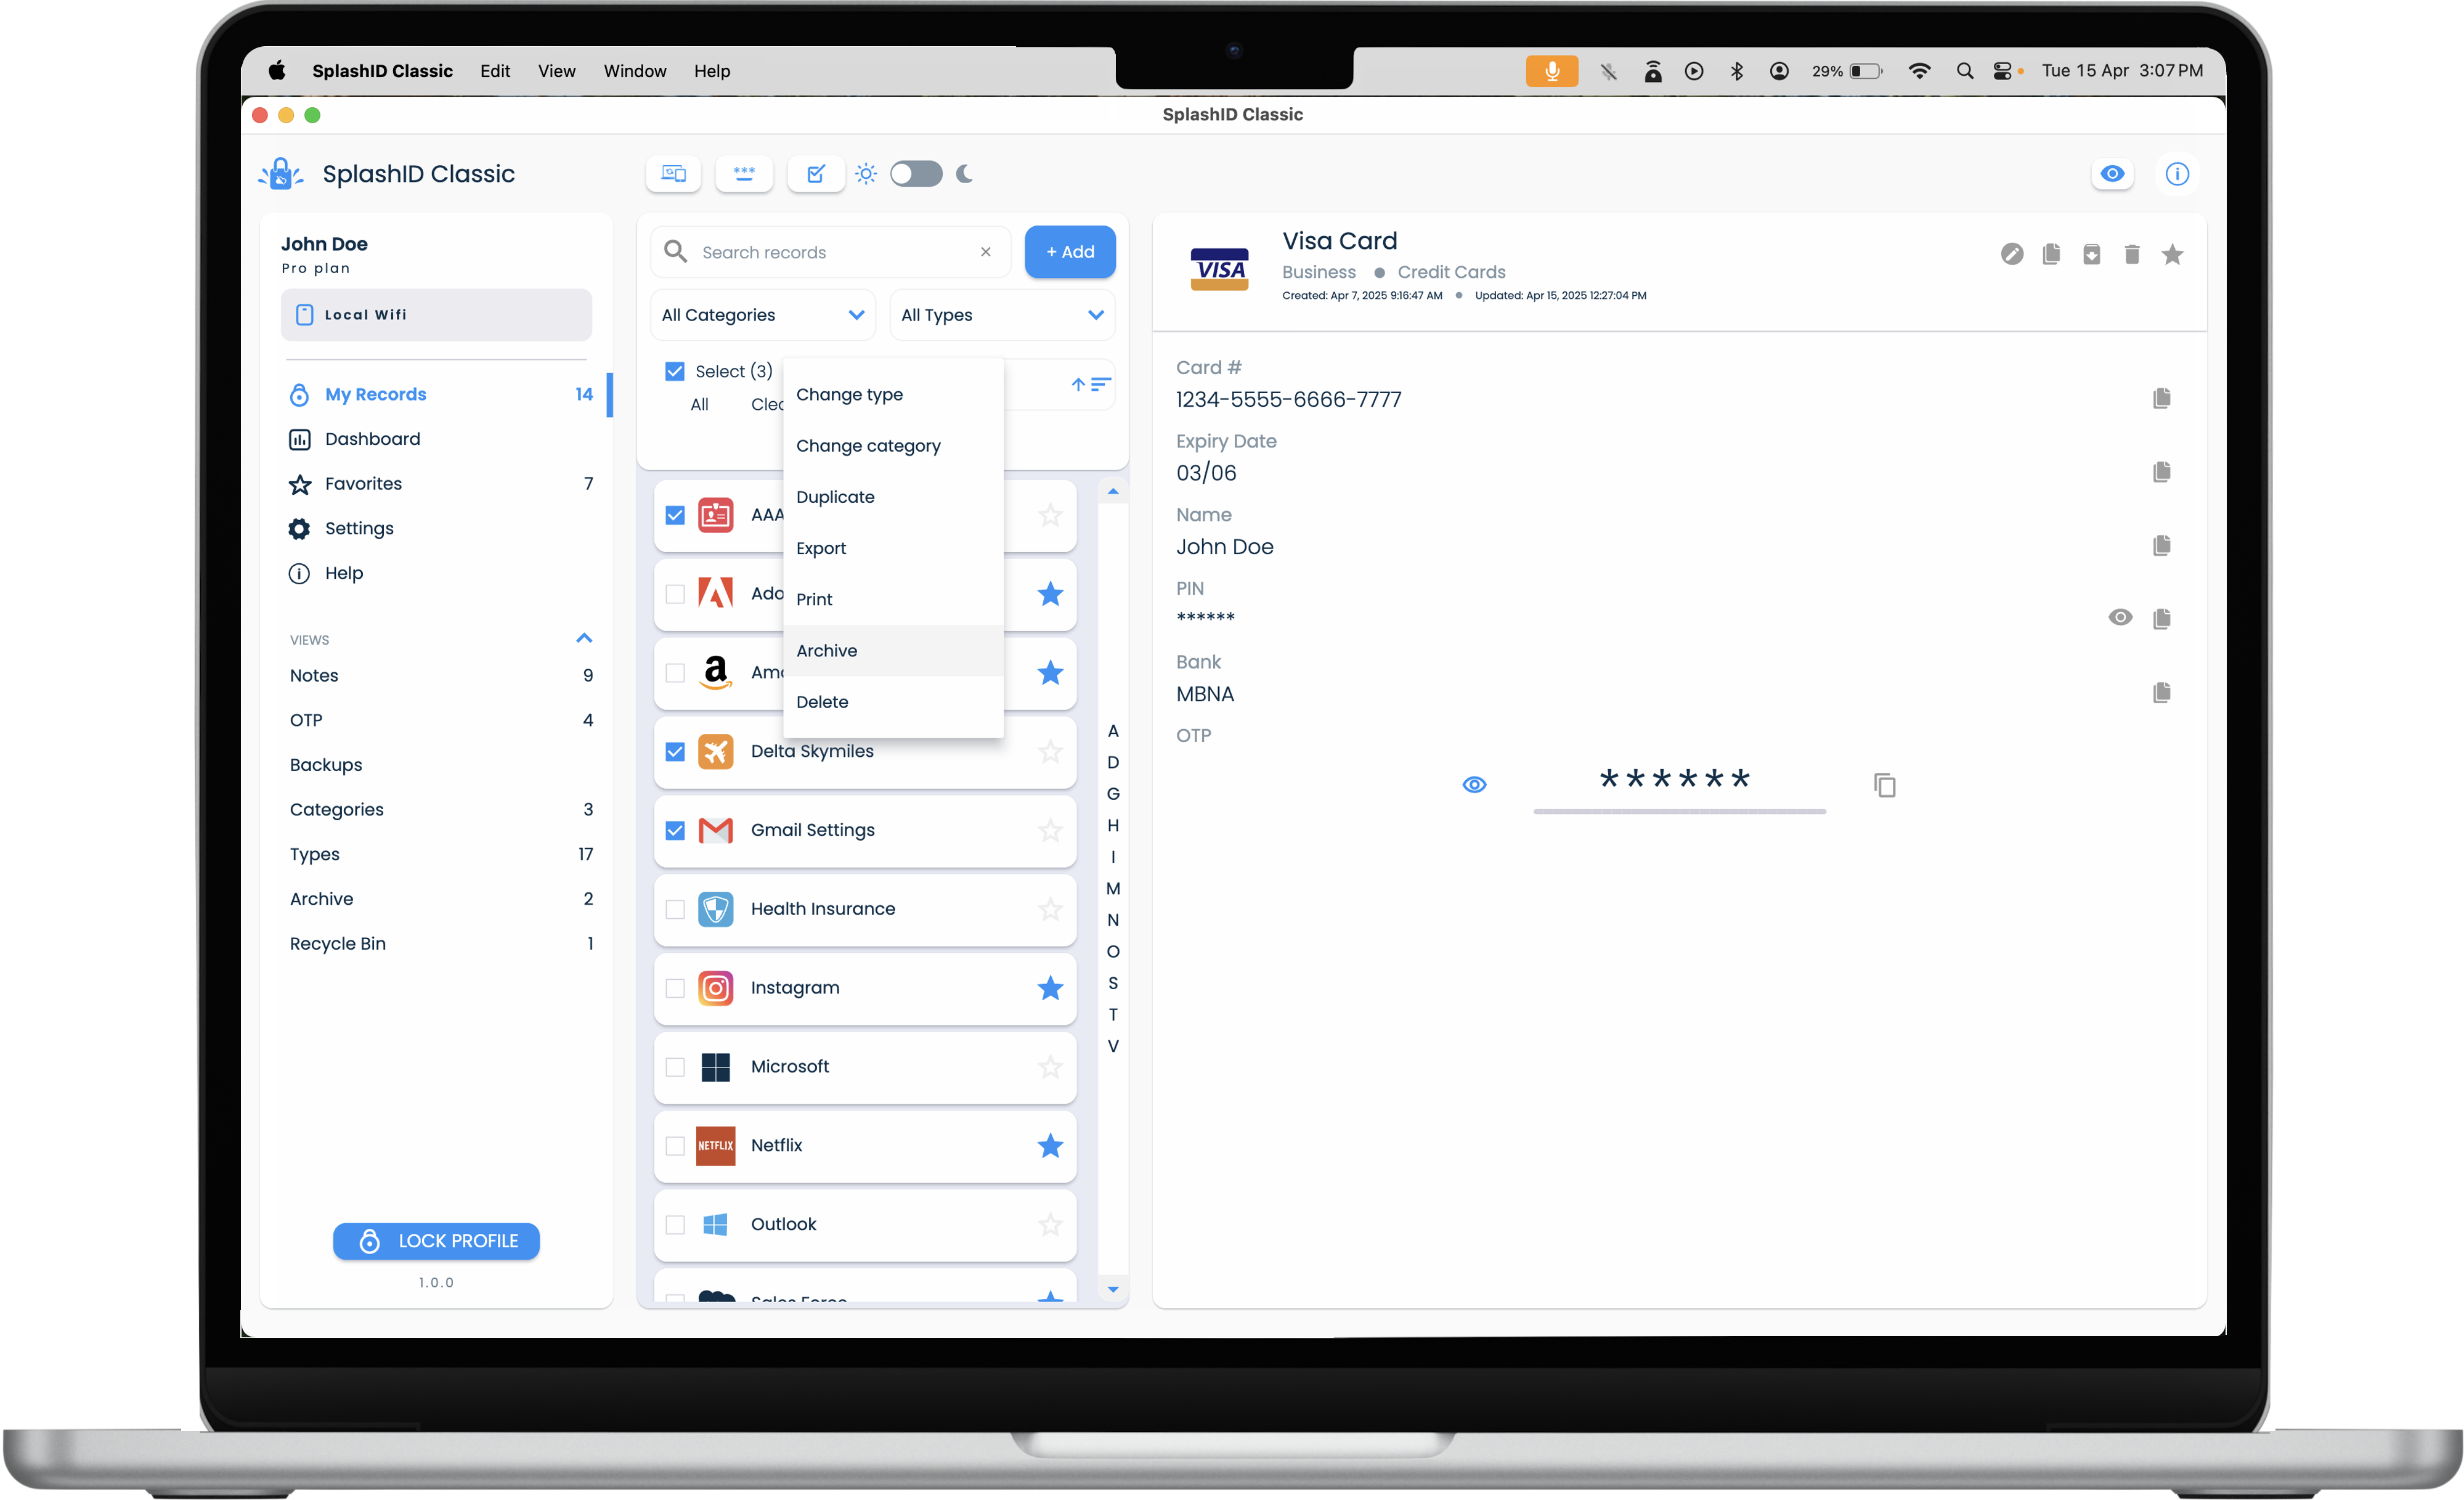
Archive multiple records
- Visit the My Records screen from the application menu.
- Expand the filter panel if it is collapsed by clicking or tapping on the Down arrow icon.
- Click or tap on the Select checkbox.
- Select the records that you want to archive.
- Click or tap on the three dots icon in the filter panel next to Select to bring up the list of actions.
- Click or tap on Archive option.
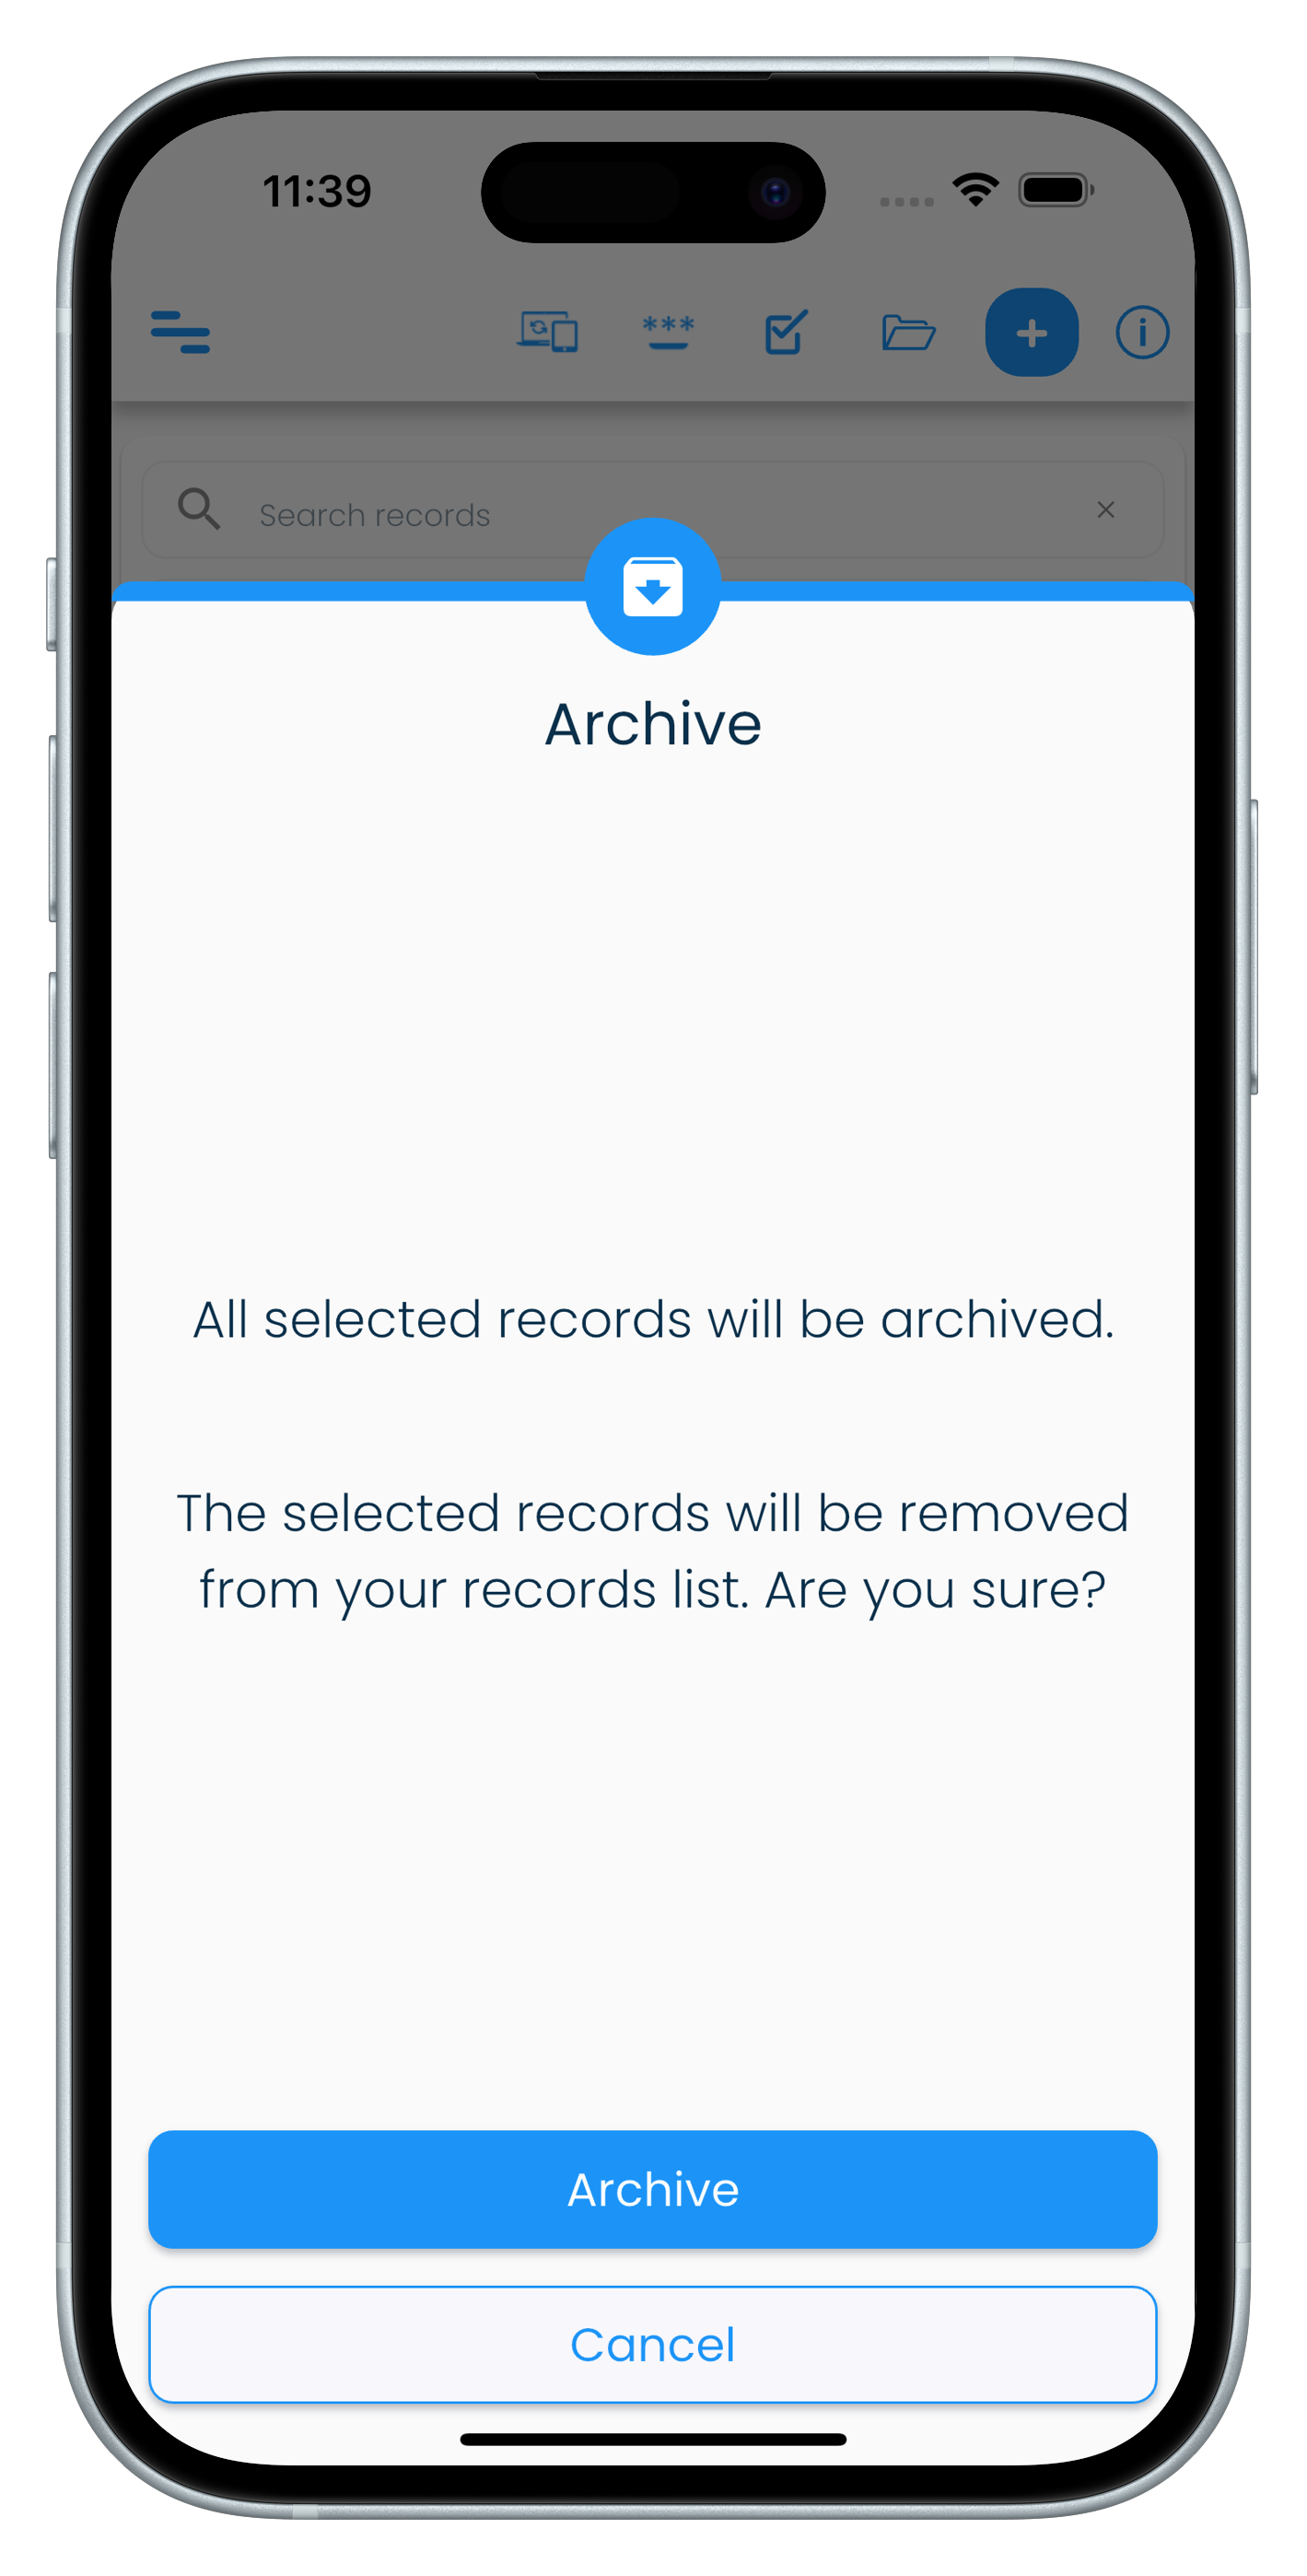
- Confirm by clicking or tapping on the Archive button to proceed with archiving the selected records.
| Mac | Windows |
|---|---|
 |
|
| Android | iPhone |
|---|---|
| |
|
| iPad |
|---|
|
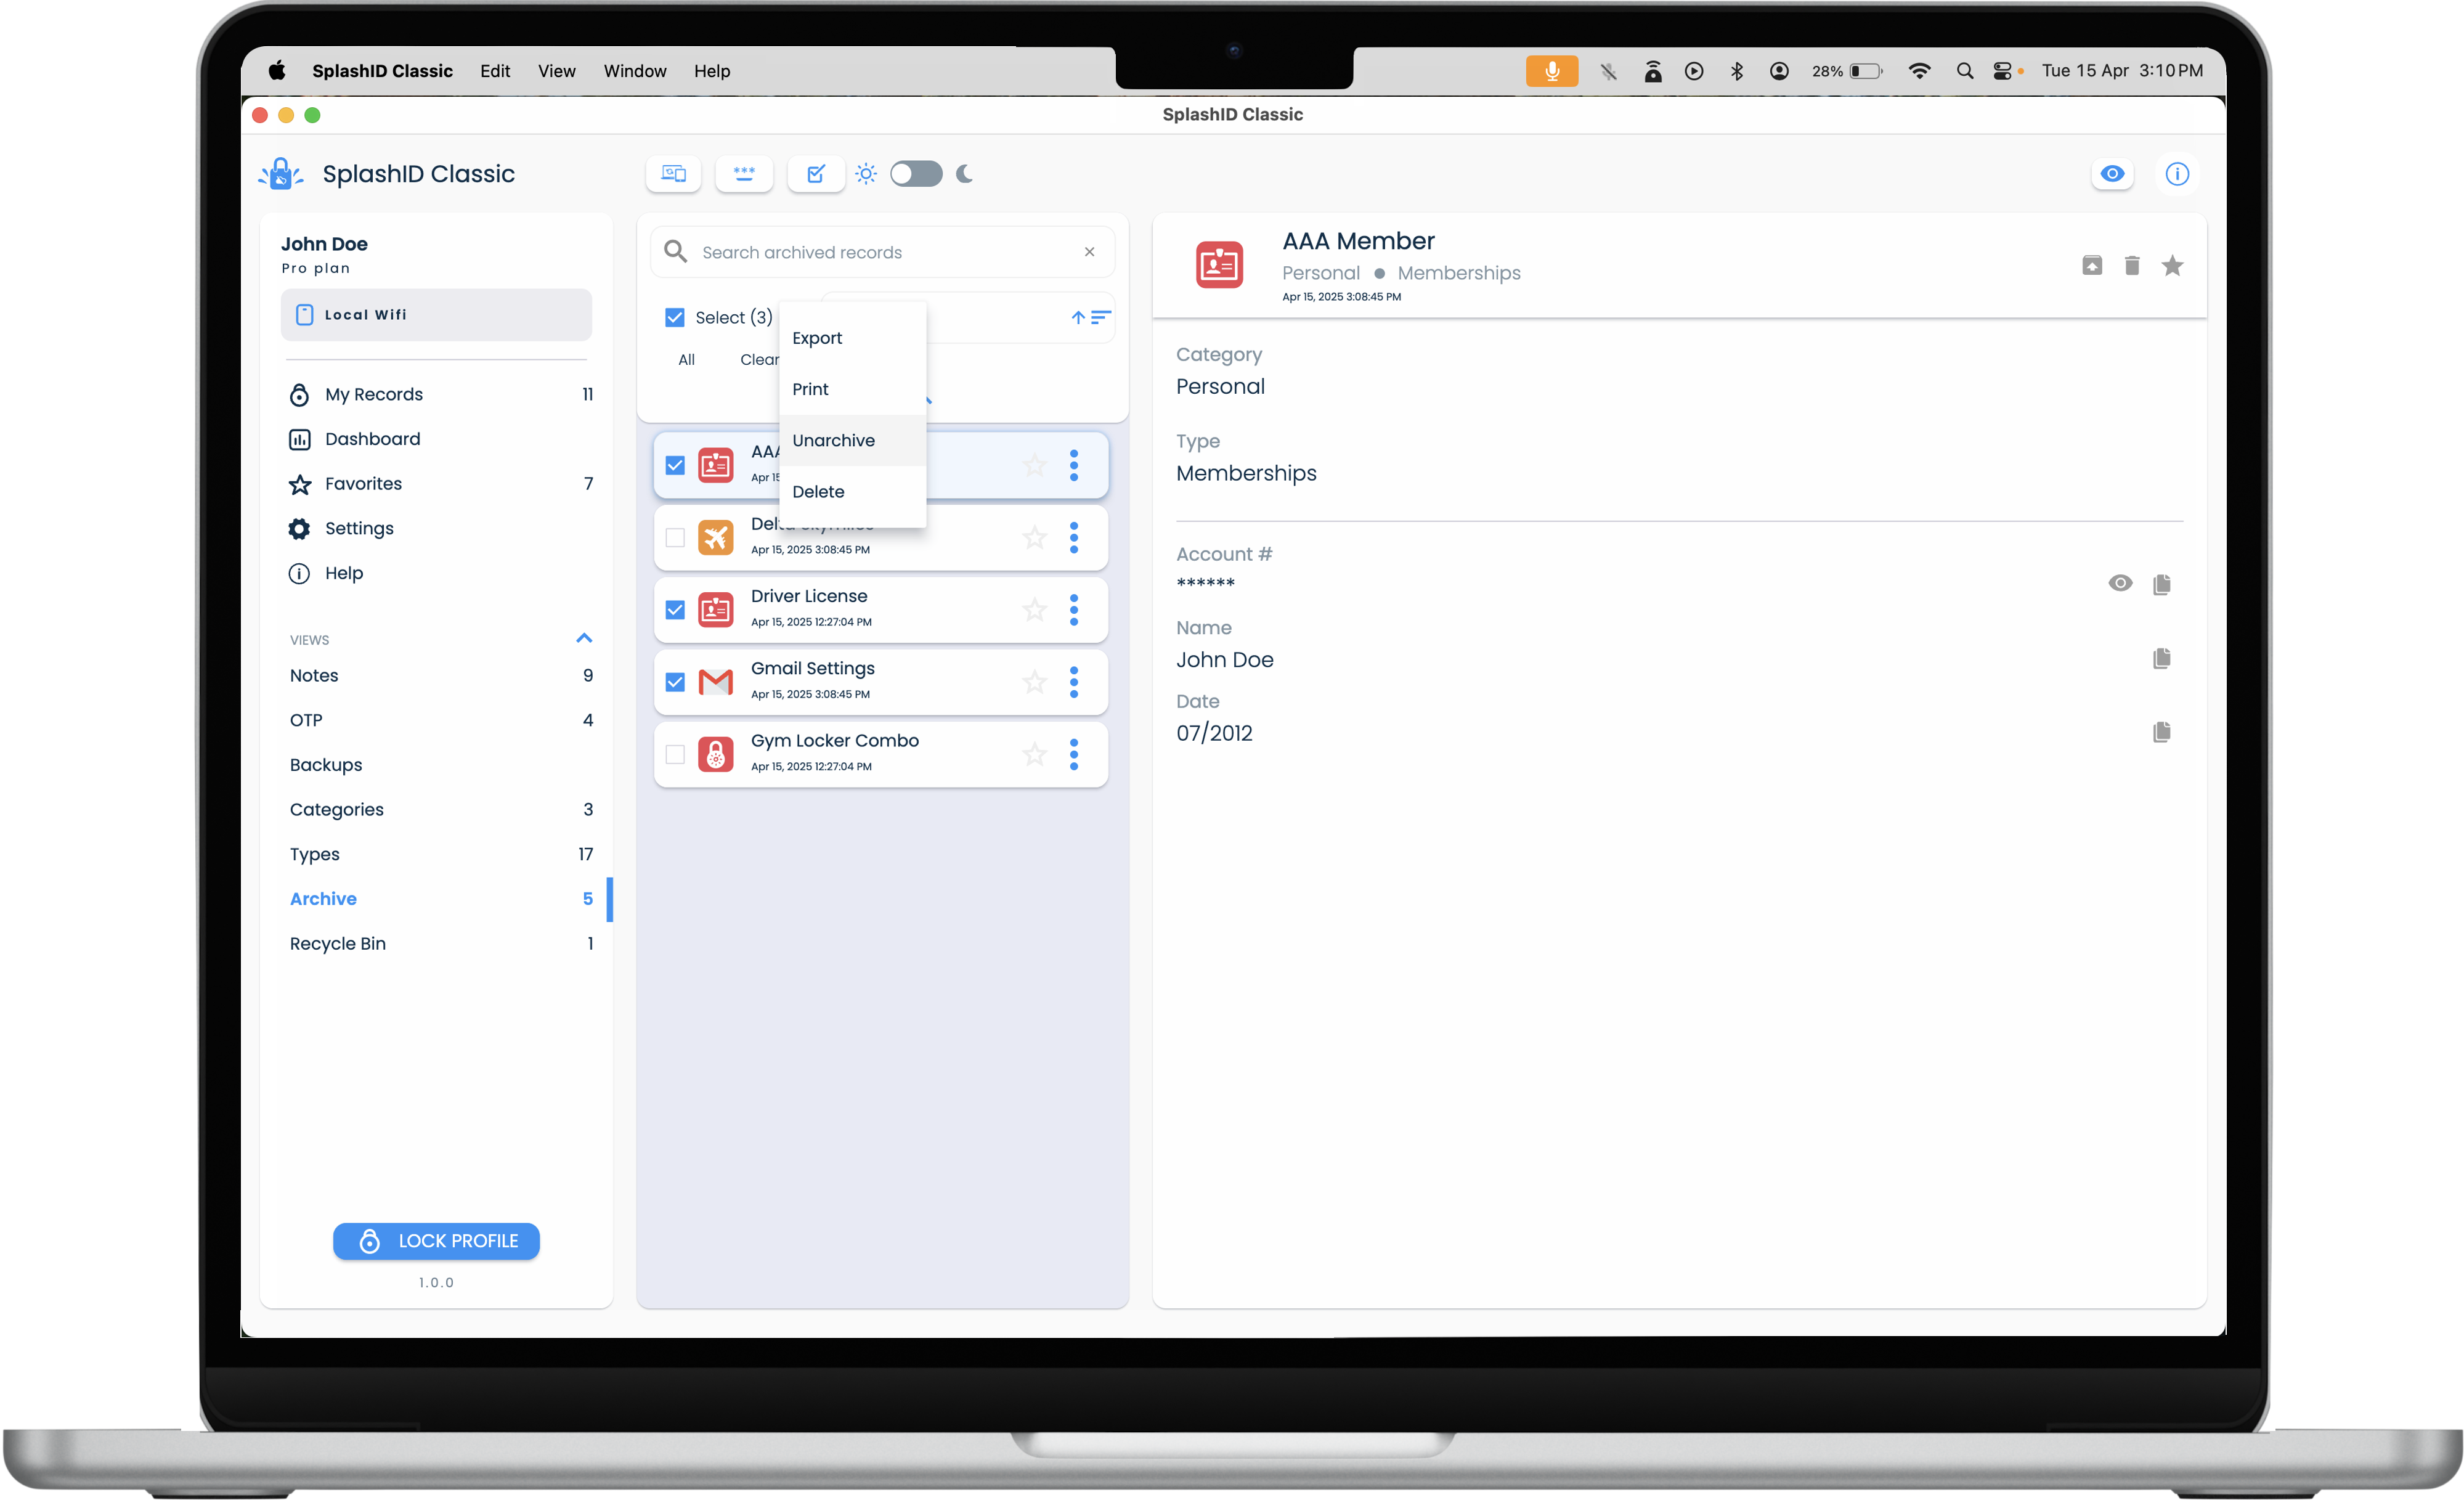
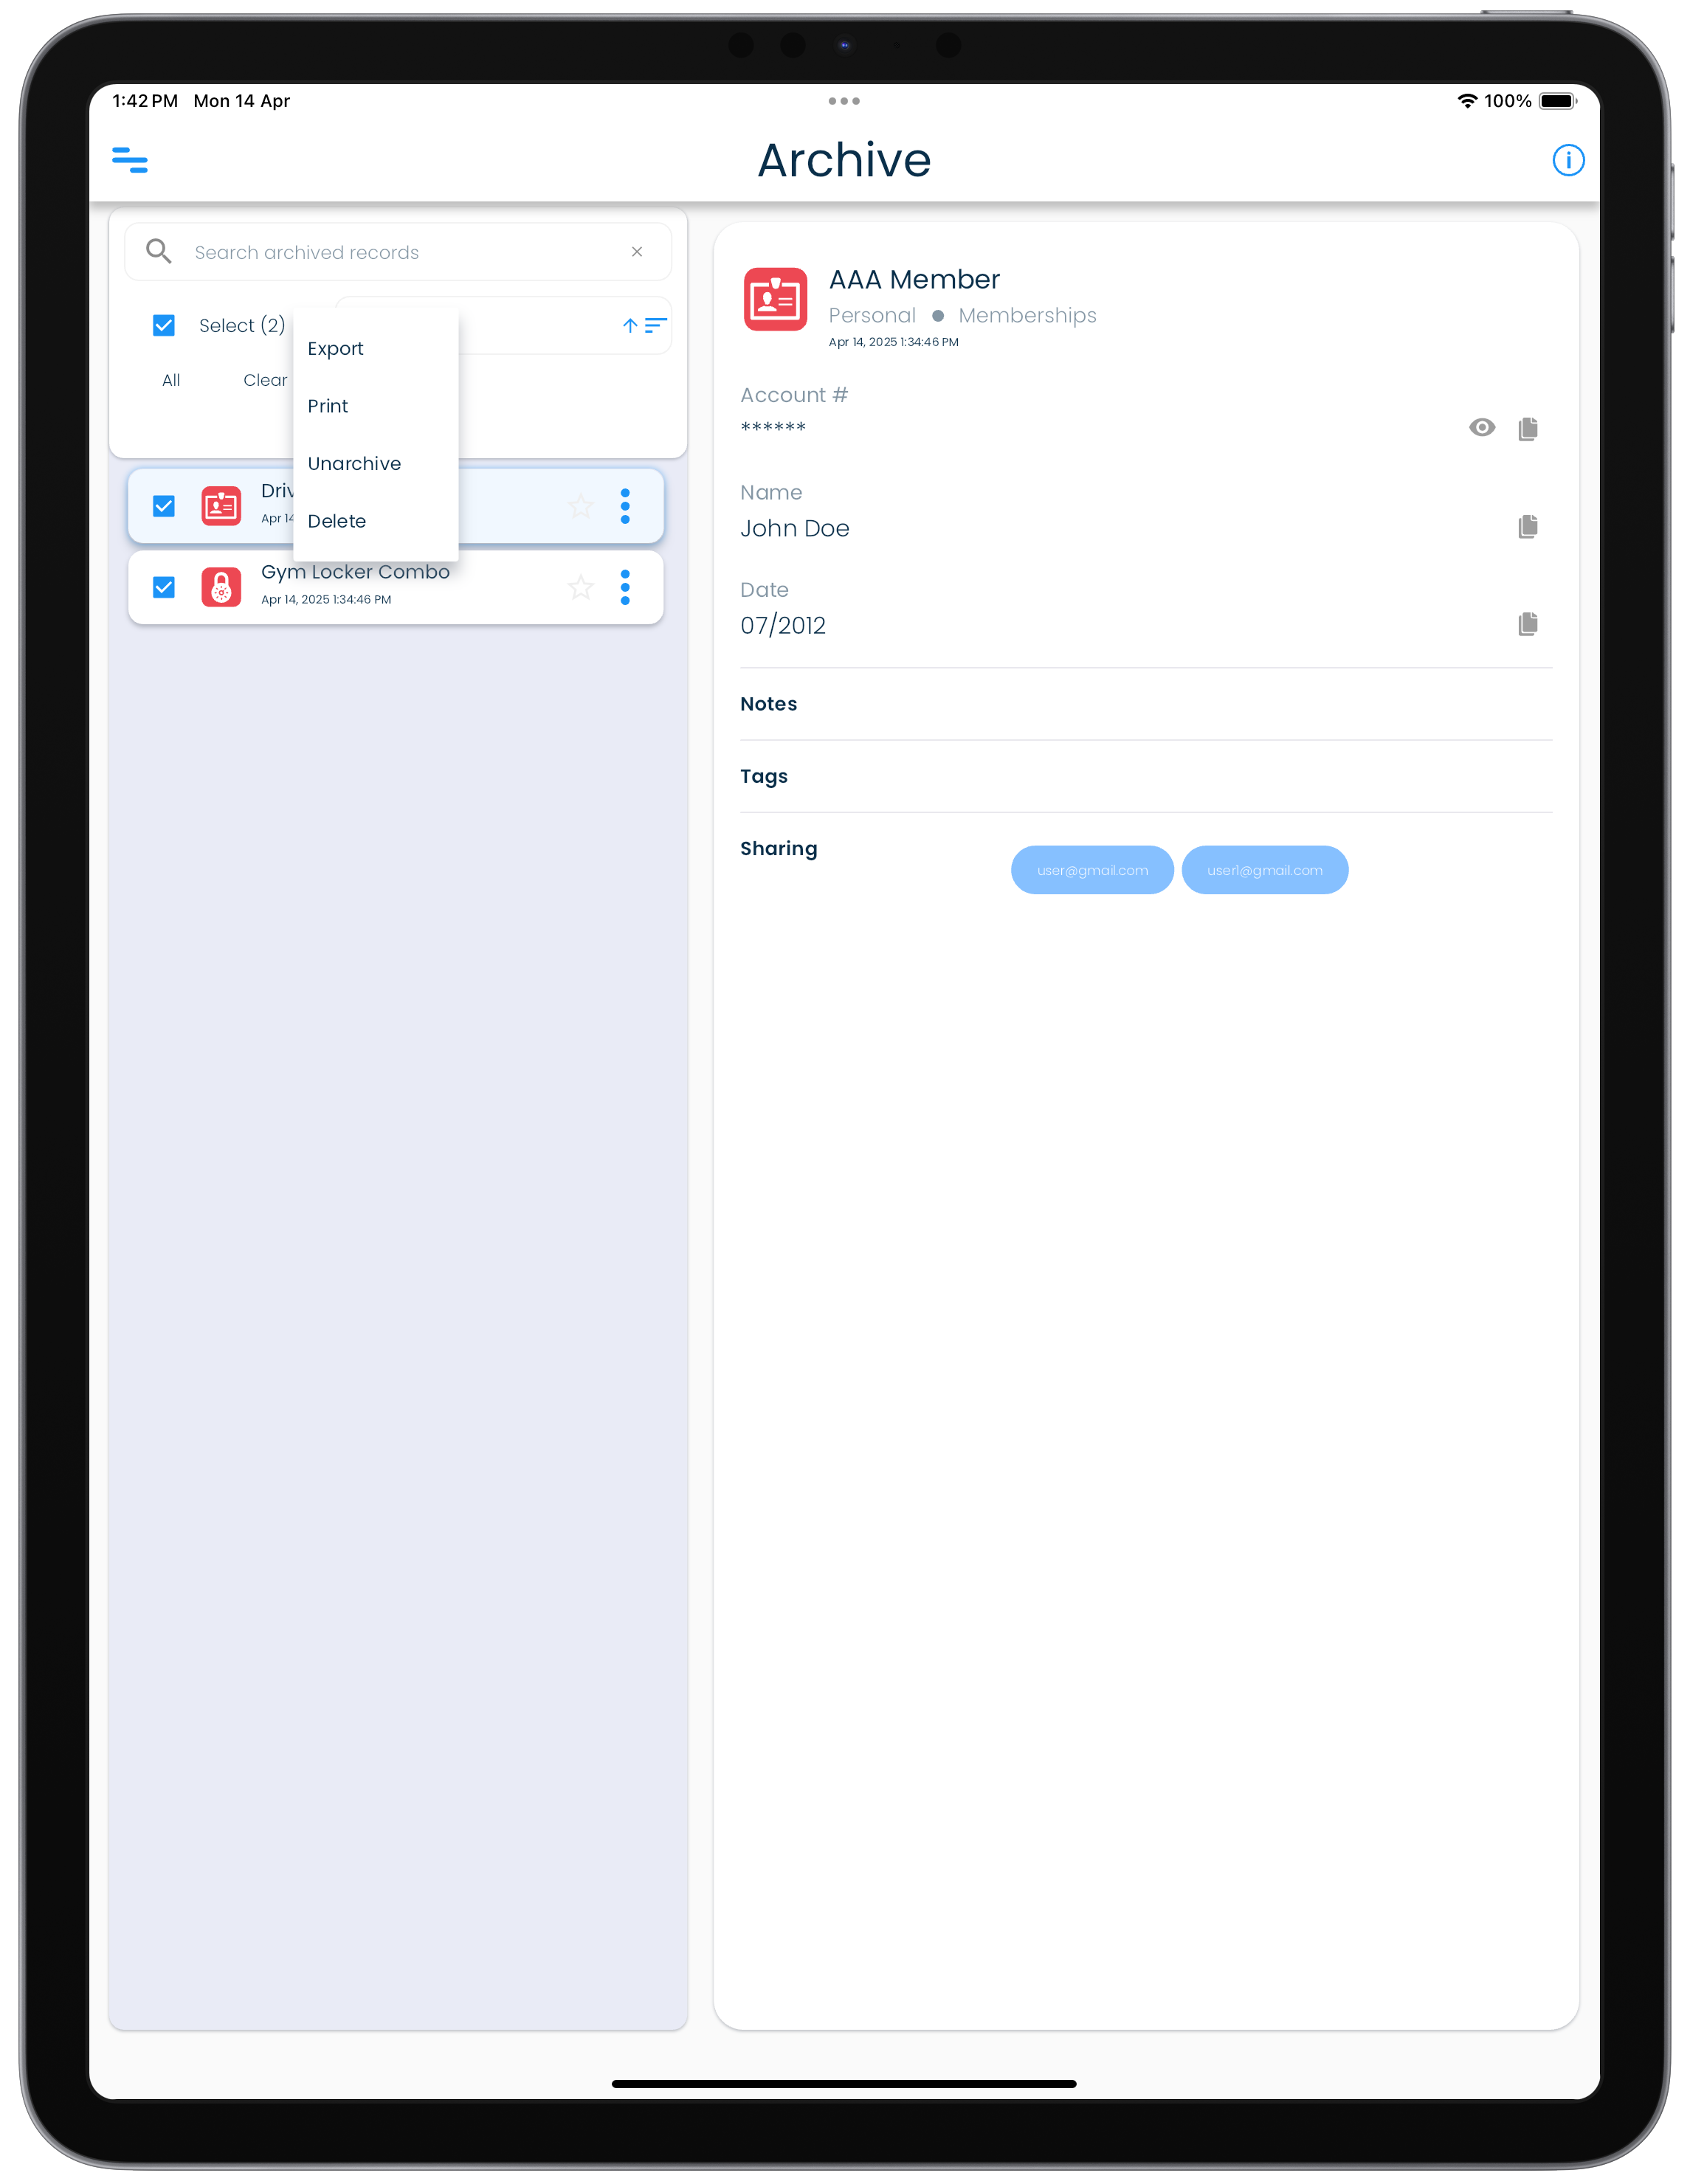
Unarchive multiple records
- Visit the Archive screen from the application menu.
- Expand the filter panel if it is collapsed by clicking or tapping on the Down arrow icon.
- Click or tap on the Select checkbox.
- Select the records that you want to unarchive.
- Click or tap on the three dots icon in the filter panel next to Select to bring up the list of actions.
- Click or tap on Unarchive option.
- Confirm by clicking or tapping on the Unarchive button to proceed with archiving the selected records.
| Mac | Windows |
|---|---|
 |
 |
| Android | iPhone |
|---|---|
 |
 |
| iPad |
|---|
 |
Deleting
Deleting a record sends it to a Recycle Bin. The Recycle Bin is a temporary holding area for your deleted records till you decide what to do with them.
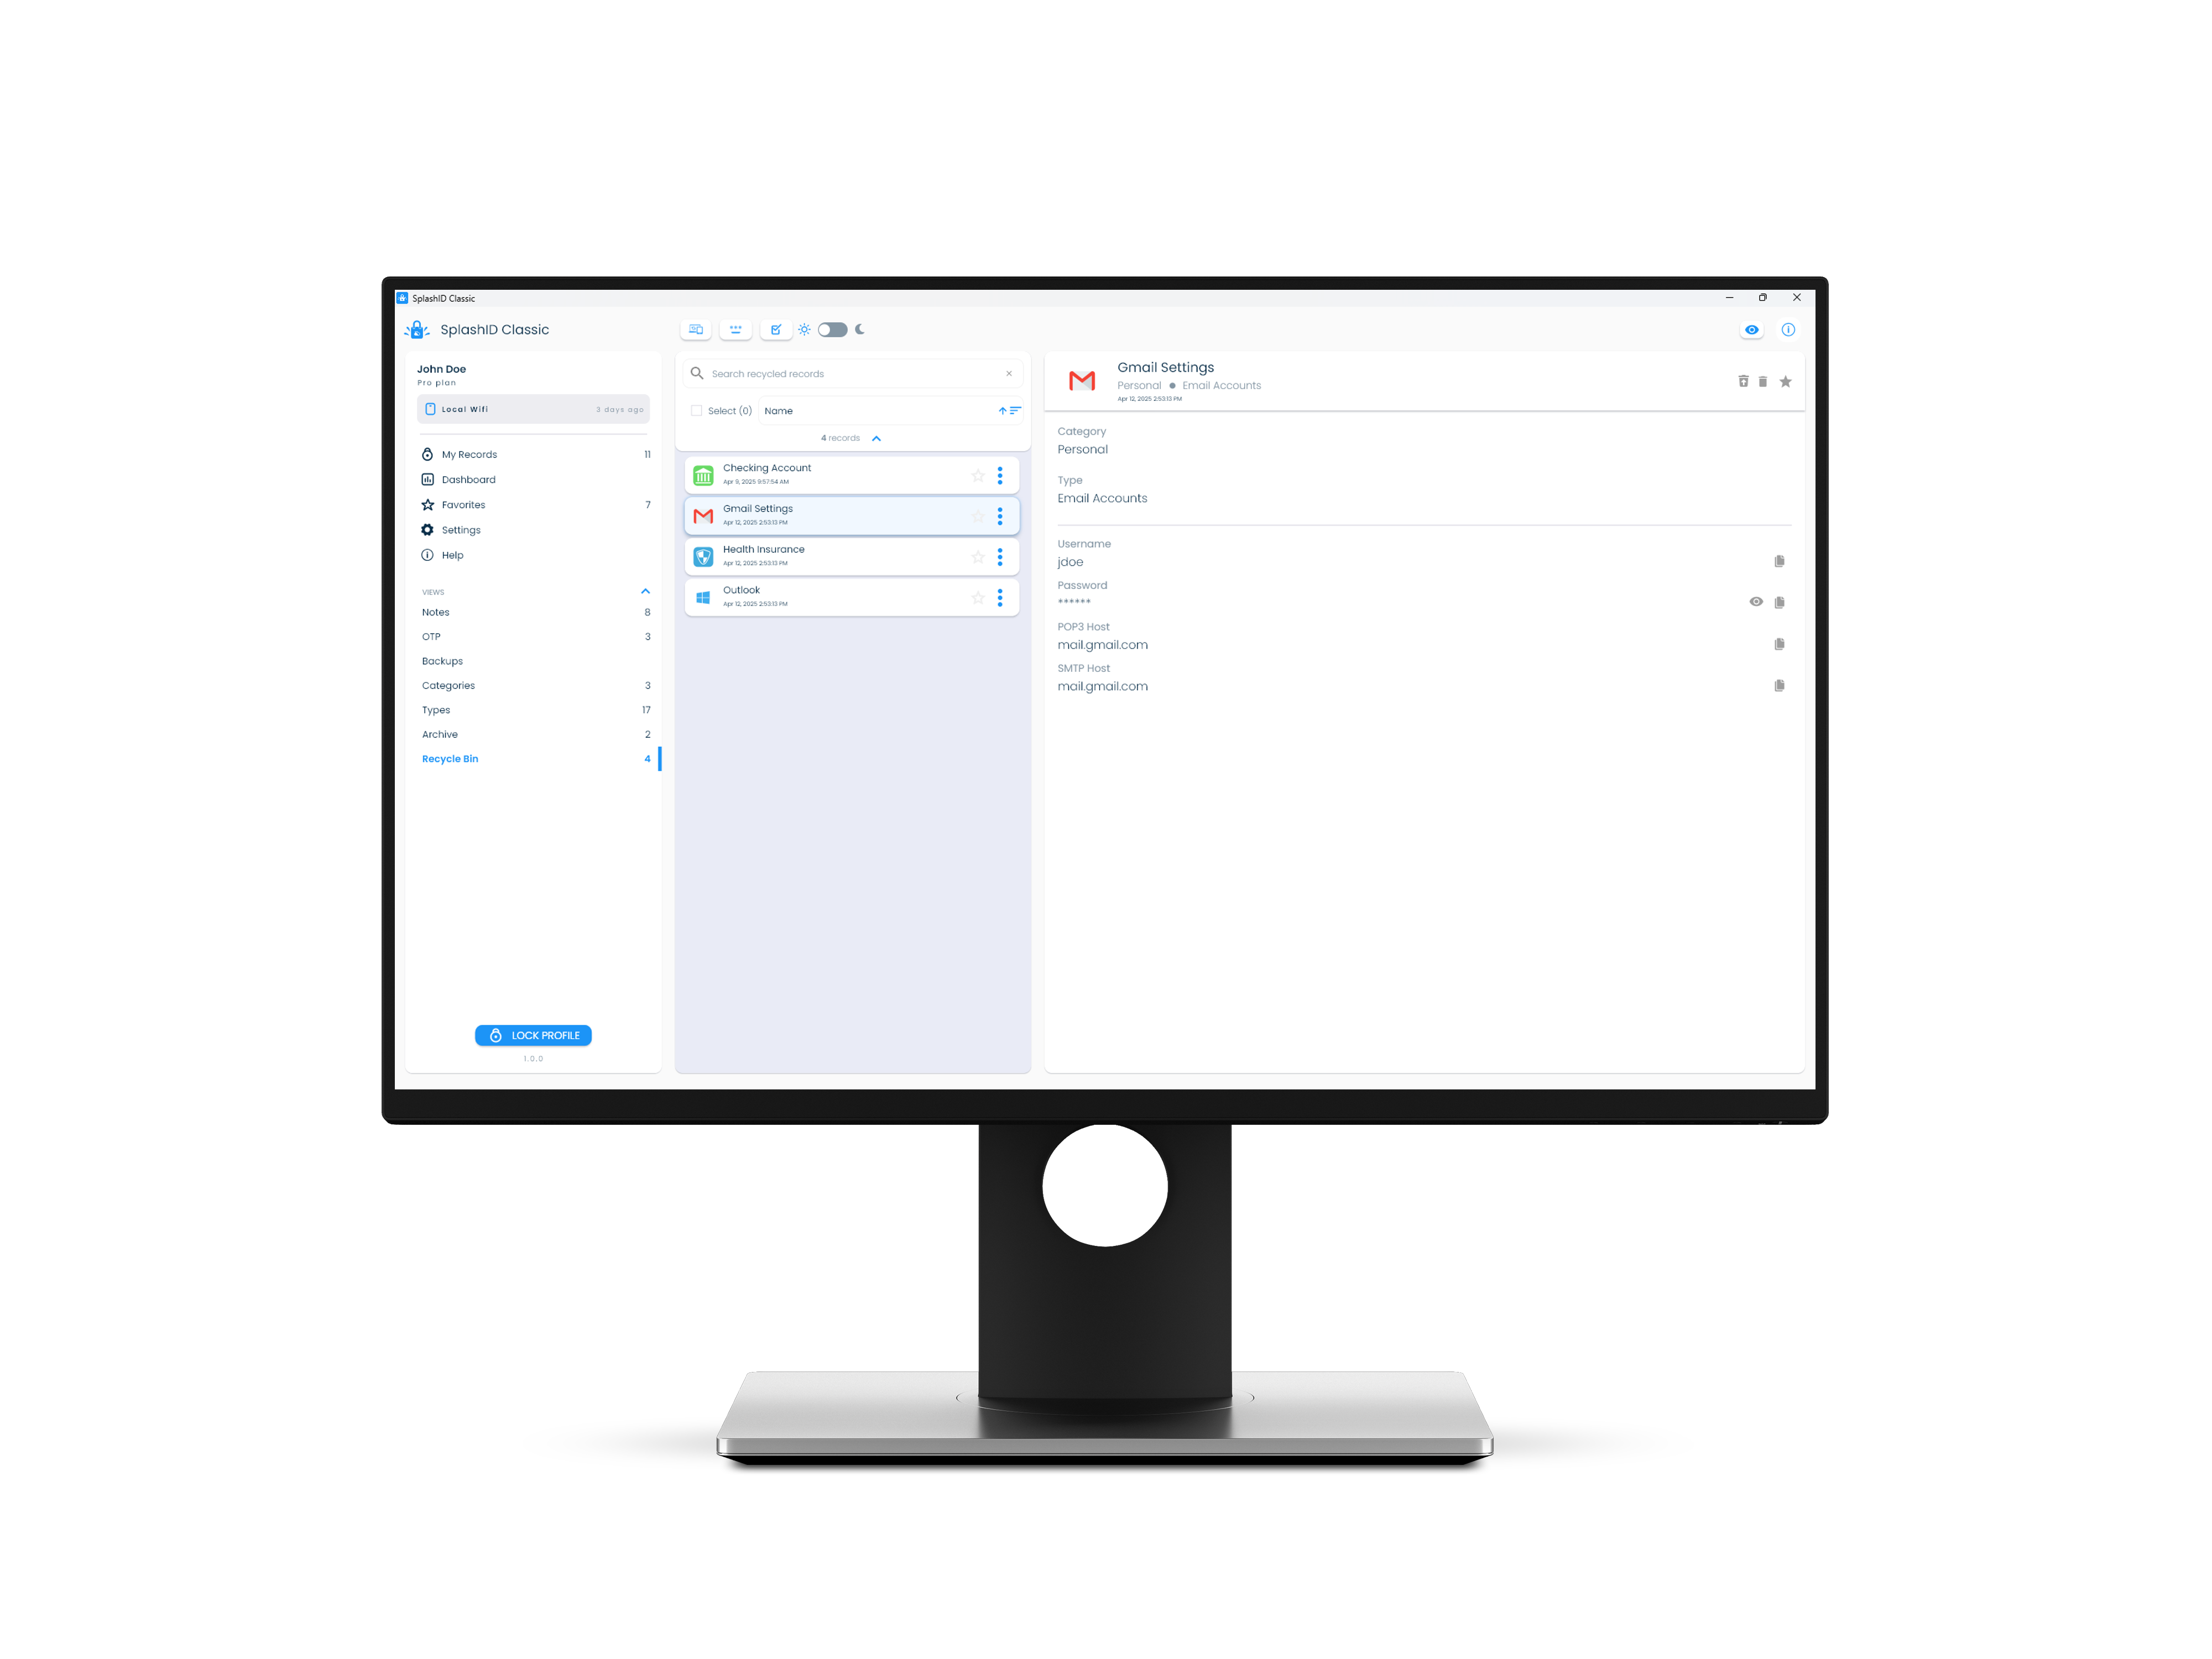
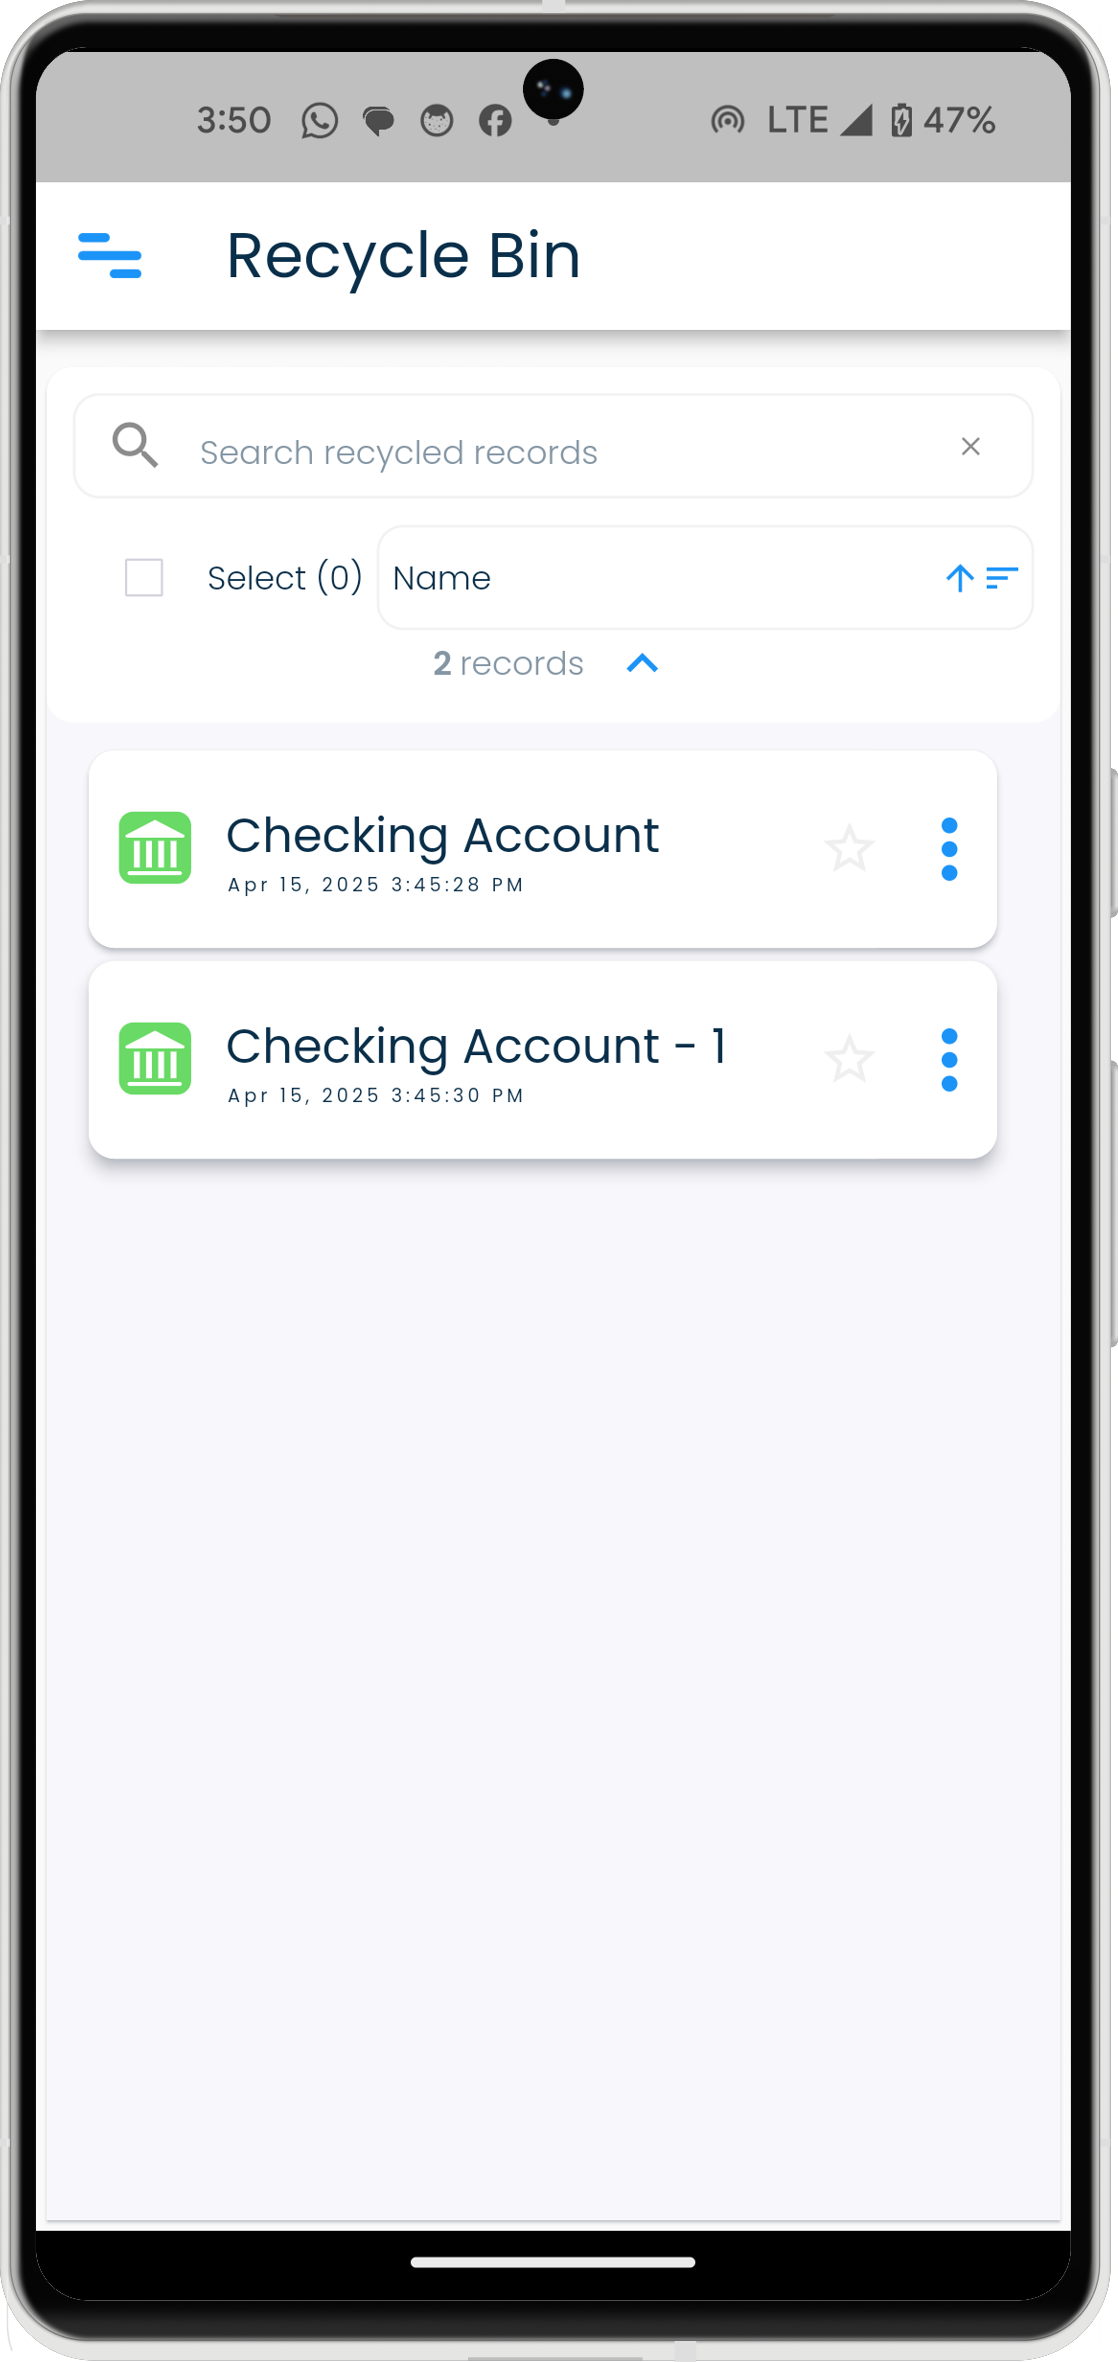
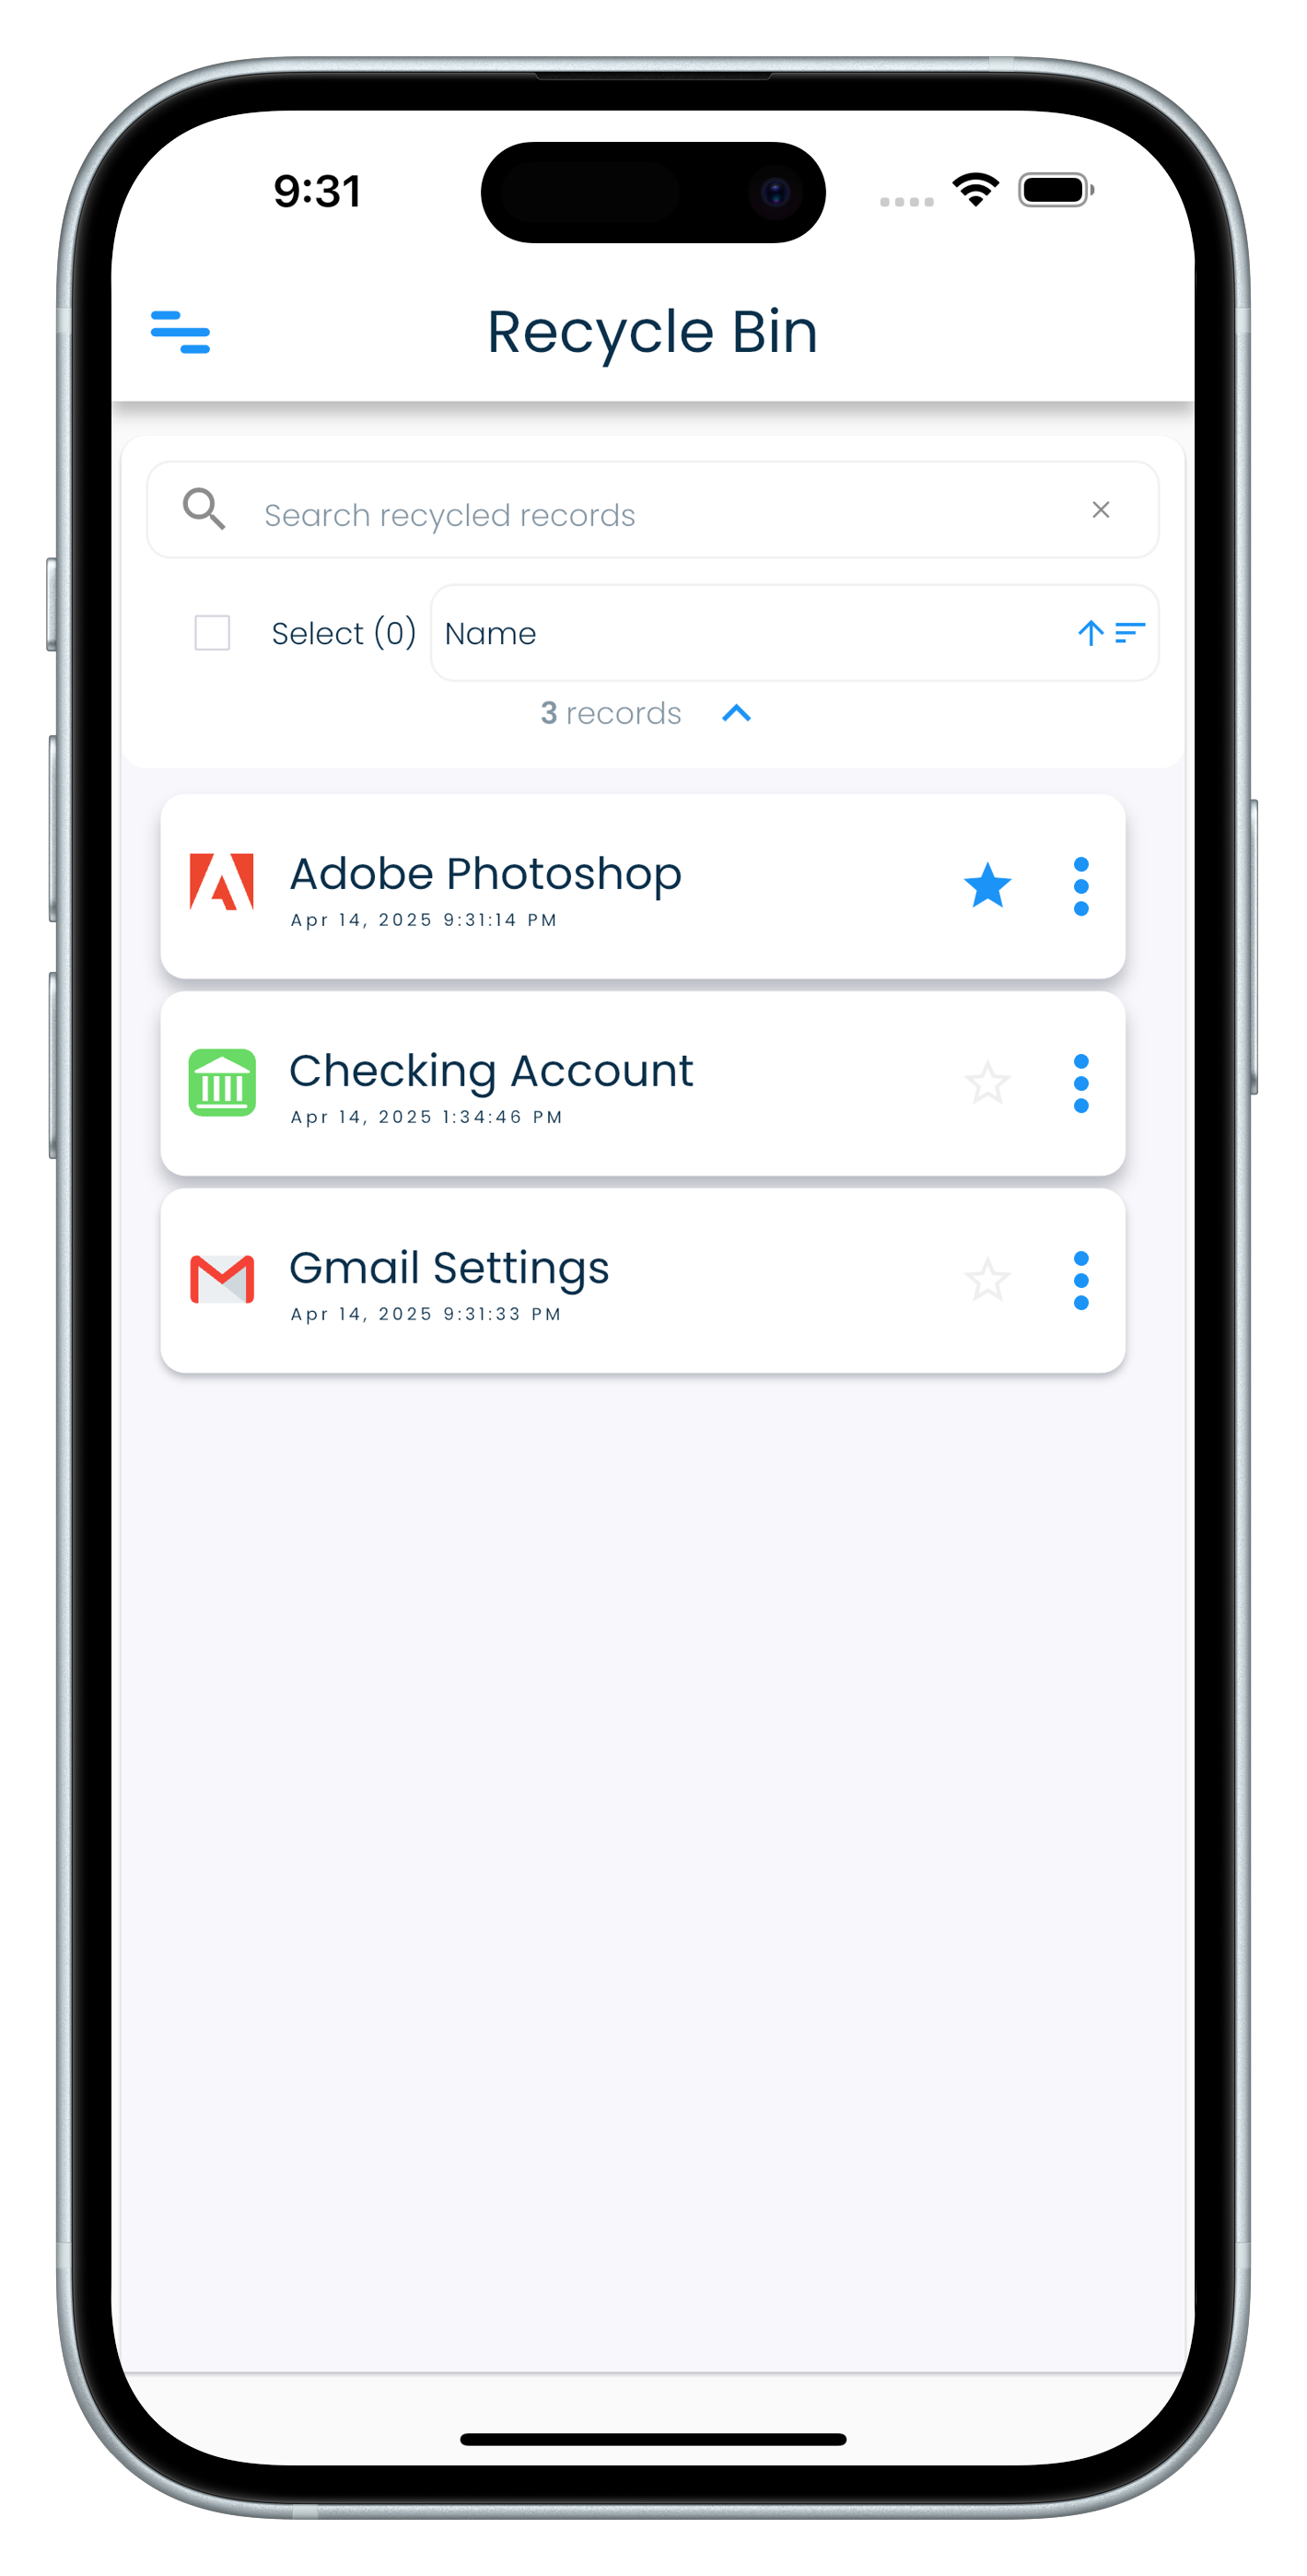
Recycle Bin screen
All your deleted records can be viewed in the Recycle Bin screen. The Recycle Bin screen can be reached by clicking on the Recycle Bin link in the application menu.
You can permanently delete them from the Recycle Bin if you are sure that you no longer need them.
Alternatively, you can restore a deleted record in the Recycle Bin to the personal record list.
Records in the Recycle Bin cannot be edited. They will need to be restored first and then edited as regular records.
Delete a record
- Visit the My Records screen from the application menu.
- Select a record in the record list.
- Click or tap on the Trash icon in the record details header to send a record to the Recycle Bin.
- Confirm by clicking or tapping on the Delete button to proceed with deleting the record.
| Mac | Windows |
|---|---|
|
|
| Android | iPhone |
|---|---|
| |
|
| iPad |
|---|
|
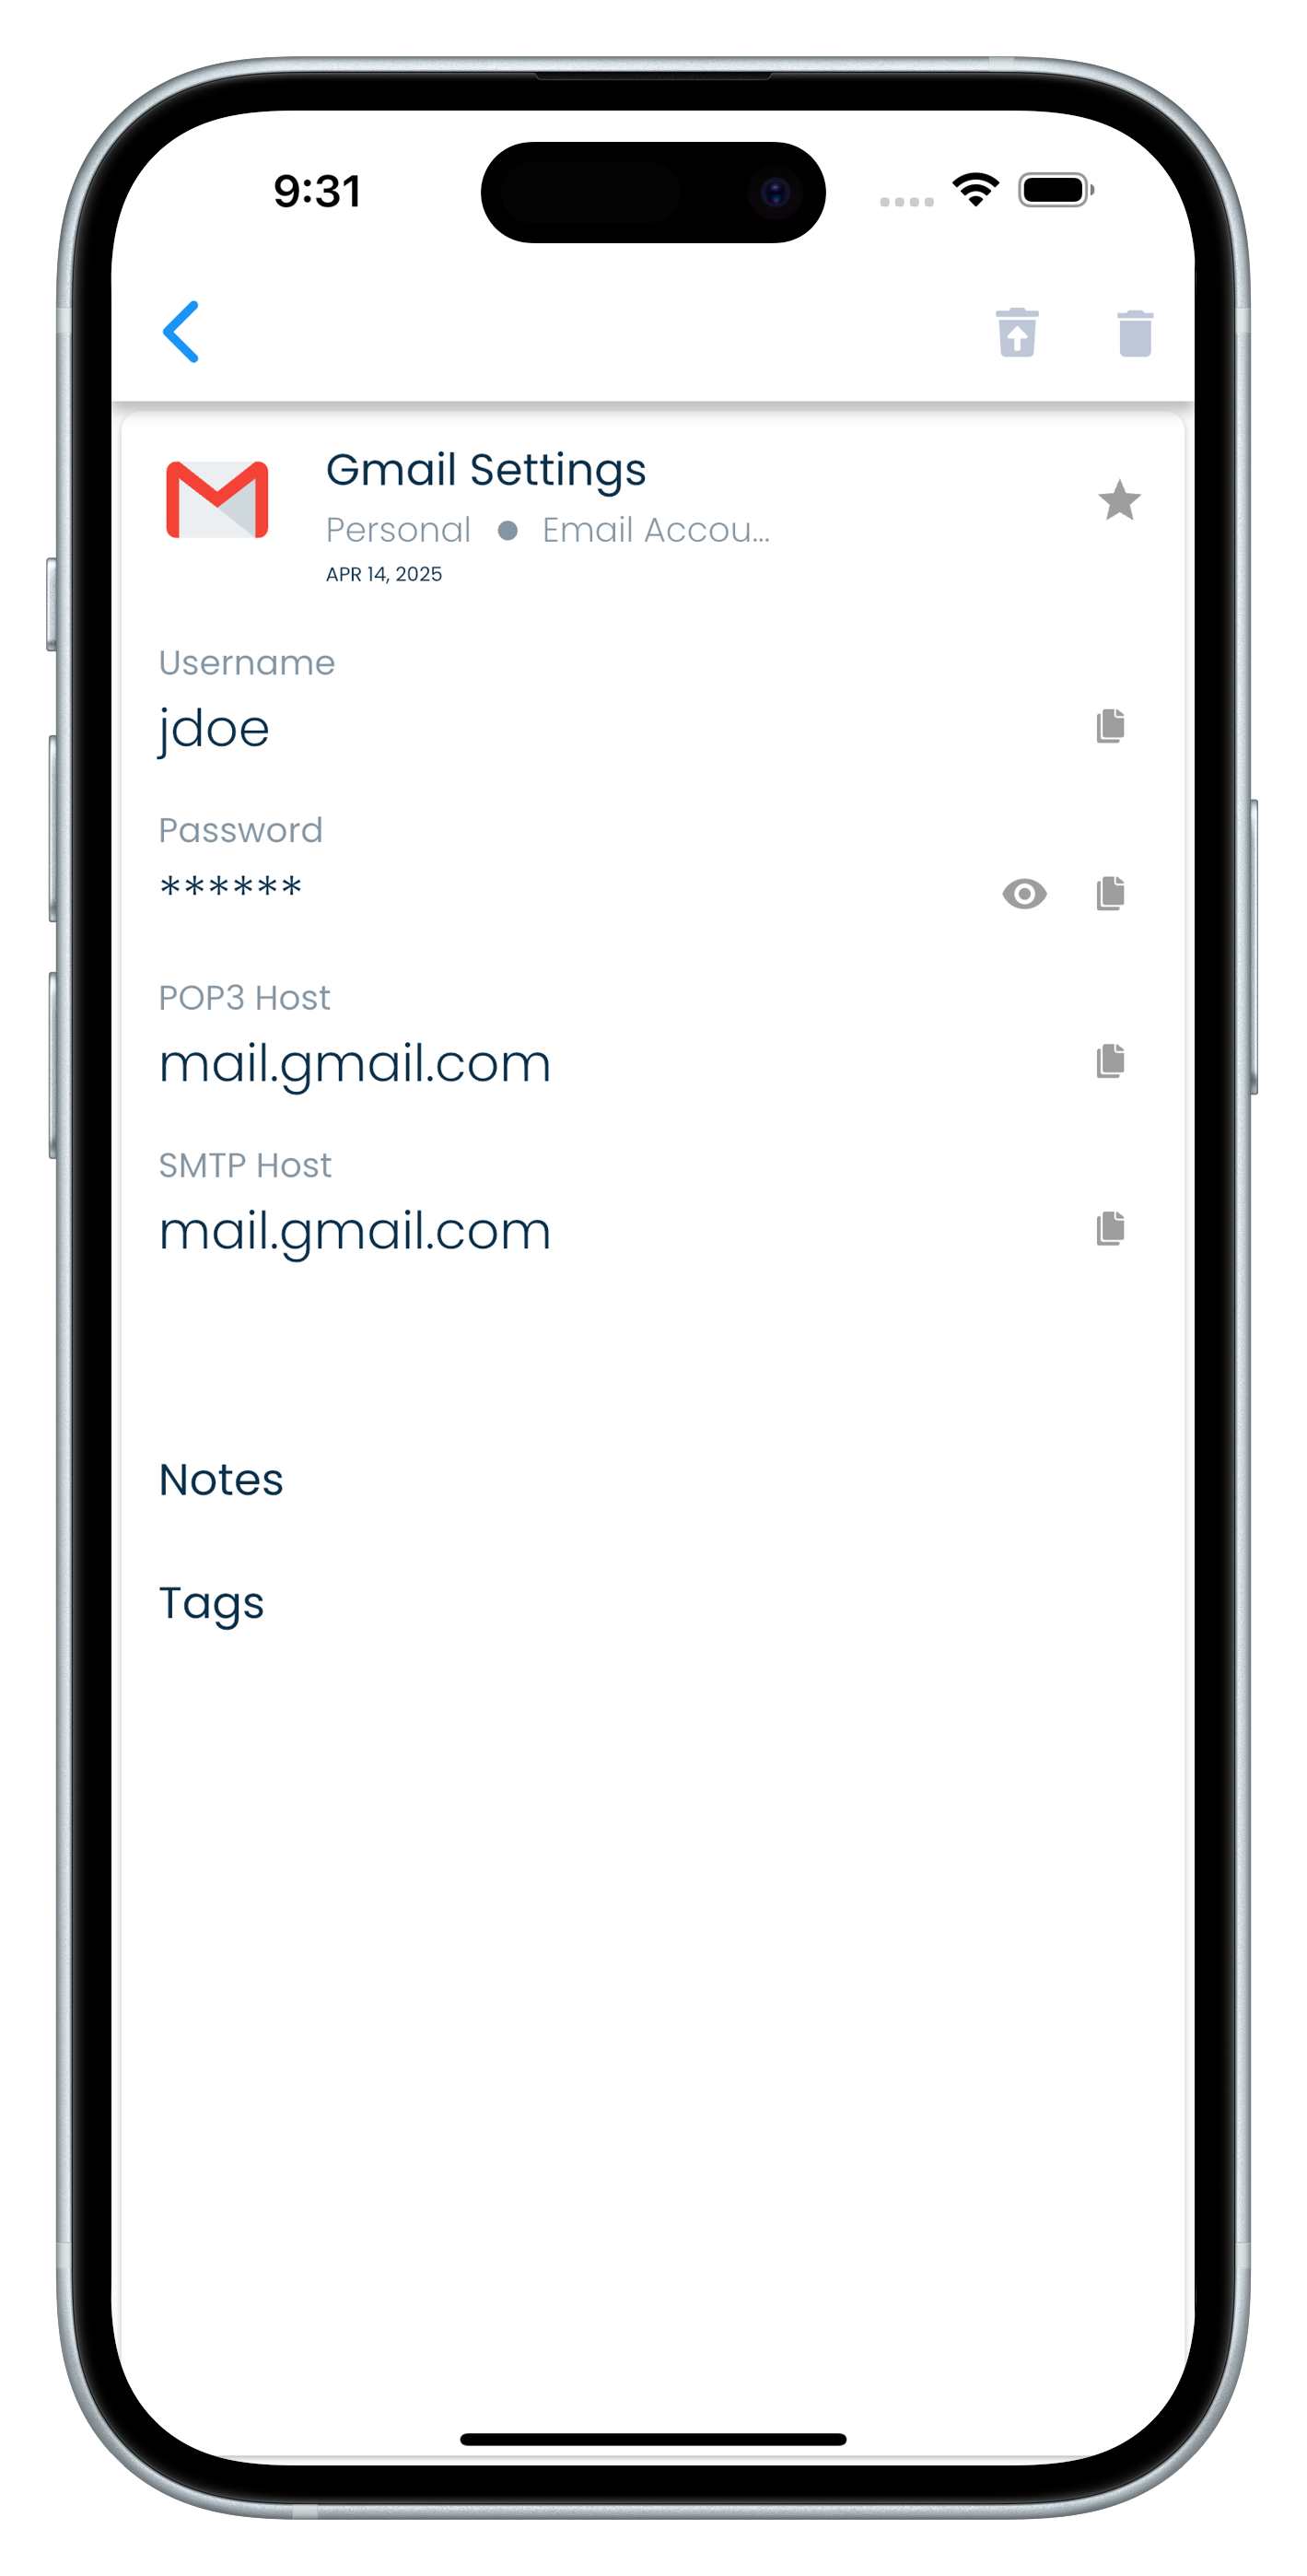
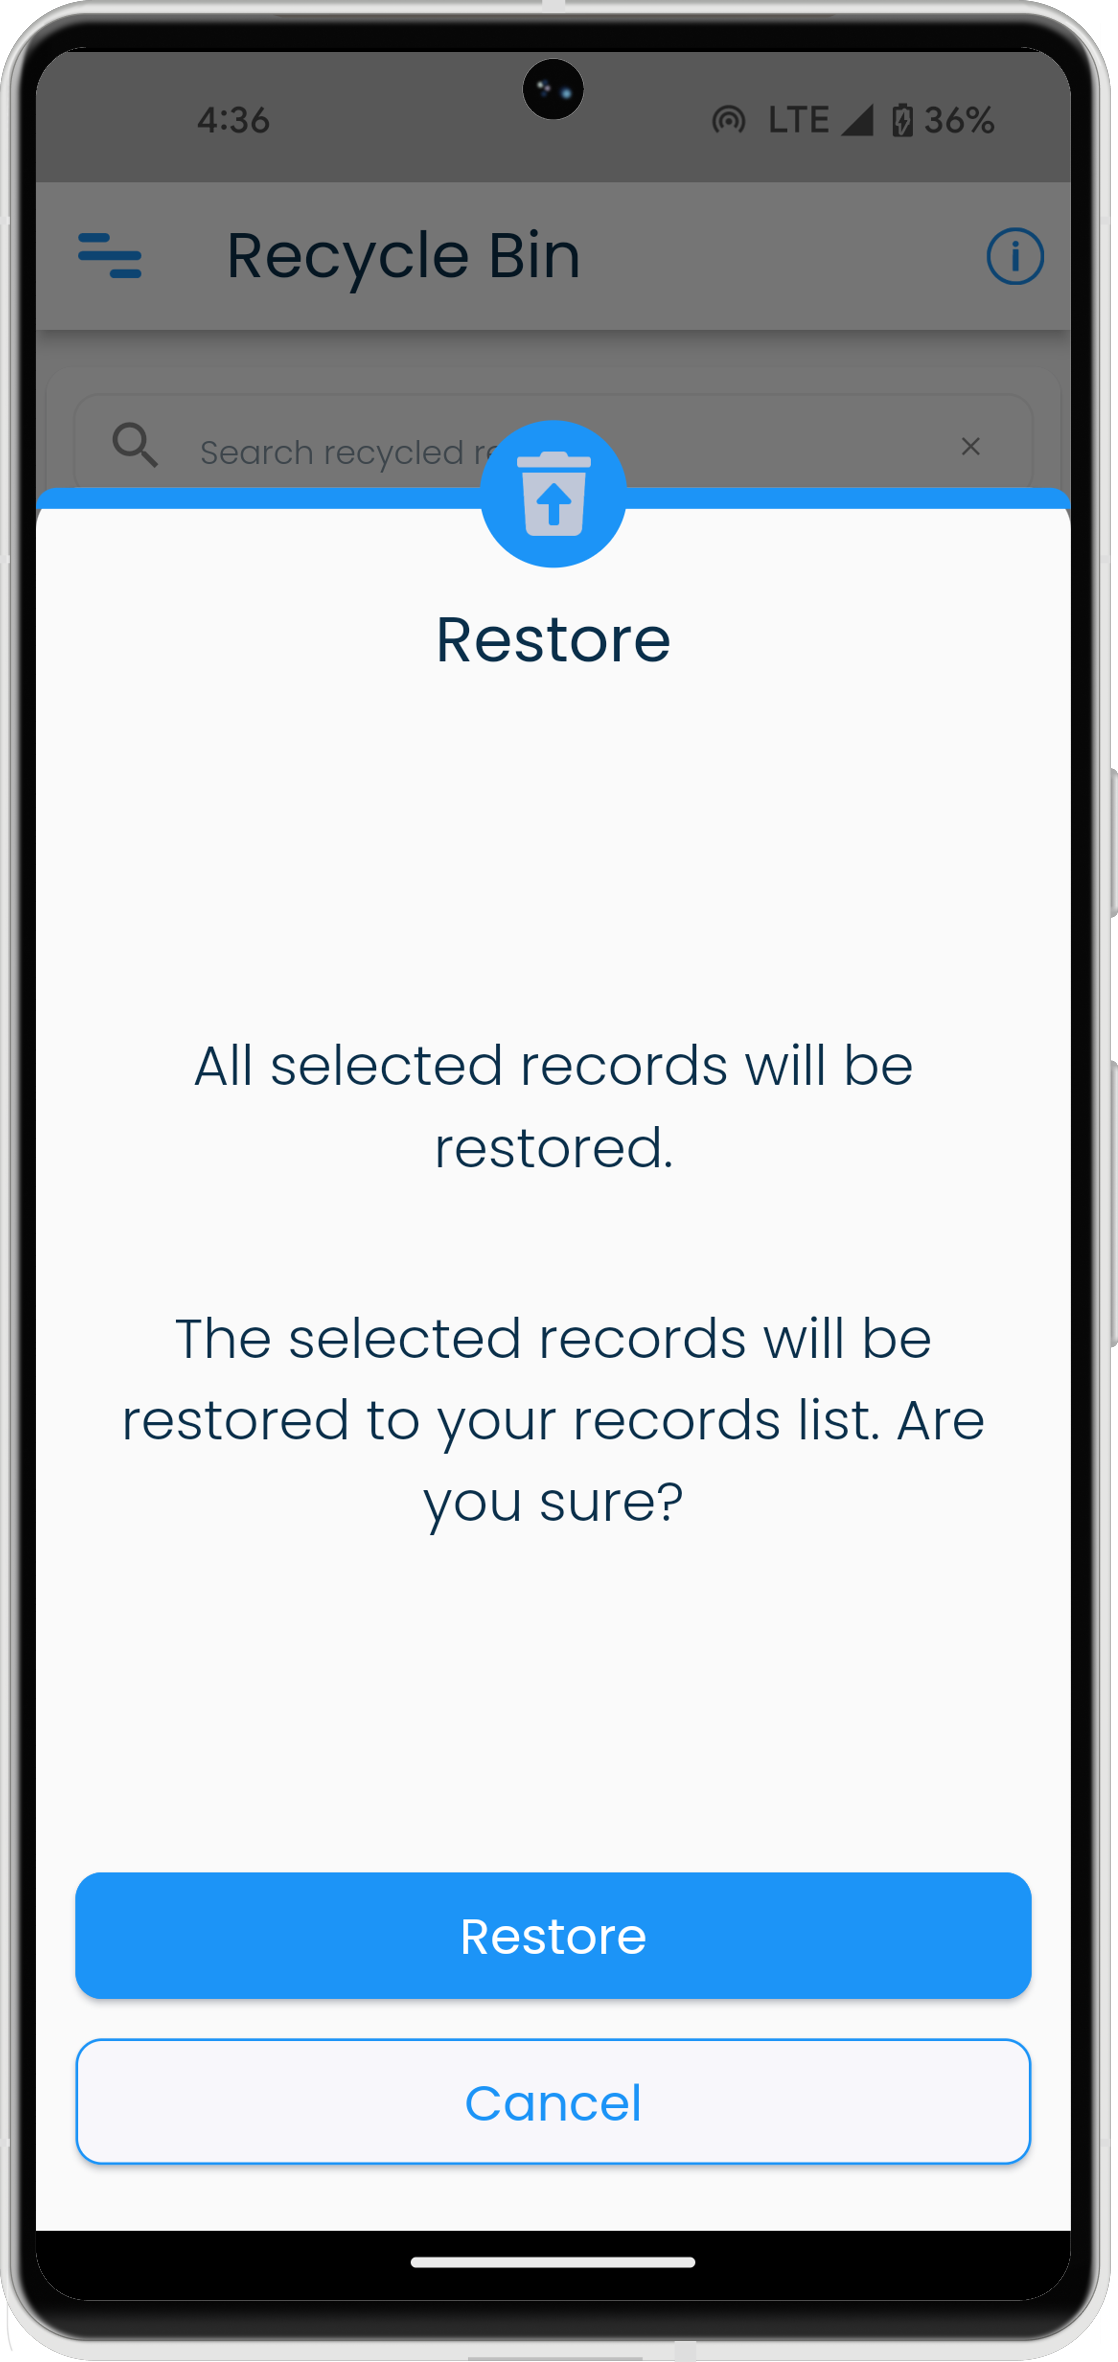
Restore a deleted record
- Visit the Recycle Bin screen from the application menu.
- Select a record in the record list in the Recycle Bin view.
- Click or tap on the Restore icon in the record details header to restore the record.
- Confirm by clicking or tapping on the Restore button to proceed with undeleting the record.
| Mac | Windows |
|---|---|
 |
 |
| Android | iPhone |
|---|---|
  |
  |
| iPad |
|---|
 |
Another way to restore a deleted record
- Visit the Recycle Bin screen from the application menu.
- Locate the record in the Recycle Bin record list.
- Click or tap on the three dots icon to bring up the list of actions.
- Click or tap on Restore option.
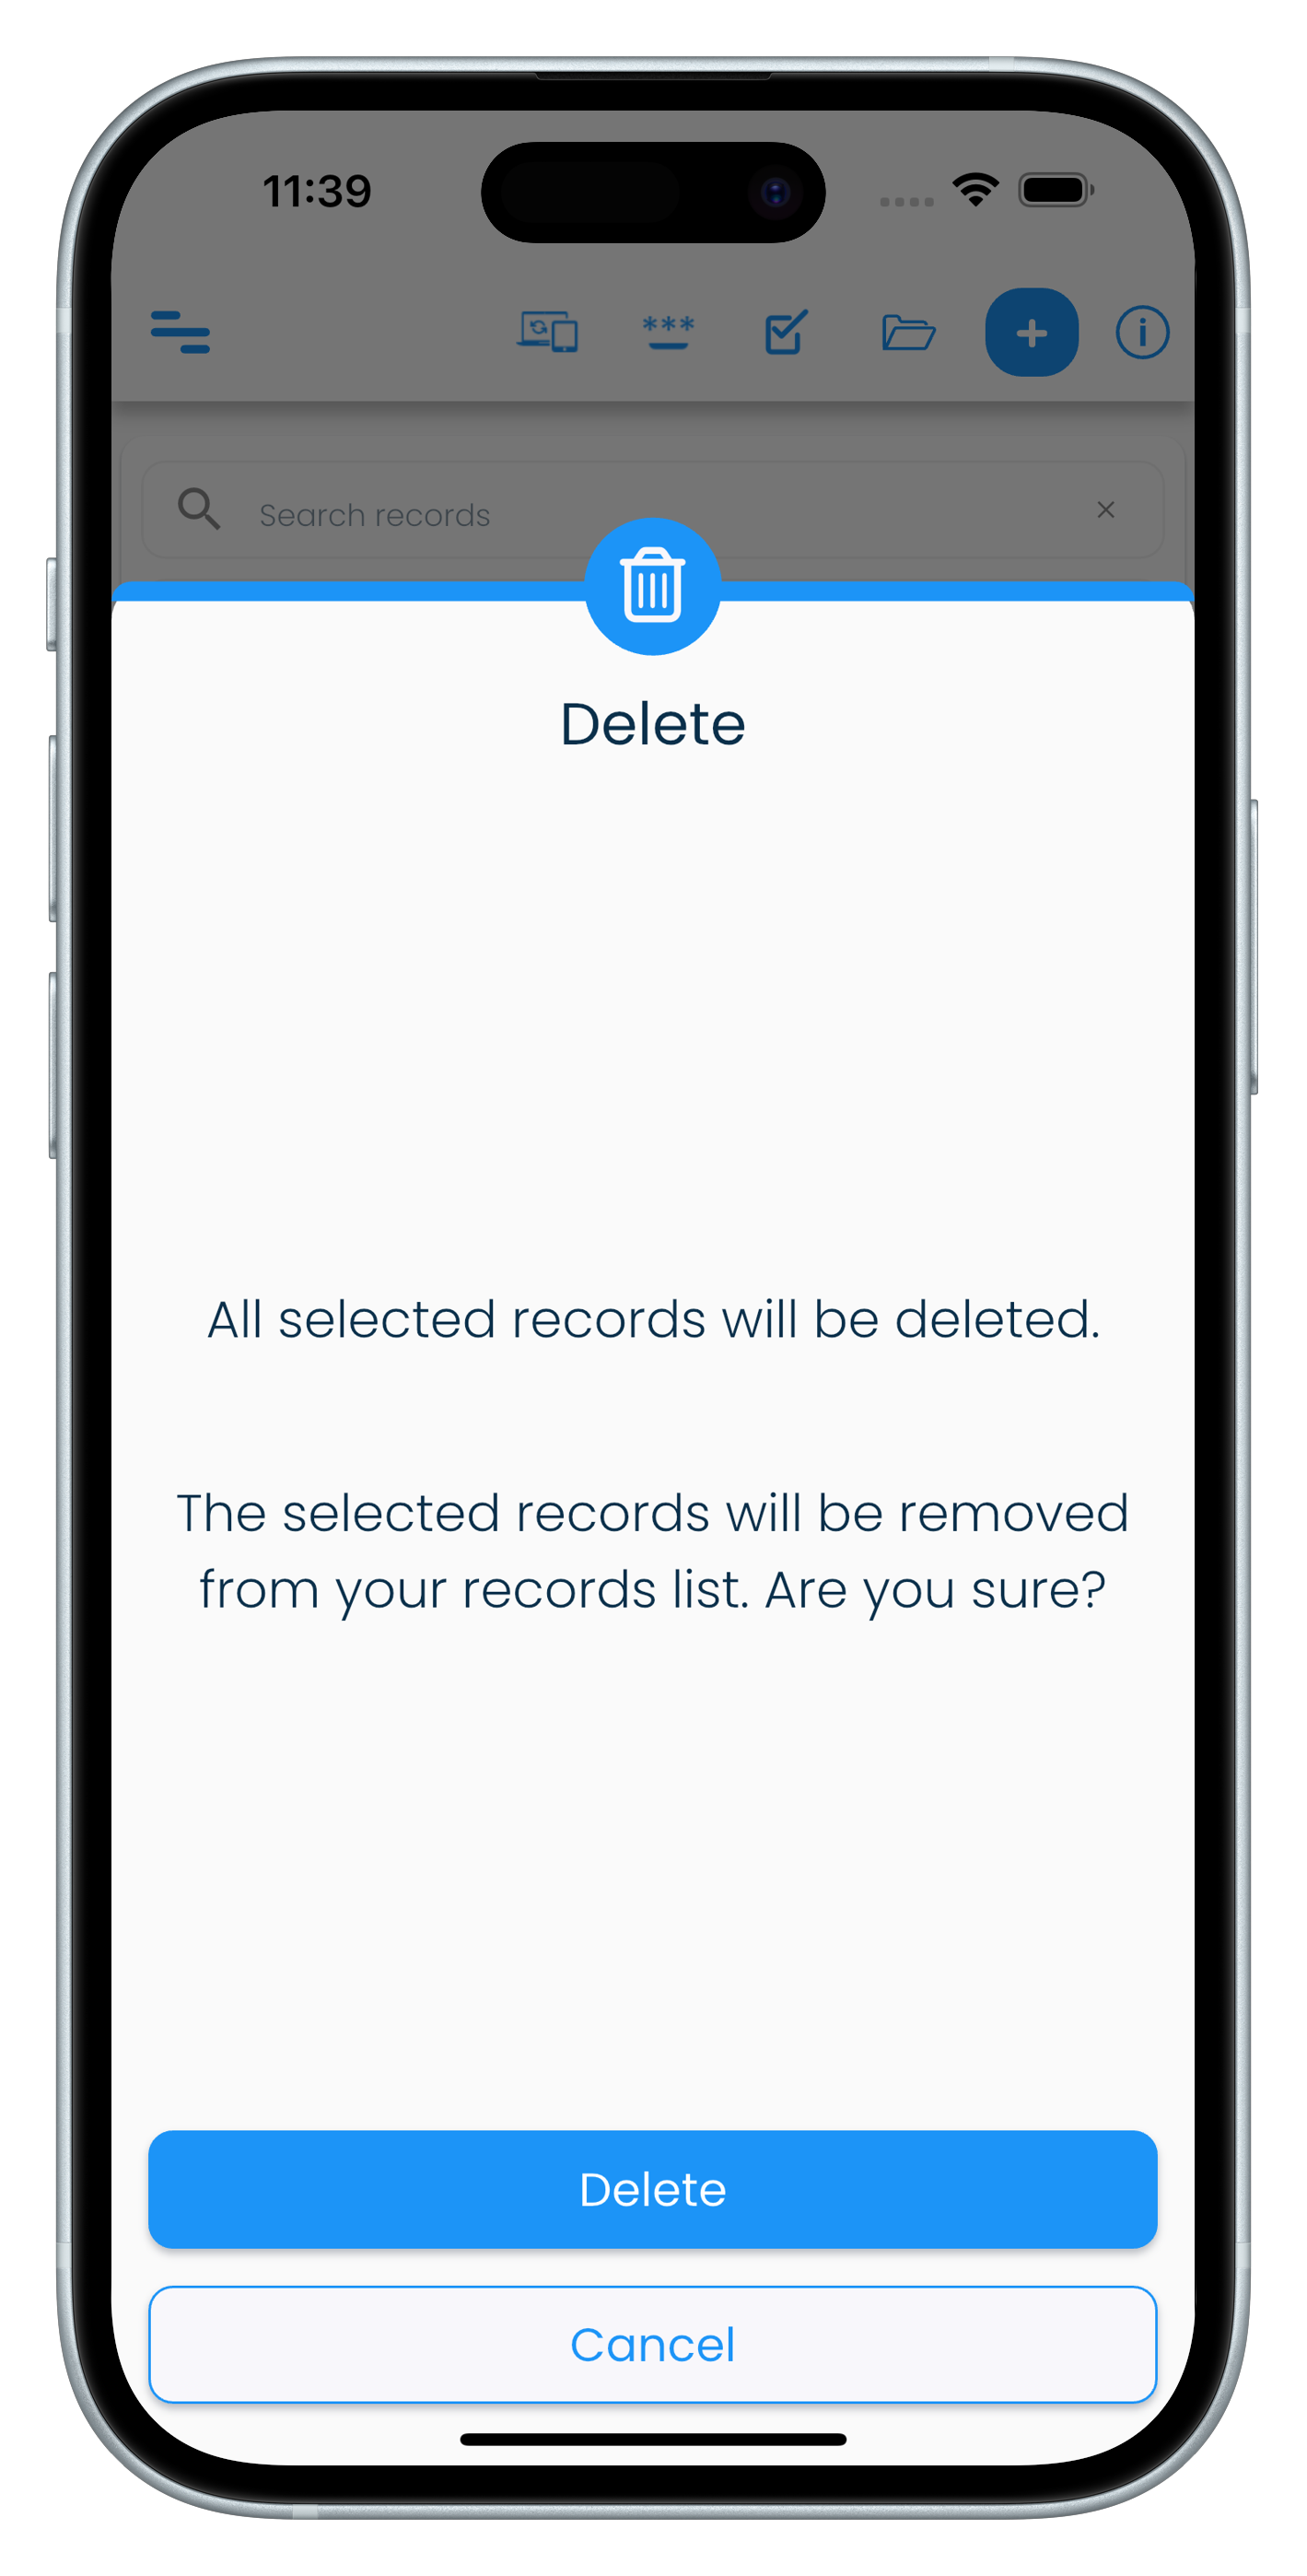
Delete multiple records
- Visit the My Records screen from the application menu.
- Expand the filter panel if it is collapsed by clicking or tapping on the Down arrow icon.
- Click or tap on the Select checkbox.
- Select the records that you want to delete.
- Click or tap on the three dots icon in the filter panel next to Select to bring up the list of actions.
- Click or tap on Delete option.
- Confirm by clicking or tapping on the Delete button to proceed with deleting the selected records.
| Mac | Windows |
|---|---|
|
 |
| Android | iPhone |
|---|---|
 |
 |
| iPad |
|---|
|
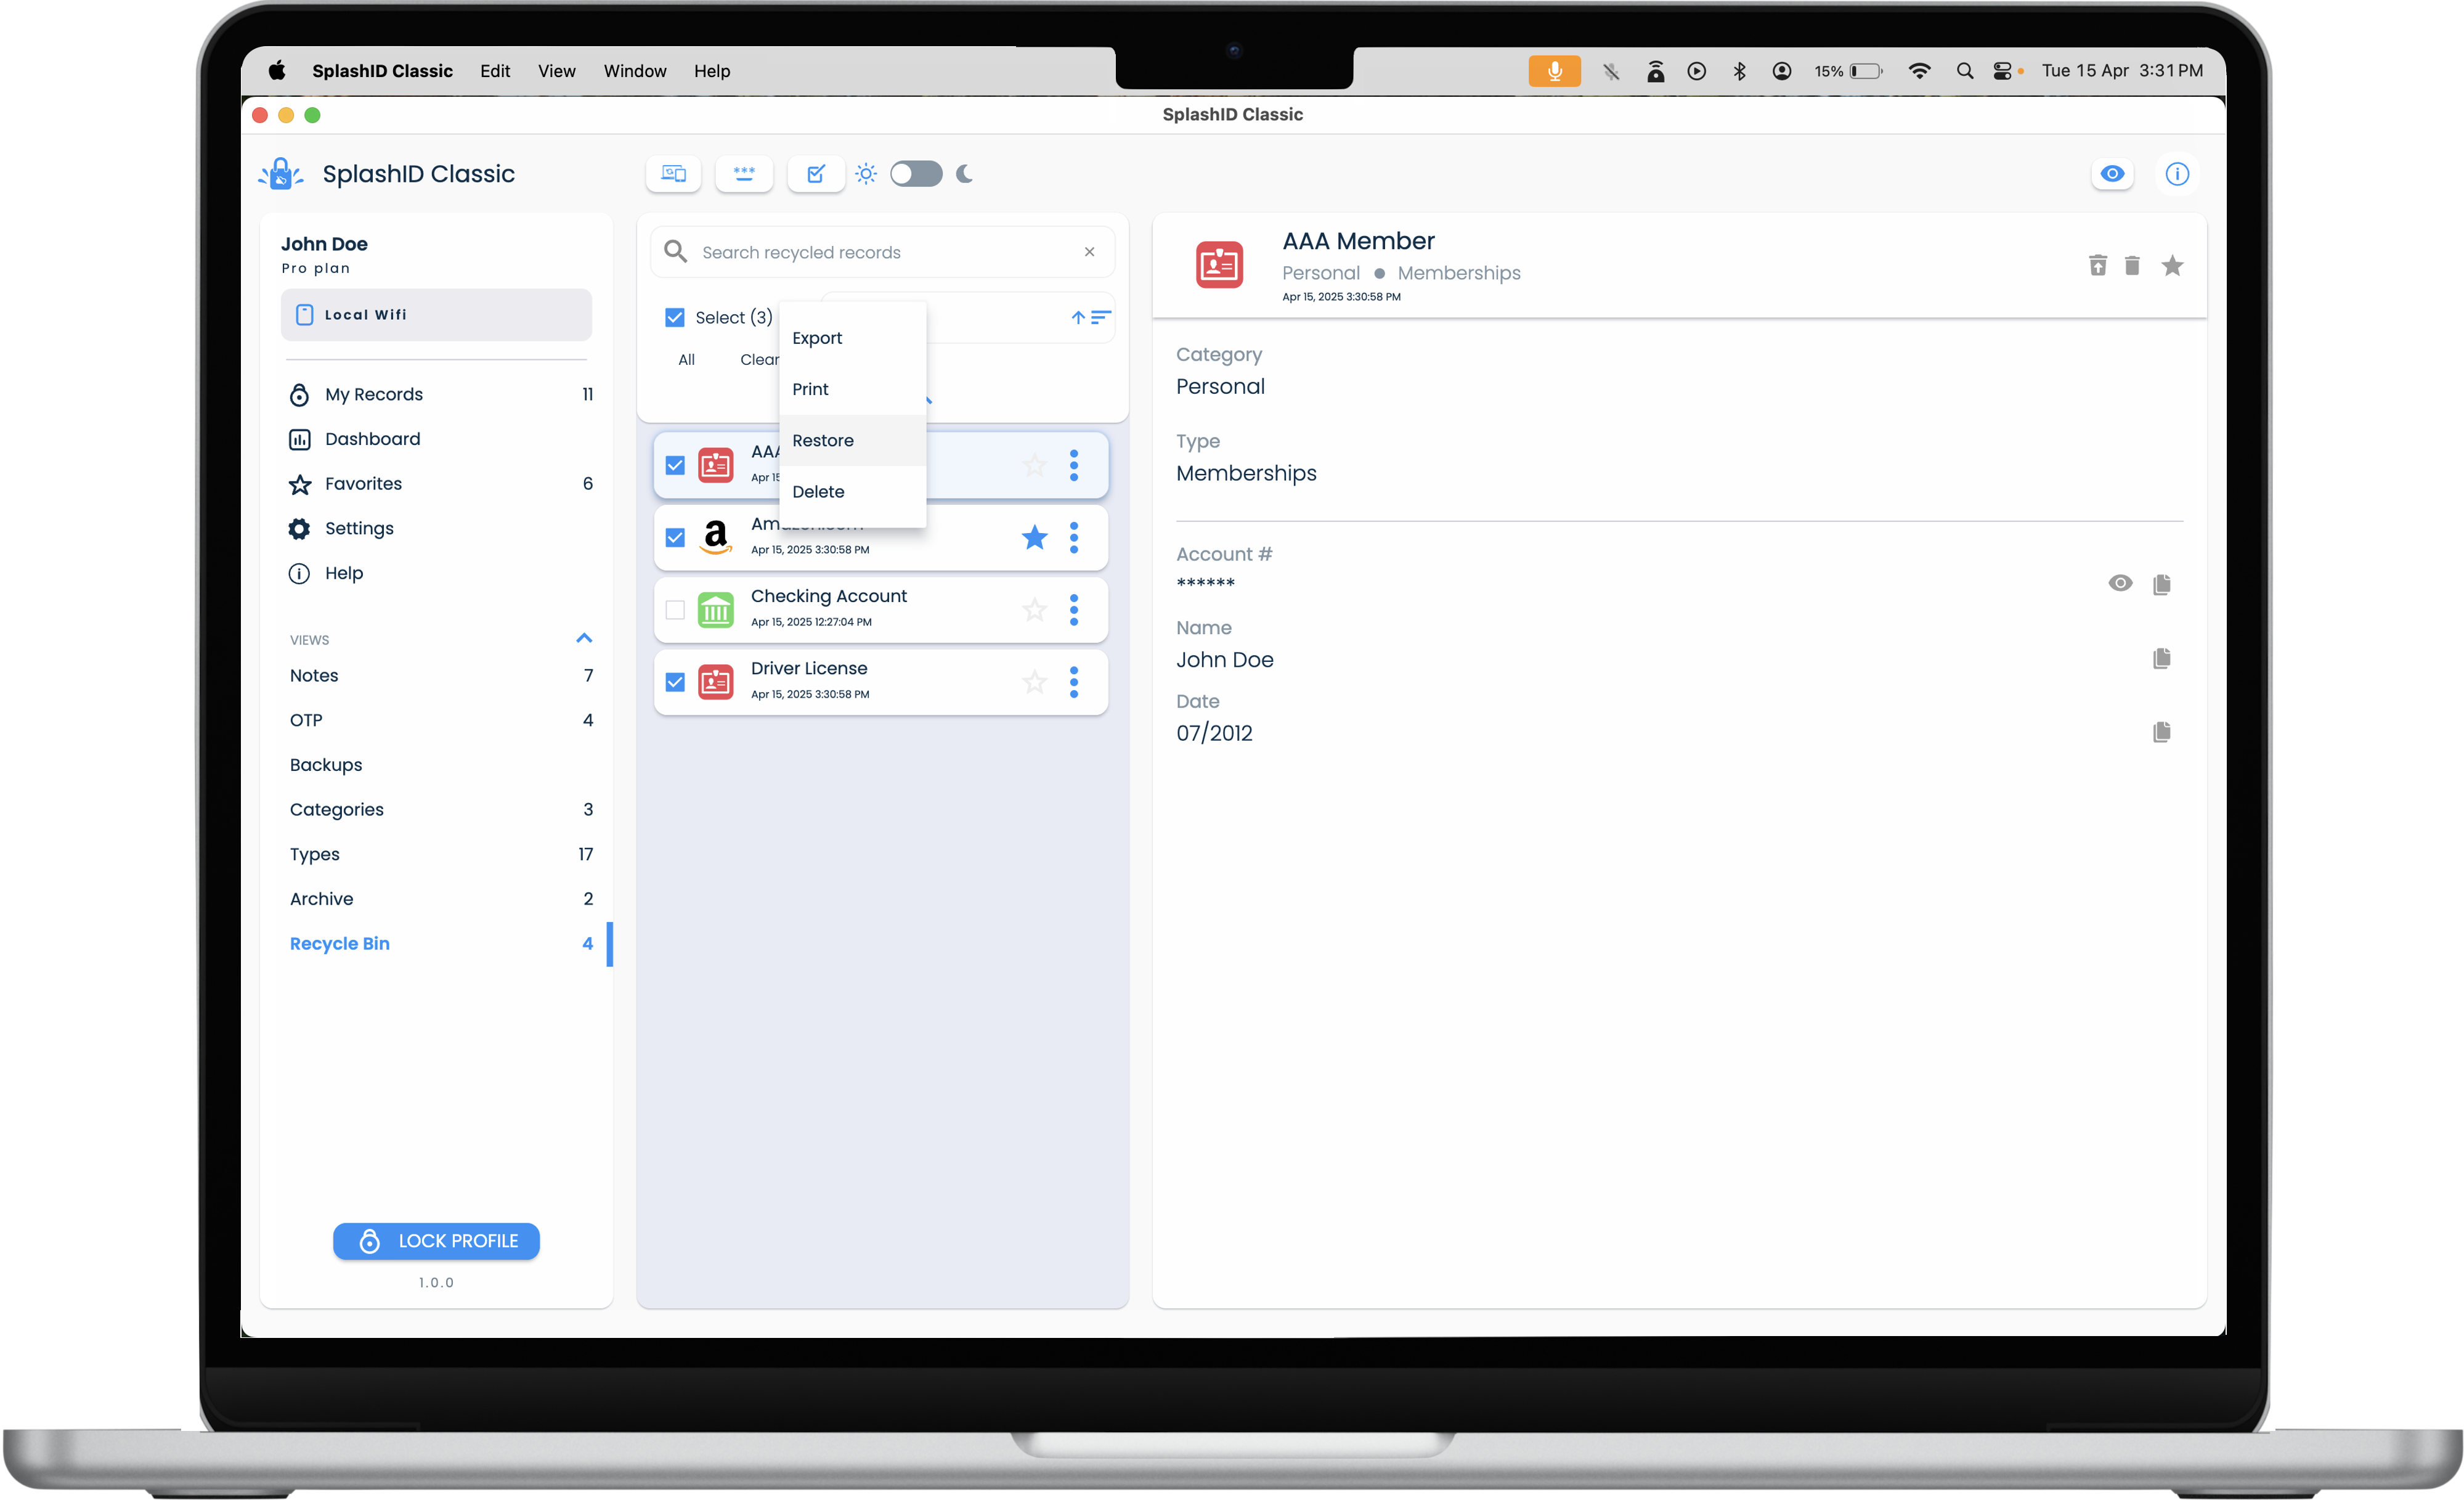
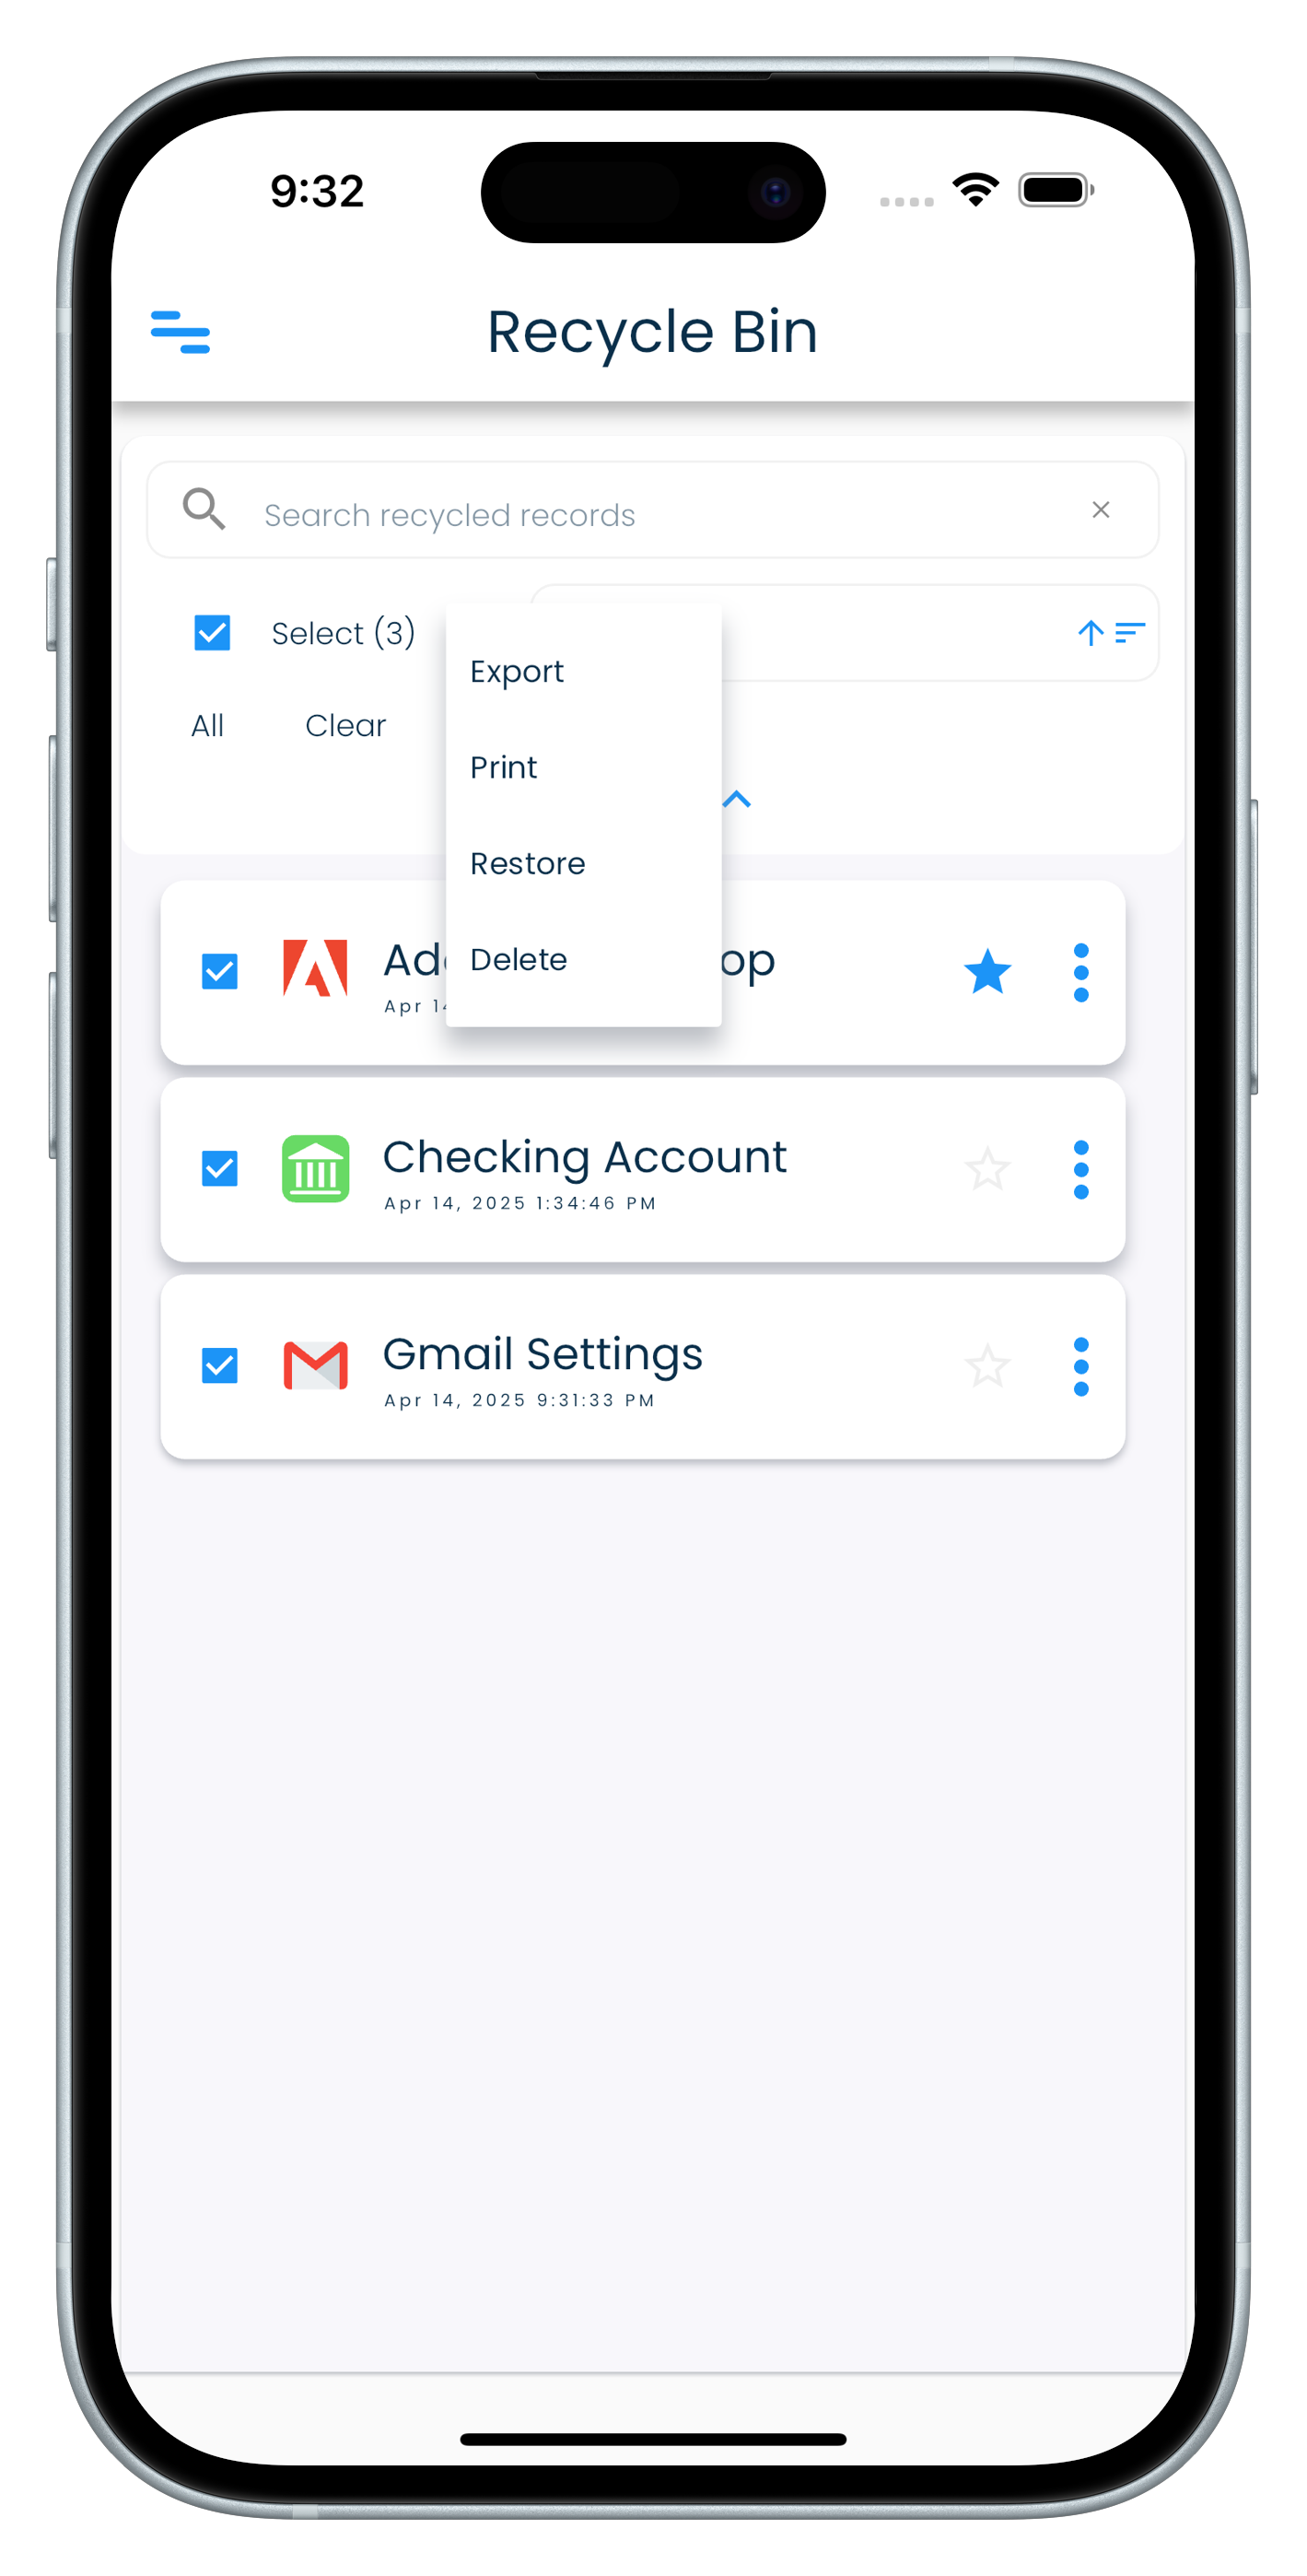
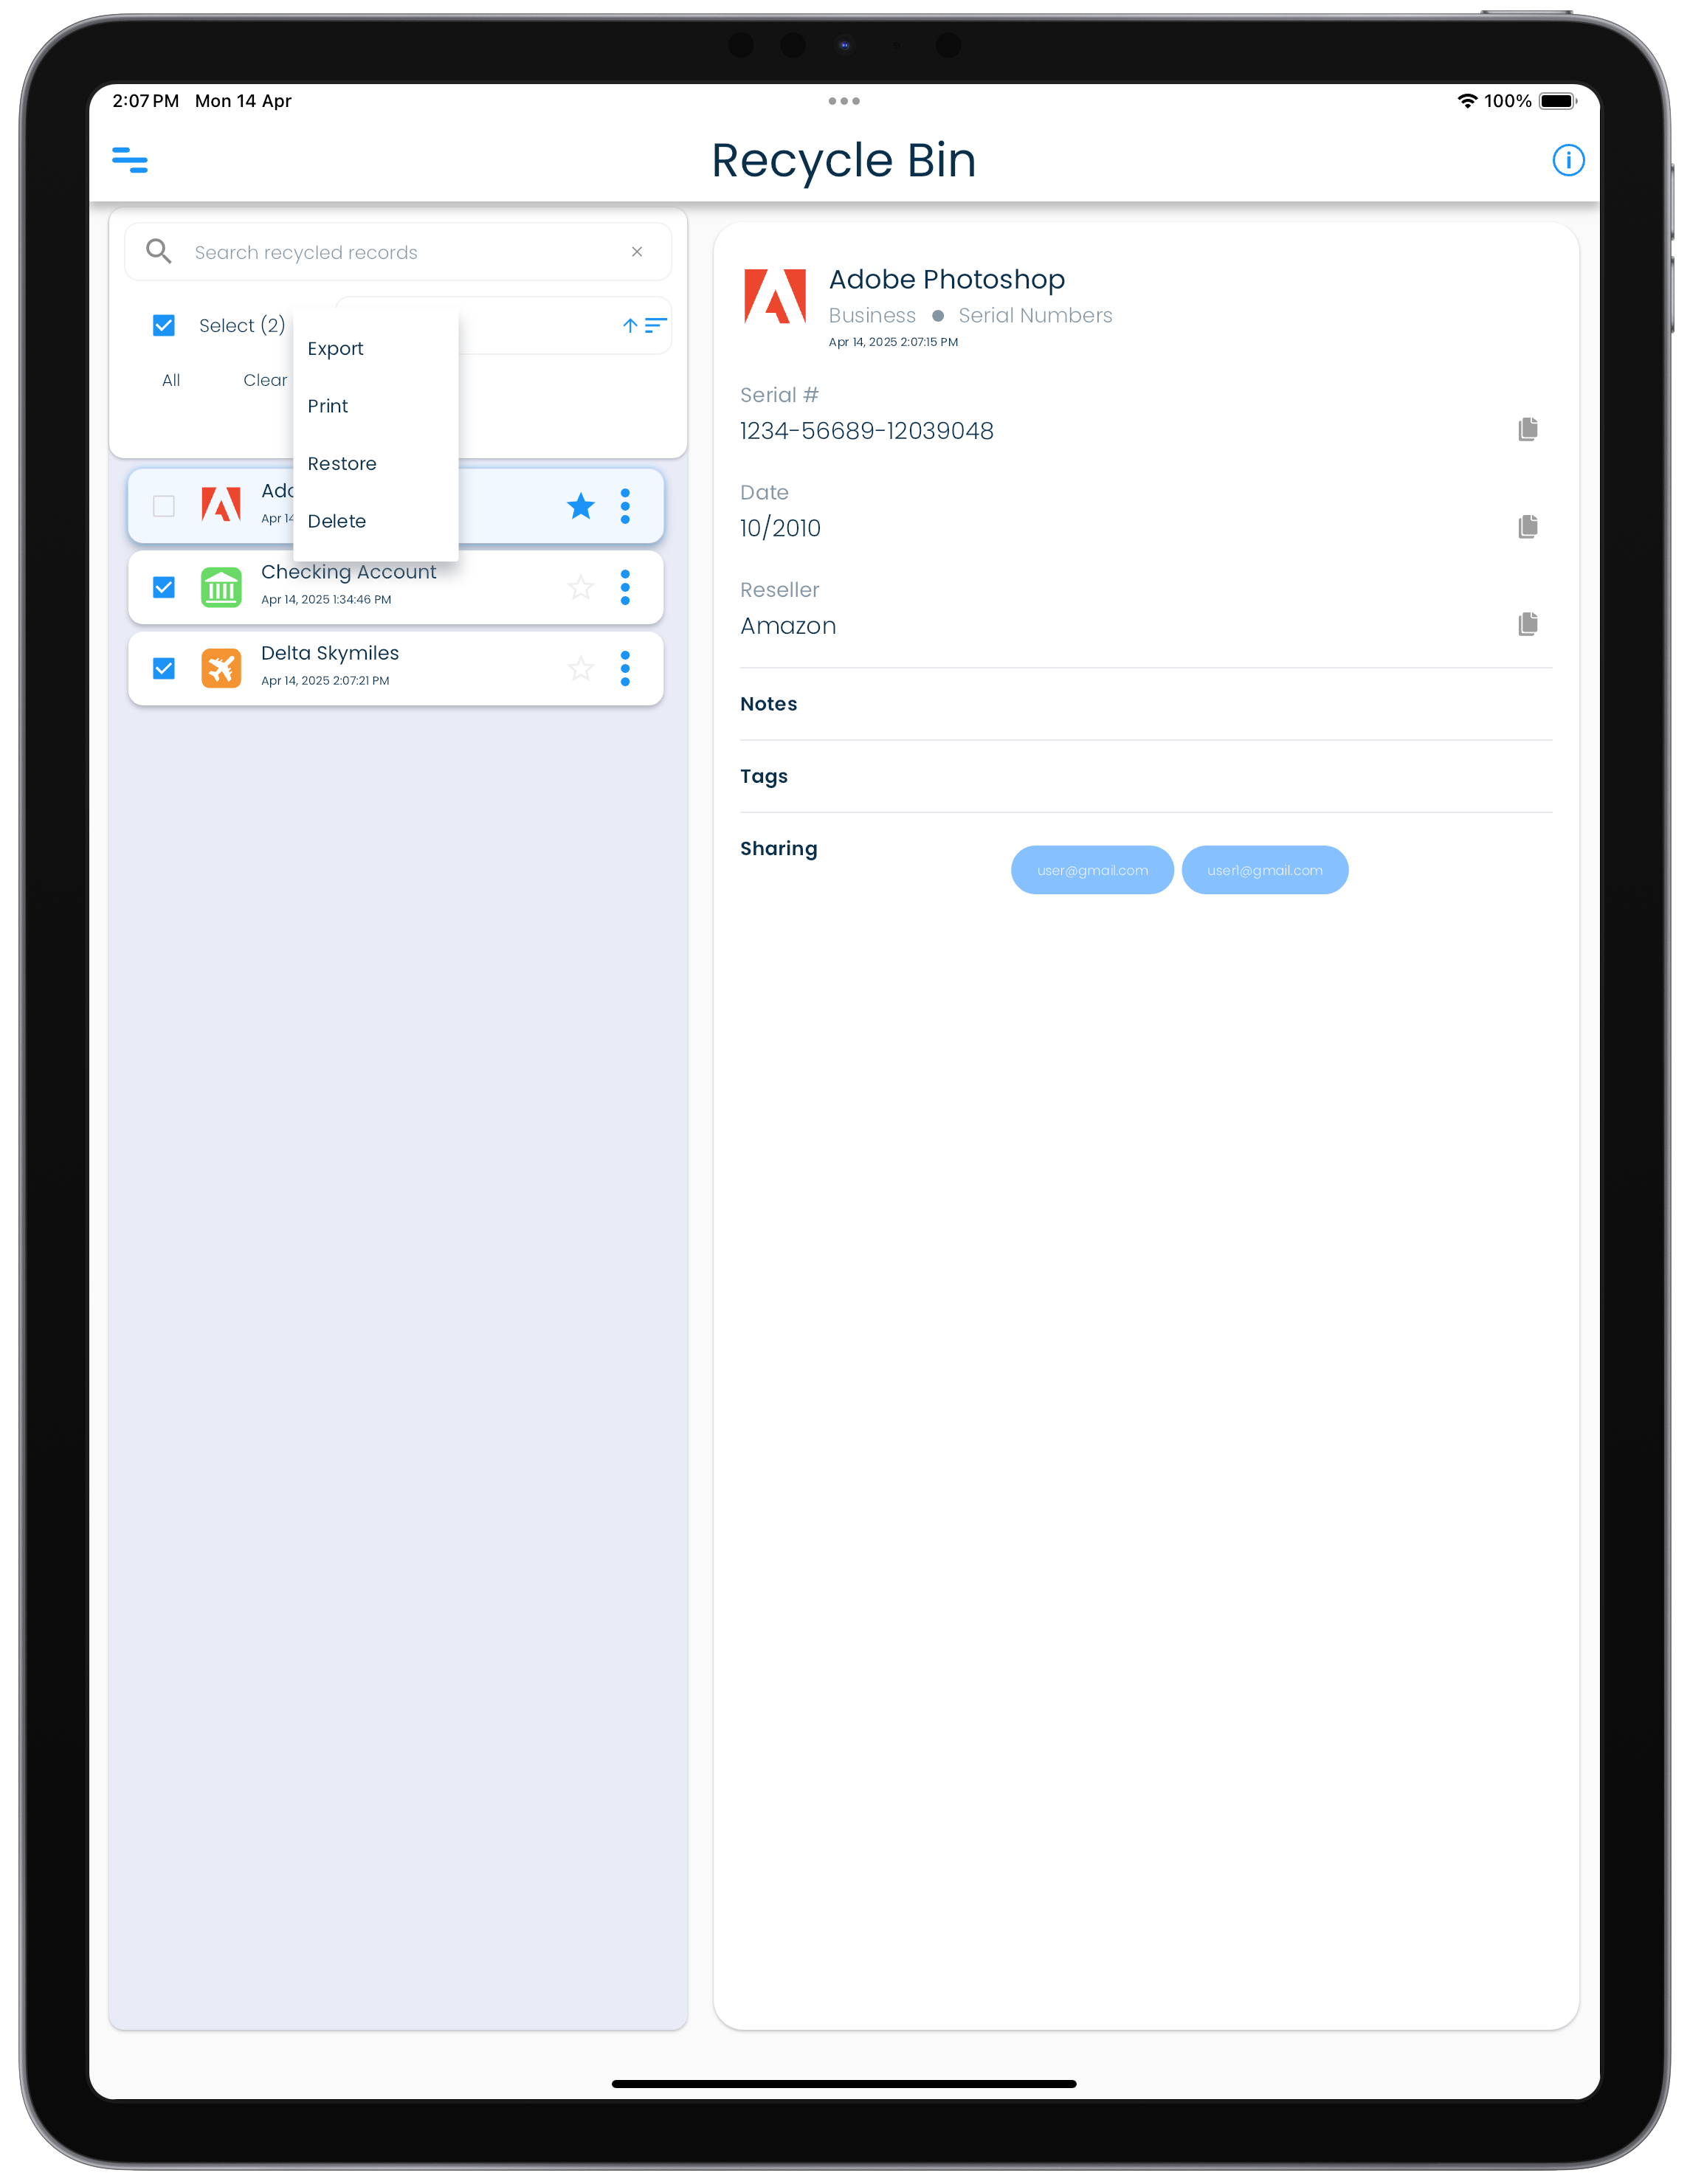
Restore multiple records
- Visit the Recycle Bin screen from the application menu.
- Expand the filter panel if it is collapsed by clicking or tapping on the Down arrow icon.
- Click or tap on the Select checkbox.
- Select the records that you want to restore.
- Click or tap on the three dots icon in the filter panel next to Select to bring up the list of actions.
- Click or tap on Restore option.
- Confirm by clicking or tapping on the Restore button to proceed with restoring the selected records.
| Mac | Windows |
|---|---|
 |
 |
| Android | iPhone |
|---|---|
 |
 |
| iPad |
|---|
 |
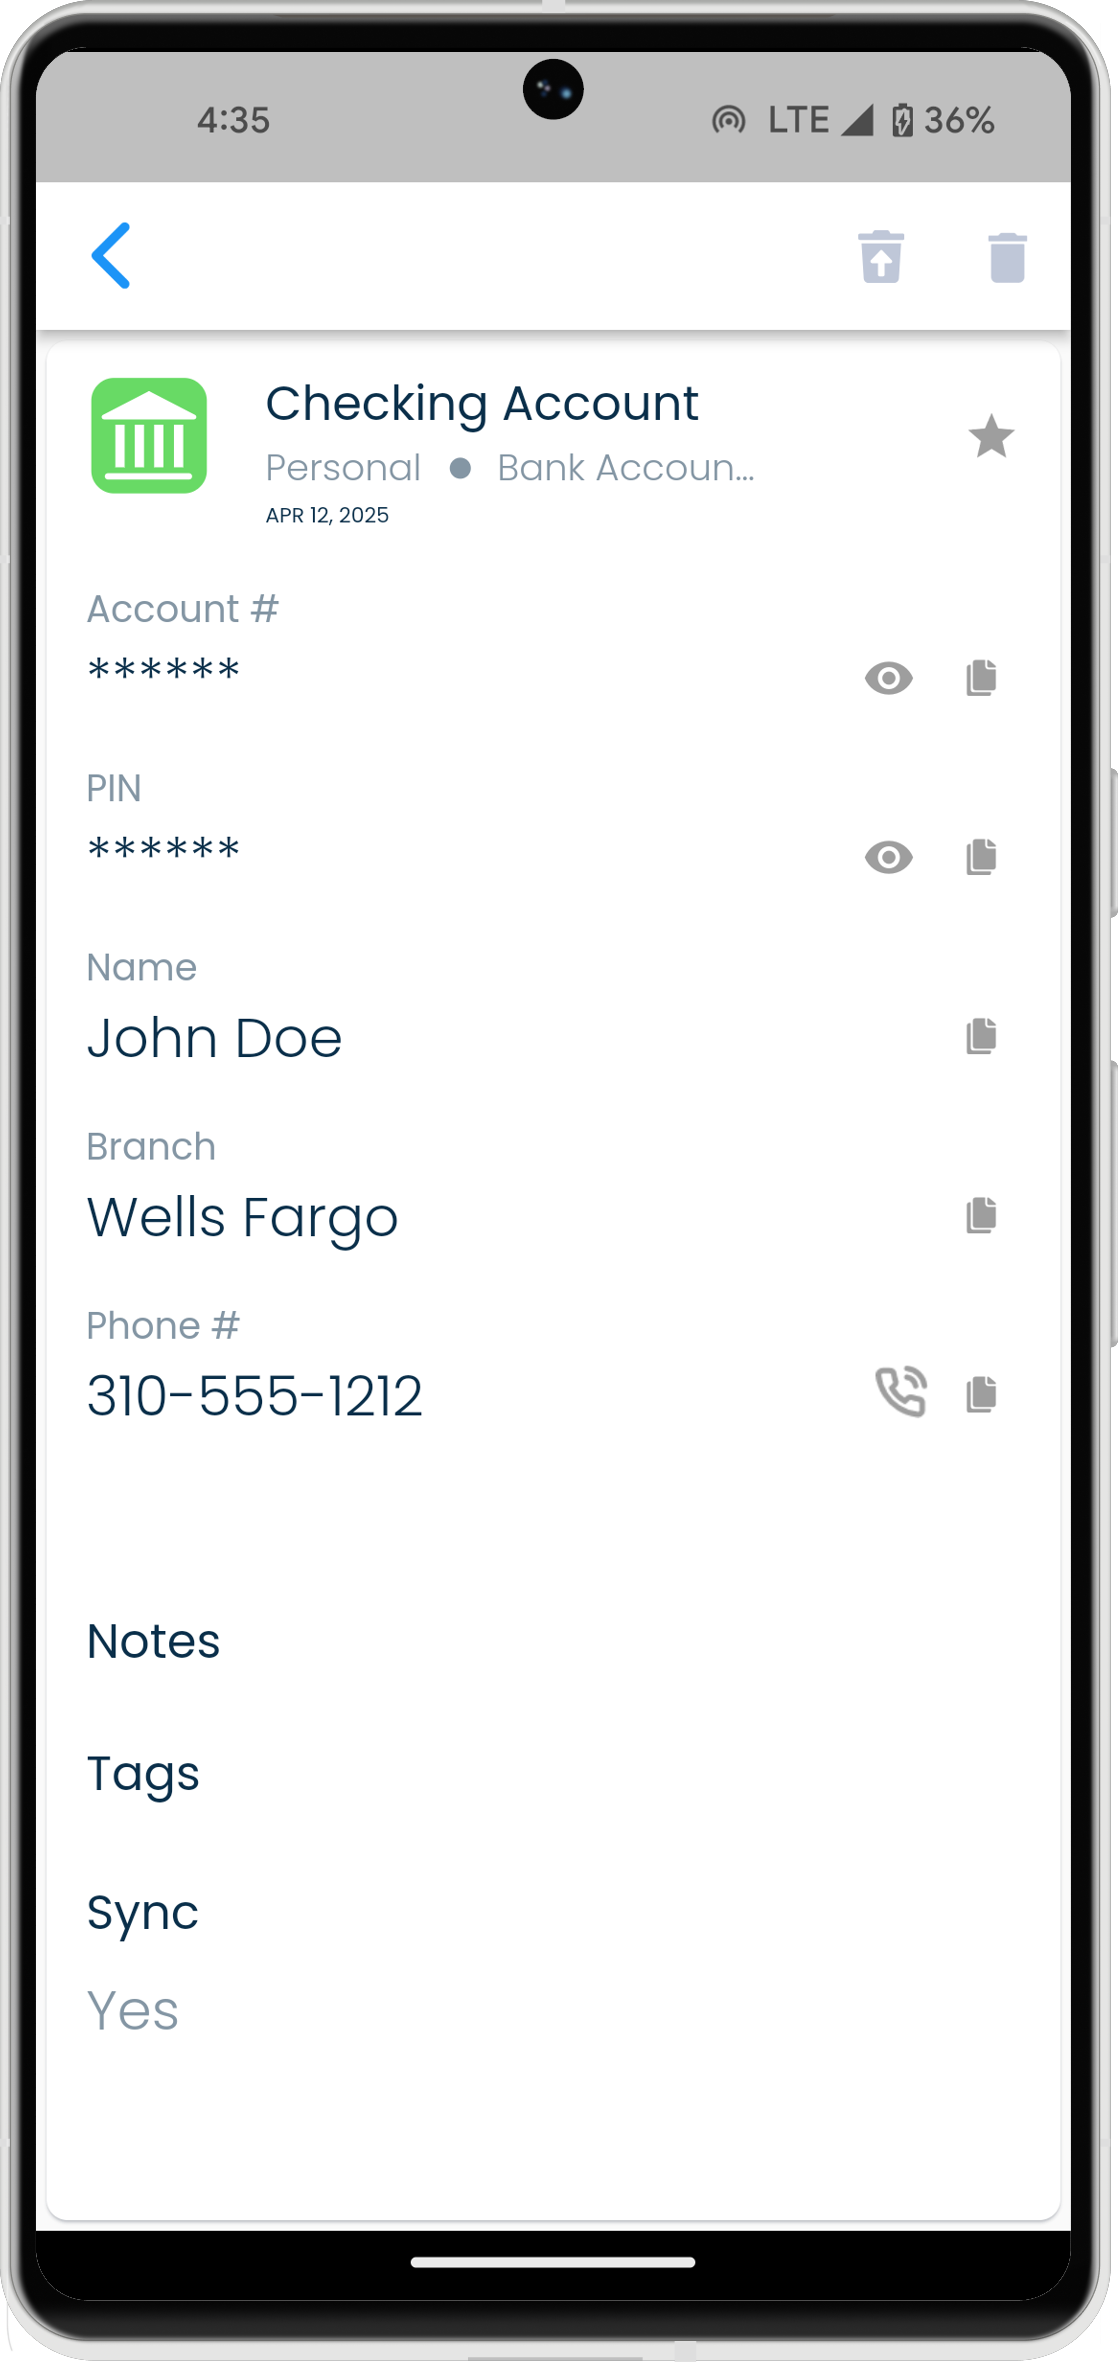
Deleting records permanently
- Visit the Recycle Bin screen from the application menu.
- Select a record in the record list in the Recycle Bin view.
- Click or tap on the Delete icon in the record details header to permanentlydelete the record.
| Mac | Windows |
|---|---|
|
|
| Android | iPhone |
|---|---|
| |
|
| iPad |
|---|
|
Another way to permanently delete a record
- Visit the Recycle Bin screen from the application menu.
- Locate the record in the Recycle Bin record list.
- Click or tap on the three dots icon to bring up the list of actions.
- Click or tap on Delete option.
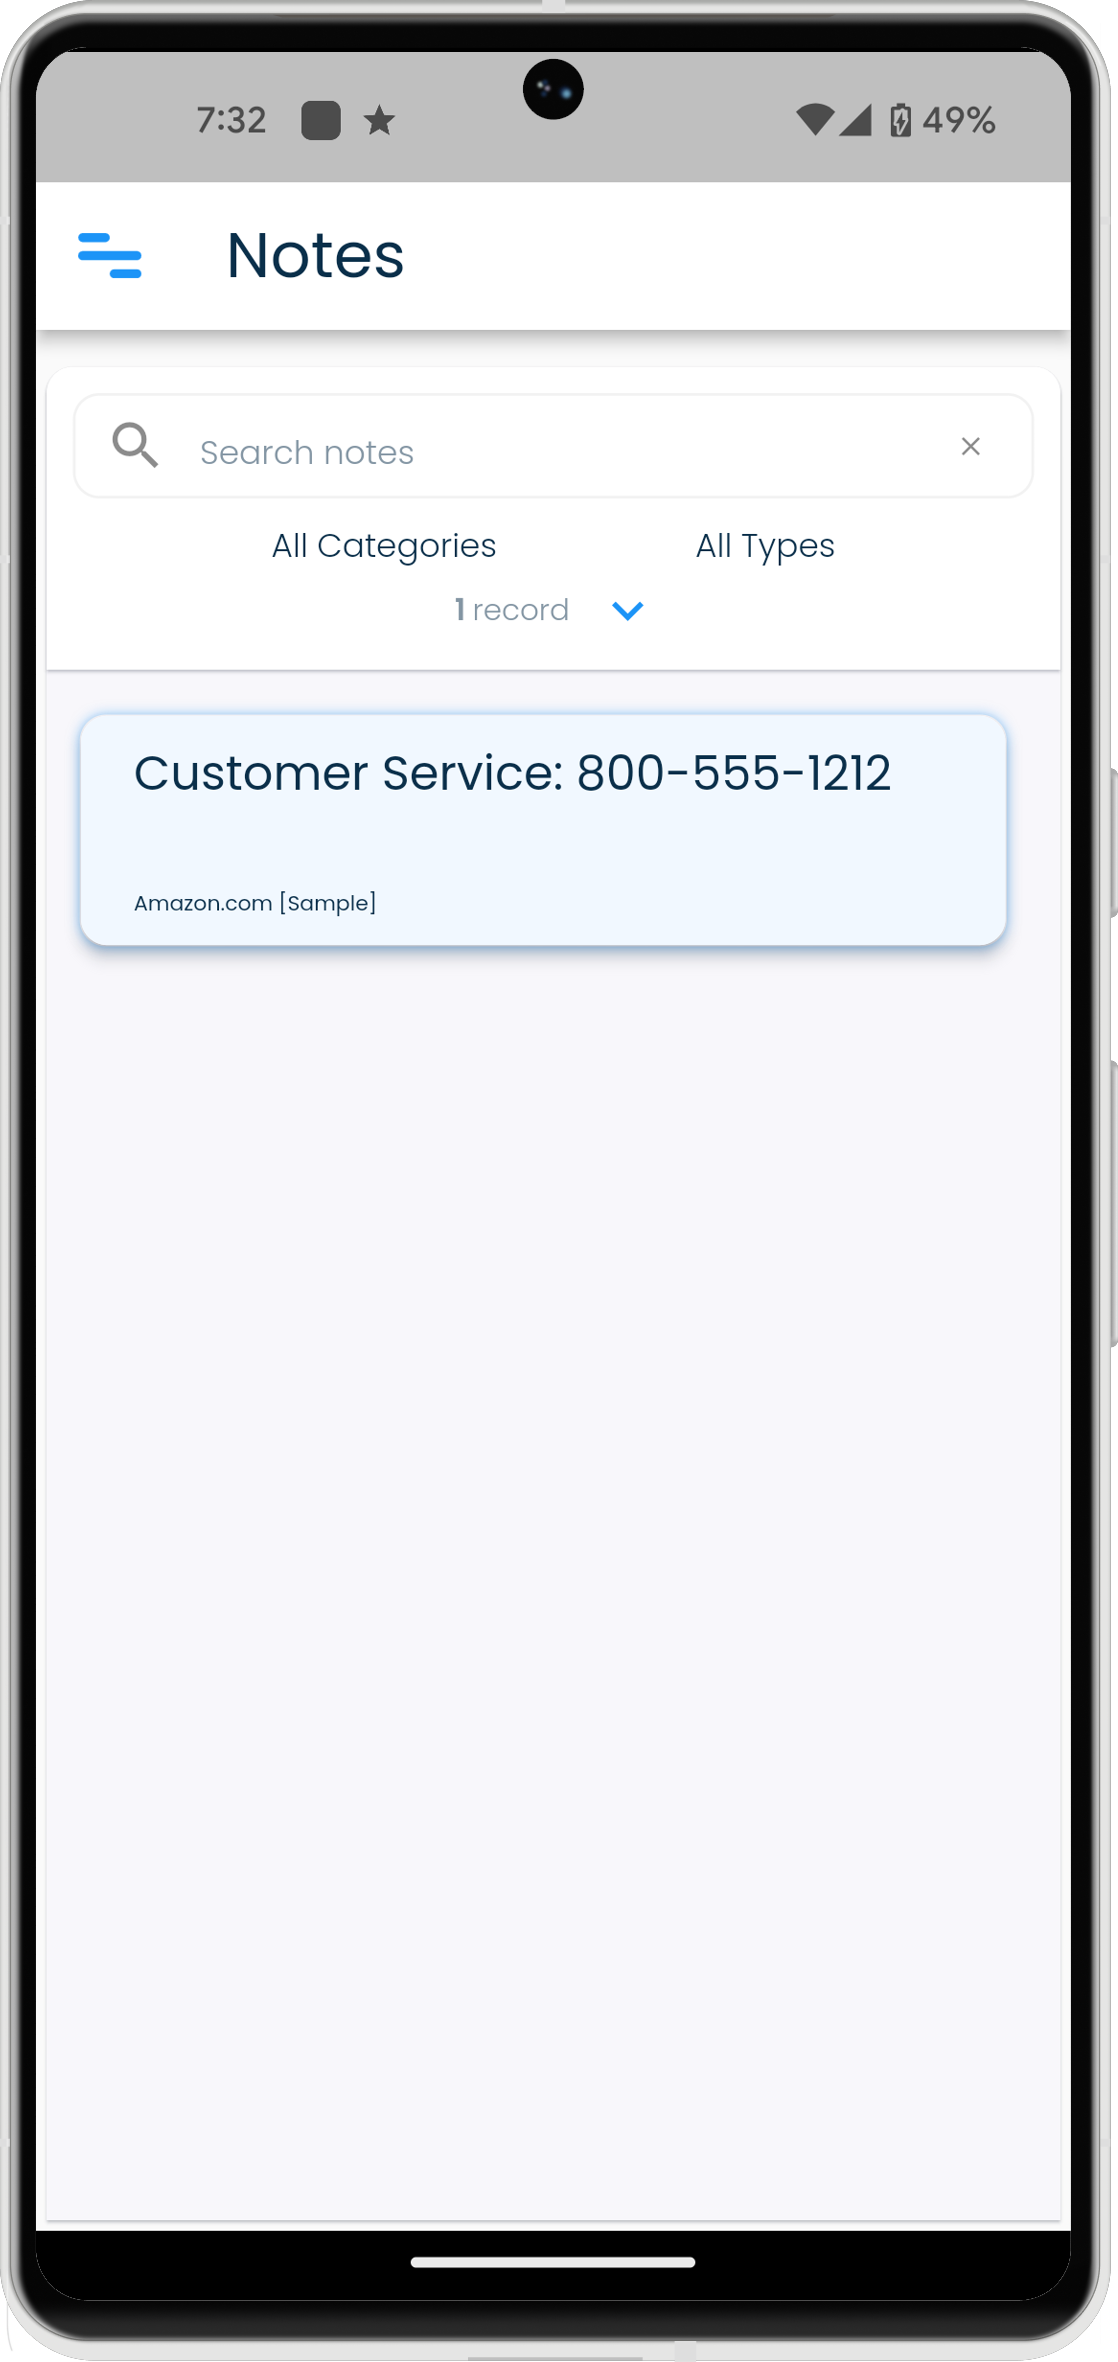
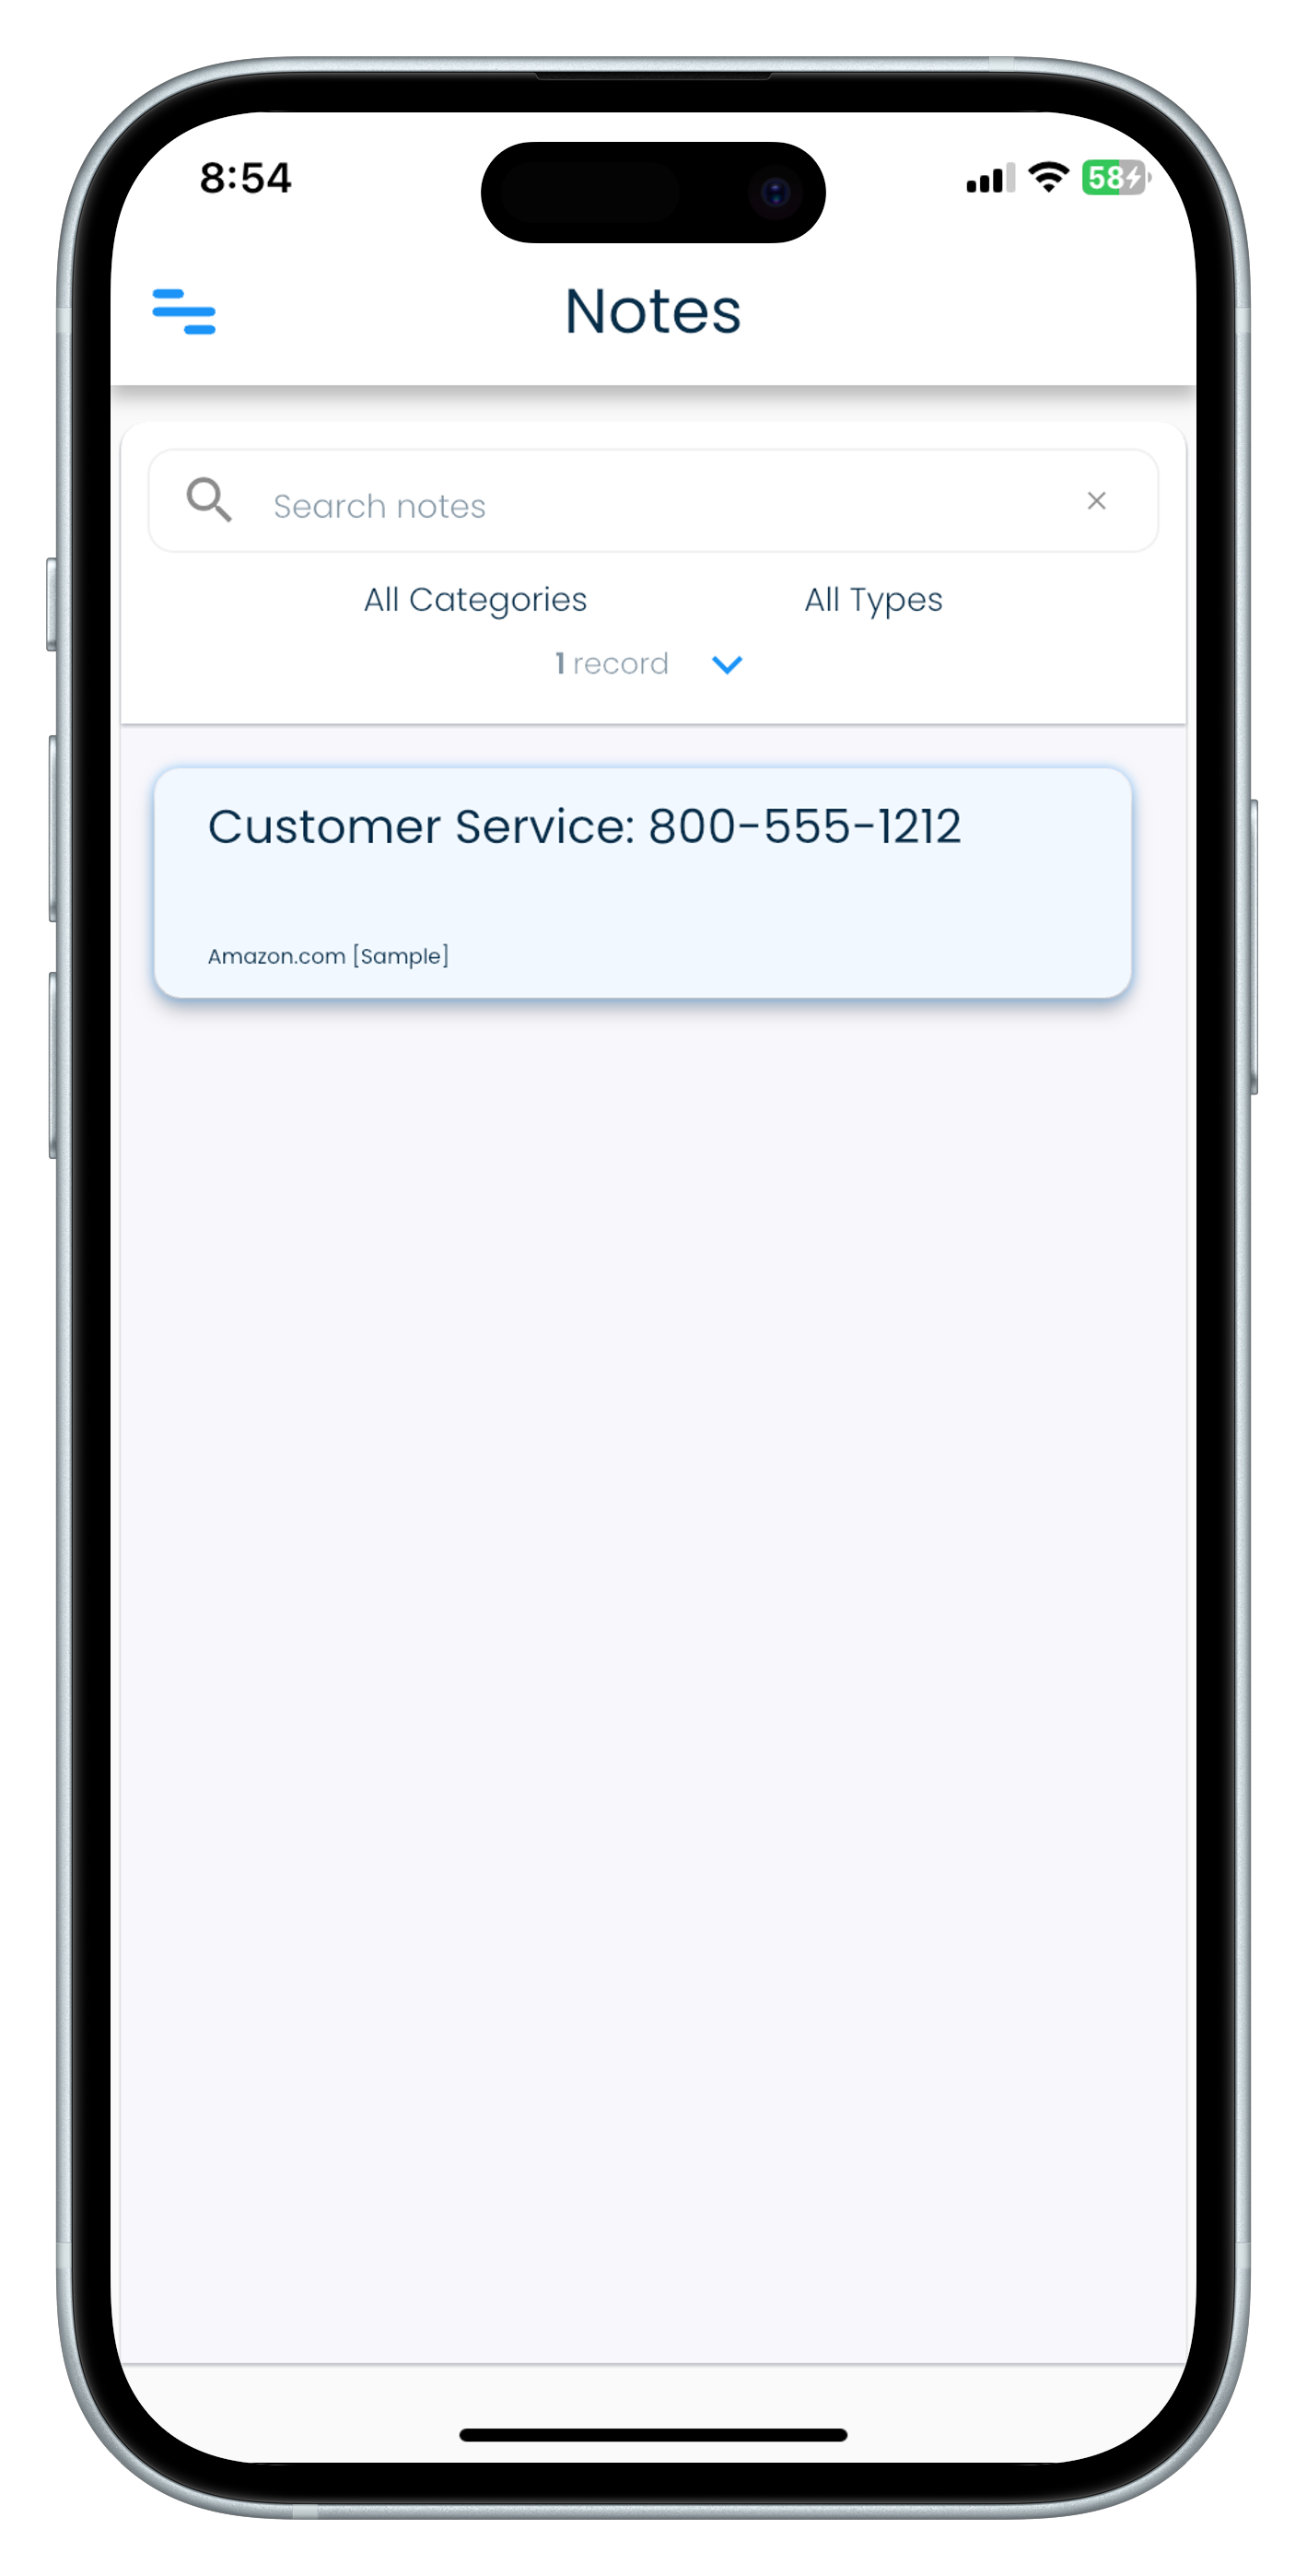
Notes
Notes screen
All the notes ypu have created in your records can be viewed in the Notes screen. The Notes screen can be reached by clicking on the Notes link in the application menu.
The notes view shows all the notes added to all your records in one screen. The primary use of this view will be to see all notes in a convenient and quick way in a single list.
| Mac | Windows |
|---|---|
|
|
| Android | iPhone |
|---|---|
|
|
| iPad |
|---|
|
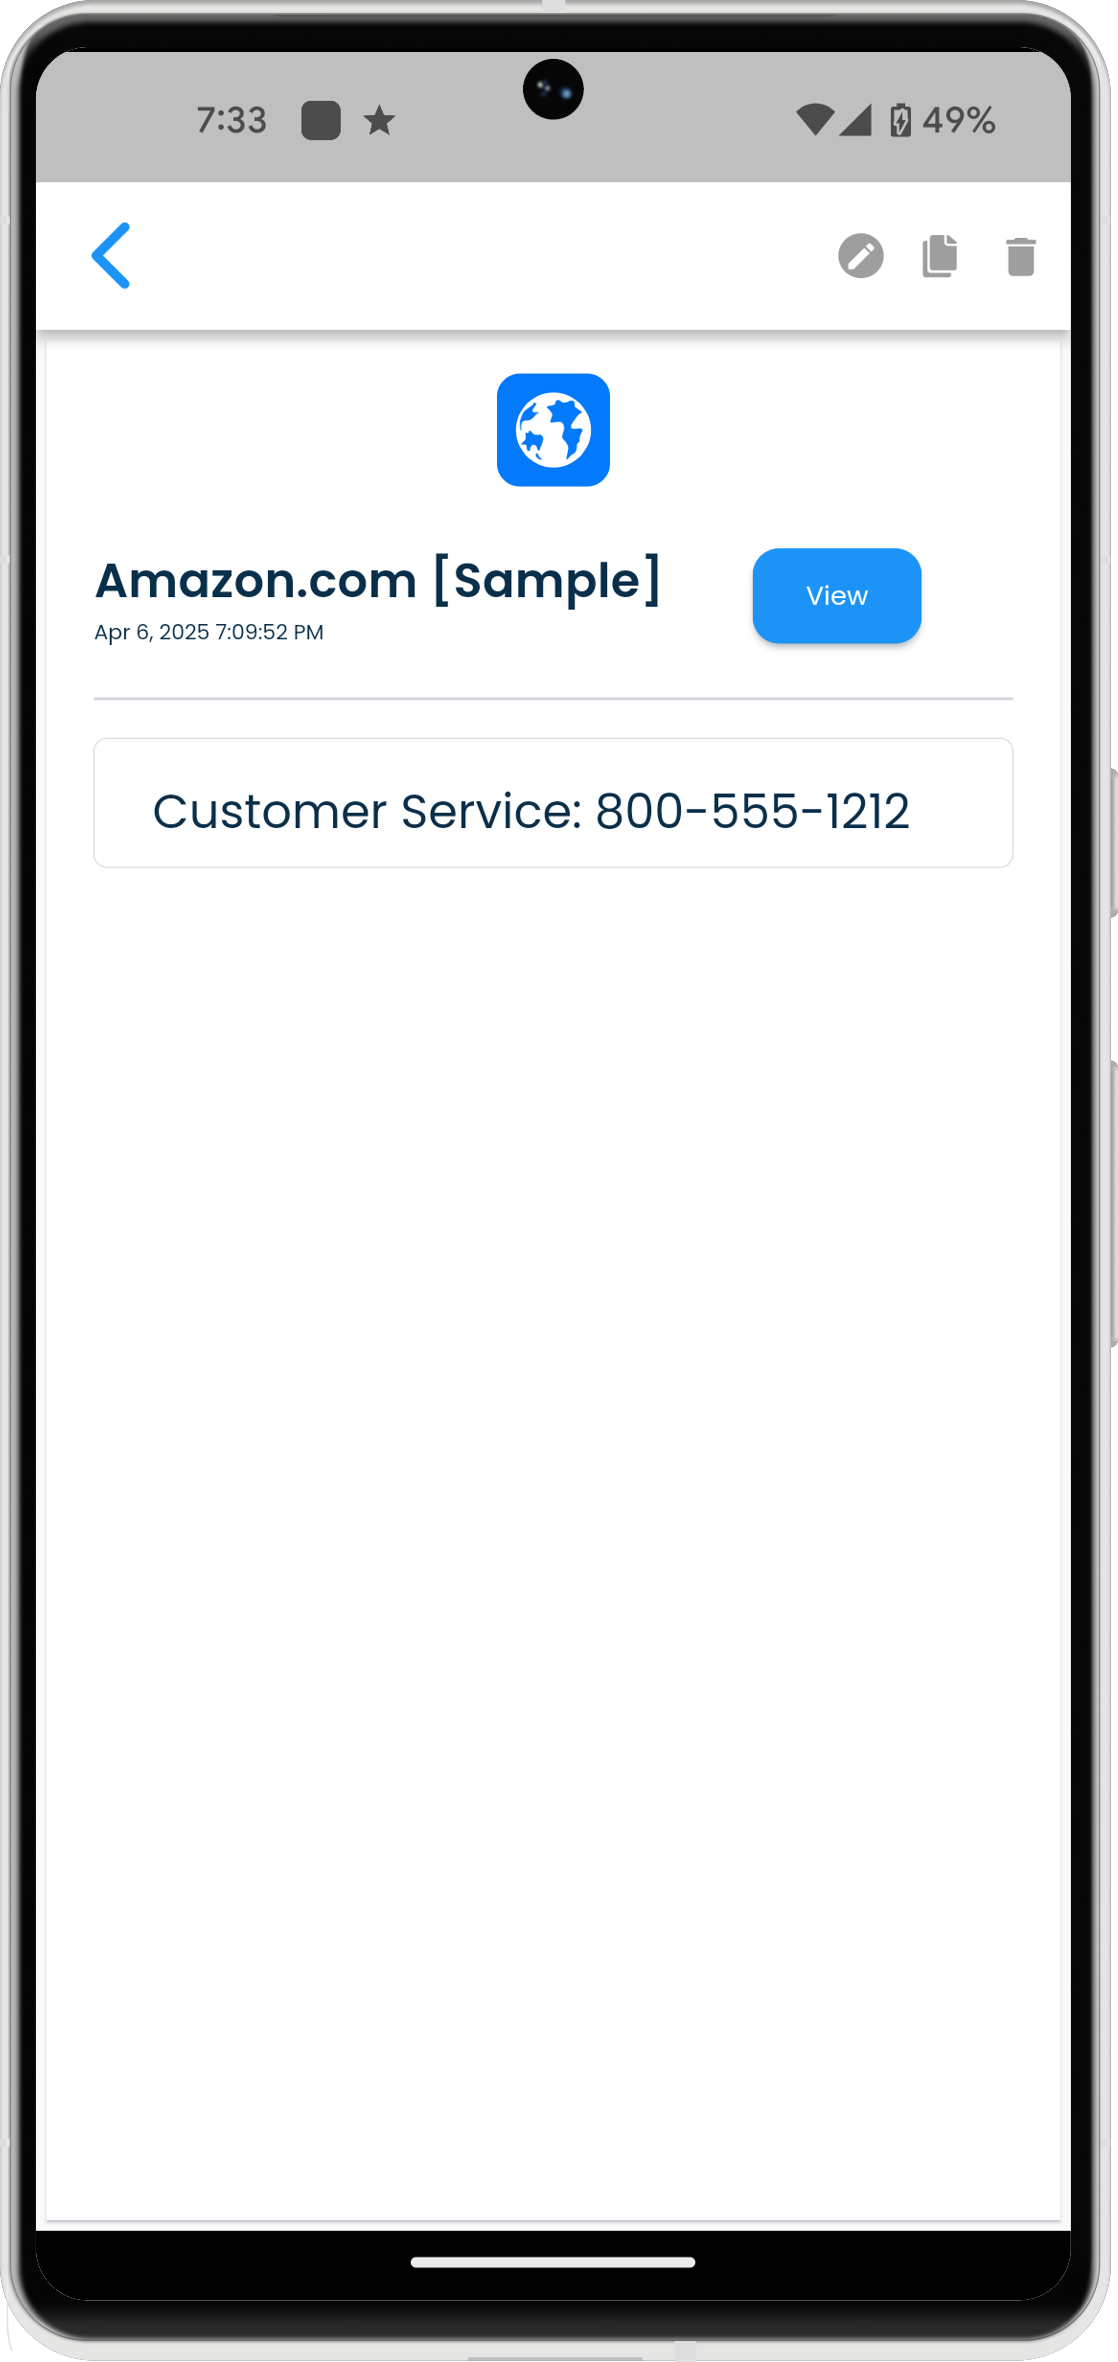
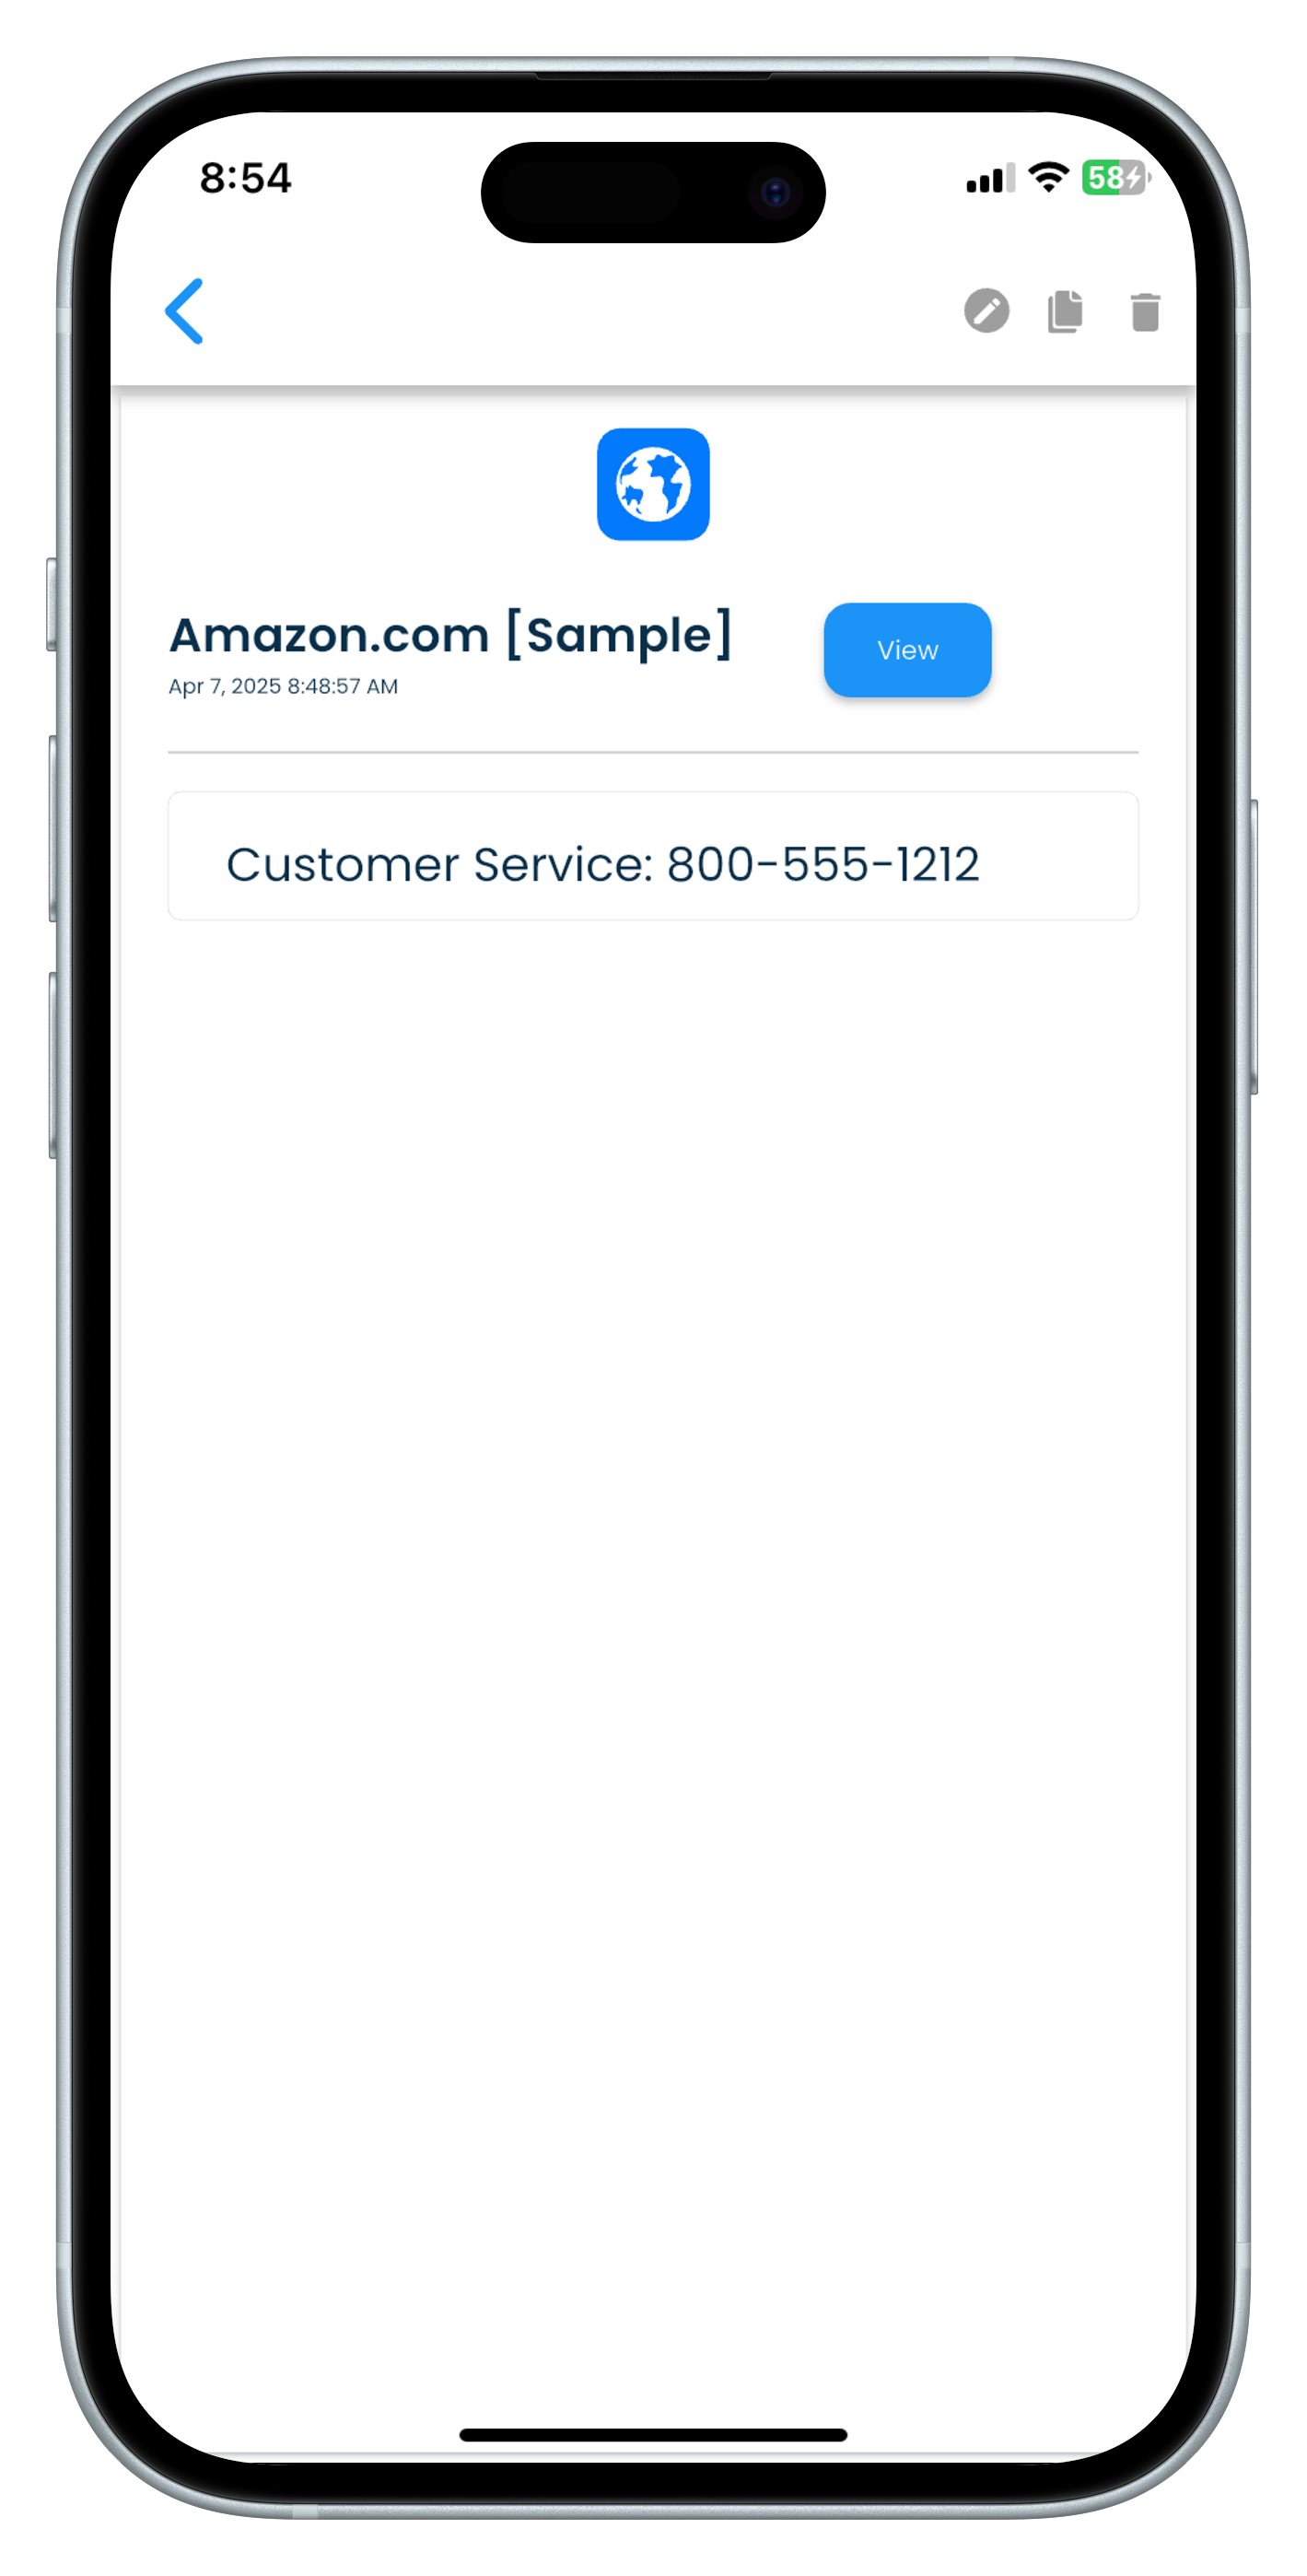
Notes in a record can be directly edited, duplicated or deleted in this view.
You can also navigate to the main record containing the note you are viewing by clicking or tapping the View button in the notes details panel.
Adding notes
To add a note you need to add it in a record. The steps below explains how to add notes in an existing record.
Existing record
- Select a record from any of the record lists displayed to see the record details.
- Click or tap on the Edit icon in the record details header to edit a record.
- Scroll down to the Notes section in the record details.
- Click or tap on the Add button in the Notes section to add a new note.
- In the new notes field add your content and format it using the options provided in the notes field header.
- When you are done save the record by clicking or tapping on the Save button in the record details header.
Another way to add a note to an existing record
You can also easily add a note to a record that has the note displayed in the Notes view. Here, first select the note in the Notes view, and then click or tap on the View button shown next to the record name displayed in the notes details panel.
You can also easily duplicate the notes entry in a record. Here, first select the note in the Notes view, and then click or tap on the Duplicate button shown in the header panel in the details section. Then click on the duplicated note and edit it while being in the Notes view.
New record
Create a new record first by clicking or tapping on the +Add button in the My Records view.
Then add the record details as you need. Finally, add some notes using the same steps as listed in the Existing record section above.
Viewing notes
Click or tap on the Notes item in the navigation panel to visit the notes view.
On navigating to the Notes view you will be presented with a list of all notes that have been collected from your personal records, and displayed in a single list.
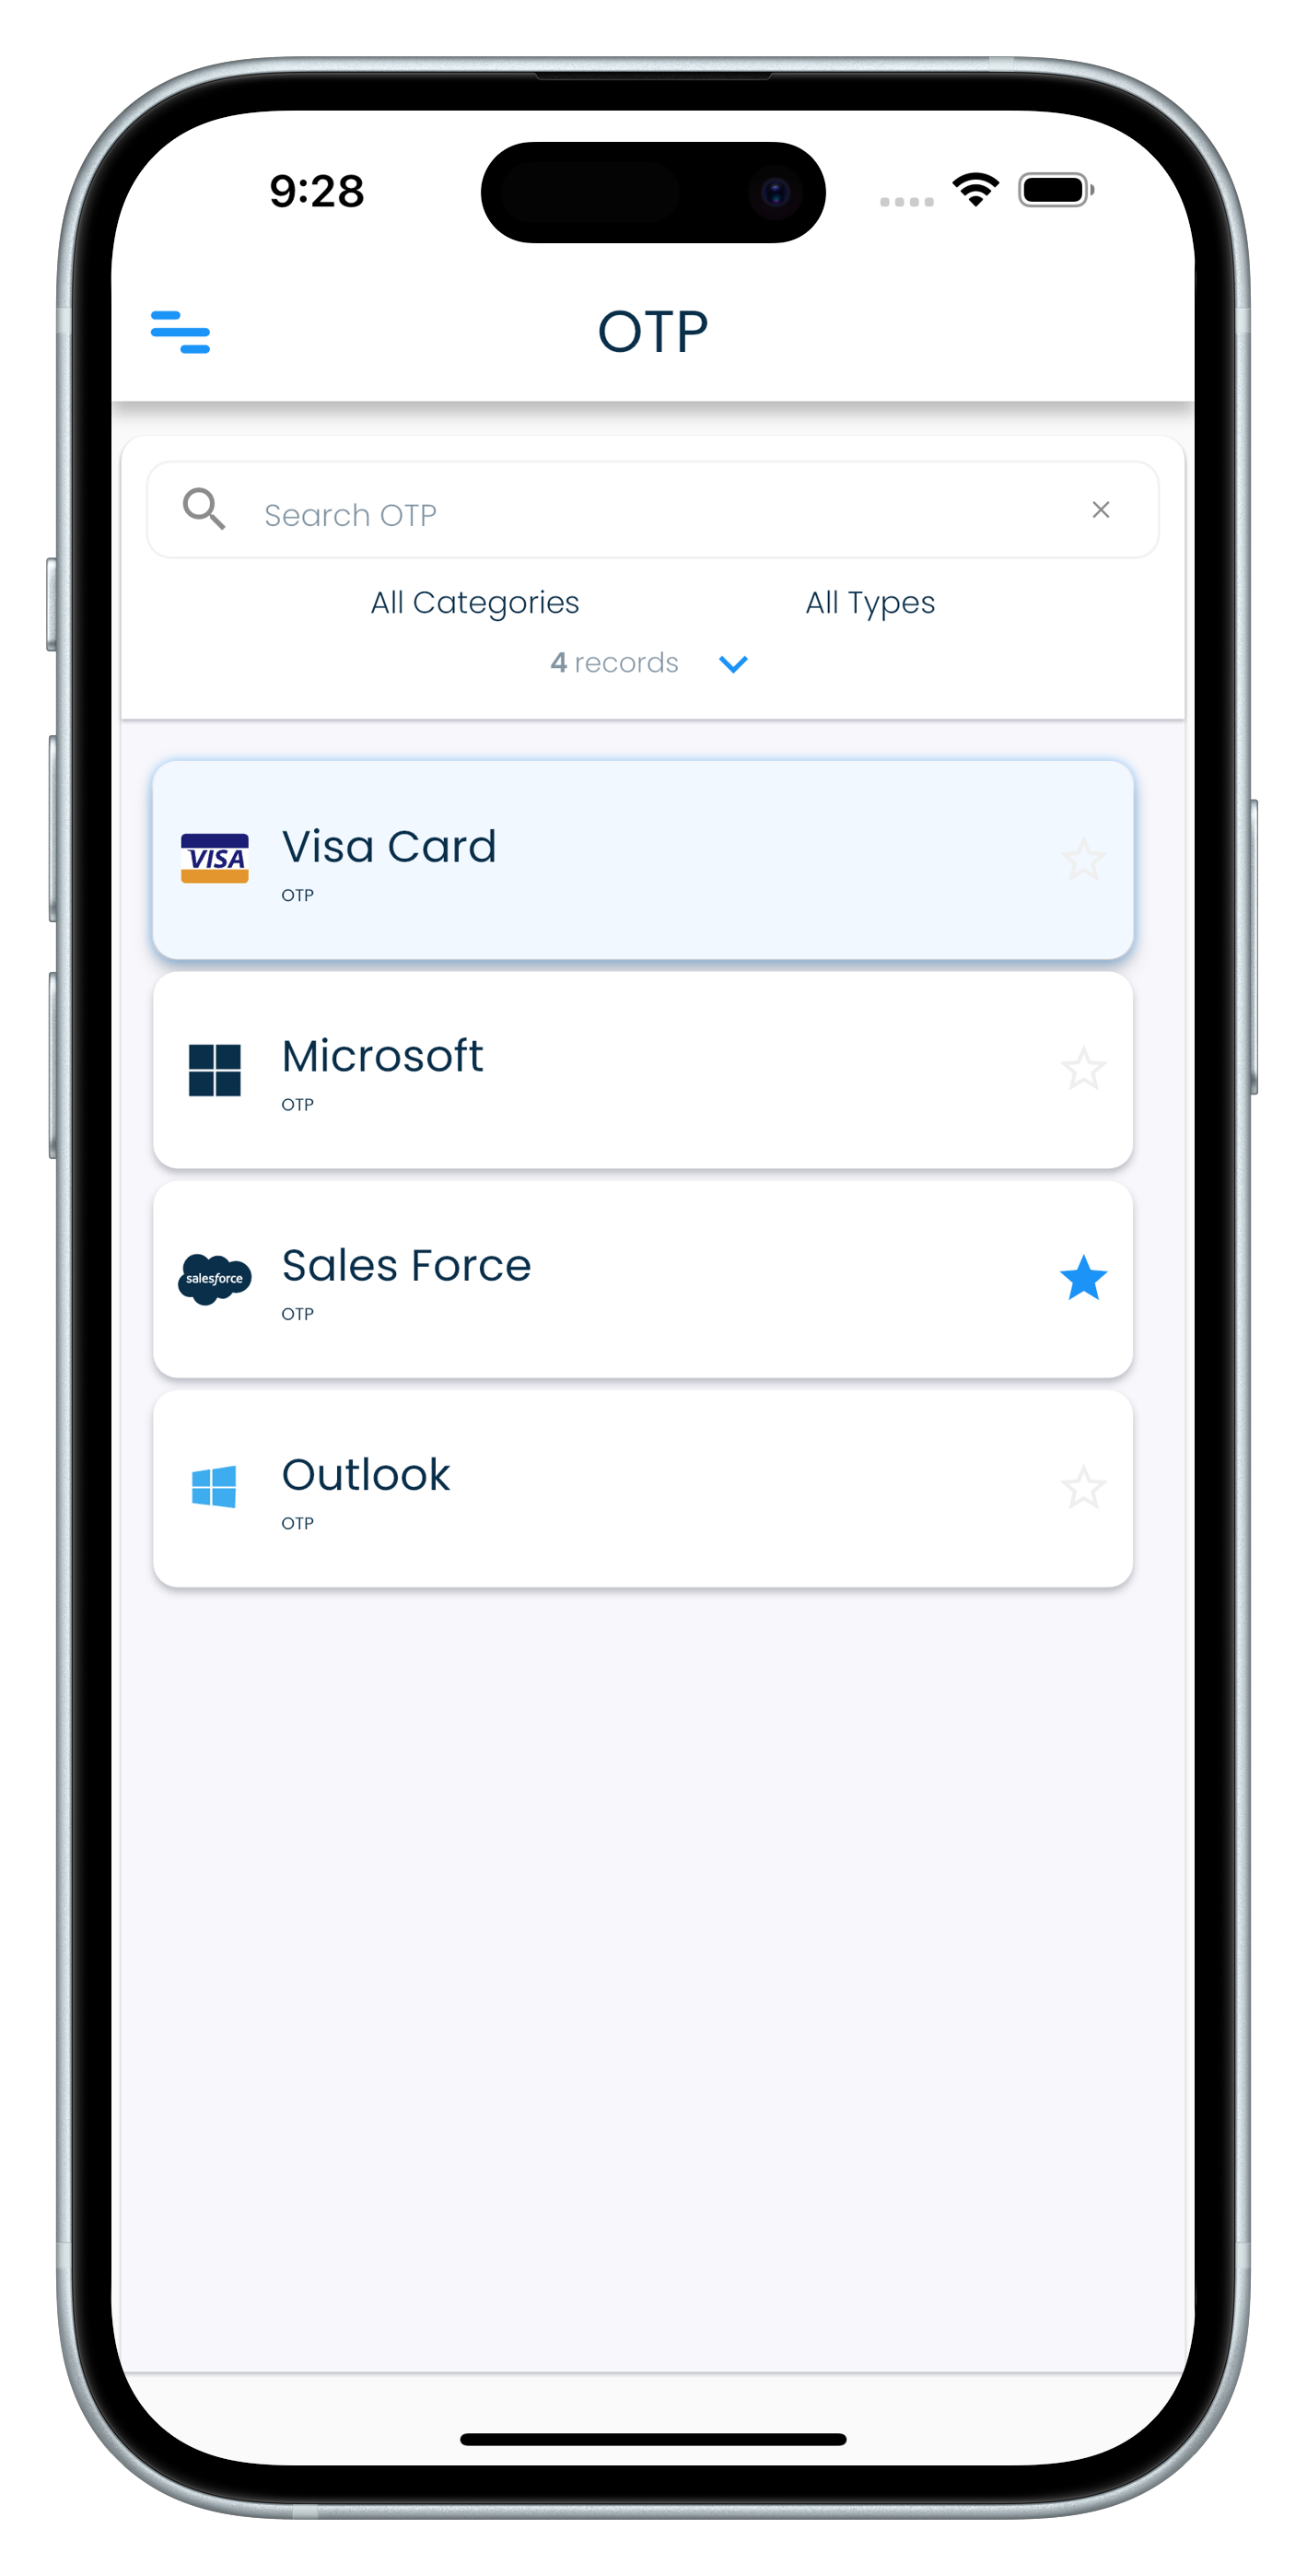
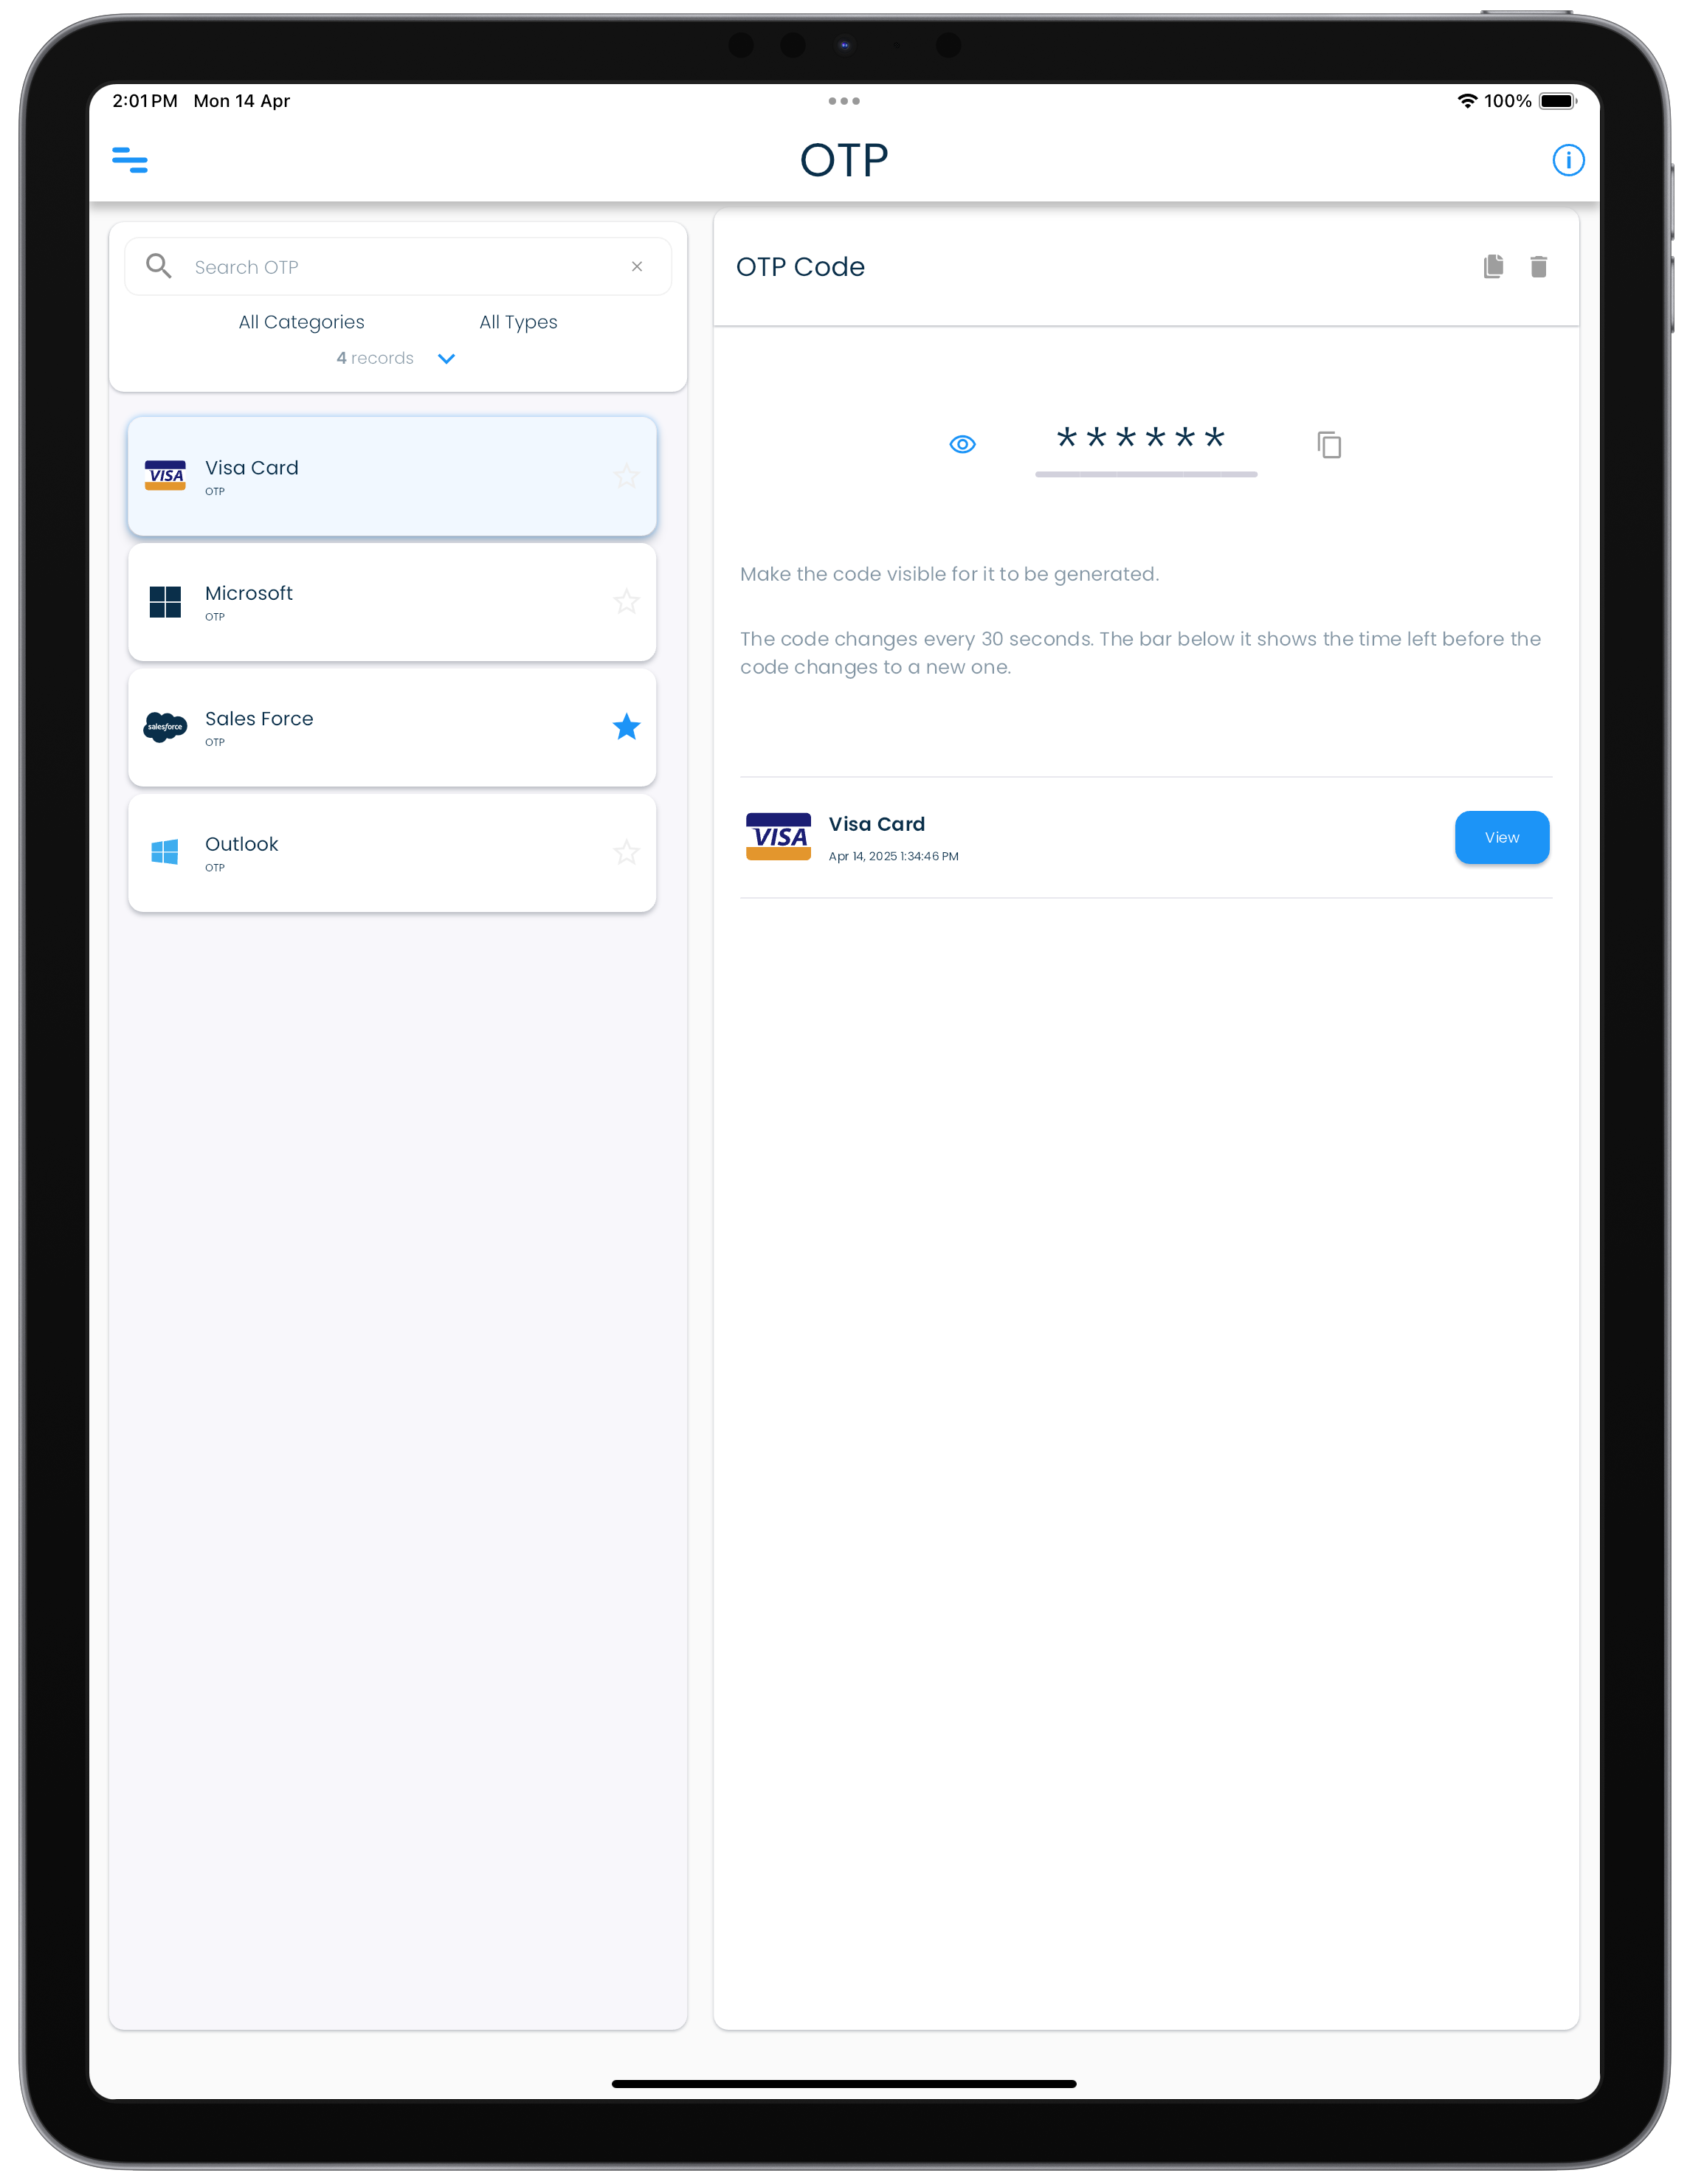
OTP
OTP screen
All your OTP codes in your records can be viewed in the OTP screen. The OTP screen can be reached by clicking on the OTP link in the application menu.
OTP codes here refer to TOTP or authenticator application codes that are used for second factor authentication in numerous websites and applications.
The OTP view shows all the second factor authenticator fields you have setup in all your records in one place. The main use of this view will be to view all the OTP authenticator codes in your records in a convenient and quick way in one place.
| Mac | Windows |
|---|---|
|
|
| Android | iPhone |
|---|---|
|
|
| iPad |
|---|
|
You can navigate to the main record containing the OTP you are viewing by clicking or tapping the View button in the OTP details panel.
OTP field in a record can also be duplicated or deleted in this view.
Setup of OTP fields
To add a OTP you need to add it in a record. The steps below explains how to add notes in an existing record.
QR code image and the OTP key code
You will need a authenticator setup code to complete the OTP field setup in SplashID Classic.
While you are setting up 2 factor in another site or application, perform the steps listed below in SplashID after you reach the QR code screen. This screen will also display a text key that you will need while adding the OTP field in SplashID Classic.
On mobiles and tablets you can use the camera icon next to the OTP field to scan the displayed QR code into the OTP field in SplashID Classic. On desktops, you will need to manually enter the displayed text key into the OTP field in the record.
Existing record
- Select a personal record from any of the record lists displayed to see the record details.
- Click or tap on the Edit icon in the record details header to edit a record.
- Scroll down to the end of the list of fields in the record.
- In the Add a field box, click or tap on the field type list and select the OTP item from the list. Click or tap on the Add button to add the OTP field to the record.
- In the new OTP field scan the displayed QR code, or type in the key displayed in the website or application for which you are setting up the authenticator code generation in SplashID.
- When you are done save the record by clicking or tapping on the Save button in the record details header.
Duplicate OTP
You can also easily duplicate a OTP entry in a record. Here, first select the OTP code in the OTP view, and then click or tap on the Duplicate button shown in the header panel in the details section.
After duplicating the OTP field, edit it and replace the OTP key by using a QR code displayed in the other website or application, or manually enter the key shown there.
New record
Create a new record first by clicking or tapping on the +Add button in the My Records view.
Then add the record details as you need. Finally, add the OTP field in the record using the same steps as listed in the Existing record section above.
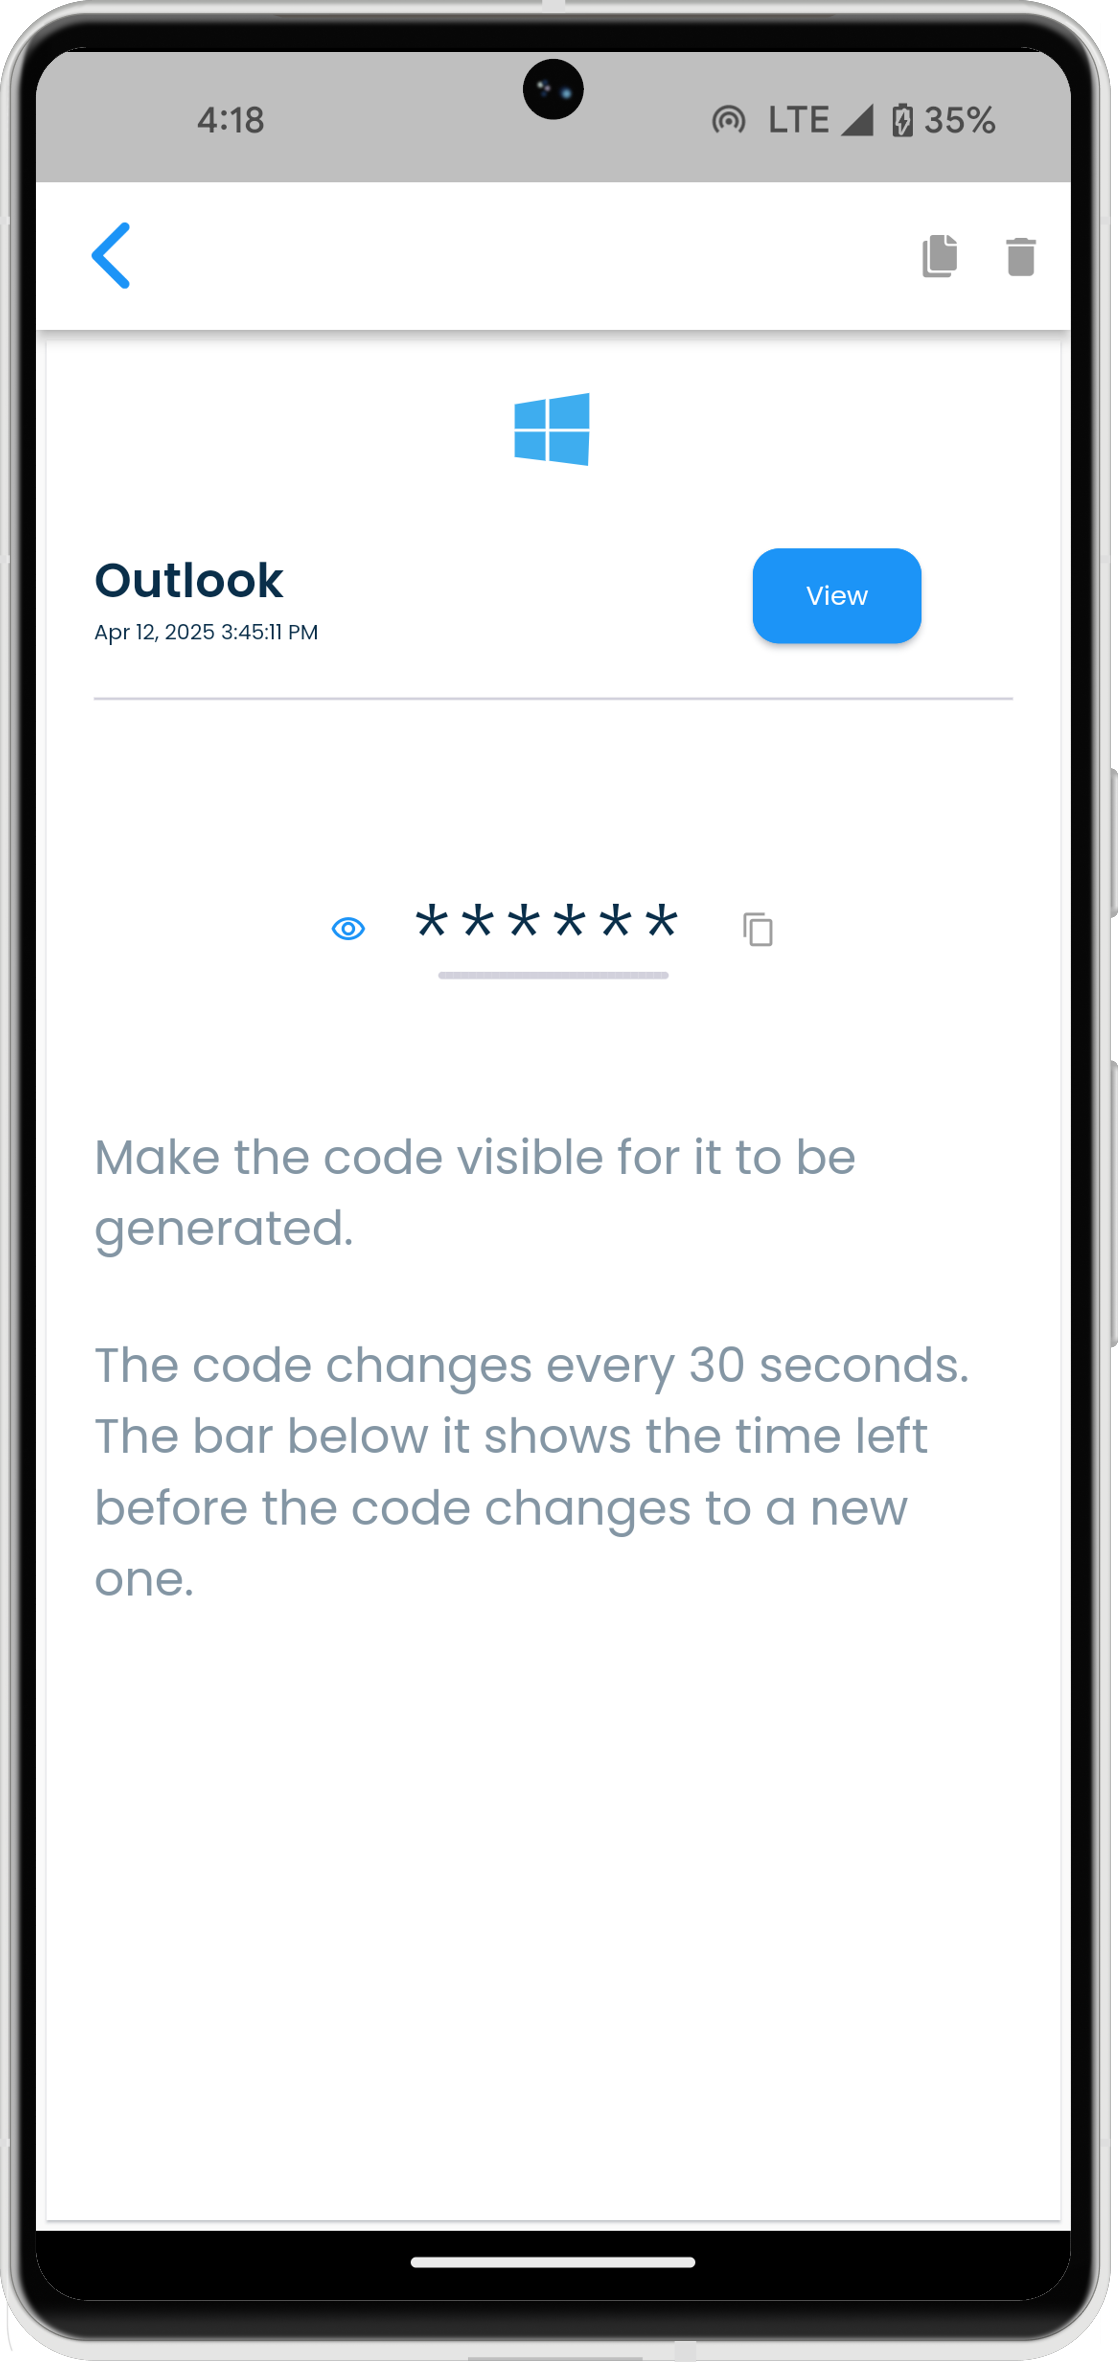
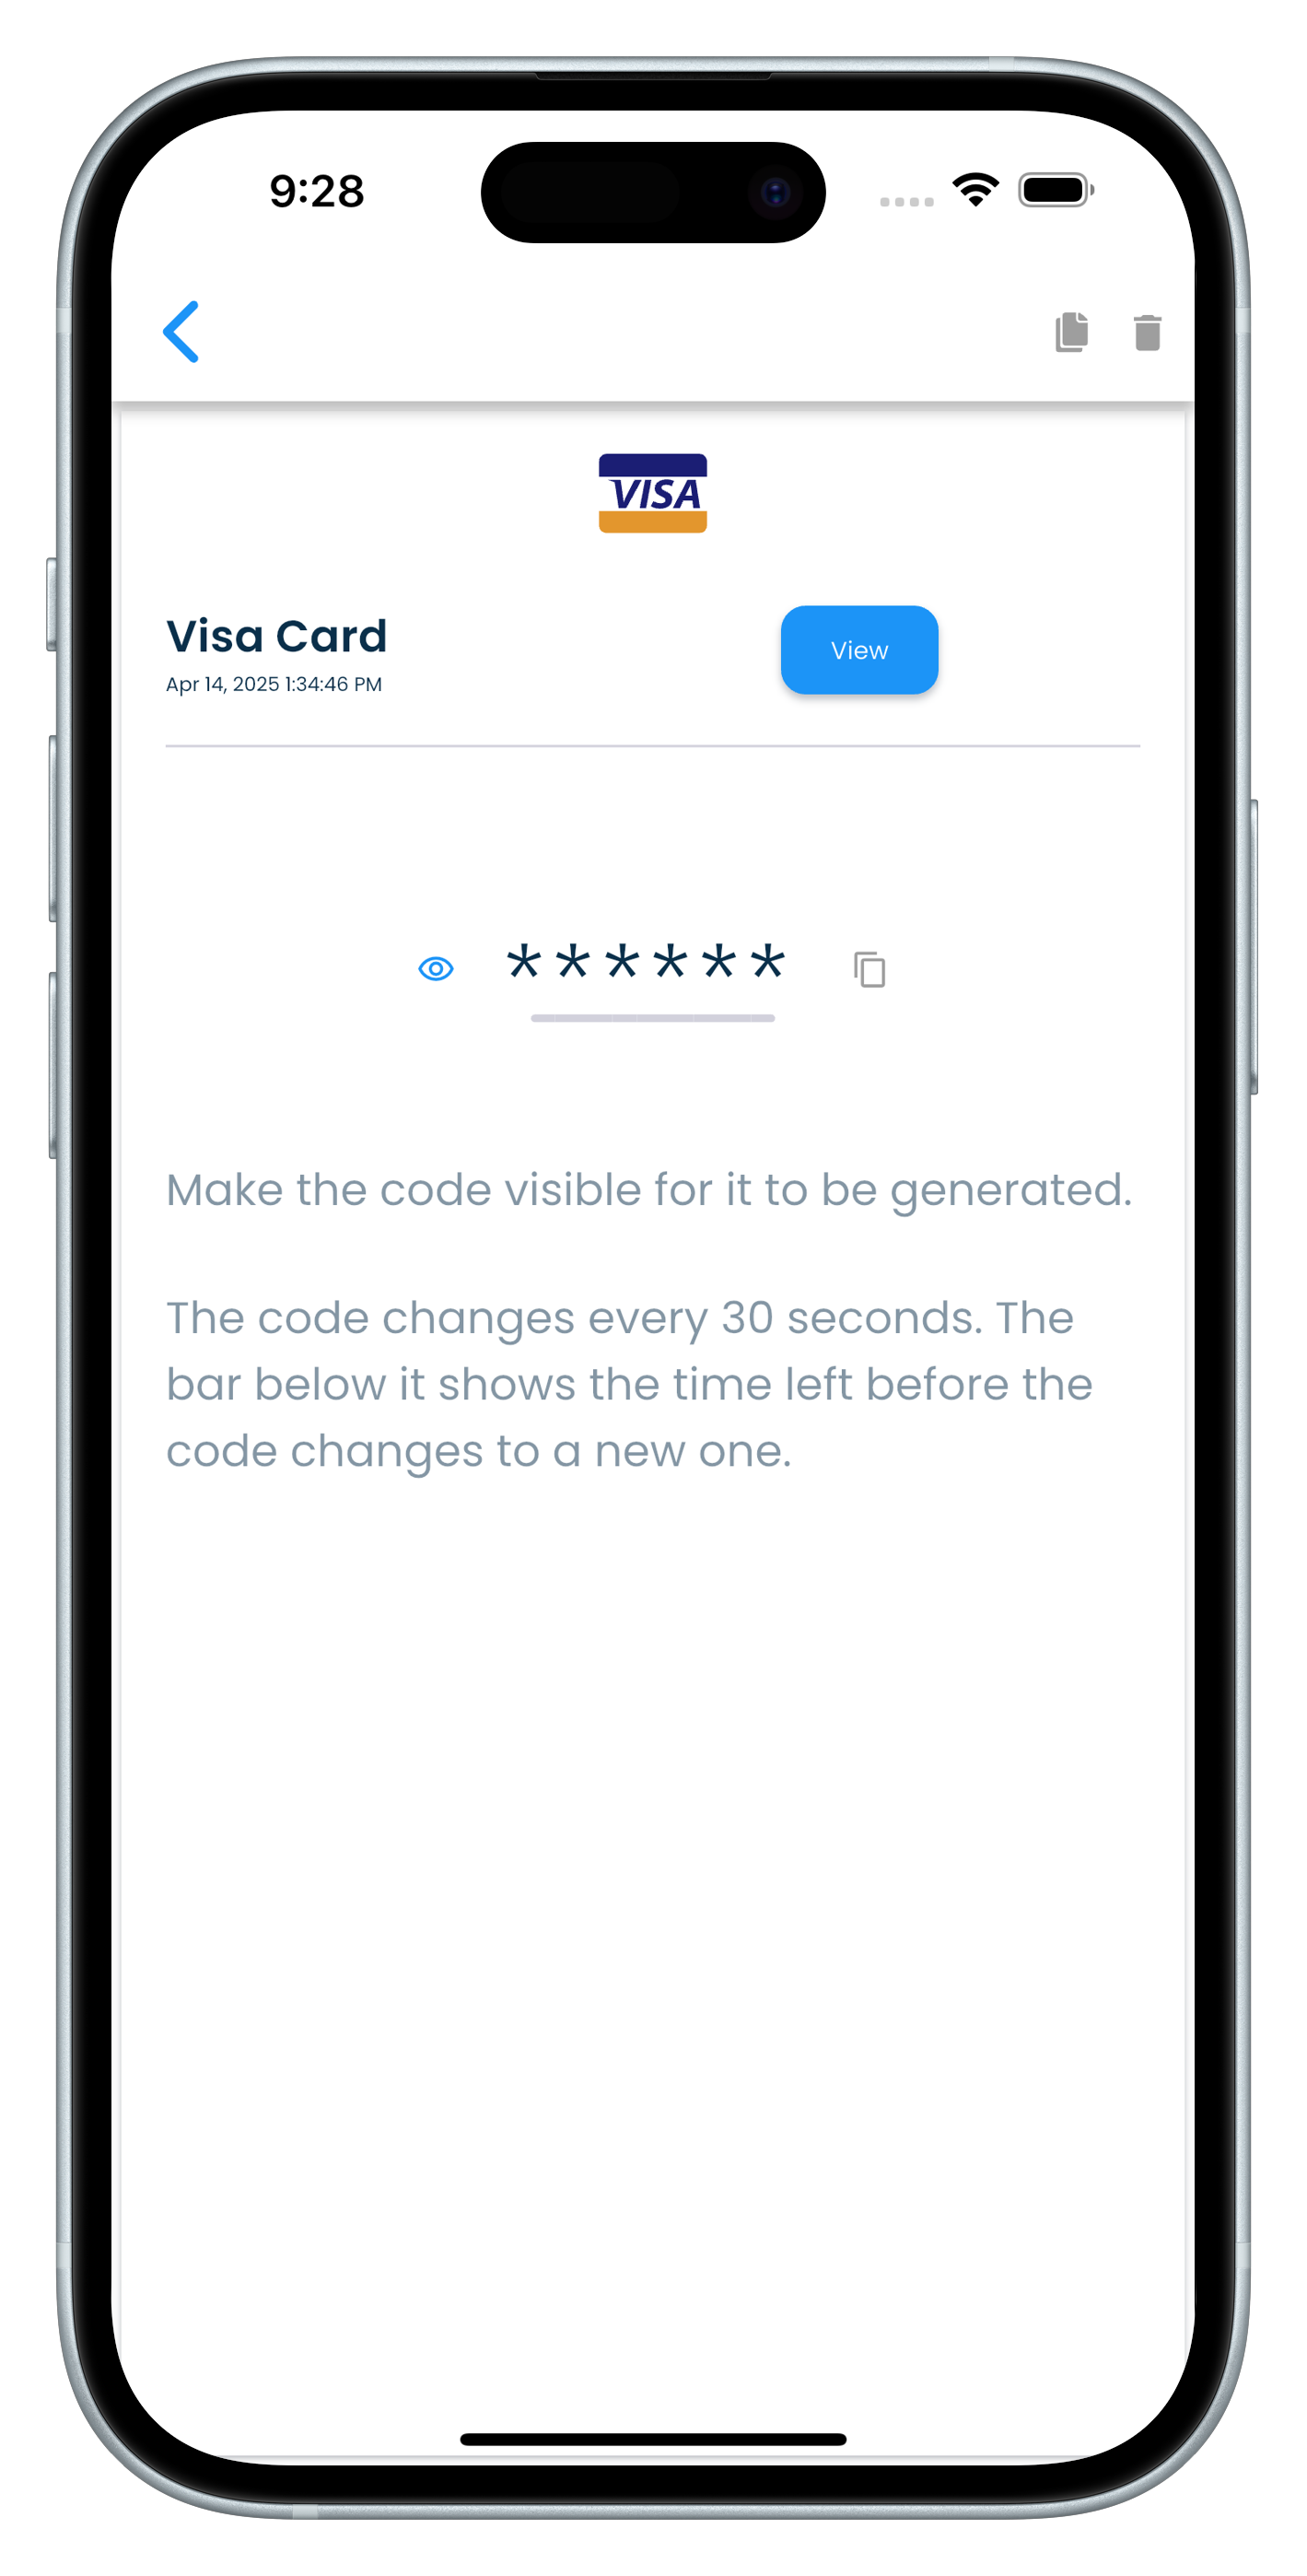
Viewing OTP codes
You will need to see the generated OTP codes in SplashID Classic, when you are trying to sign in to a website or application for which you have setup the code in SplashID Classic.
To see the code you can do it in one of the following two ways.
View the record containing the OTP field
You need to navigate to the record in which you have setup the OTP field.
- Click or tap on the My Records item in the application menu to show your list of records.
- Select a record from any of the record lists displayed to see the record details. You can use search or the other filter options to locate your record.
- In the record details view scroll down to the field that has the OTP code.
- Click or tap on the eye icon to see the generated OTP code. The code changes every 30 seconds.
- You will need to manually enter the displayed code in the application or website you are trying to log into. Alternatively, if you are on the same device, then you can copy the OTP code to the clipboard, and paste it in the website or application if they allow it.
View it in the OTP screen
You need to go to the OTP screen in this method.
- Click or tap on the OTP item in the application menu to show your list of OTP fields.
- Select an OTP field from the list displayed to see the OTP details. You can use search or the other filter options to locate your OTP field.
- In the OTP details view, click or tap on the eye icon to see the generated OTP code. The code changes every 30 seconds.
- You will need to manually enter the displayed code in the application or website you are trying to log into. Alternatively, if you are on the same device, then you can copy the OTP code to the clipboard, and paste it in the website or application if they allow it.
Hiding the OTP code
Once you have used the generated OTP code to login to the website or application that it was setup for, you no longer need the code to be displayed.
Click on the crossed eye icon to stop the code generation and hide it.
Backups
Backups allow for easy and safe storage of records in your profile for safe keeping locally on your device. In the eventuality of having lost some information, backups can be used for restoring the records using the content that was stored in the backed up file.
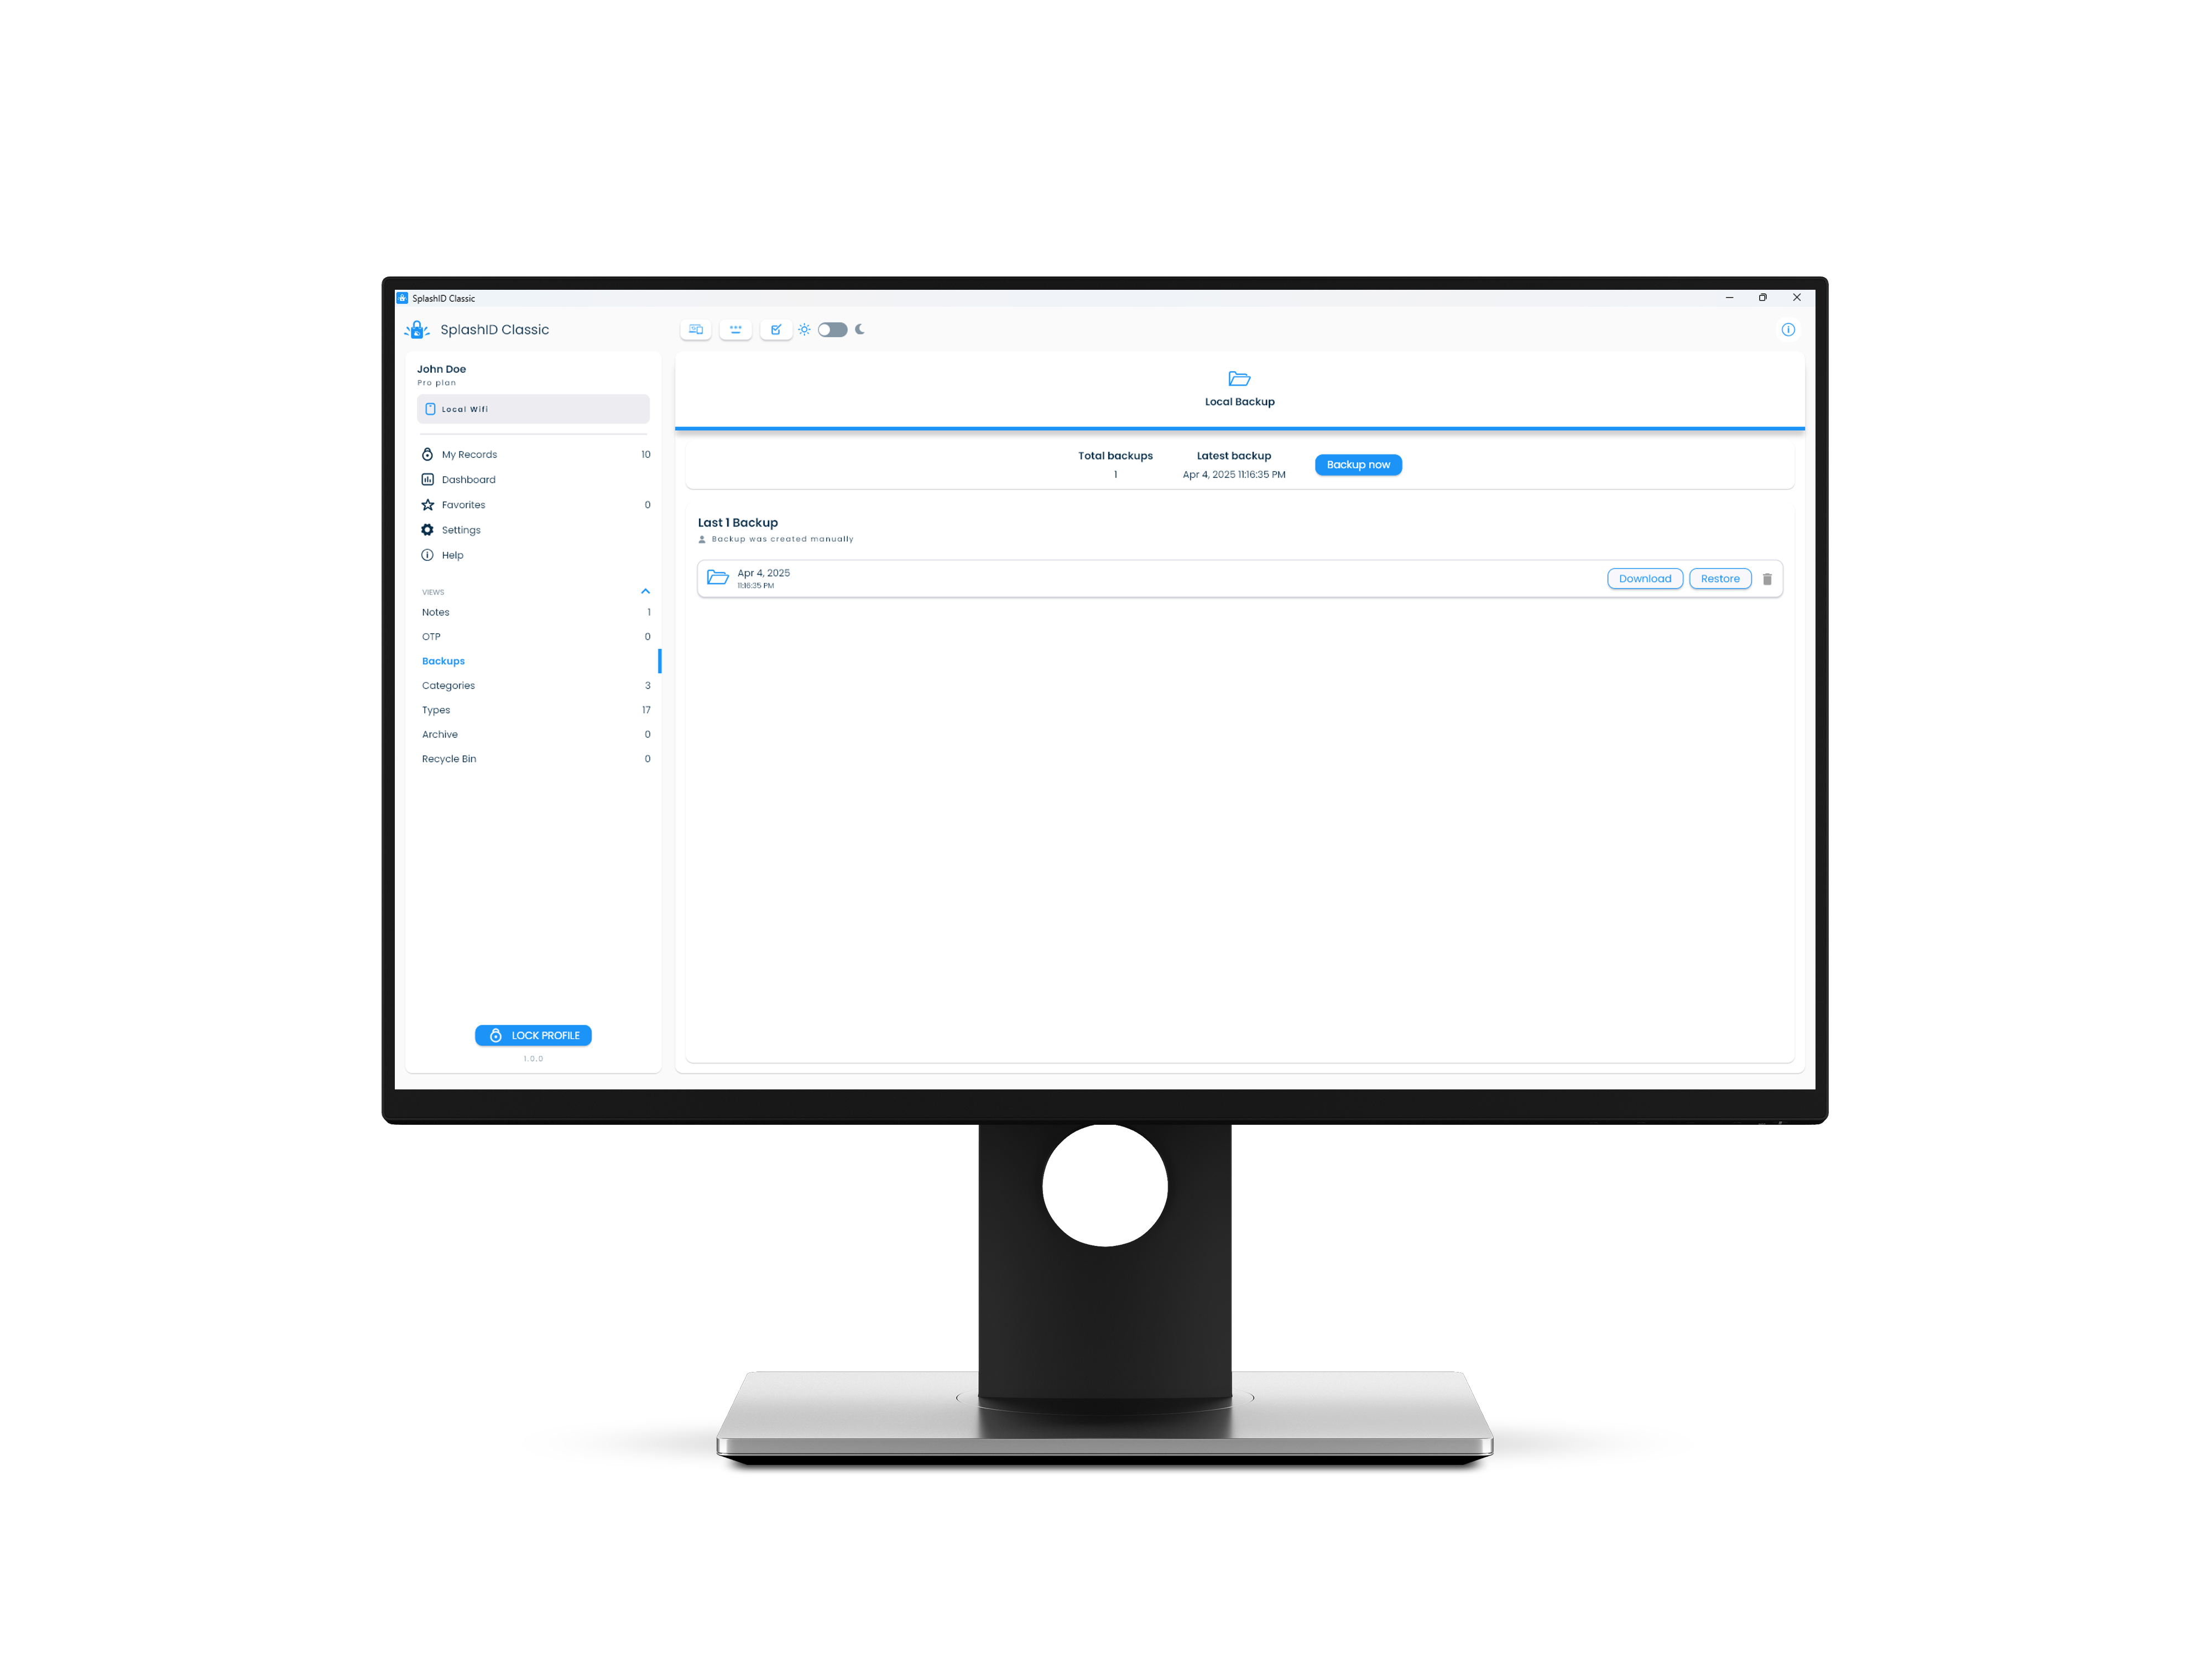
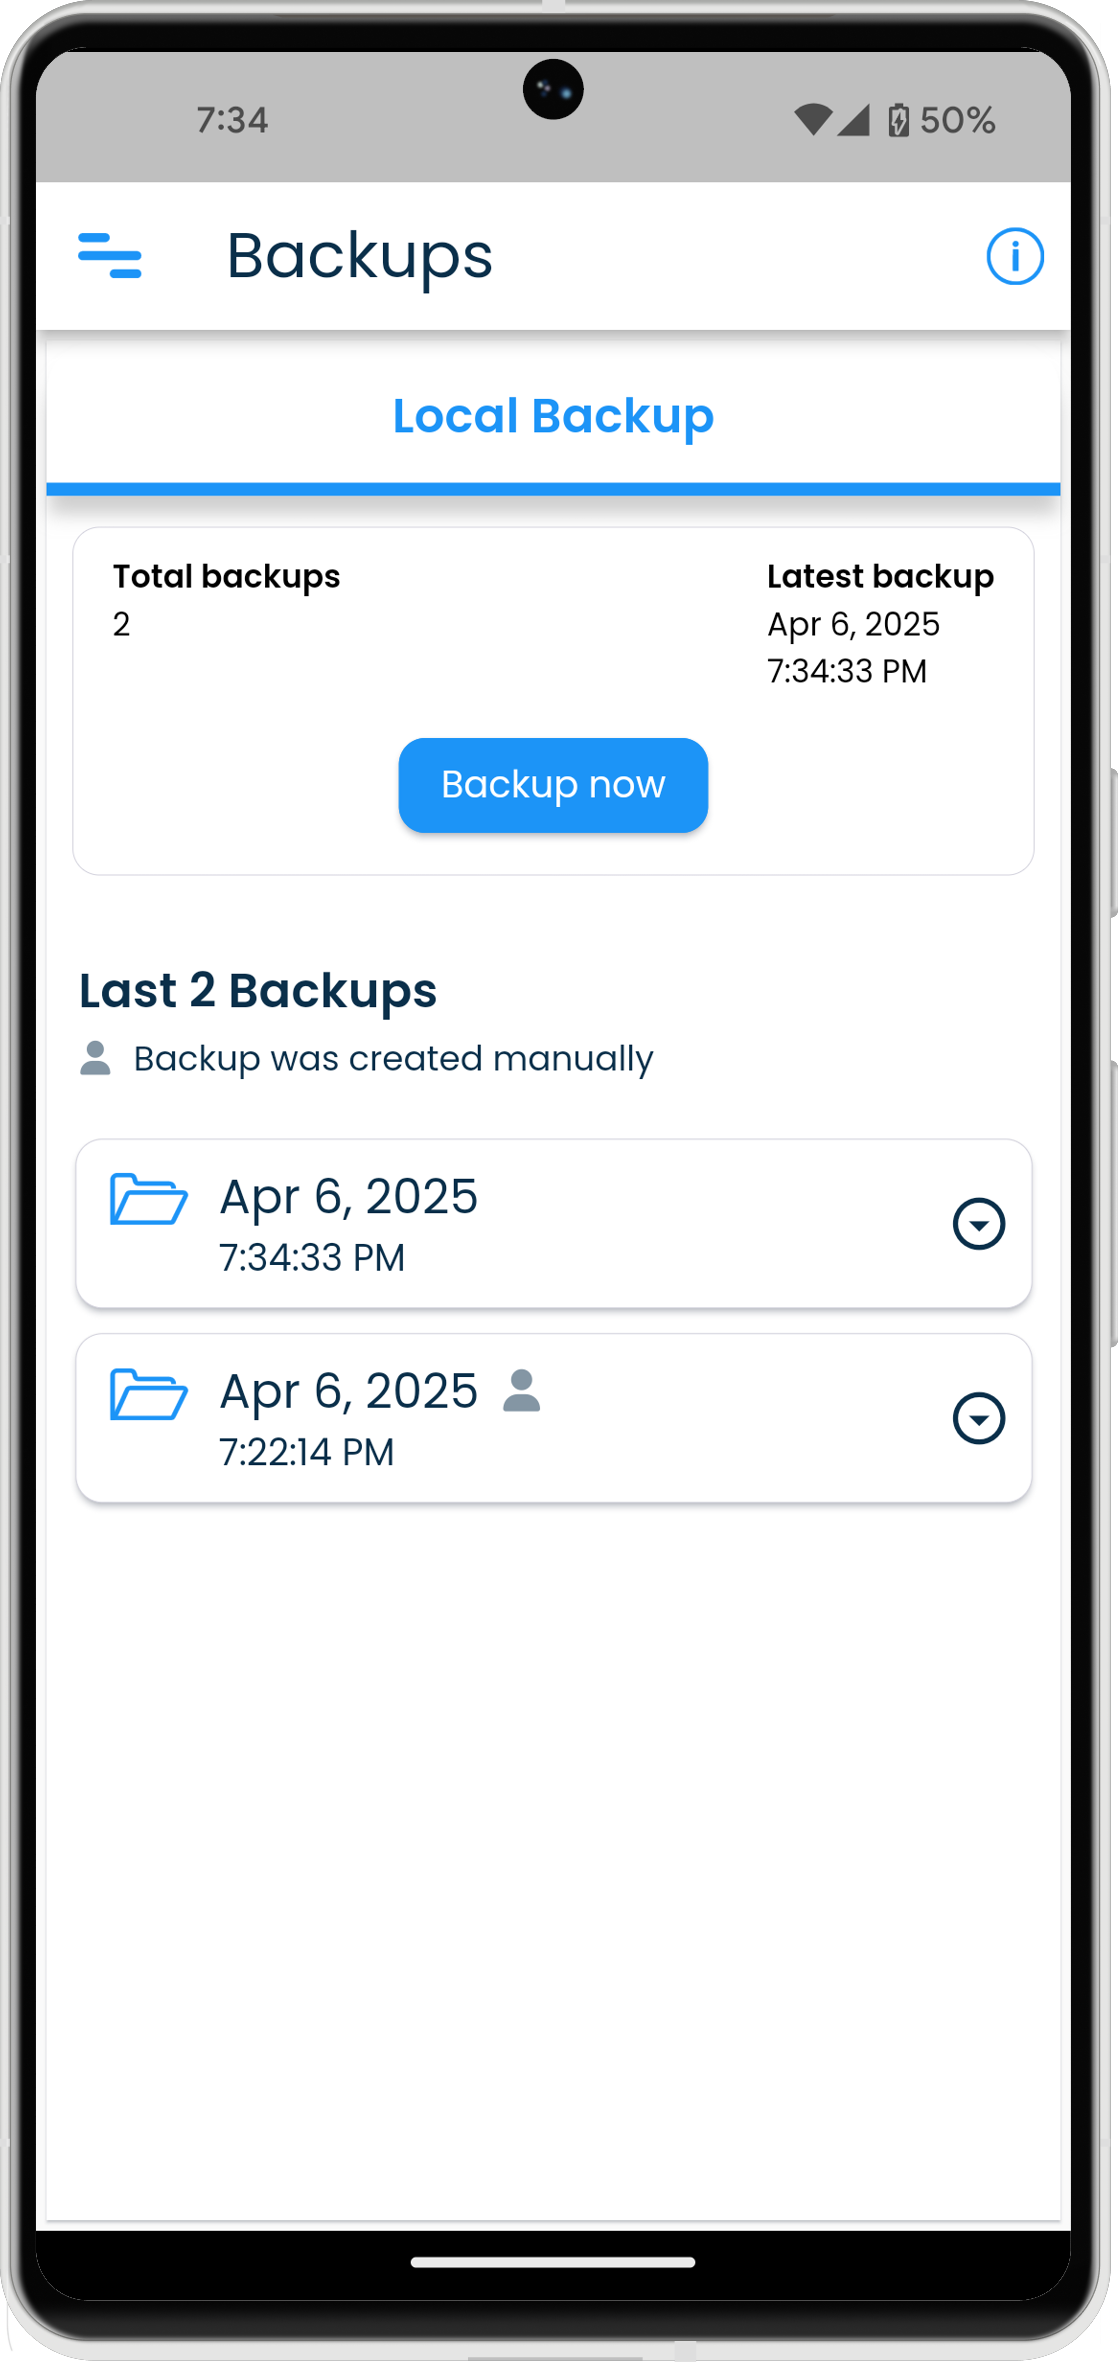
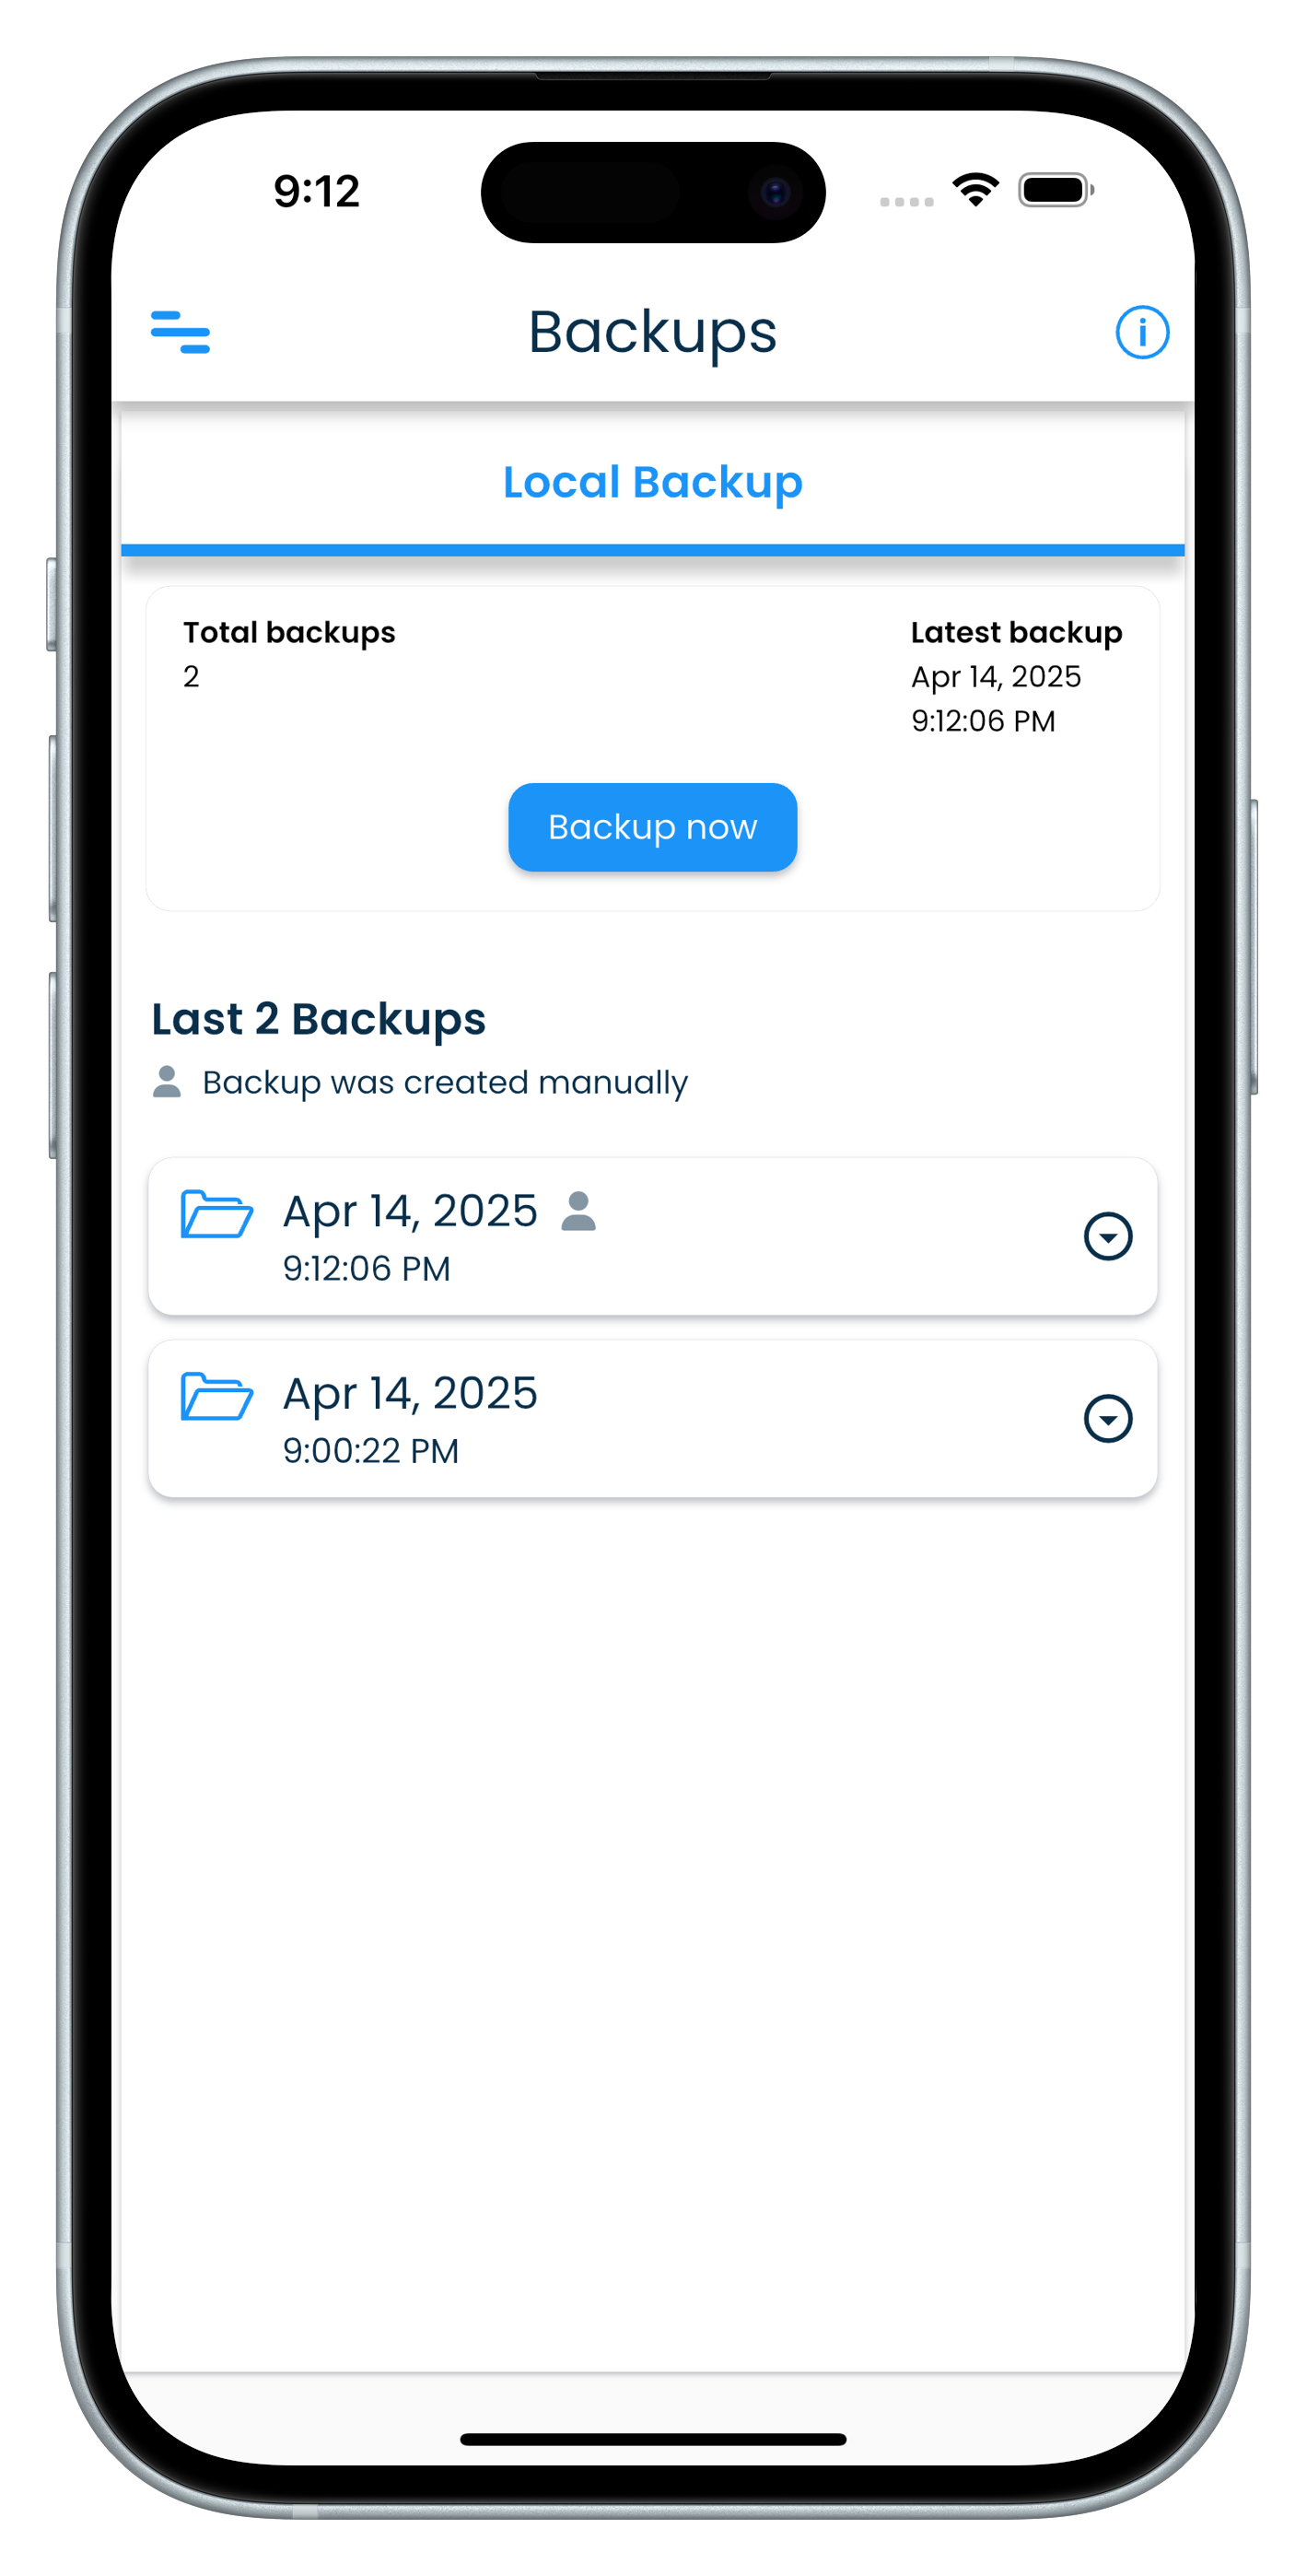
Backups screen
All your available backups can be viewed in the Backups screen. The Backups screen can be reached by clicking on the Backups link in the application menu.
| Mac | Windows |
|---|---|
  |
  |
| Android | iPhone |
|---|---|
  |
  |
| iPad |
|---|
  |
SplashID Classic gives you automated local backups. A local backup contains the following information that is present at the time of the backup creation.
- Records
- Categories
- Types
Local backups
Local backups are stored on the physical media storage available in your devices. These type of backups are available for all the users irrespective of the sync type of the profile.
| Mac | Windows |
|---|---|
|
|
| Android | iPhone |
|---|---|
|
|
| iPad |
|---|
|
Local backups are taken automatically on certain actions as listed below.
- Locking the app
- Change of the Sync method
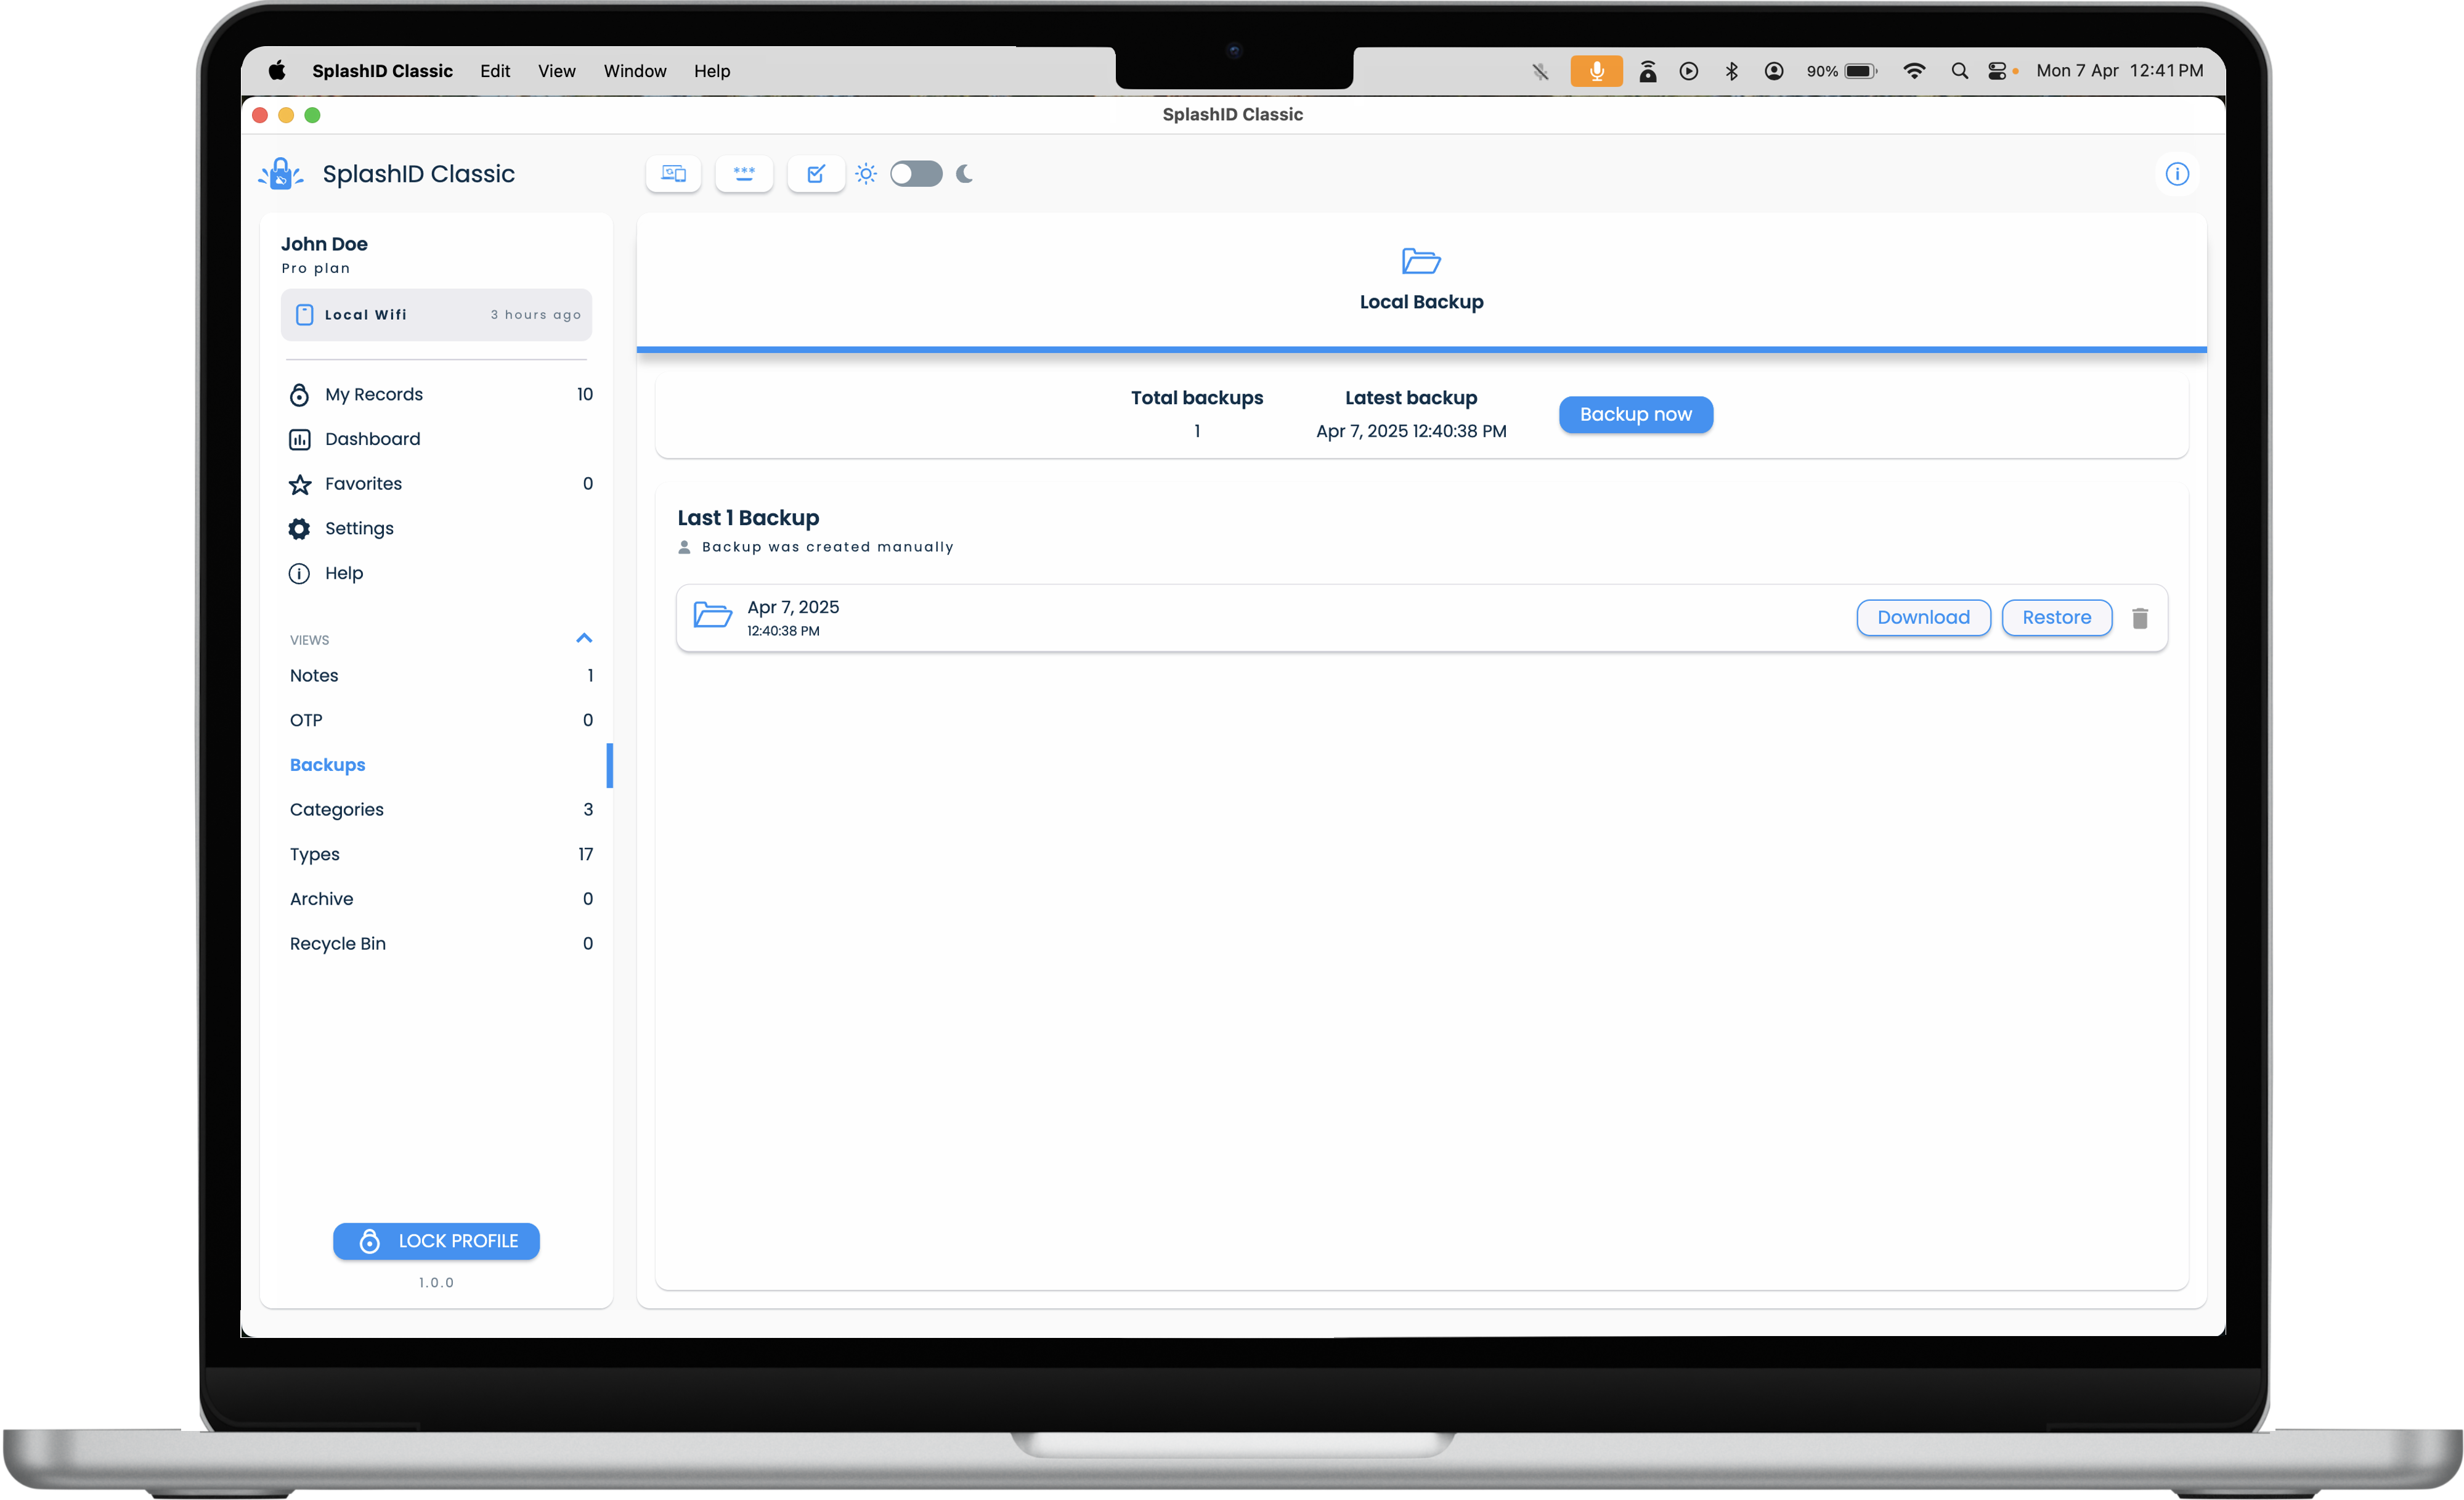
You can also manually trigger a local backup. This can be done as follows.
- Go to the Backups screen by clicking or tapping on the Backups entry in the application menu.
- Click or tap on the Local Backup tab to see your backups taken locally.
- Click or tap on the Backup now button to start a local backup manually.
Local backups on app usage
A local backup is taken only on the days the app is used i.e. when the app is launched and unlocked.
If you do not use the app on a given day, then there wont be any local backups taken for that day.
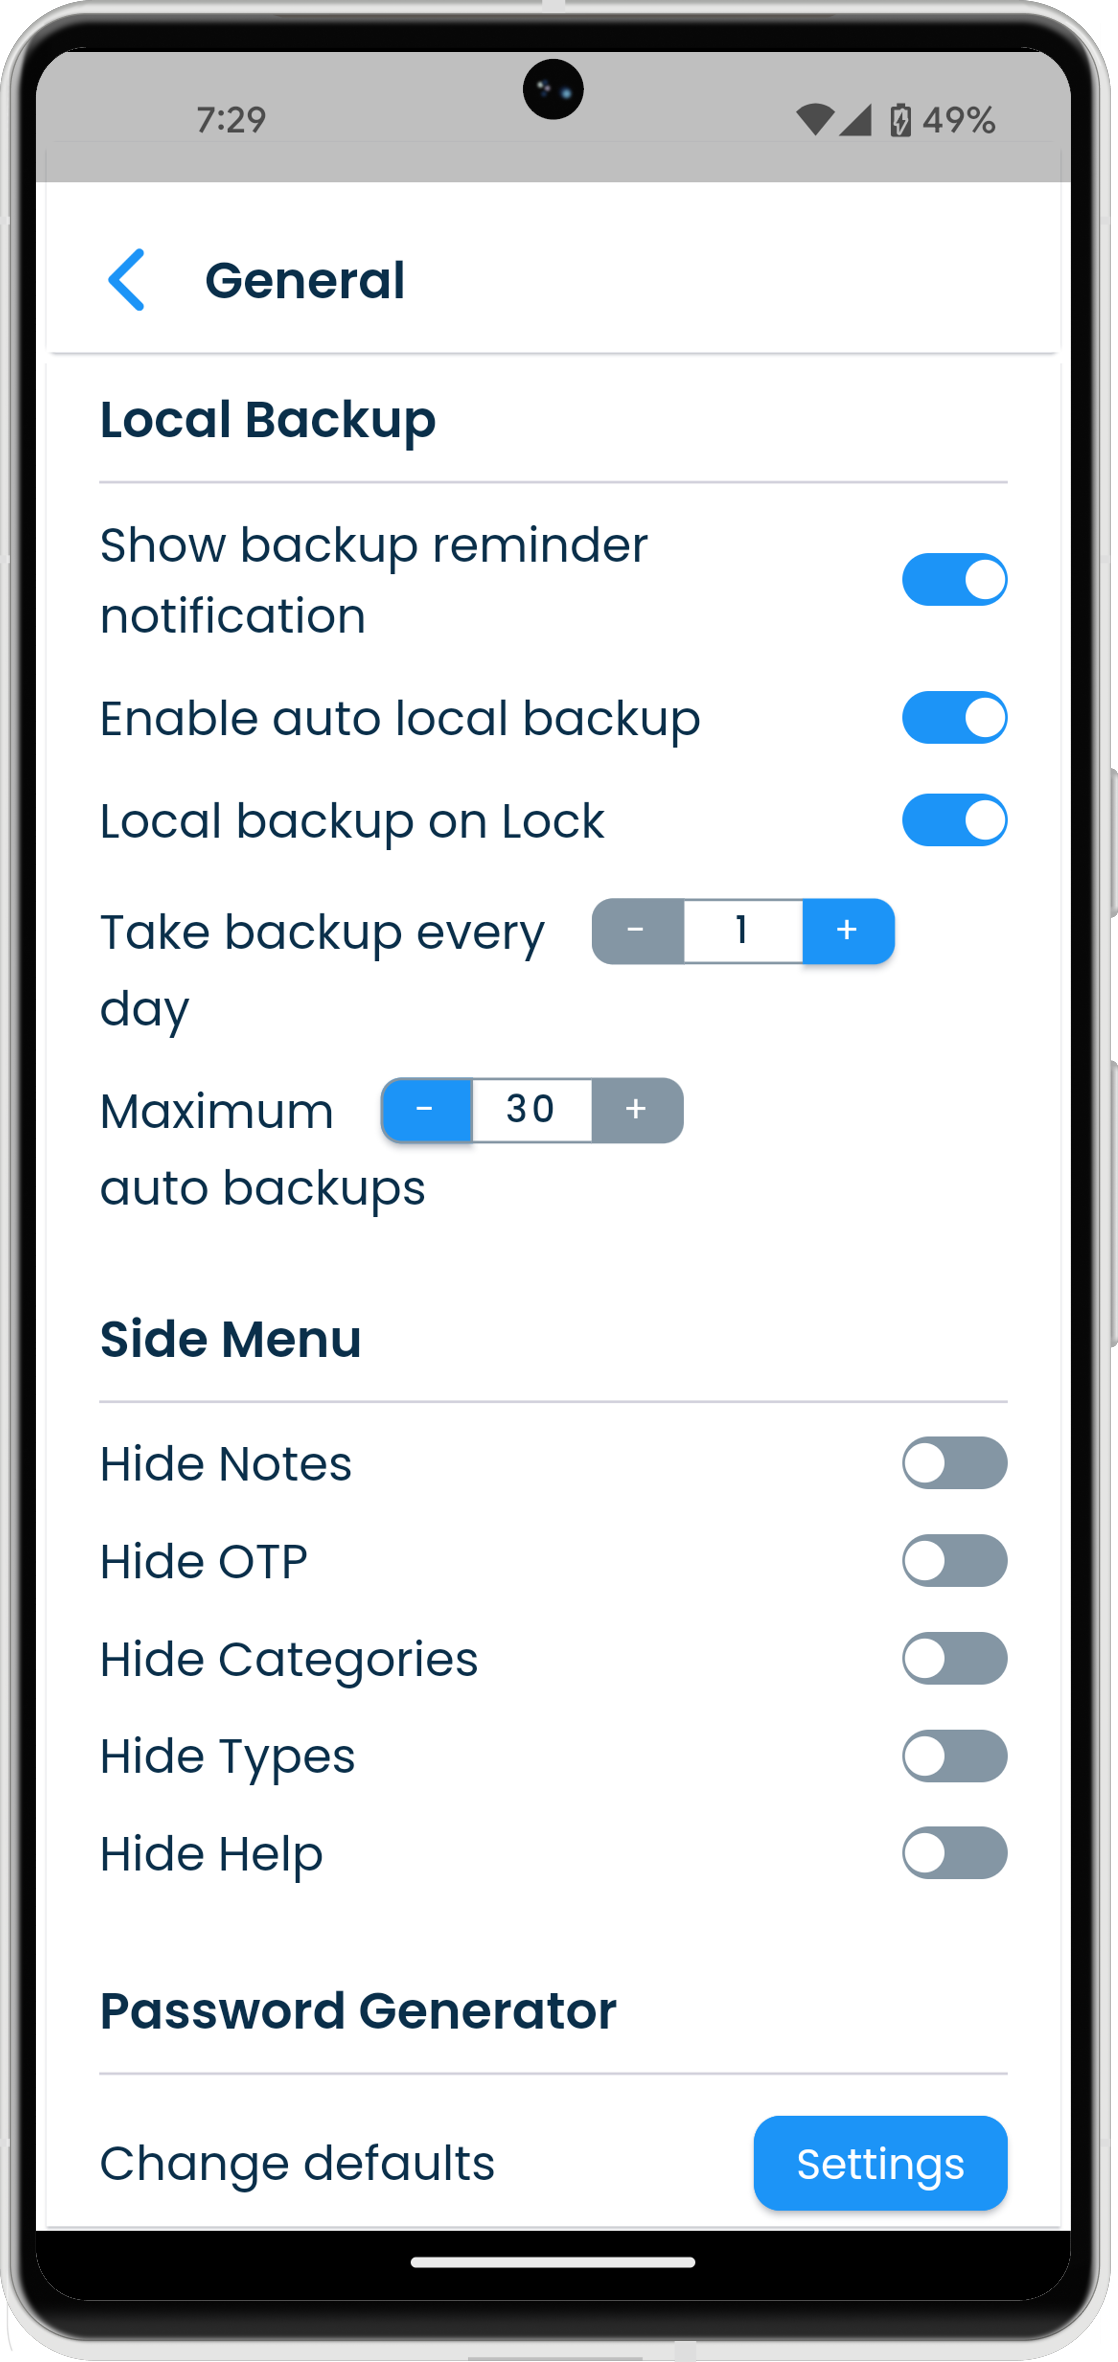
Settings
The local backups settings allow you to configure the following.
- Switching on or off the automatic local backups.
- The desired local backup frequency.
- Number of backups you want to retain on your local storage media.
By default, there will be a maximum of 30 local backups stored, with one being kept for each day you sign in to the application.
| Mac | Windows |
|---|---|
|
|
| Android | iPhone |
|---|---|
|
|
| iPad |
|---|
|
Local backups do not sync
Local backups remain on the device where they were taken, and do not sync across the users devices.
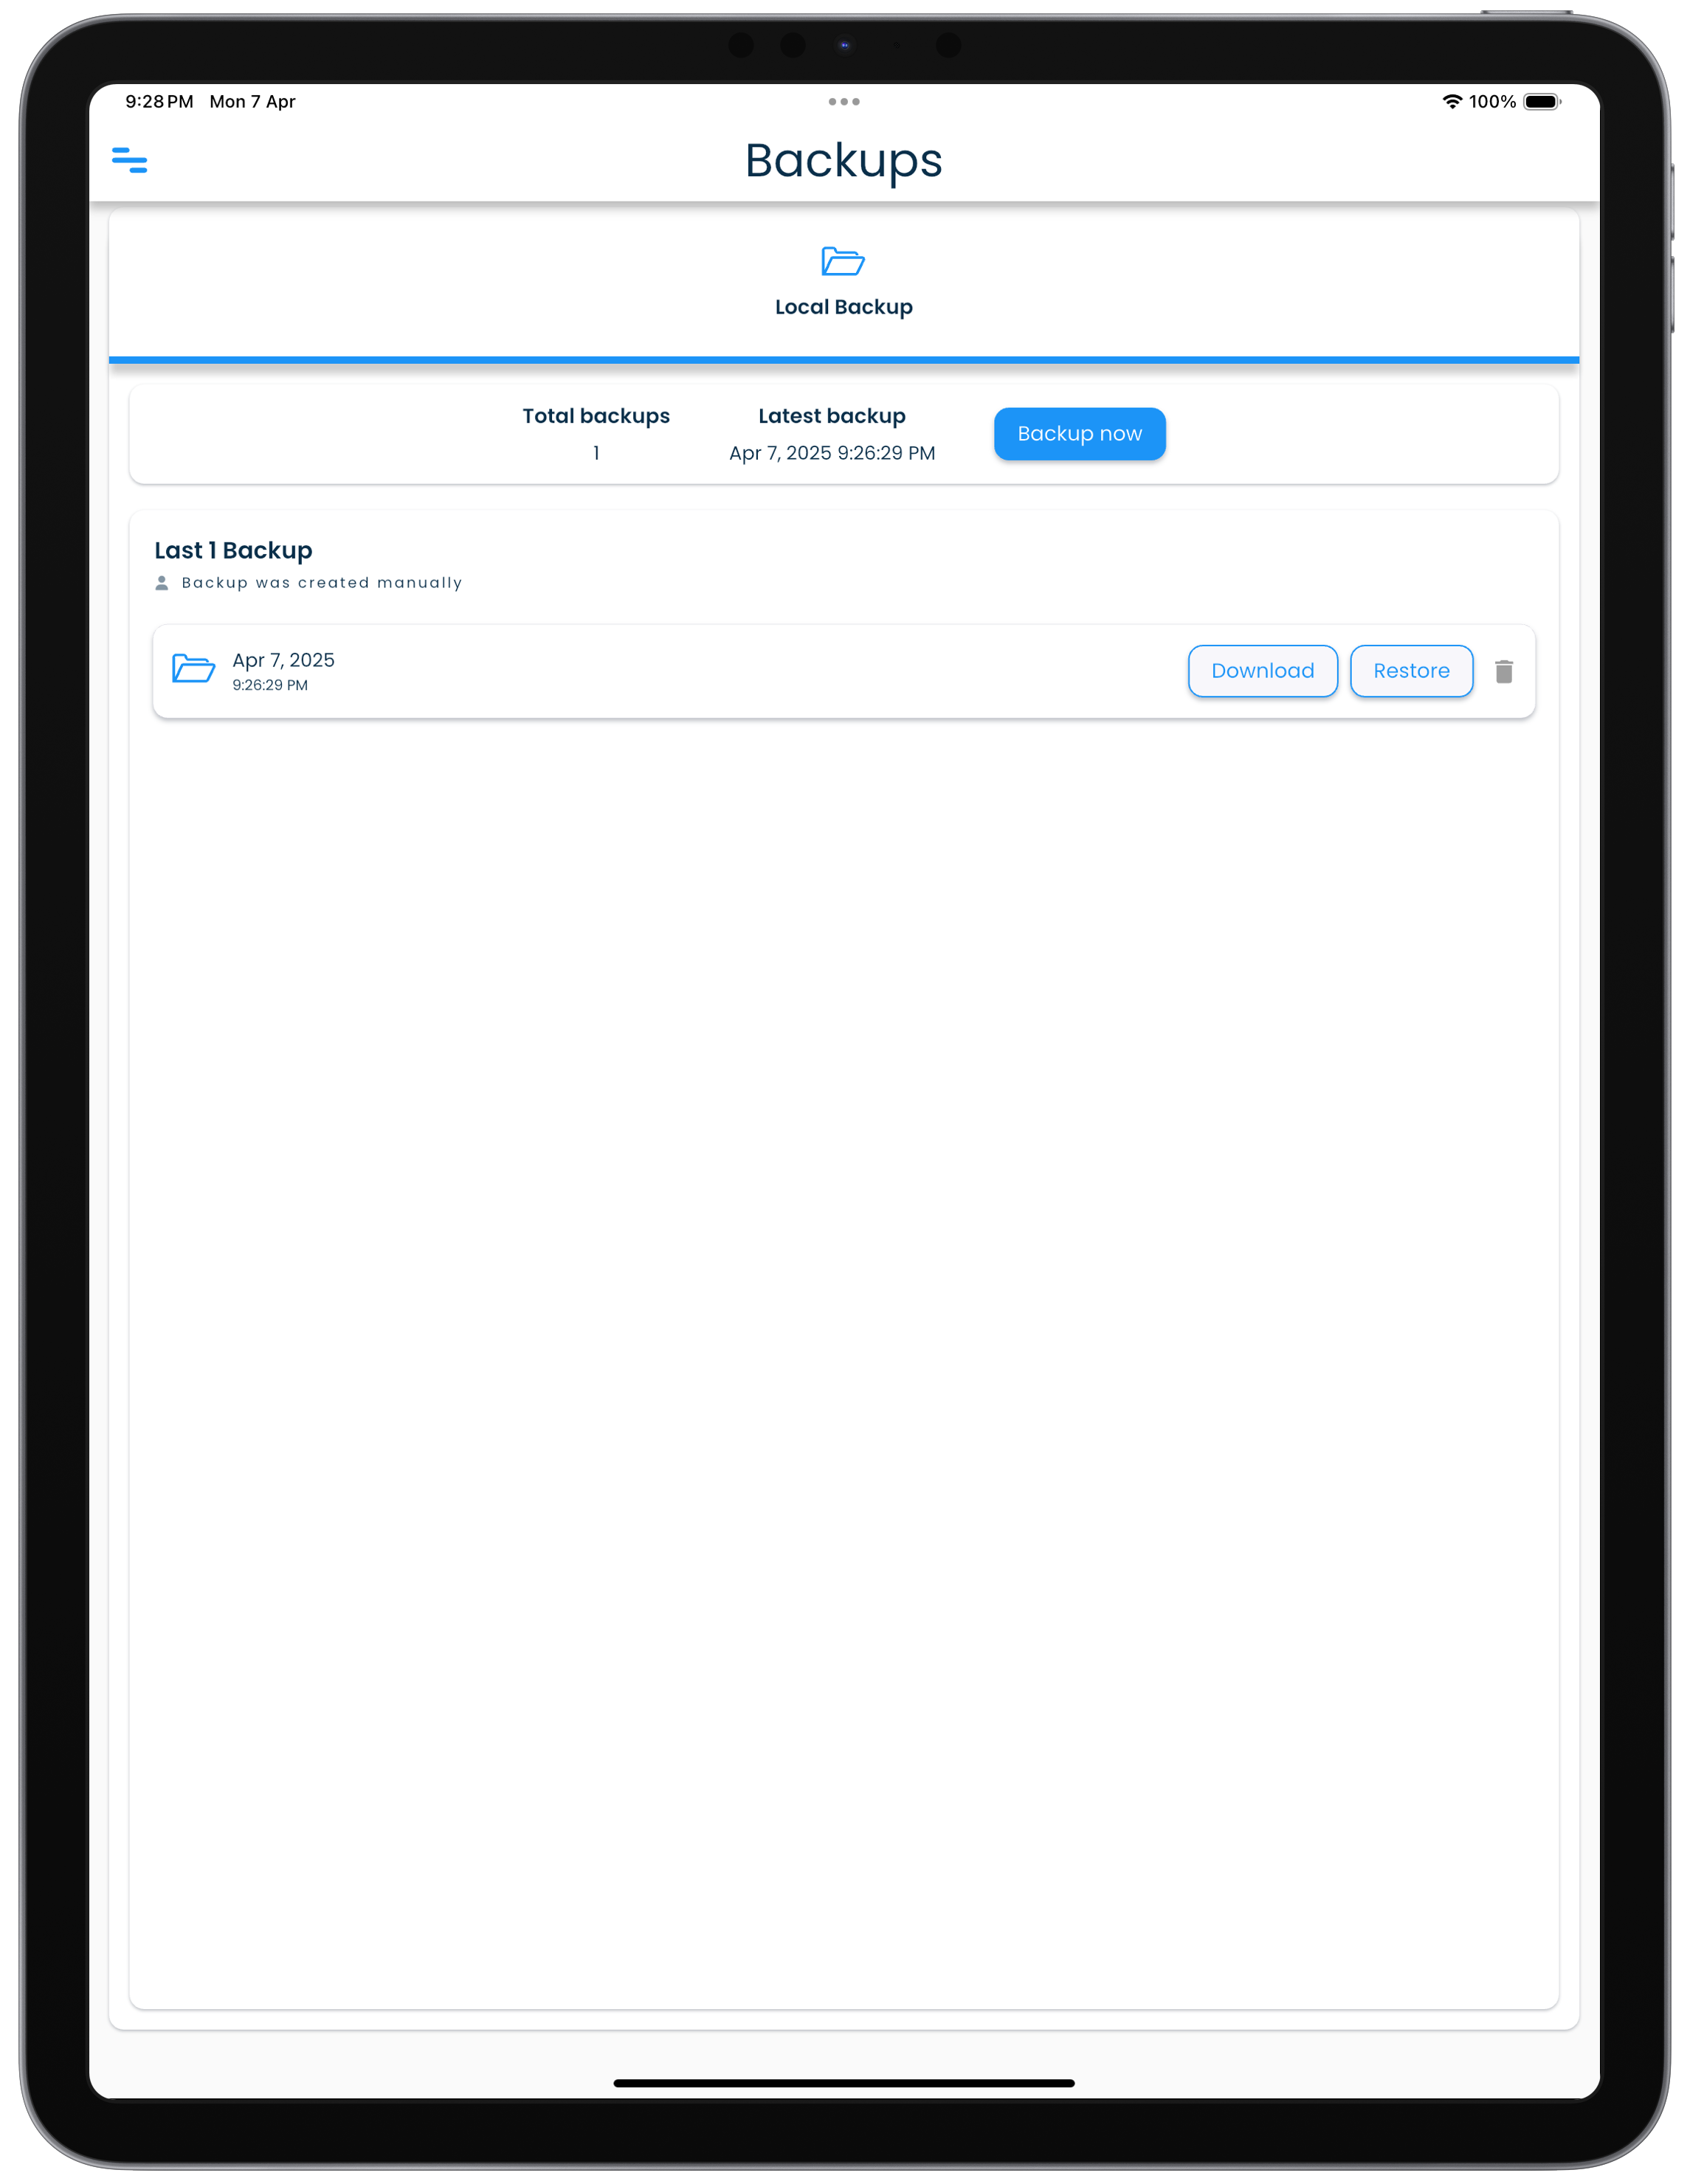
Lock a backup
You can lock a local backup to prevent it from being overwritten when a new backup is taken.
To lock a local backup do the following in the Local Backup section in the Backups screen.
- Locate the local backup in the displayed list.
- Click or tap on the Lock button in the backup entry.
- Wait till the lock is set on the backup.
Unlock a backup
You can unlock a previously locked local backup. This will remove the lock that was set on the backup, and allow it to be overwritten when a new backup is taken as per the backup schedule.
To unlock a local backup do the following in the Local Backup section in the Backups screen.
- Locate the locked local backup in the displayed list.
- Click or tap on the Unlock button in the backup entry.
- Wait till the lock is removed on the backup.
Restore a backup
If you need to remove all your existing information in your profile, and restore them from a backup, then you need to use the Restore function.
Sign out from all other devices before a restore
Before you initiate a restore of a backup, it is a good practice that you delete the data on all other devices to prevent duplication of data during sync.
Alternately, you can uninstall SplashID Classic from all your other devices before you proceed with the restore on your main device.
After the restore you can install SplashID Classic on your other devices and sync them up to get the restored data.
Do the following to restore a local backup.
- Select the device that you want to perform the restore on.
- Delete data from all your other devices.
- Locate the local backup in the displayed list on your device.
- Click or tap on the Restore button in the backup entry.
- Provide the required confirmation by entering your master password.
- Wait till the restore completes.
Delete a backup
An existing backup can be deleted, if you are sure that you no longer need it.
Do the following to delete a local backup.
- Locate the local backup in the displayed list on your device.
- Click or tap on the Trash icon in the backup entry.
- Provide the required confirmation by clicking or tapping on the Delete button.
- Wait till the backup is deleted.
Avoid manually deleting files on your desktop
Please do not access any of the backup files in the application folders on your device or desktop. The backup files will not work for any other user profiles.
Export and Import
Overview
Exporting and importing of records allow you to extract, store and add records to your or other profiles. Refer to the sections below for more details.
| Mac | Windows |
|---|---|
 |
 |
| Android | iPhone |
|---|---|
 |
 |
| iPad |
|---|
 |
Export
Exporting of records in SplashID Classic allows you to store your records in a file.
You can use the exported file to
- Keep your own backups.
- Add content to other profiles.
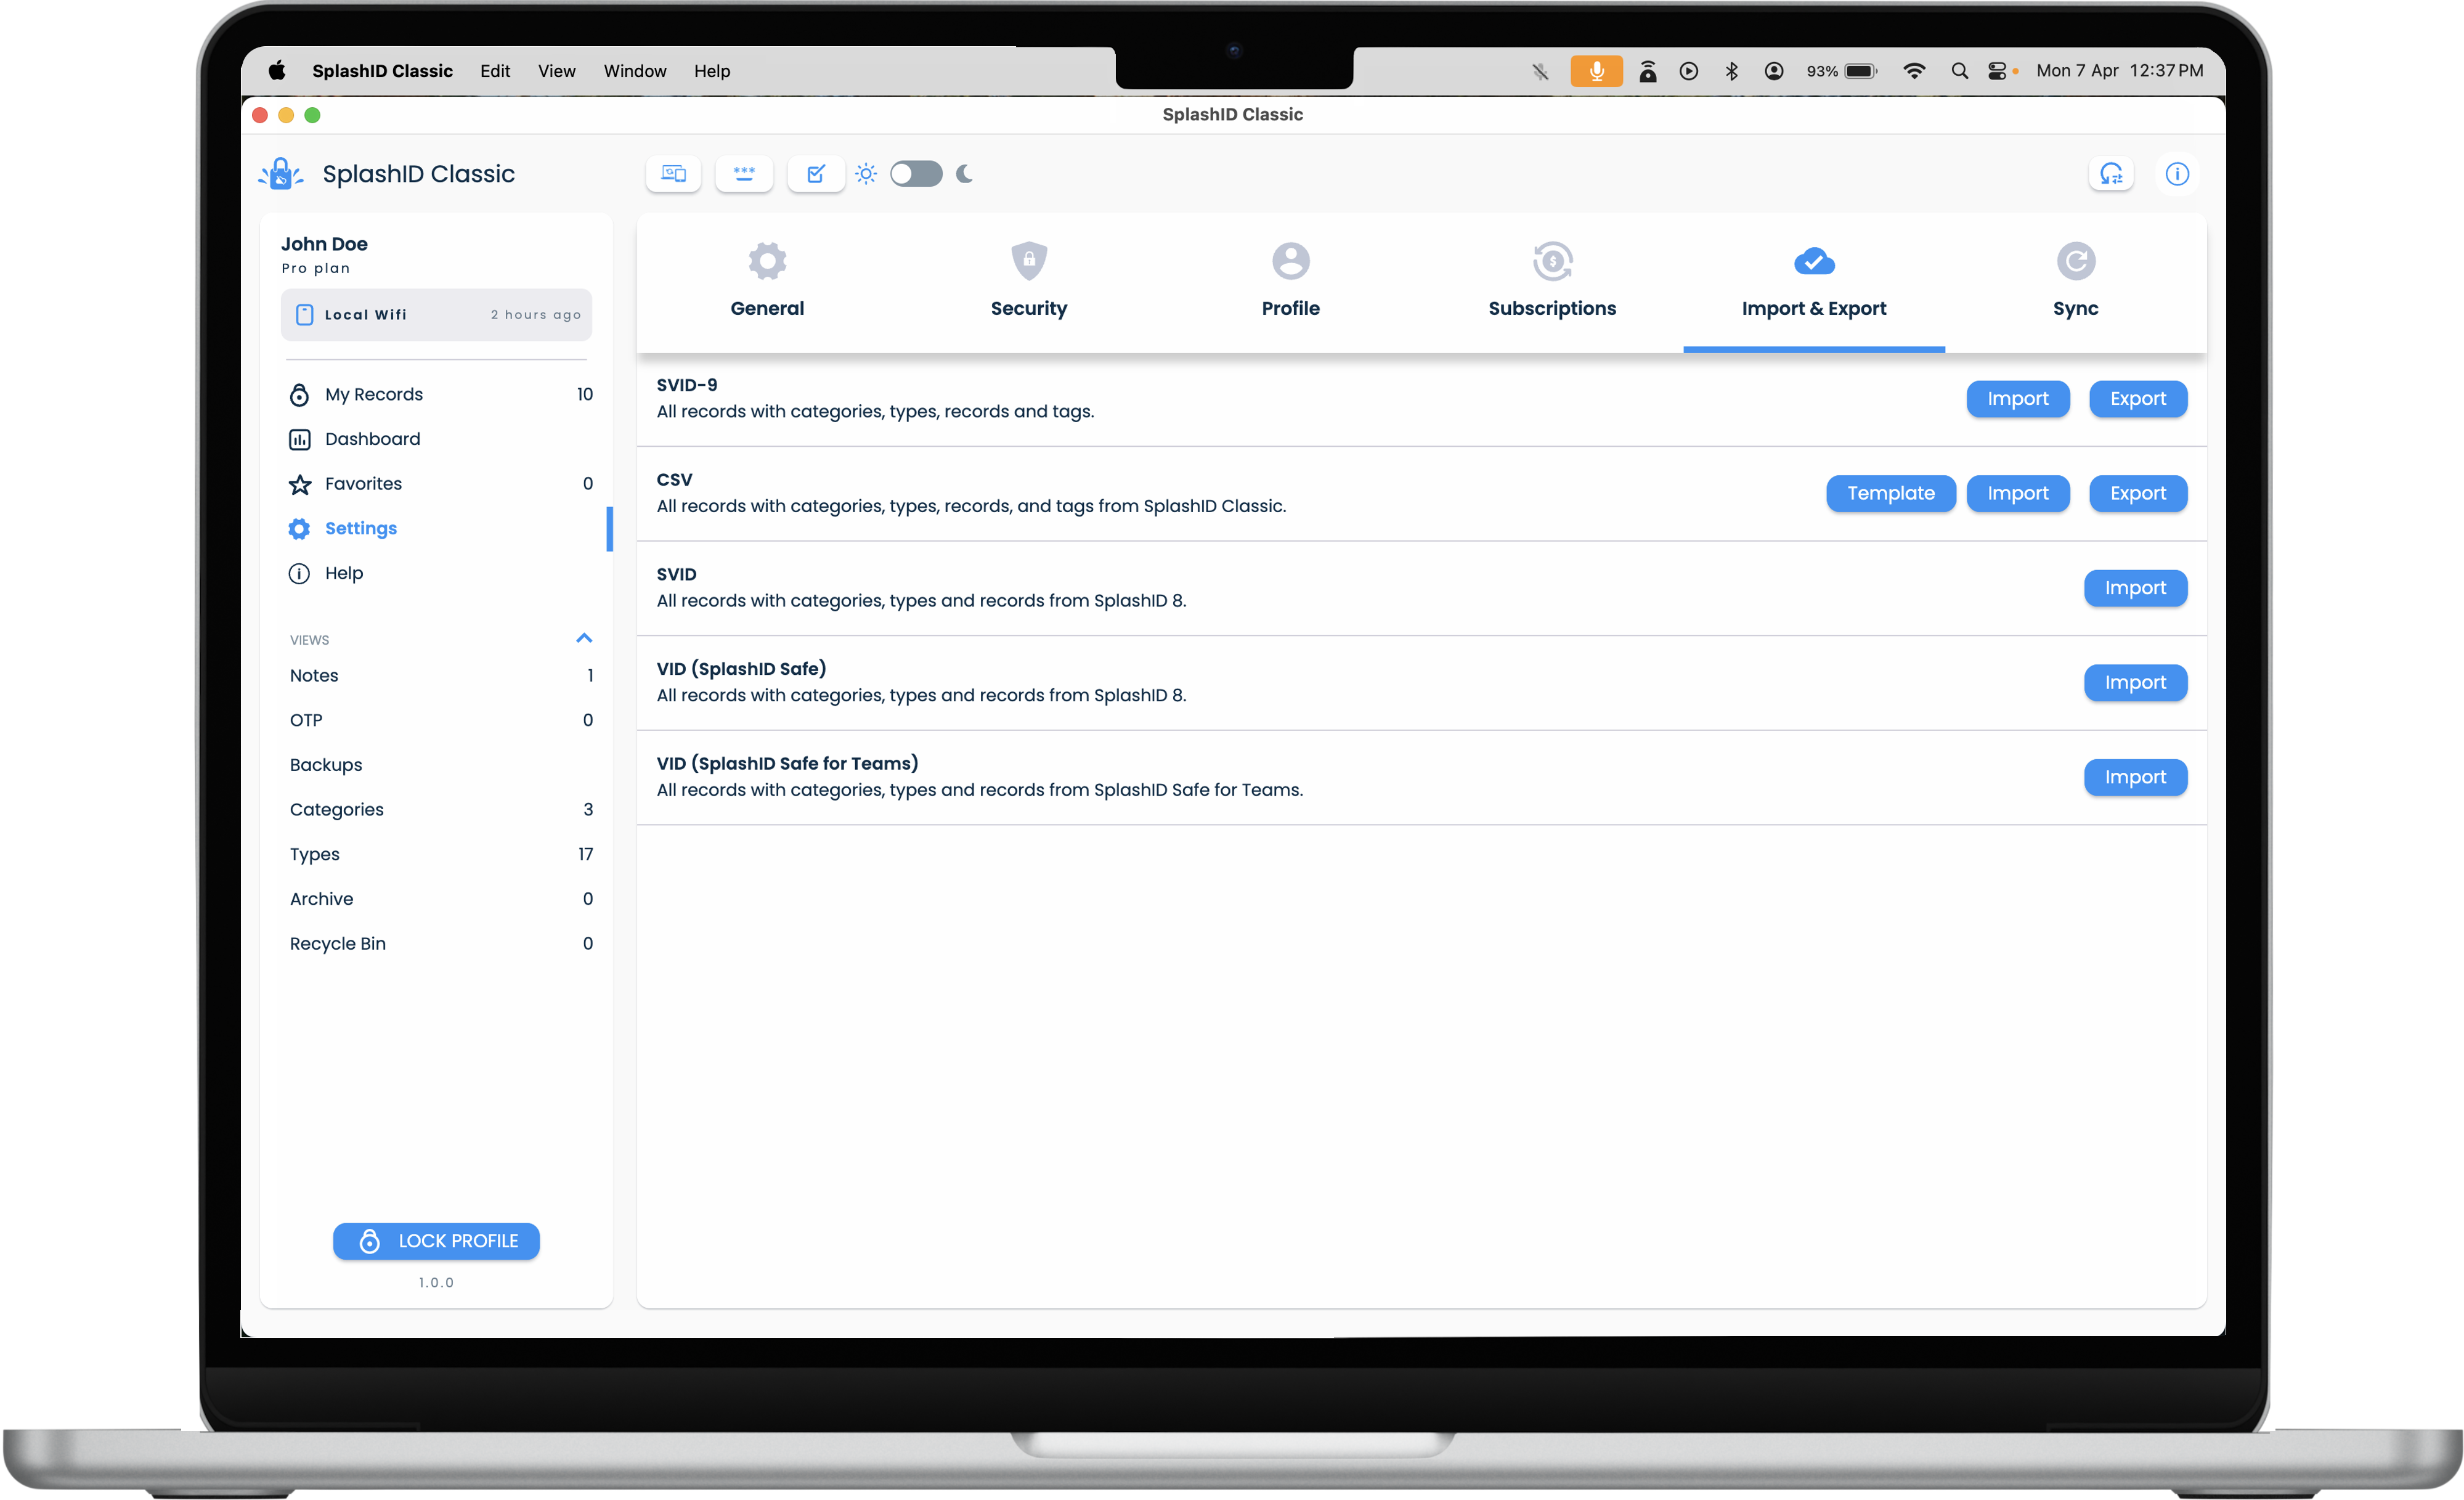
Export screen
The export screen can be reached by clicking or tapping on the Settings link in the application menu, and then clicking or tapping on the Import & Export section header.
Types of export
SplashID Classic supports exporting to two file formats.
- SVID-9
- CSV
SVID-9
SVID-9 is a custom file format that SplashID Classic uses. The contents of the file are encrypted with a password you provide at the time of taking the export.
An exported SVID-9 file name will have the exported date and time with an extension called svid9.zip . An example of an SVID-9 file name is 2022-05-28_09-30-19_classic.svid9.zip.
CSV
The CSV export saves the record fields in a tabular format with only the field values. The contents of the file are NOT encrypted and contain only the textual information present in your records.
An exported CSV file will have the exported date and time with an extension called csv. An example of an SVID-9 file name is 2022-12-28_08-05-22_classic.csv.
Download folder
The exported file is normally stored in the Downloads folder on your desktop, tablet or mobile device.
Export to SVID-9
- Click or tap on the Settings item in the application menu.
- Click or tap on Import & Export.
- Click or tap on the Export button in the SVID-9 row.
- In the dialog shown, provide a strong password and confirm it. Click or tap on the Export button to complete the export.
- In your file explorer, navigate to the Downloads folder to access the exported file.
Export to CSV
- Click or tap on the Settings item in the application menu.
- Click or tap on Import & Export.
- Click or tap on the Export button in the CSV row.
- In the dialog shown click or tap on the Export button to complete the export.
- In your file explorer, navigate to the Downloads folder to access the exported file.
CSV file format
CSV files from SplashID Safe, SplashID Pro 9 and SplashID Classic are not compatible with each other.
Import
You can import records into your profile using an SVID-9 or CSV file that was previously exported from a SplashID Classic profile.
Import screen
The import screen can be reached by clicking or tapping on the Settings link in the application menu, and then clicking or tapping on the Import & Export section header.
Types of import
SplashID Classic supports importing of four file formats.
- SVID-9
- CSV
- SVID
- vID
SVID-9
SVID-9 is a custom file format that SplashID Classic uses. The contents of the file are encrypted with a password you provide at the time of taking the export.
CSV
The CSV export is a regular CSV file with basic record information. The contents of the file are NOT encrypted and contain only the textual information present in your records.
SVID
SVID is a custom file format that SplashID Safe uses. The contents of the file are encrypted with a password you provide at the time of taking the export in the older SplashID Safe app.
vID
vID is a custom file format that SplashID Safe uses. The contents of the file are encrypted with a password you provide at the time of taking the export in the older SplashID Safe app. vID files do not support user uploaded icons.
Do not close application
To prevent partial import of content do not close or quit your app while the import is happening.
Large files could take a long time depending on the device you are importing into.
Import SVID-9
- Click or tap on the Settings item in the application menu.
- Click or tap on Import & Export.
- Click or tap on the Import button in the SVID-9 row.
- Choose the file you want to import.
- In the dialog shown, enter the password used at the time of the export. Optionally, if you want to replace the types from the file being imported then select the Replace current Type fields with incoming Type fields option.
- Click or tap on the Next button to display a summary of content that will be imported.
- Click or tap on the Import button to start the import.
- After the import completes you can see a dialog displaying the summary of the imported content.
Import CSV
- Click or tap on the Settings item in the application menu.
- Click or tap on Import & Export.
- Click or tap on the Import button in the CSV row.
- Choose the file you want to import.
- Click or tap on the Import button to start the import. Please wait till it completes.
- After the import completes you can see a dialog displaying the summary of the imported content.
CSV file format
CSV files from SplashID Safe and SplashID Classic are not compatible.
Import SVID
- Click or tap on the Settings item in the application menu.
- Click or tap on Import & Export.
- Click or tap on the Import button in the SVID row.
- Choose the file you want to import.
- In the dialog shown, enter the password used at the time of the export.
- Click or tap on the Import button to start the import.
- After the import completes you can see a dialog displaying the summary of the imported content.
Import vID
- Click or tap on the Settings item in the application menu.
- Click or tap on Import & Export.
- Click or tap on the Import button in the SVID-9 row.
- Choose the file you want to import.
- In the dialog shown, enter the password used at the time of the export.
- Click or tap on the Import button to start the import.
- After the import completes you can see a dialog displaying the summary of the imported content.
Sync your data across devices
You can keep your information in sync across multiple devices by using WiFi sync, or use it on multiple devices without any syncing in the No sync mode.
The sync mode is first chosen at the time of setting up your profile when you create or clone your profile.
If you later decide to change your sync mode on the device then you can do that in the Settings section from inside the app.
Sync mode changes
The sync mode is chosen by you depending on how you want to store and sync your data on your device. It is not intended to be changed frequently as it requires additional actions on your behalf to ensure that data is in sync before and after changing sync modes.
Types of syncing
There are two types of sync modes in SplashID Classic.
- Local WiFi sync
- No sync
| Mac | Windows |
|---|---|
 |
 |
| Android | iPhone |
|---|---|
 |
 |
| iPad |
|---|
 |
WiFi sync
WiFi sync is a (1) Pro feature
- Requires a paid SplashID Classic license.
In this mode you can sync your information between your devices that are connected to the same local network. The devices can be connected to the local network over WiFi or by using a LAN cable.
Use WiFi sync mode if you want your records to sync between your SplashID Classic applications on your devices. Here your data flows between the devices on your local network only.
The sections below explain how to sync your data using WiFi sync.
Enabling Wifi sync
If you need to change your profile to Wifi sync, please do the following.
- Click or tap on the Settings item in the application menu.
- Click or tap on Sync.
- Click or tap on the Sync with other devices over WiFi setting to enable it.
Syncing manually
You can manually start WiFi sync between your devices. The steps below explain in general on how to perform WiFi sync between any two devices with SplashID Classic on them.
- Ensure that both your devices are connected to the same local network. This will normally be the case if all your devices connect to the same internet router in your home or office.
- Unlock your profile on both your devices.
- On one of your devices, navigate to the My Records screen by clicking or tapping on the My Records entry in the application menu.
- Click or tap on the Wifi sync button displayed on top of the record list screen to go to the WiFi sync screen.
- Click or tap on the device in the list that should be synced with. Wait till the WiFi sync completes.
Sync direction in WiFi sync
By default the sync direction is two way sync.
You can select one of the other to options to override the sync direction that allows for overwriting the data on one device with the data from the other device.
WiFi syncing with unlisted devices
If you do not see your device with the same profile listed then you need to add it to the trusted devices list. Ensure that you have unlocked SplashID Classic on the unlisted device and have connected your device to your WiFi network.
Tap on the + New device to start the process. This will display another screen where you will see the unlisted device. Click or tap on the Add button and follow the steps to complete the pairing process.
Troubleshooting WiFi sync
The following conditions need to be met for WiFi sync to happen between your devices. Check that all of them have been fulfilled.
- You have signed in with the same SplashID Classic profile on your two devices.
- Both of your devices are connected to the same local network.
- You have accepted all permissions asked for when the app was installed or when launched.
- You do not have any firewalls on your devices or internet router that block SplashID Classic traffic to flow between them.
Restarting WiFi services
There are two options to further troubleshoot discovery and connection issues. Please ensure that the requirements as listed above are met before you try one or both of the options given below.
- Restart WiFi service
Click on the refresh button to restart the app WiFi broadcast and discovery services. Once clicked wait for a few seconds for the WiFi services to do their work in the background.
- Refresh WiFi broadcast
Sometimes you just need the other devices to see the device you are currently on. In such cases, you can just make the current device broadcast its presence to the other devices by clicking on the refresh button.
No sync
In this mode SplashID Classic on the device will have its own information.
If you do not want your records to sync between some or all of your devices, then you can set your profile in No sync mode on all these devices.
Enabling No sync
If you need to switch your profile to No sync, please do the following.
- Click or tap on the Settings item in the application menu.
- Click or tap on Sync.
- Click or tap on the Sync with other devices over WiFi setting to disable it.
Copying profile
In No sync devices too, you can use the same steps as described in copying your profile to setup your profile on multiple devices.
Ensure that both your devices are connected to the same local network.
Mixing WiFi and No sync
There are no restrictions on using only one type of sync method across all your devices.
If you choose, you can setup some of your devices to use WiFi sync, and the other devices to use No sync. In this case you will be able to use your WiFi sync devices to sync the information in them over WiFi. The ones with the No sync device will then work independently of all your other devices.
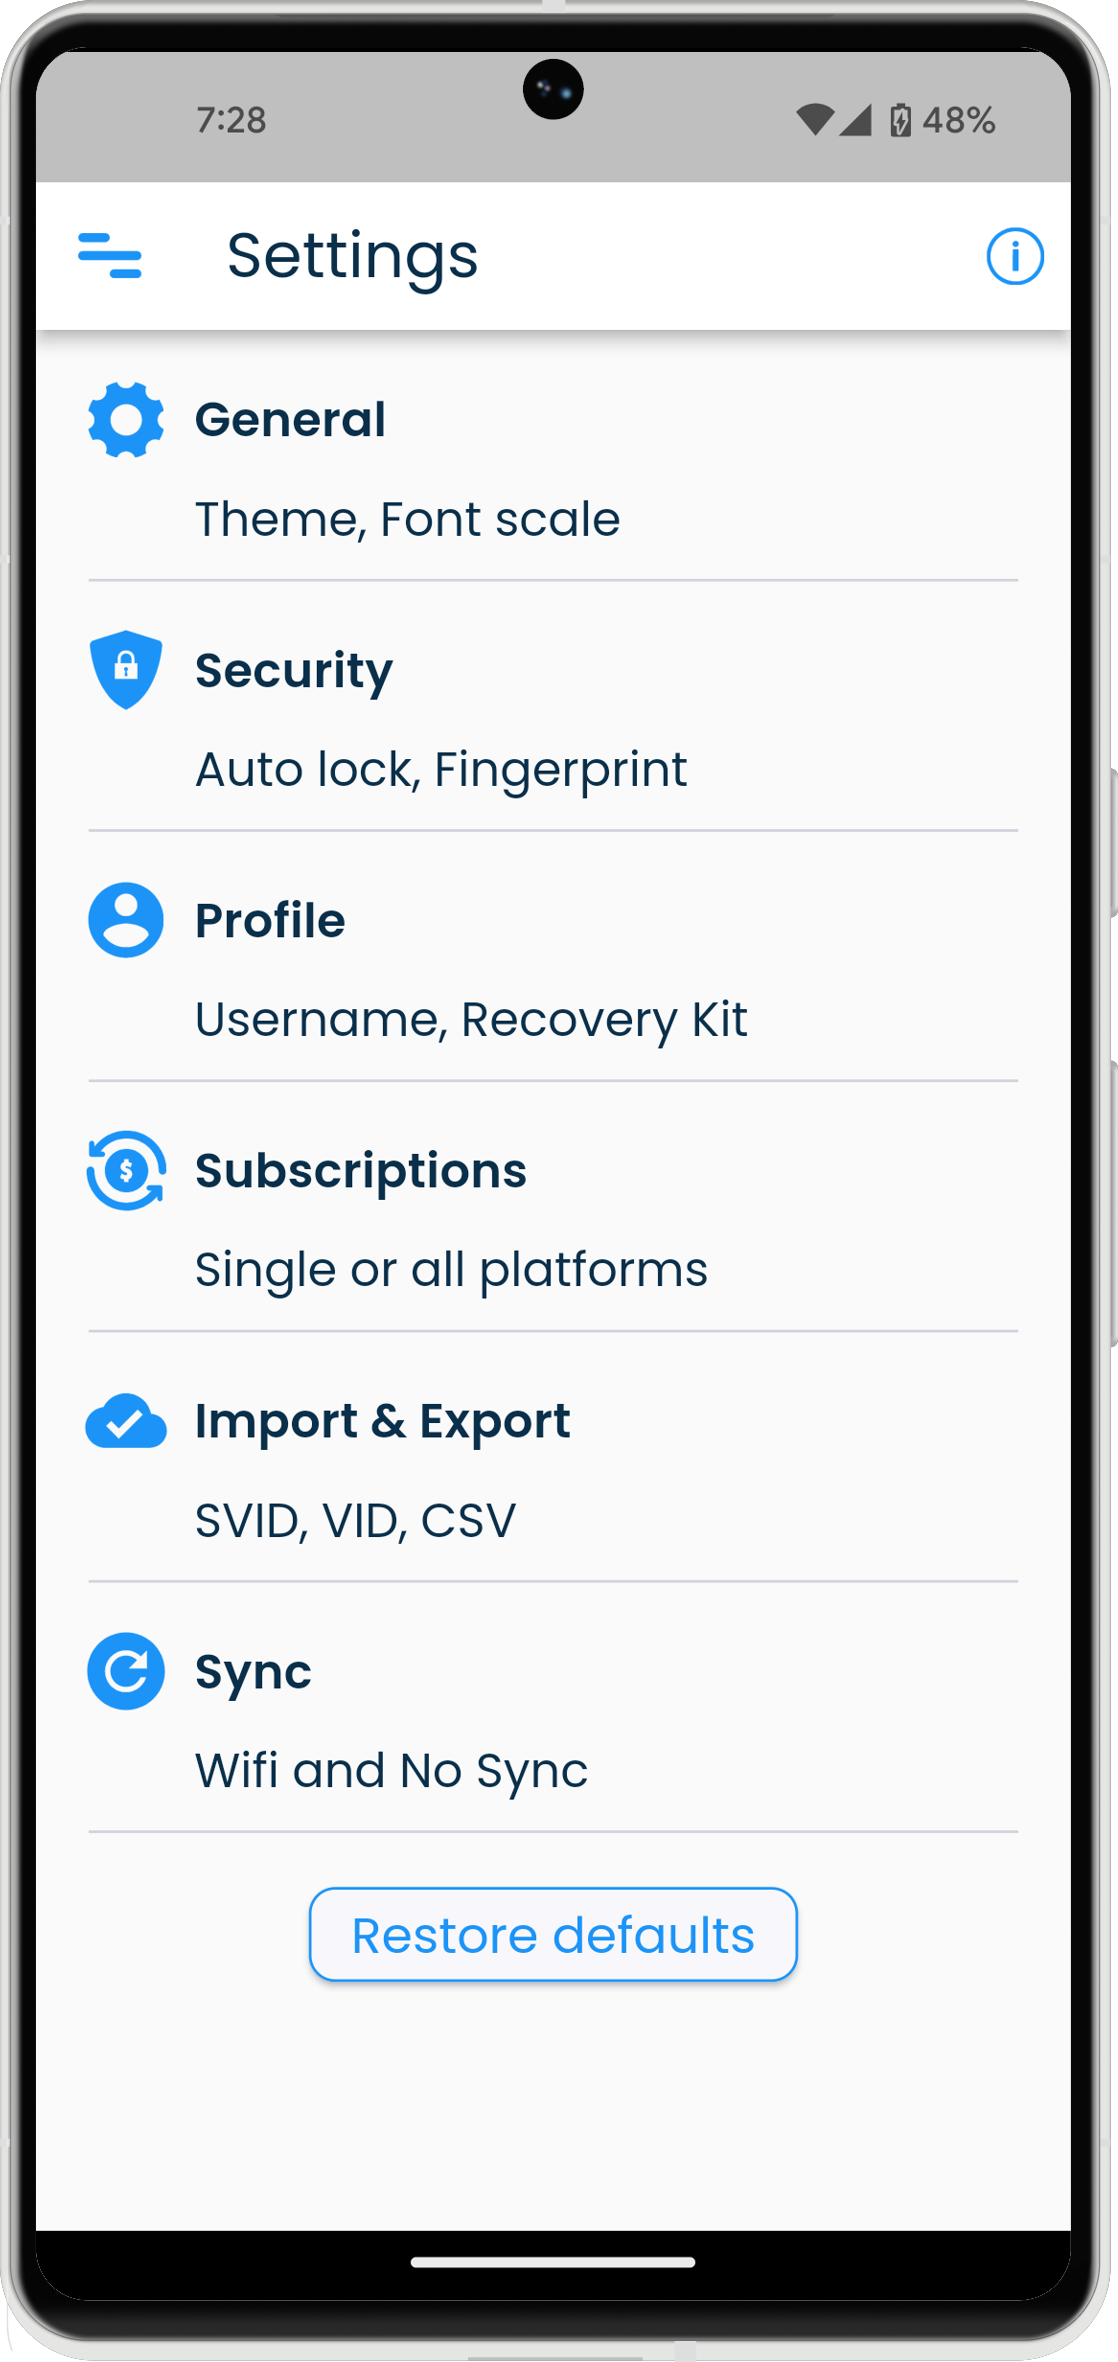
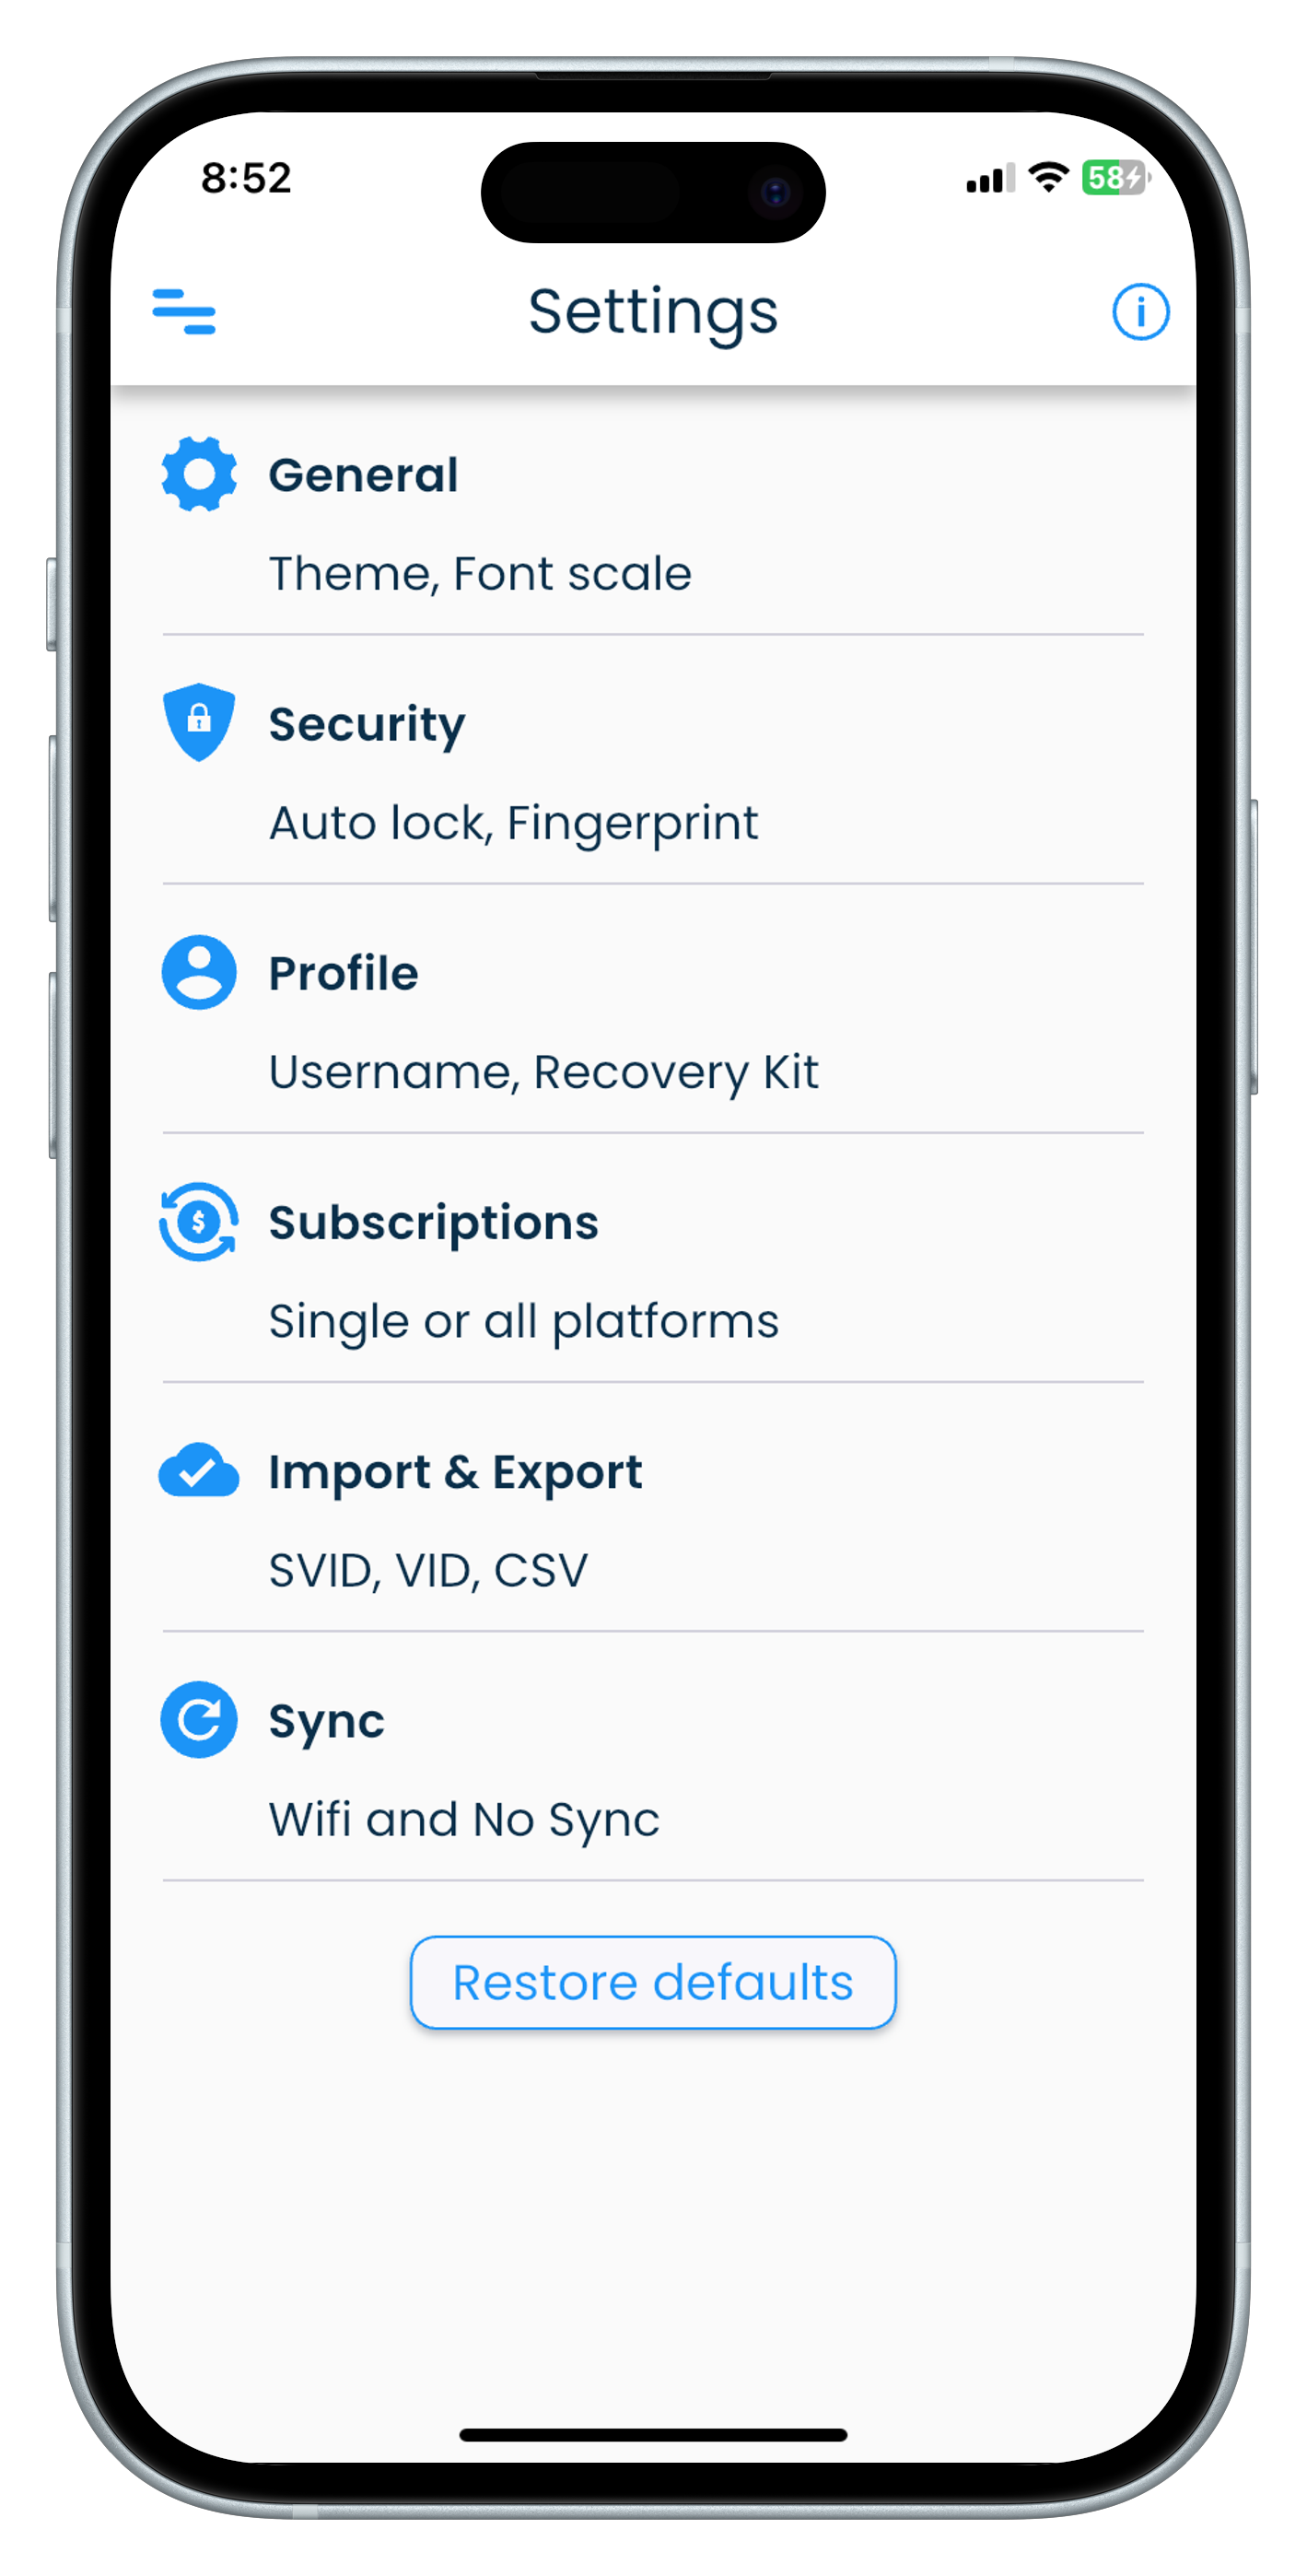
Settings for your profile
The settings screen allows you to customise your profile.
Settings screen
Your profile and device specific settings can be viewed and managed in the Settings screen. The Settings screen can be reached by clicking on the Settings link in the application menu.
| Mac | Windows |
|---|---|
 |
 |
| Android | iPhone |
|---|---|
 |
 |
| iPad |
|---|
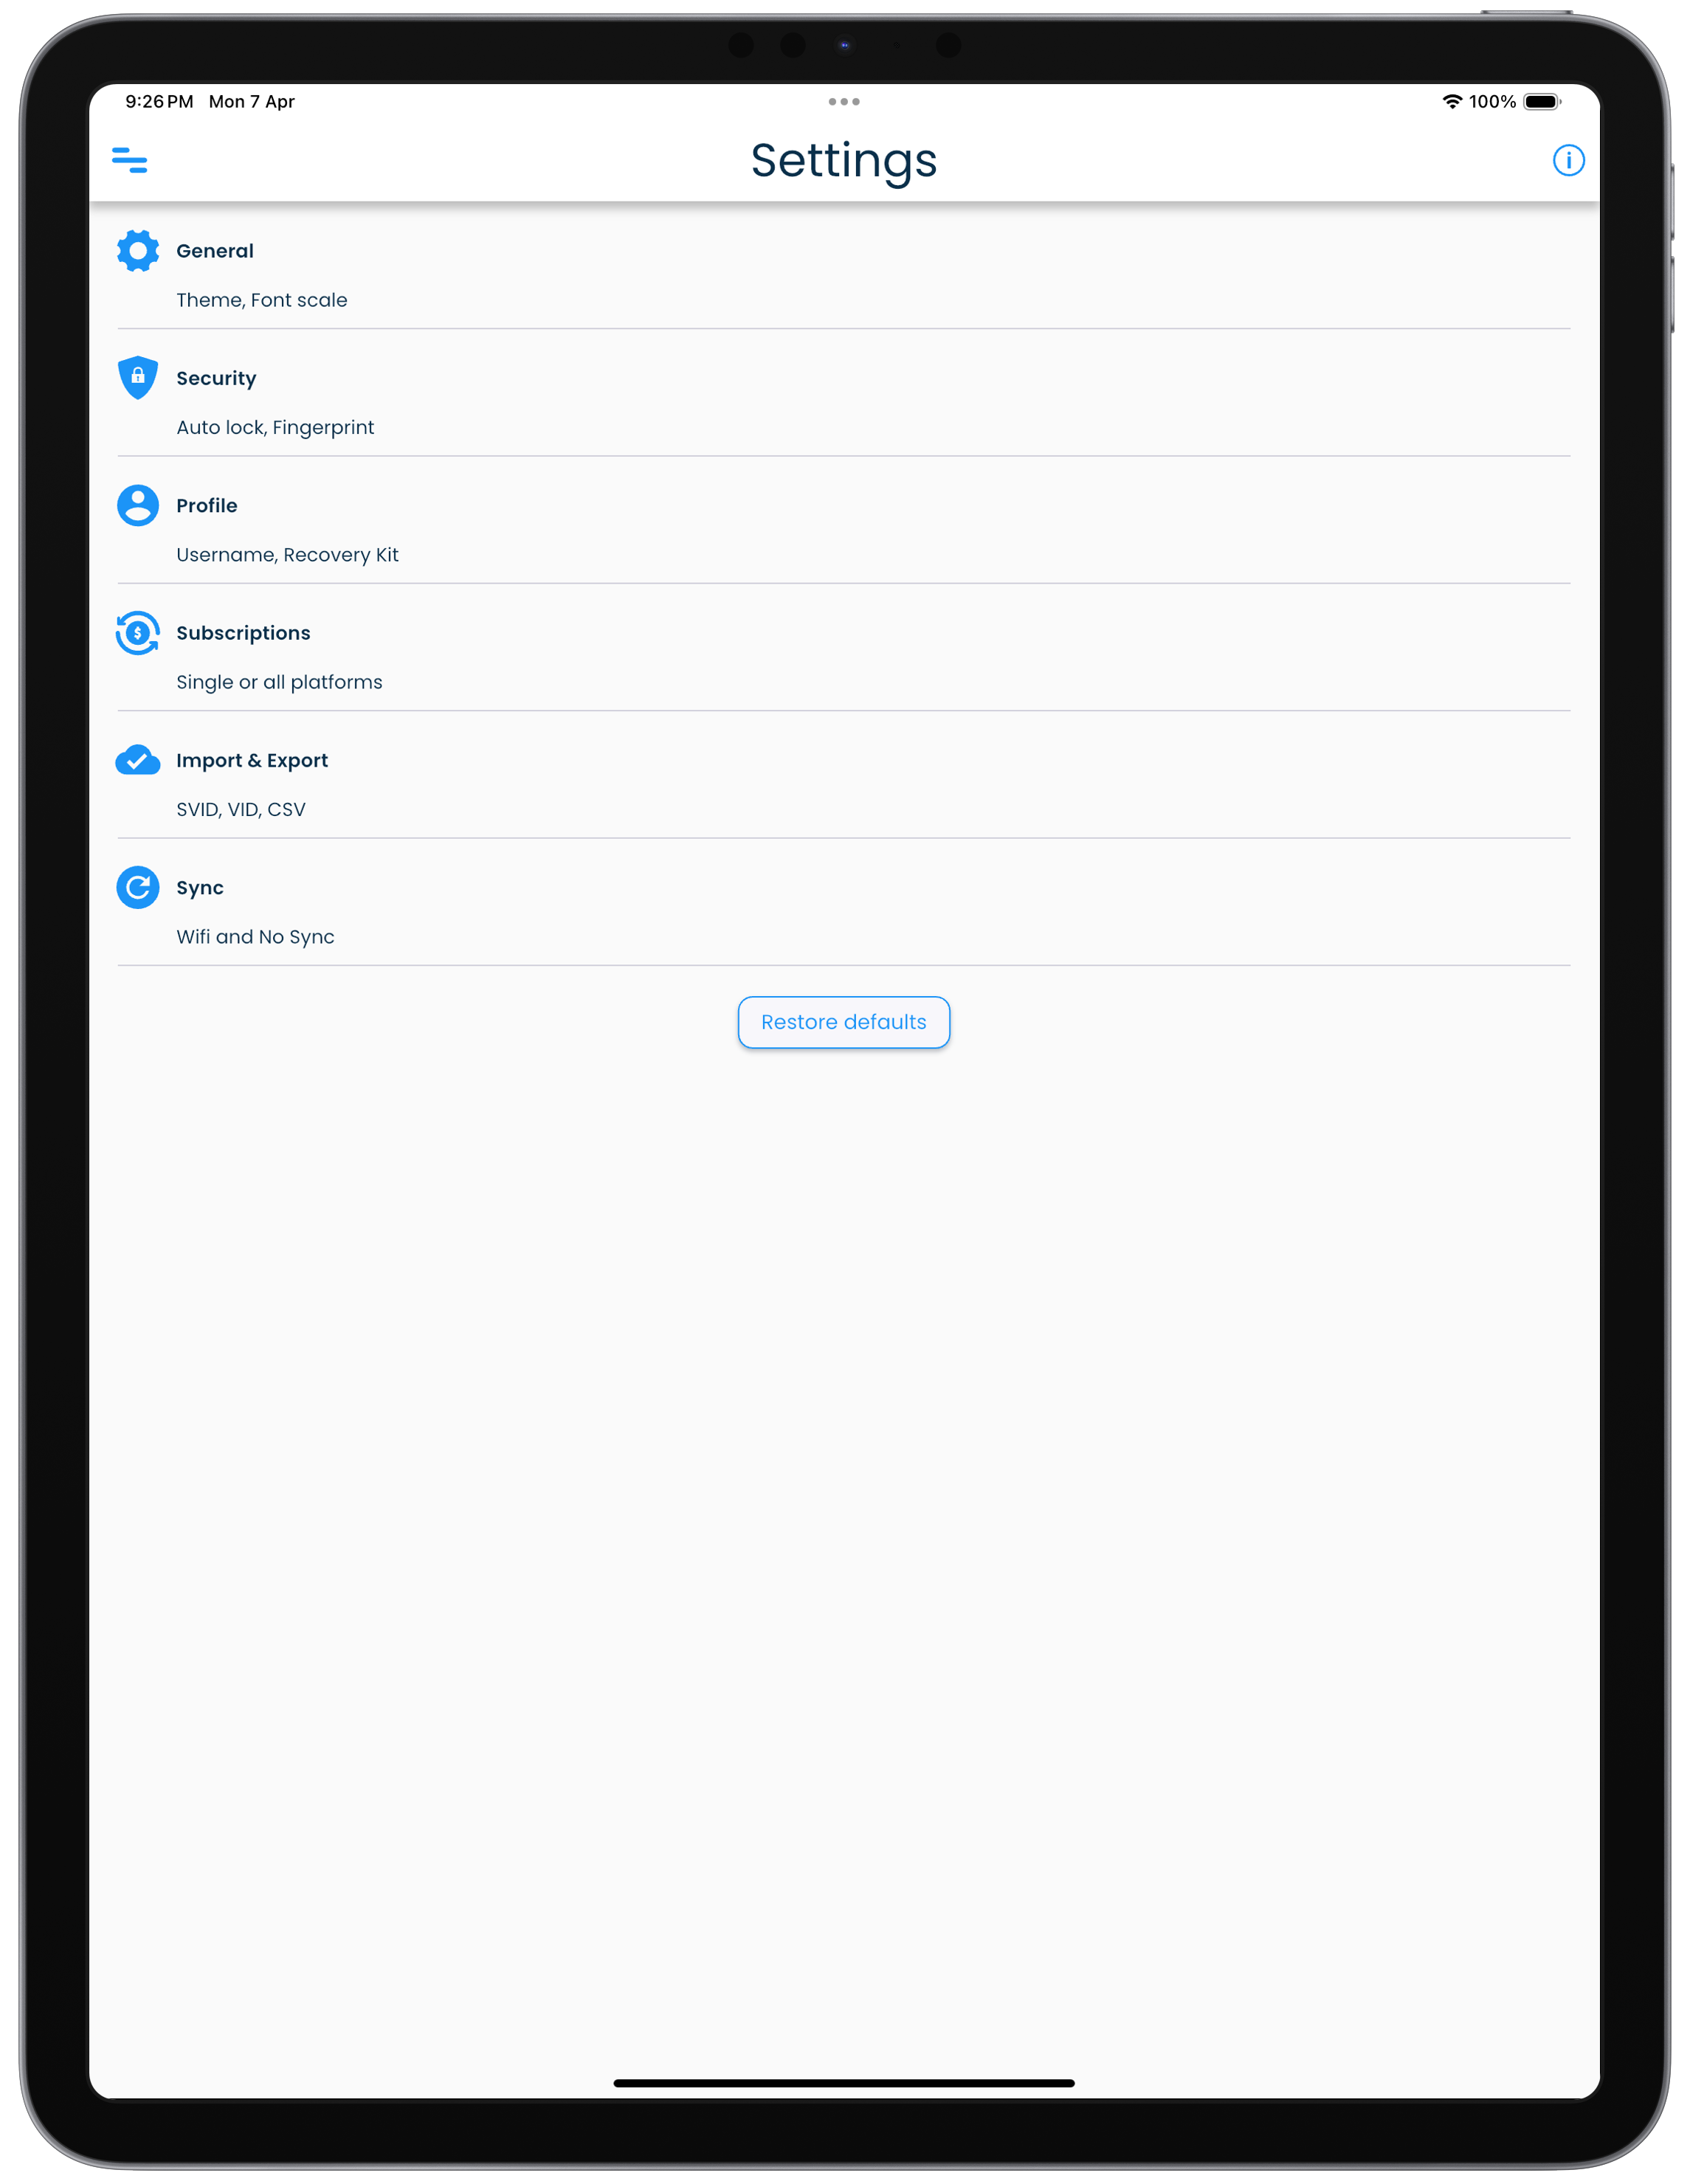 |
The settings options will vary across users, depending on the Pro license type of the profile, the device in use and the sync method chosen.
The available settings for your profile and your devices are organised into groups. On desktops, the setting groups are displayed as tabs, while on mobiles the groups are organized as a list.
Refer to the following sections to get an idea of the available settings in SplashID Classic.
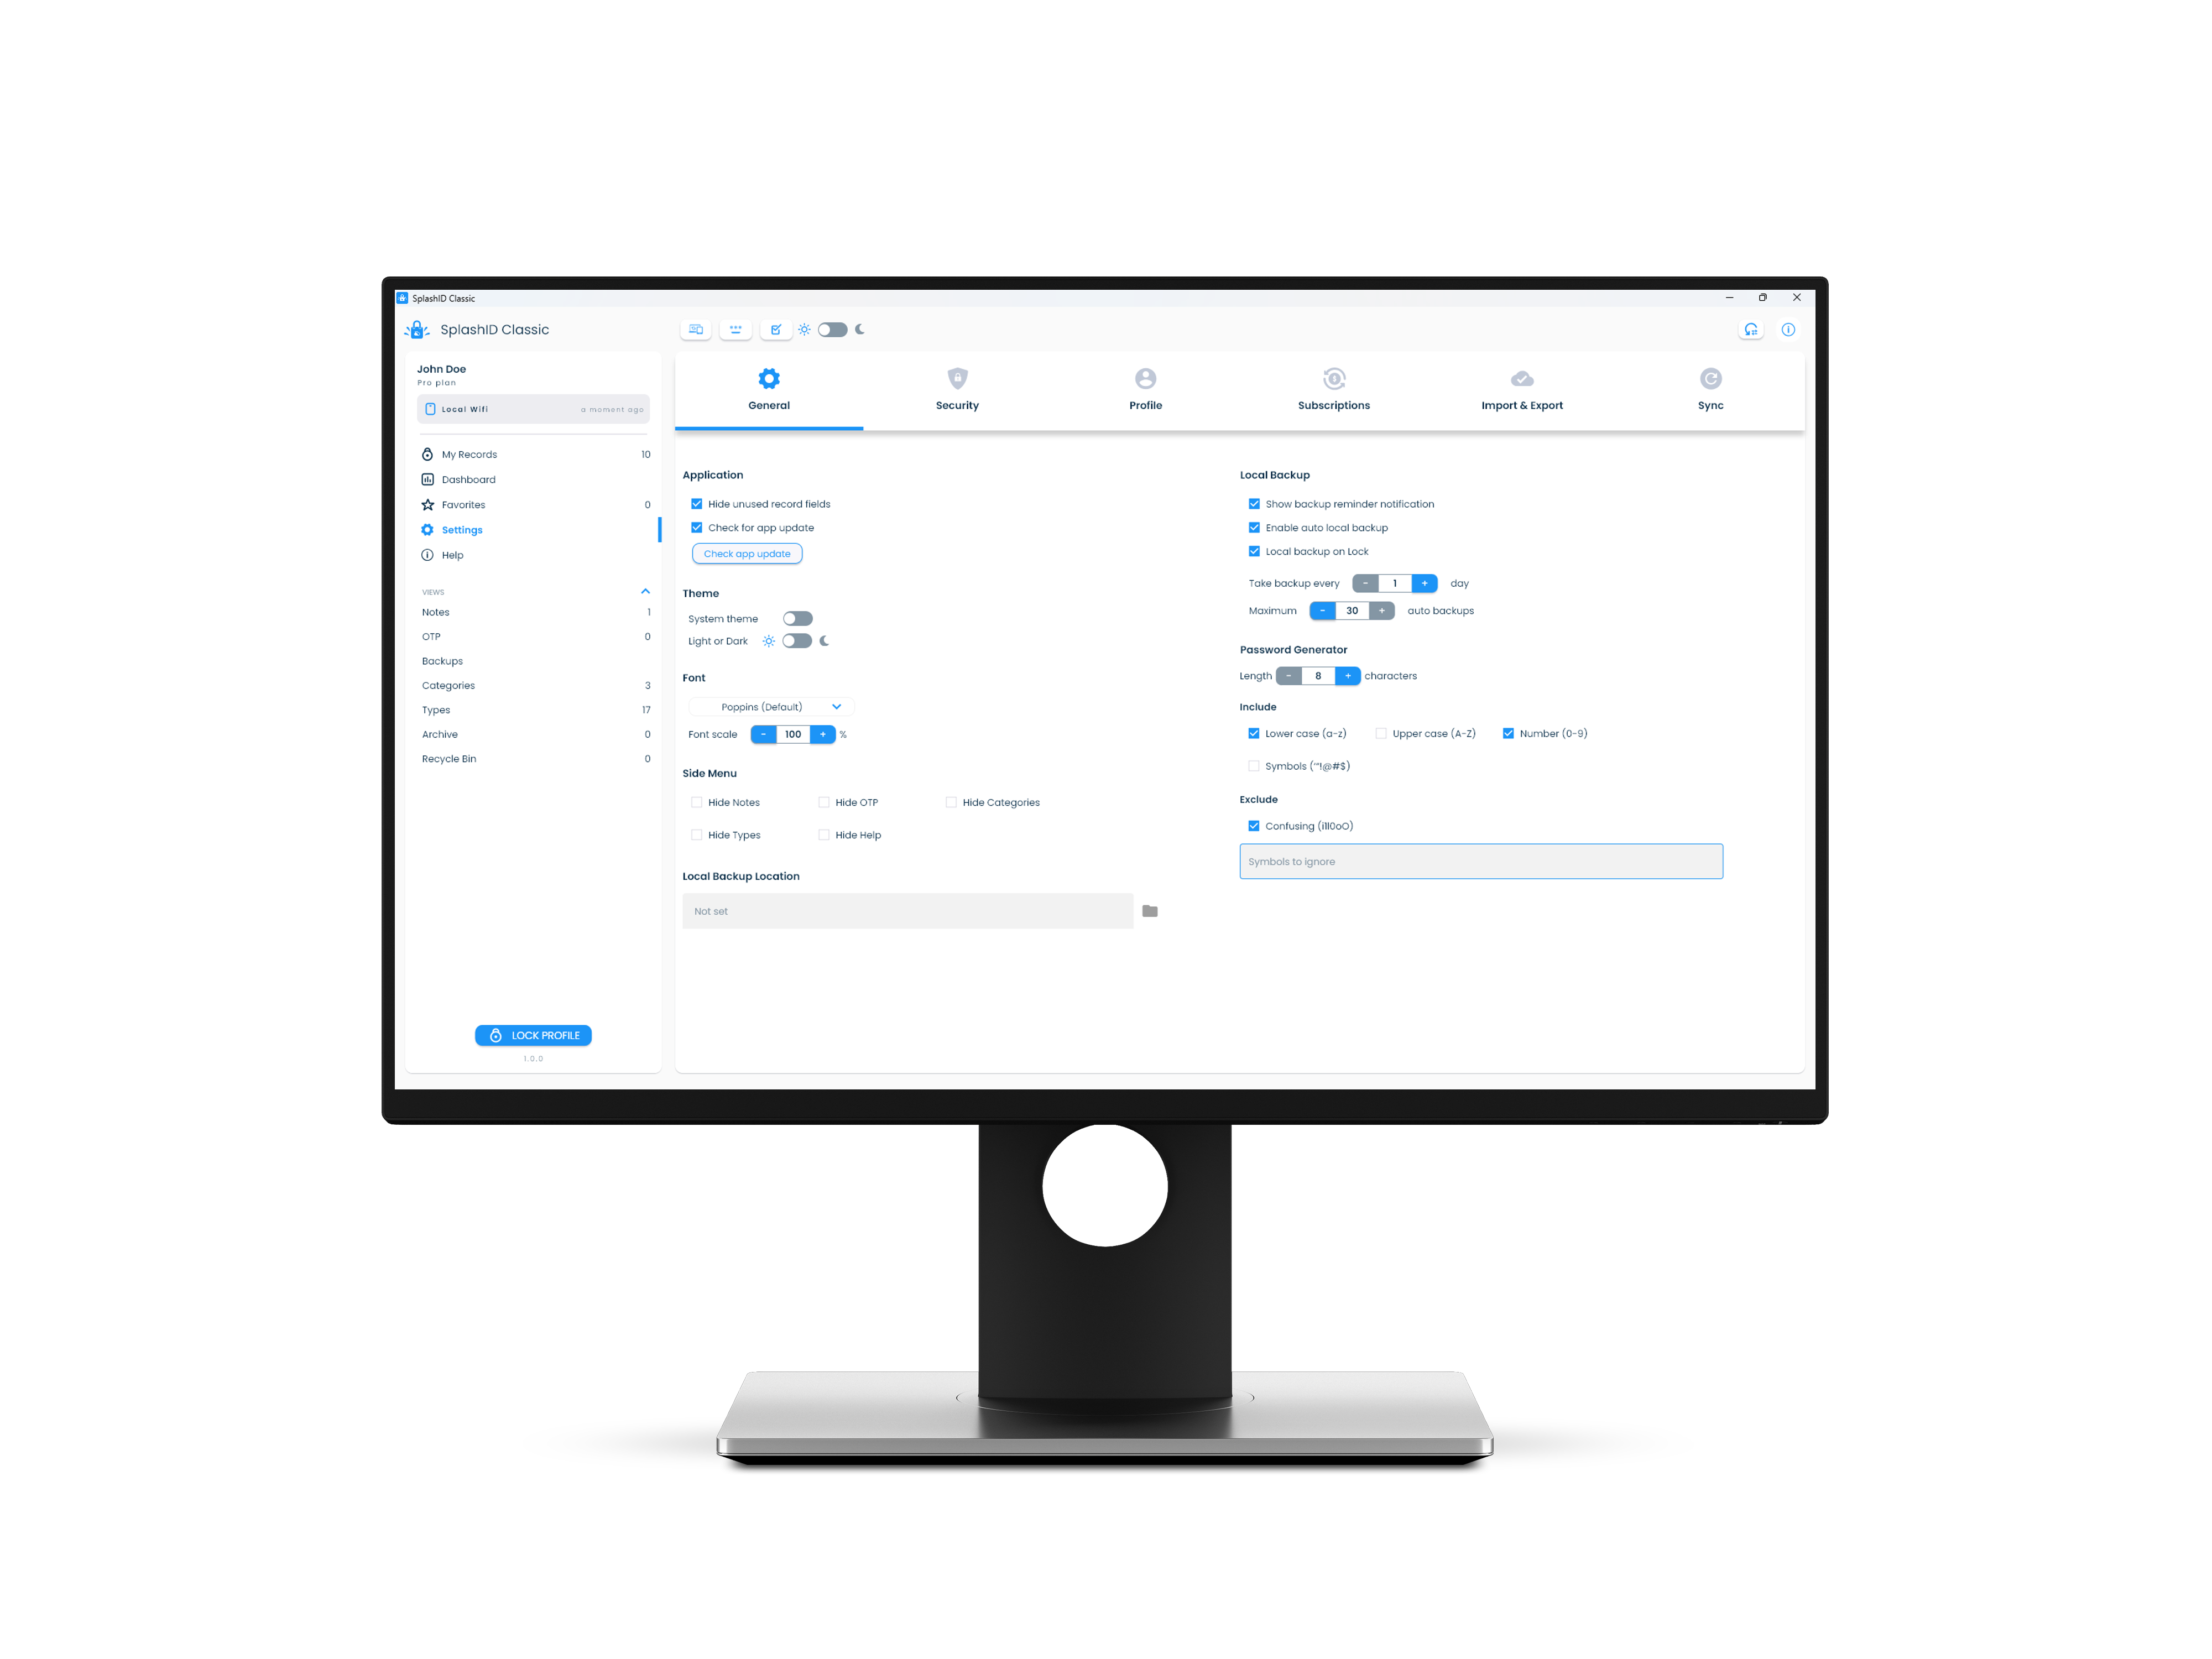
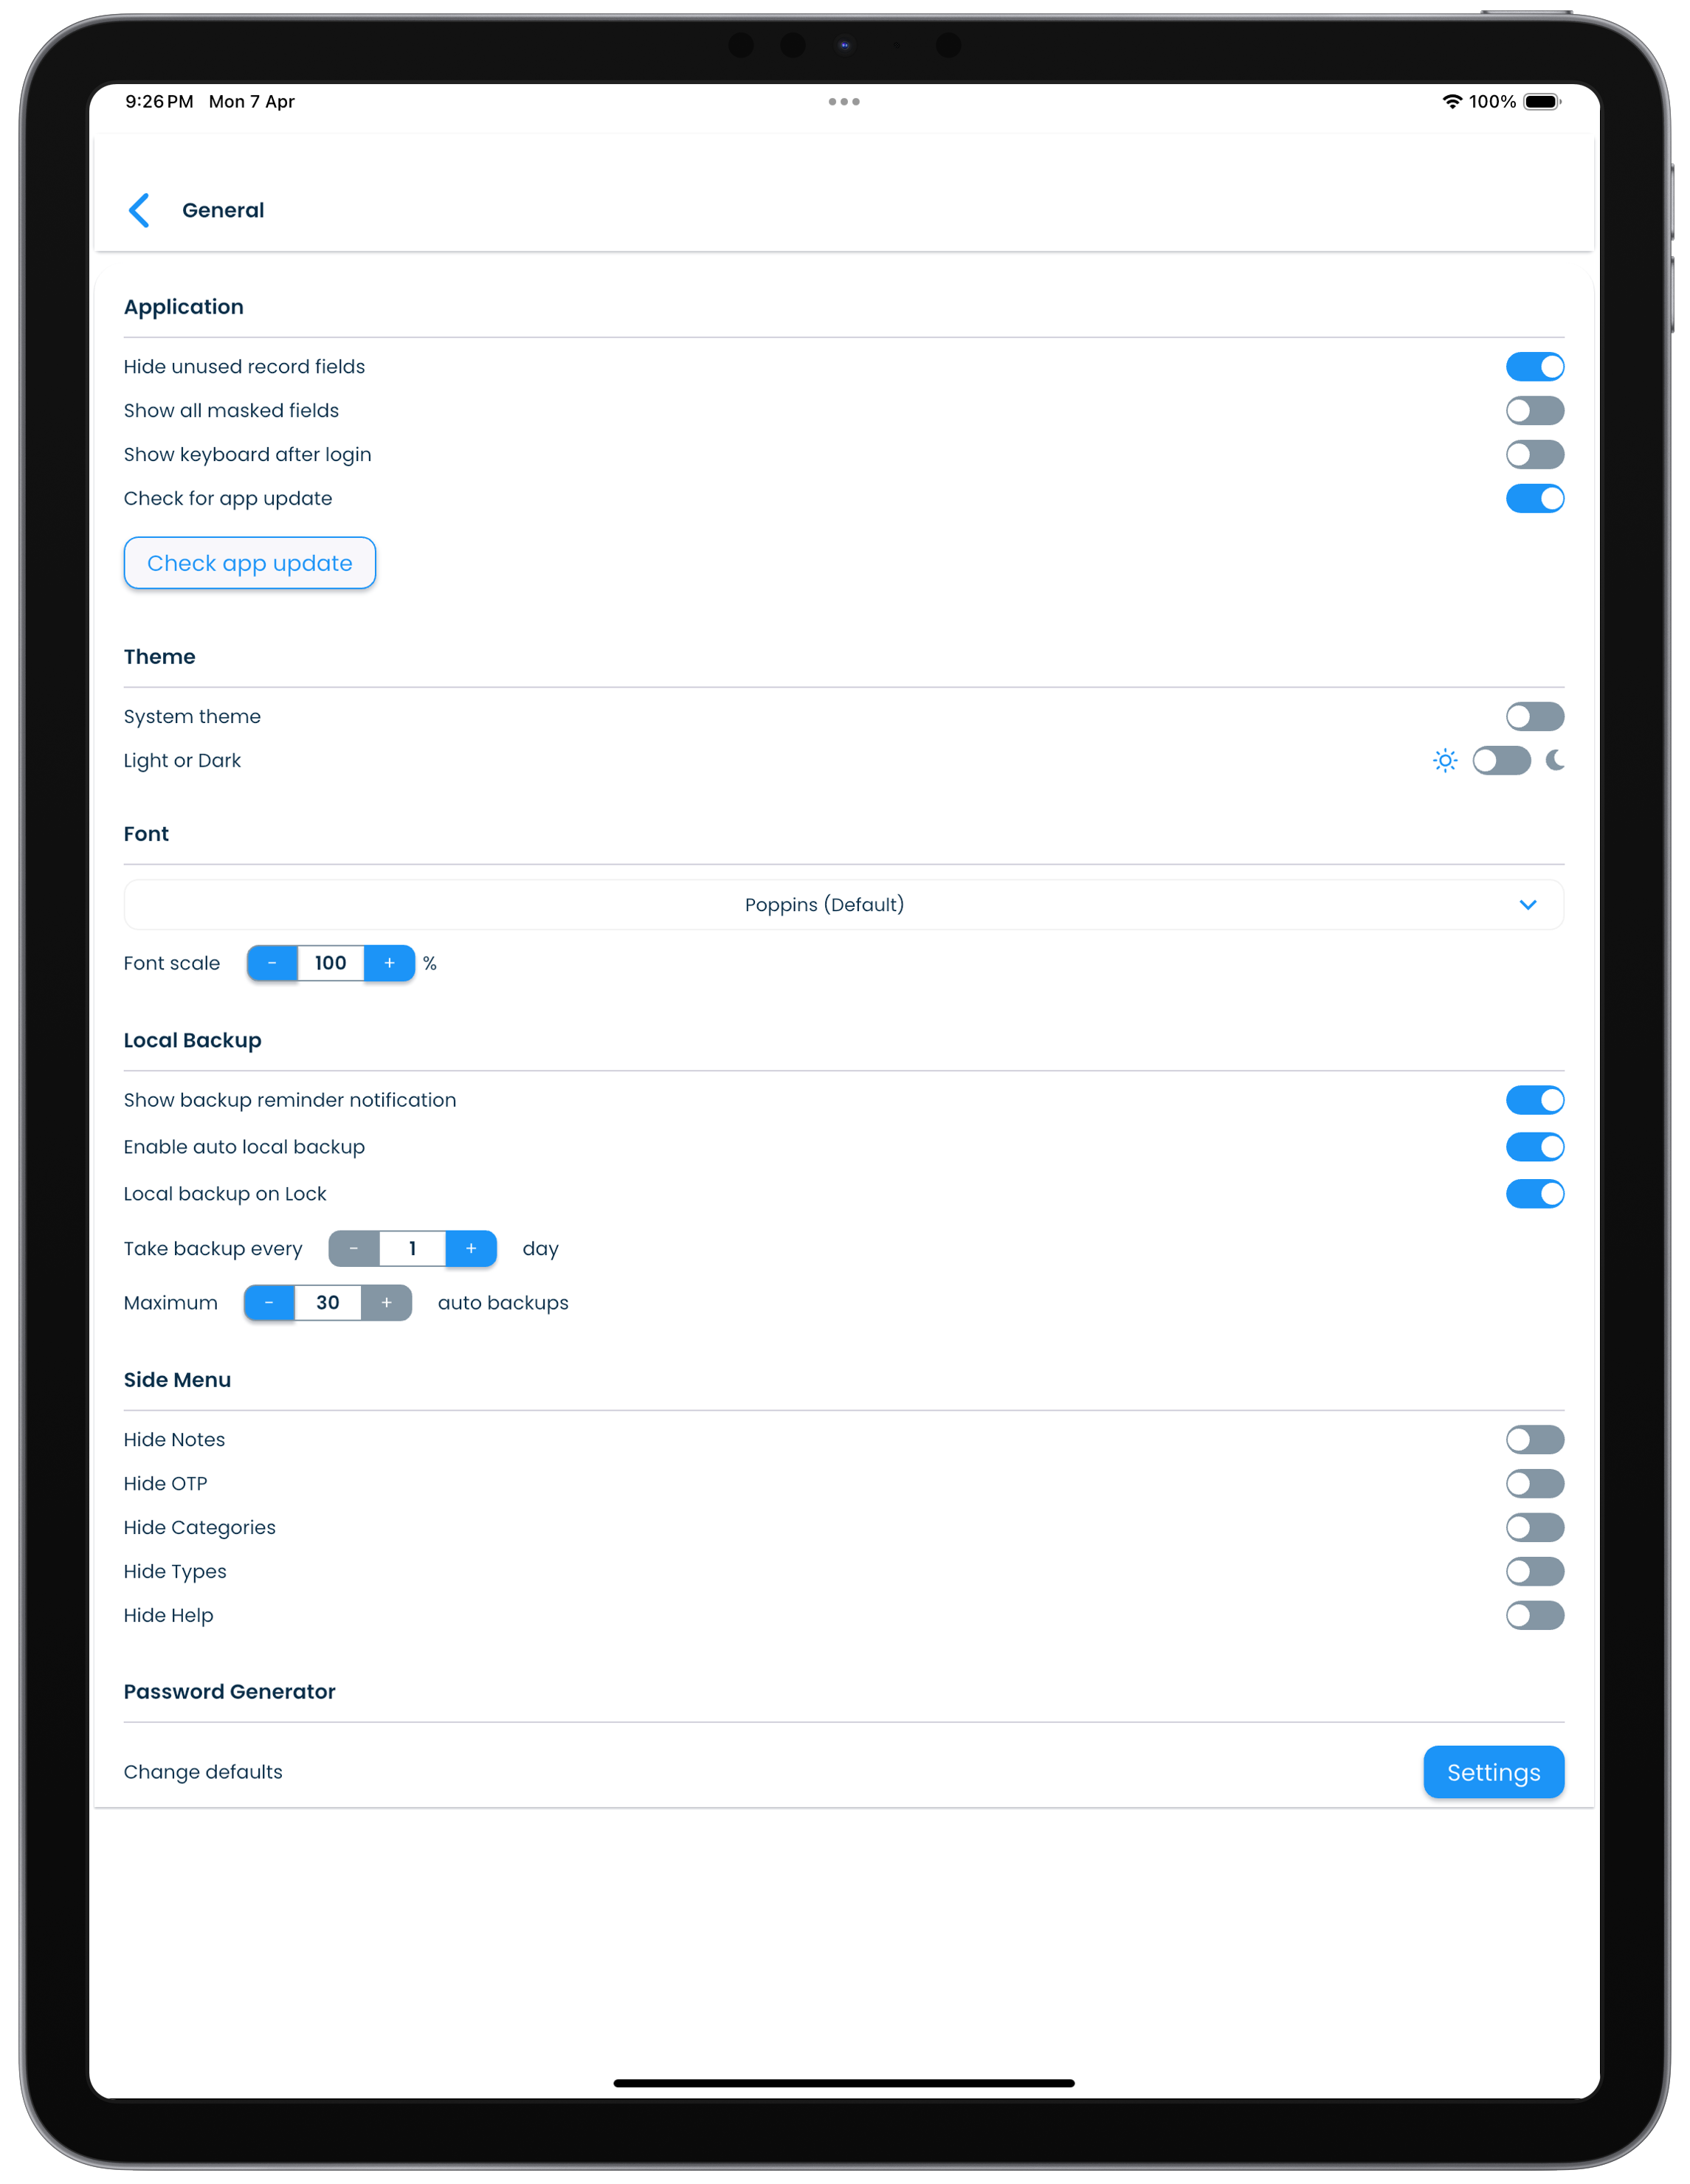
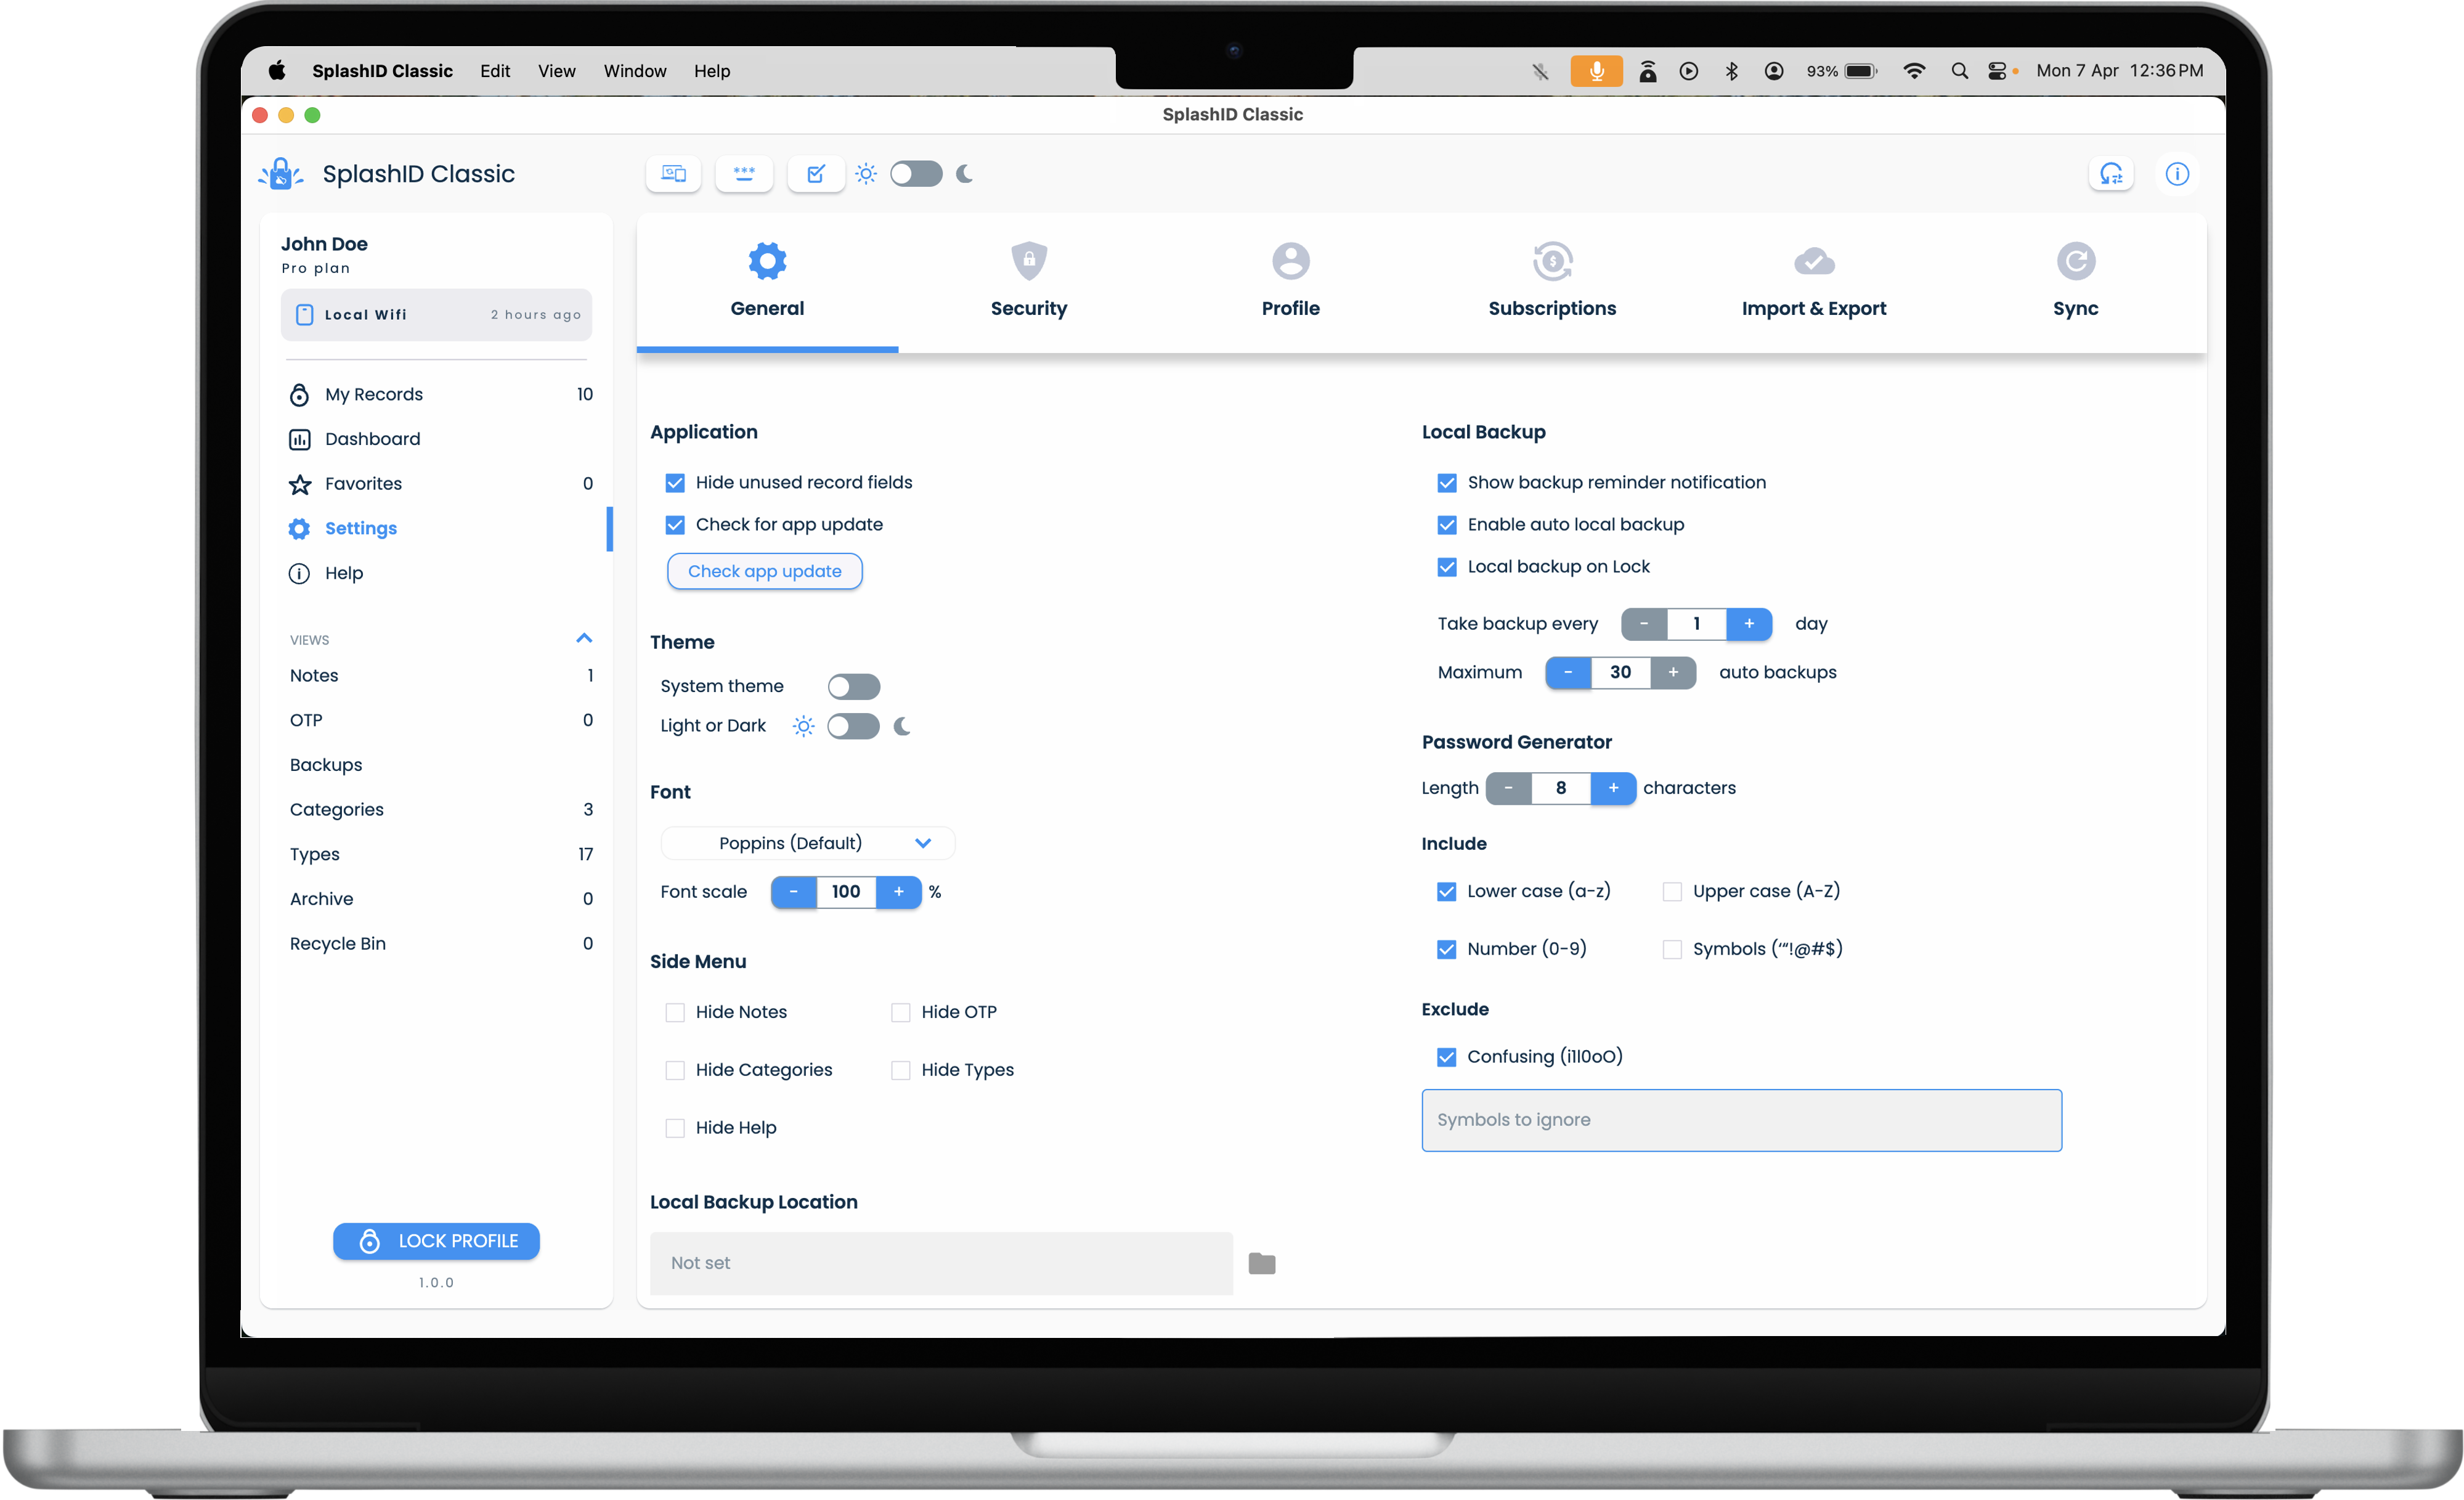
General
All settings that are common at the application level are included here.
| Mac | Windows |
|---|---|
|
|
| Android | iPhone |
|---|---|
 |
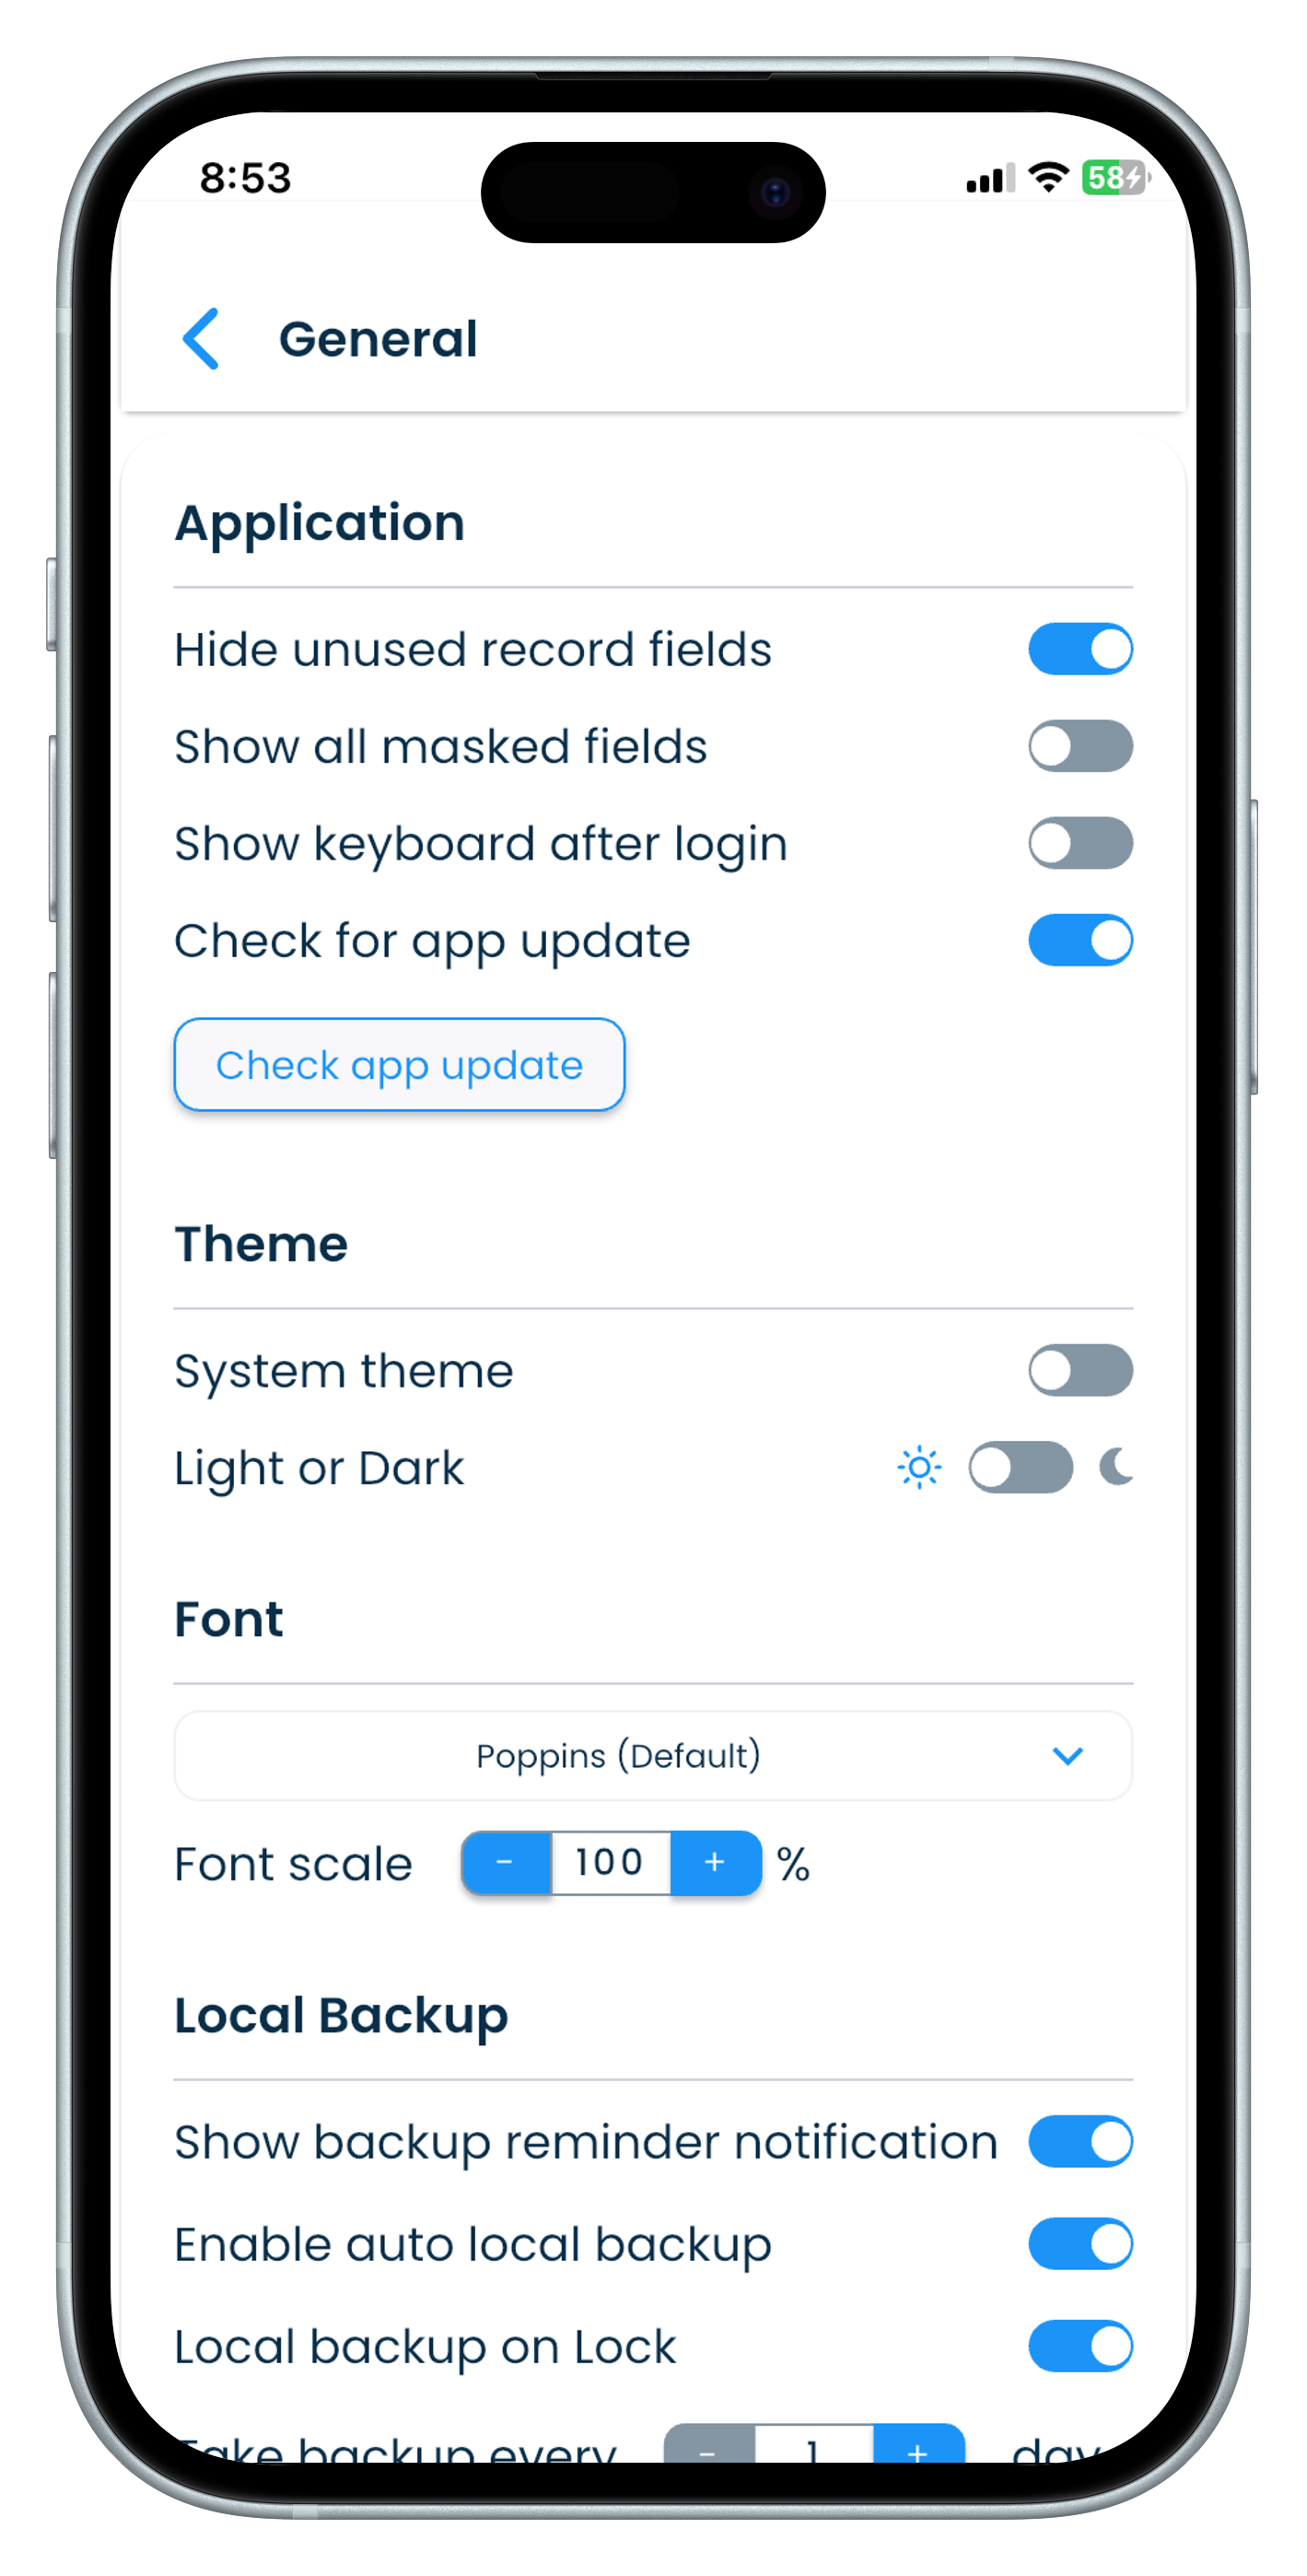  |
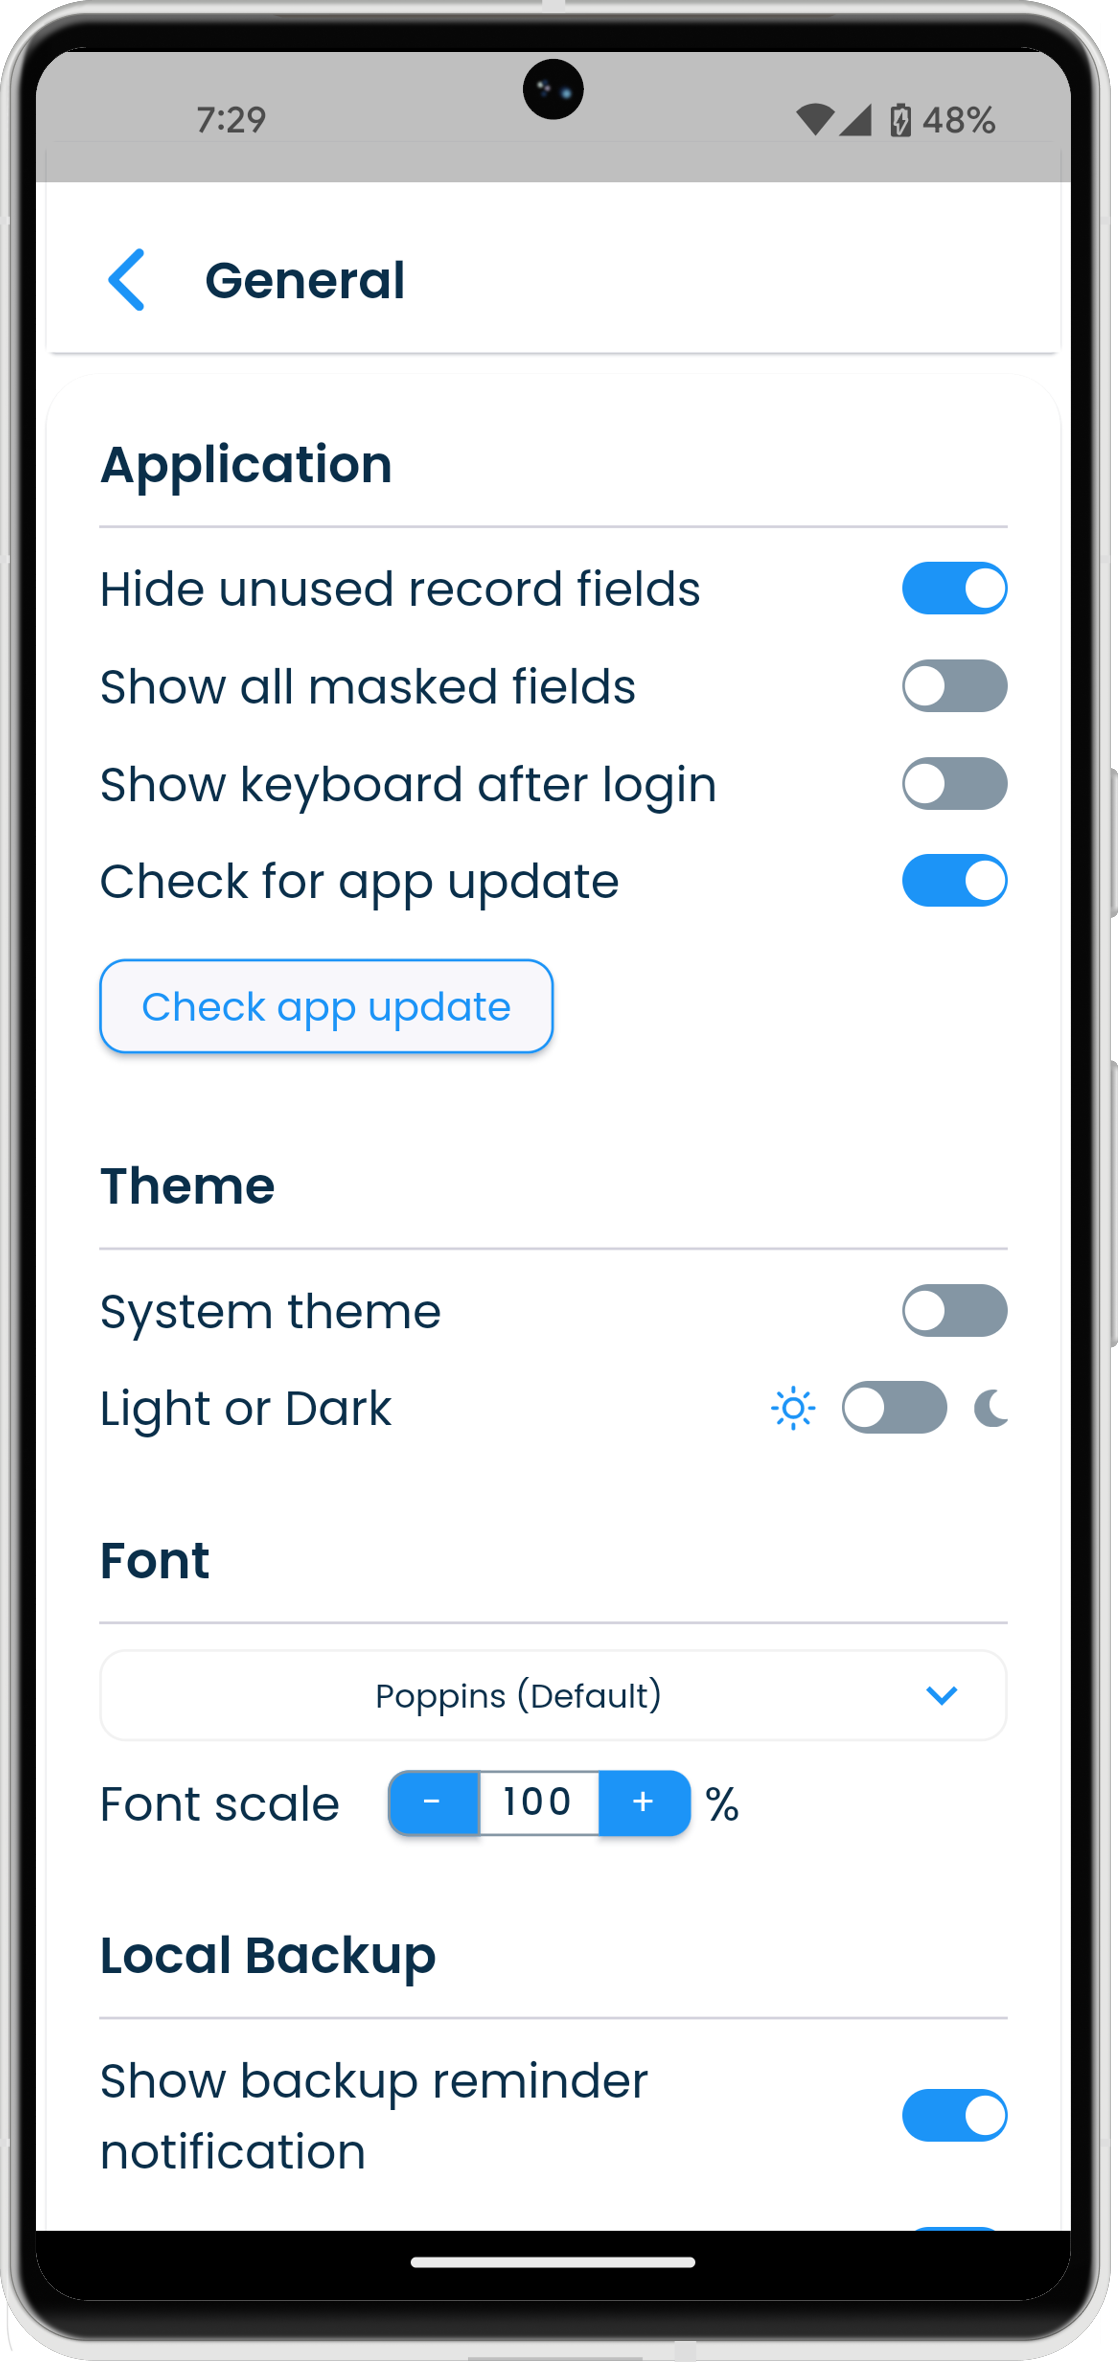
| iPad |
|---|
|
Setting |
Description |
|---|---|
| Application | |
| Hide unused record fields | Determines if the record details should display fields that are empty. |
| Theme | |
| System theme | Select if the application theme should follow the system theme set on your device. |
| Light or Dark | Manually set the theme mode, if you do not want the application theme to be the same as the system theme. |
| Font | |
| Font | Select a font from the list to be used in the application. |
| Font scale | Increase or decrease the font size across the application. |
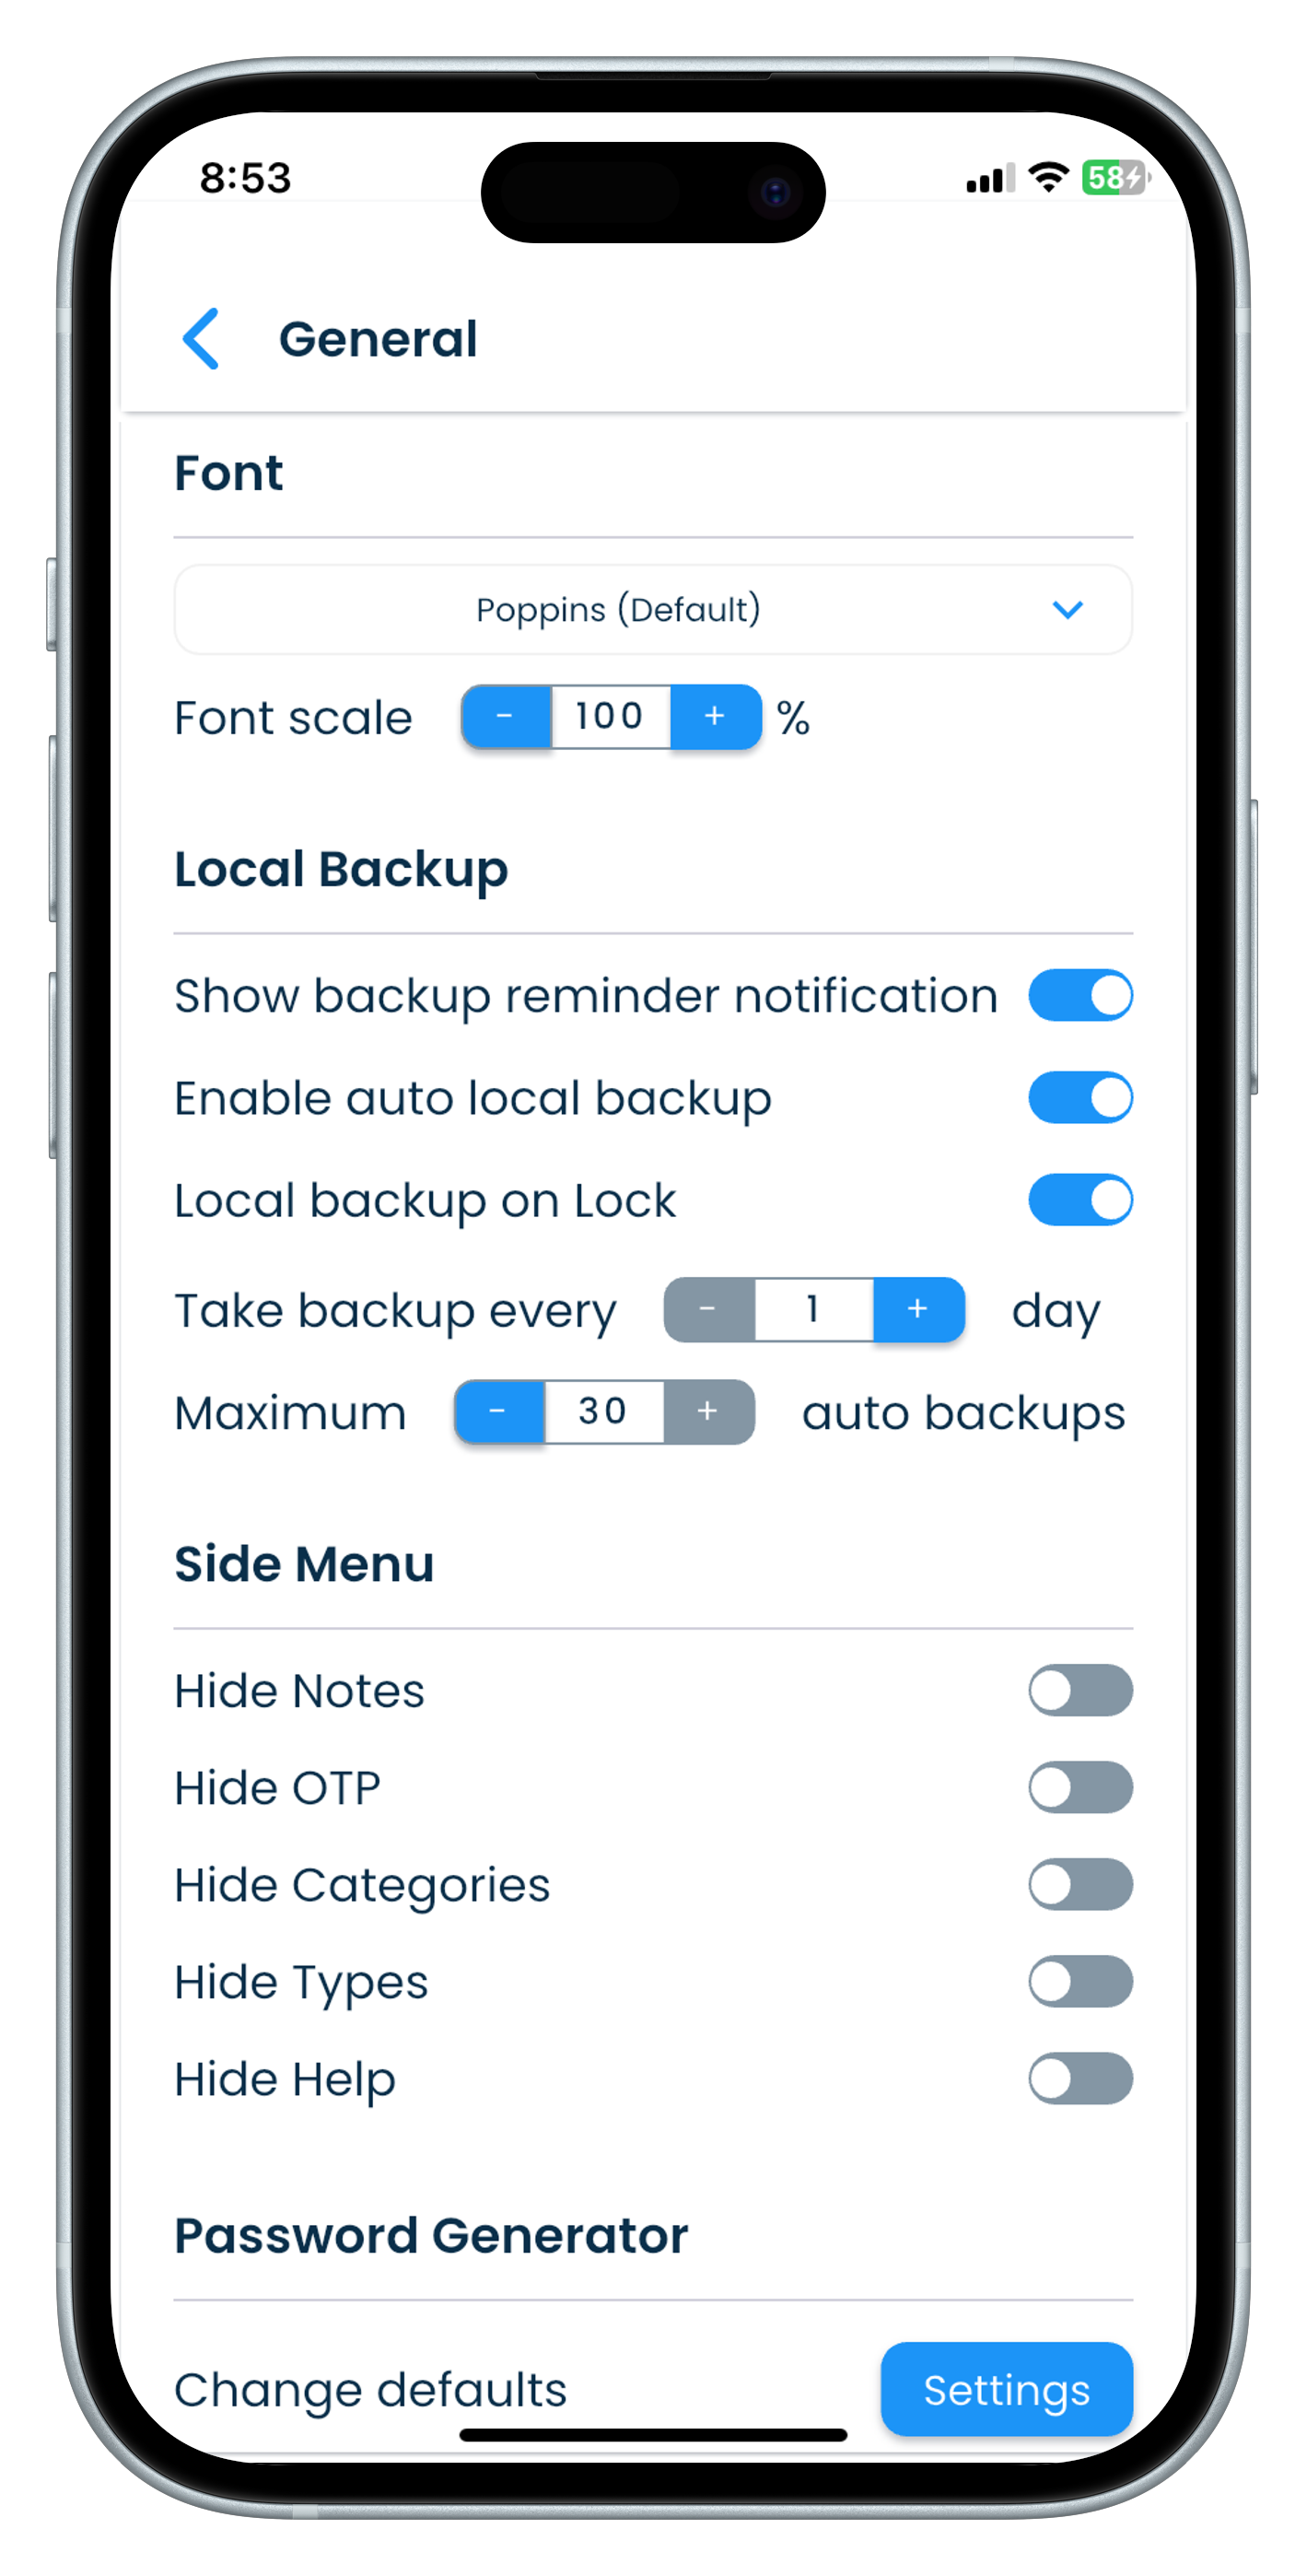
| Side Menu | |
| Hide Notes | Select it to hide the Notes view if you do not need it. |
| Hide OTP | Select it to hide the OTP view if you do not need it. |
| Hide Categories | Select it to hide the Categories view if you do not need it. |
| Hide Types | Select it to hide the Types view if you do not need it. |
| Hide Help | Select it to hide the Help content view if you do not need it. |
| Local Backup Location | |
| Select a location | Select a folder on your device where the local backup files will be stored. Local backup files can be restored only the user for whom the local backup was taken. |
| Password Generator These settings are used every time you open the password generator in the app to create a password. |
|
| Length | Set the length of the password generated by the utility. |
| Characters to include | Select the character sets to be included in the generated password. |
| Characters to exclude | Exclude from the password to be generated, the confusing characters set (i1l0oO), and any other characters you specify. |
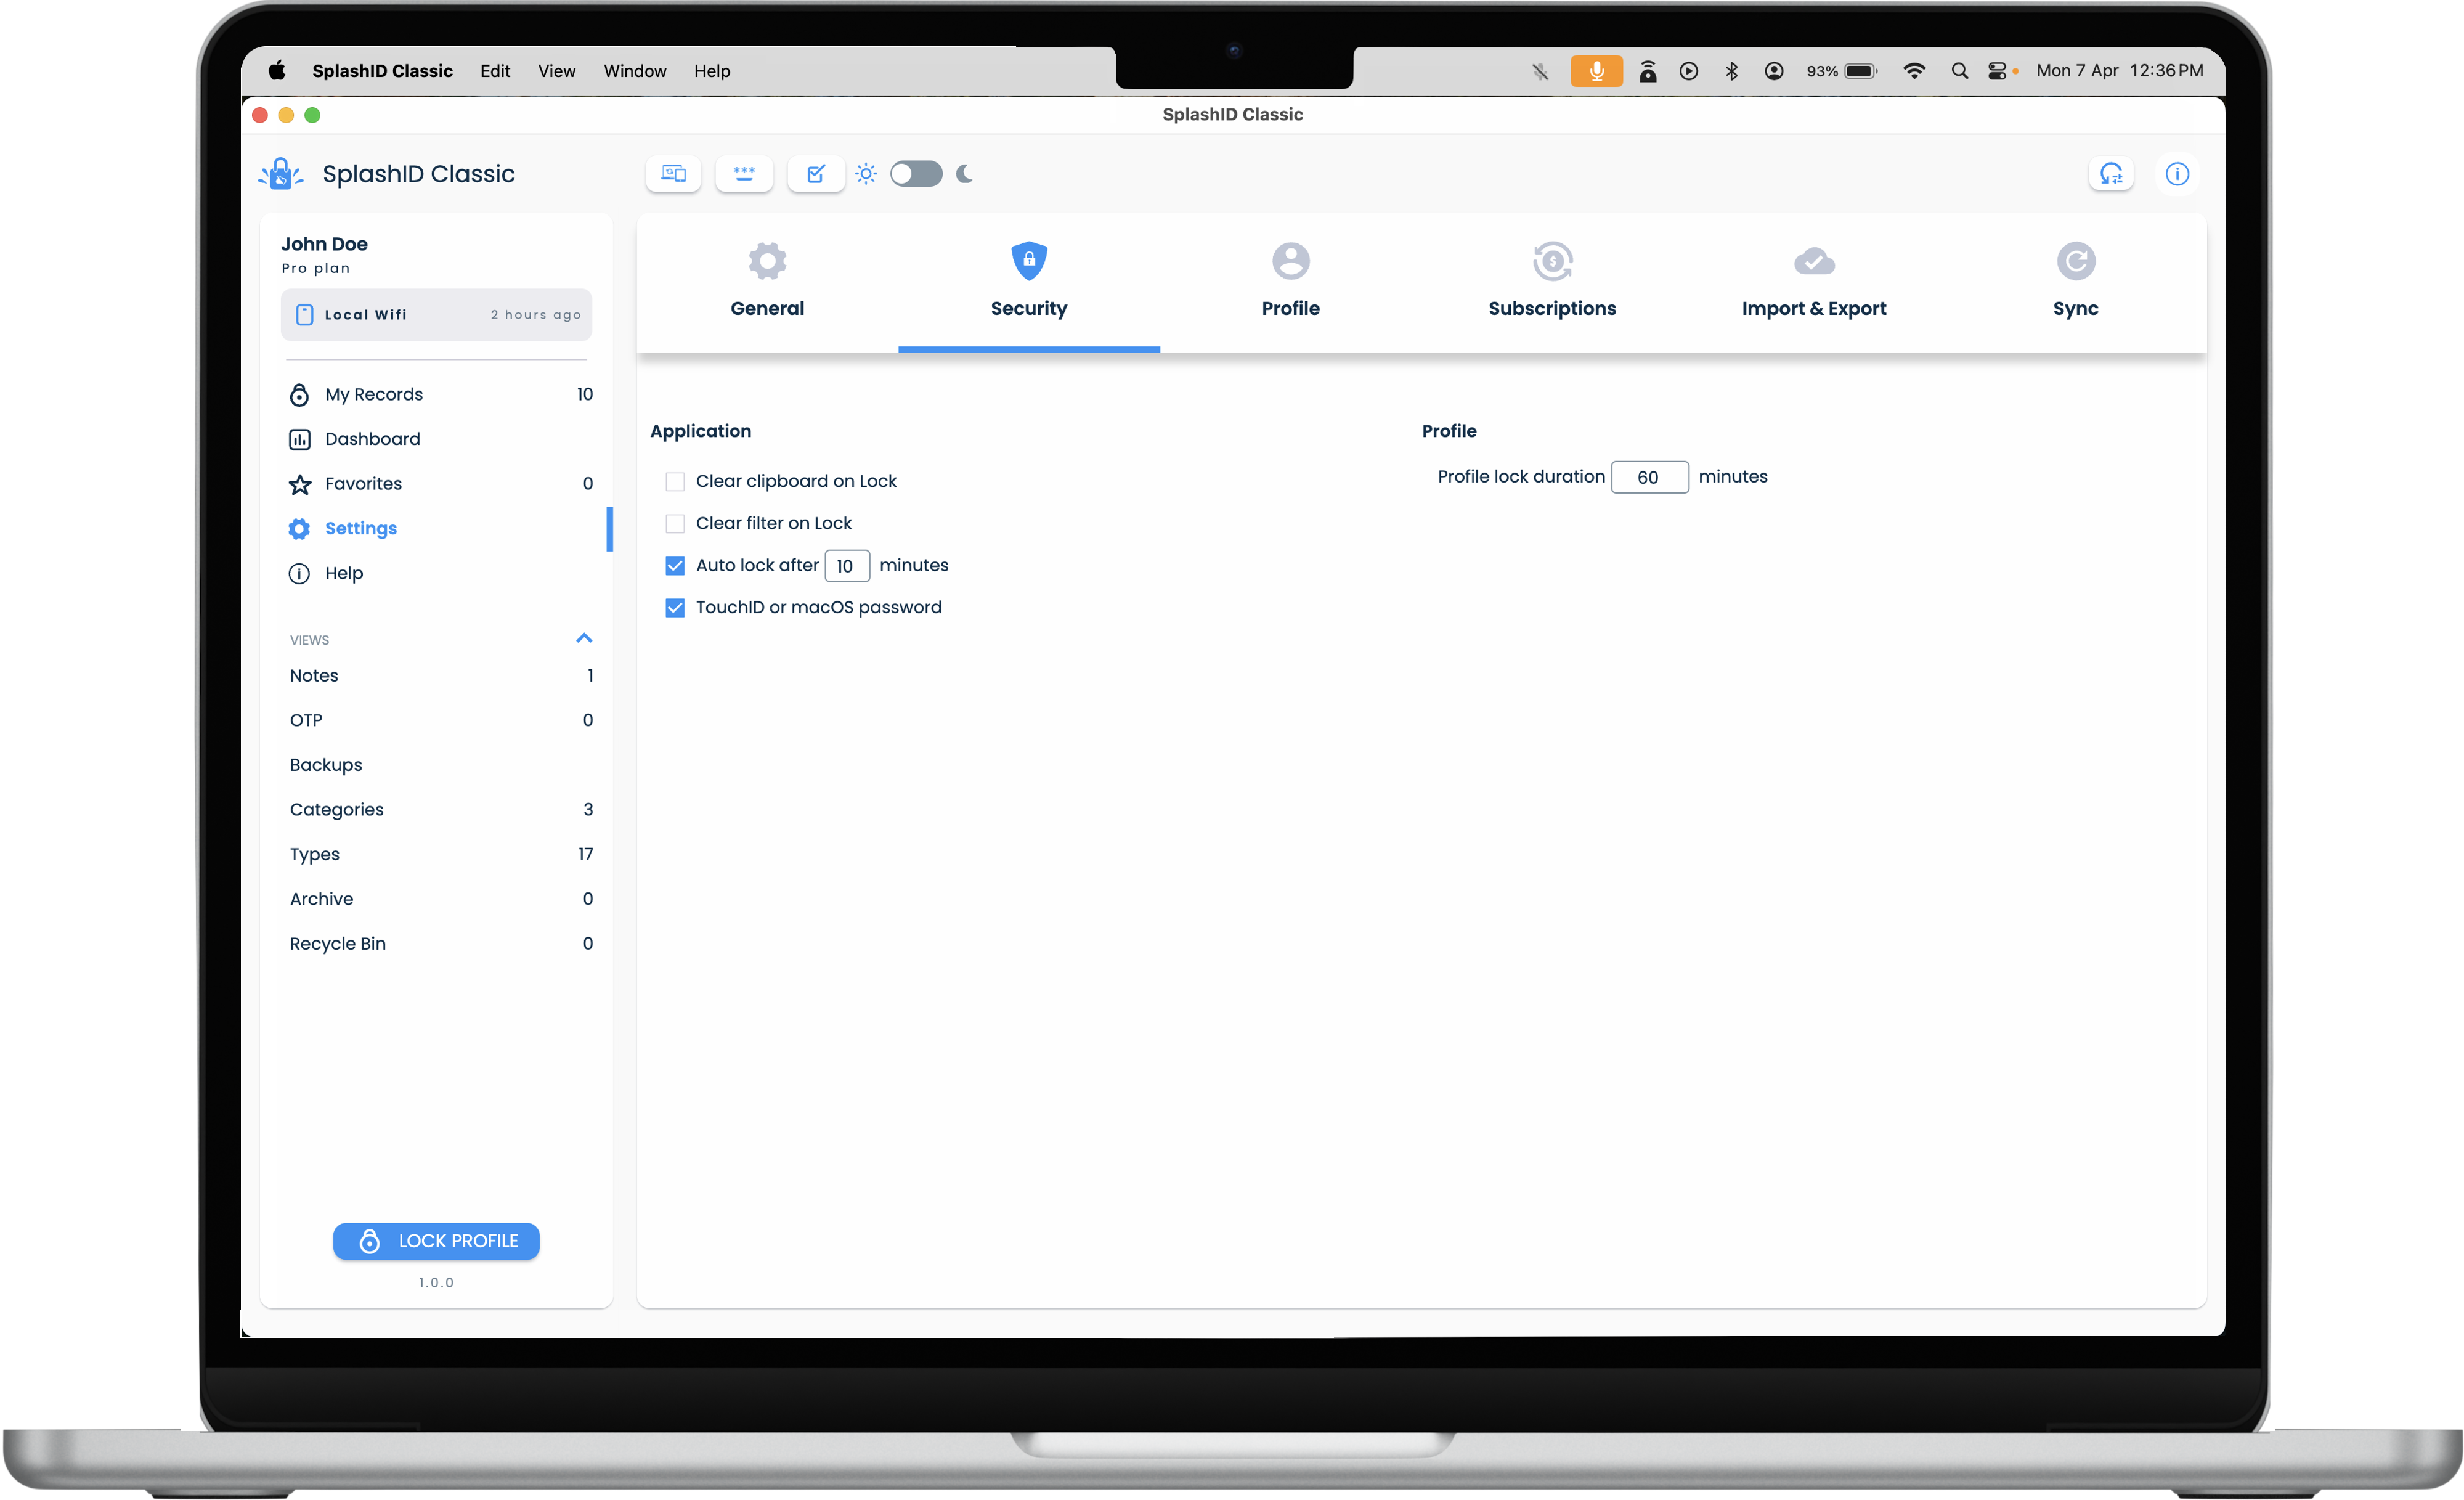
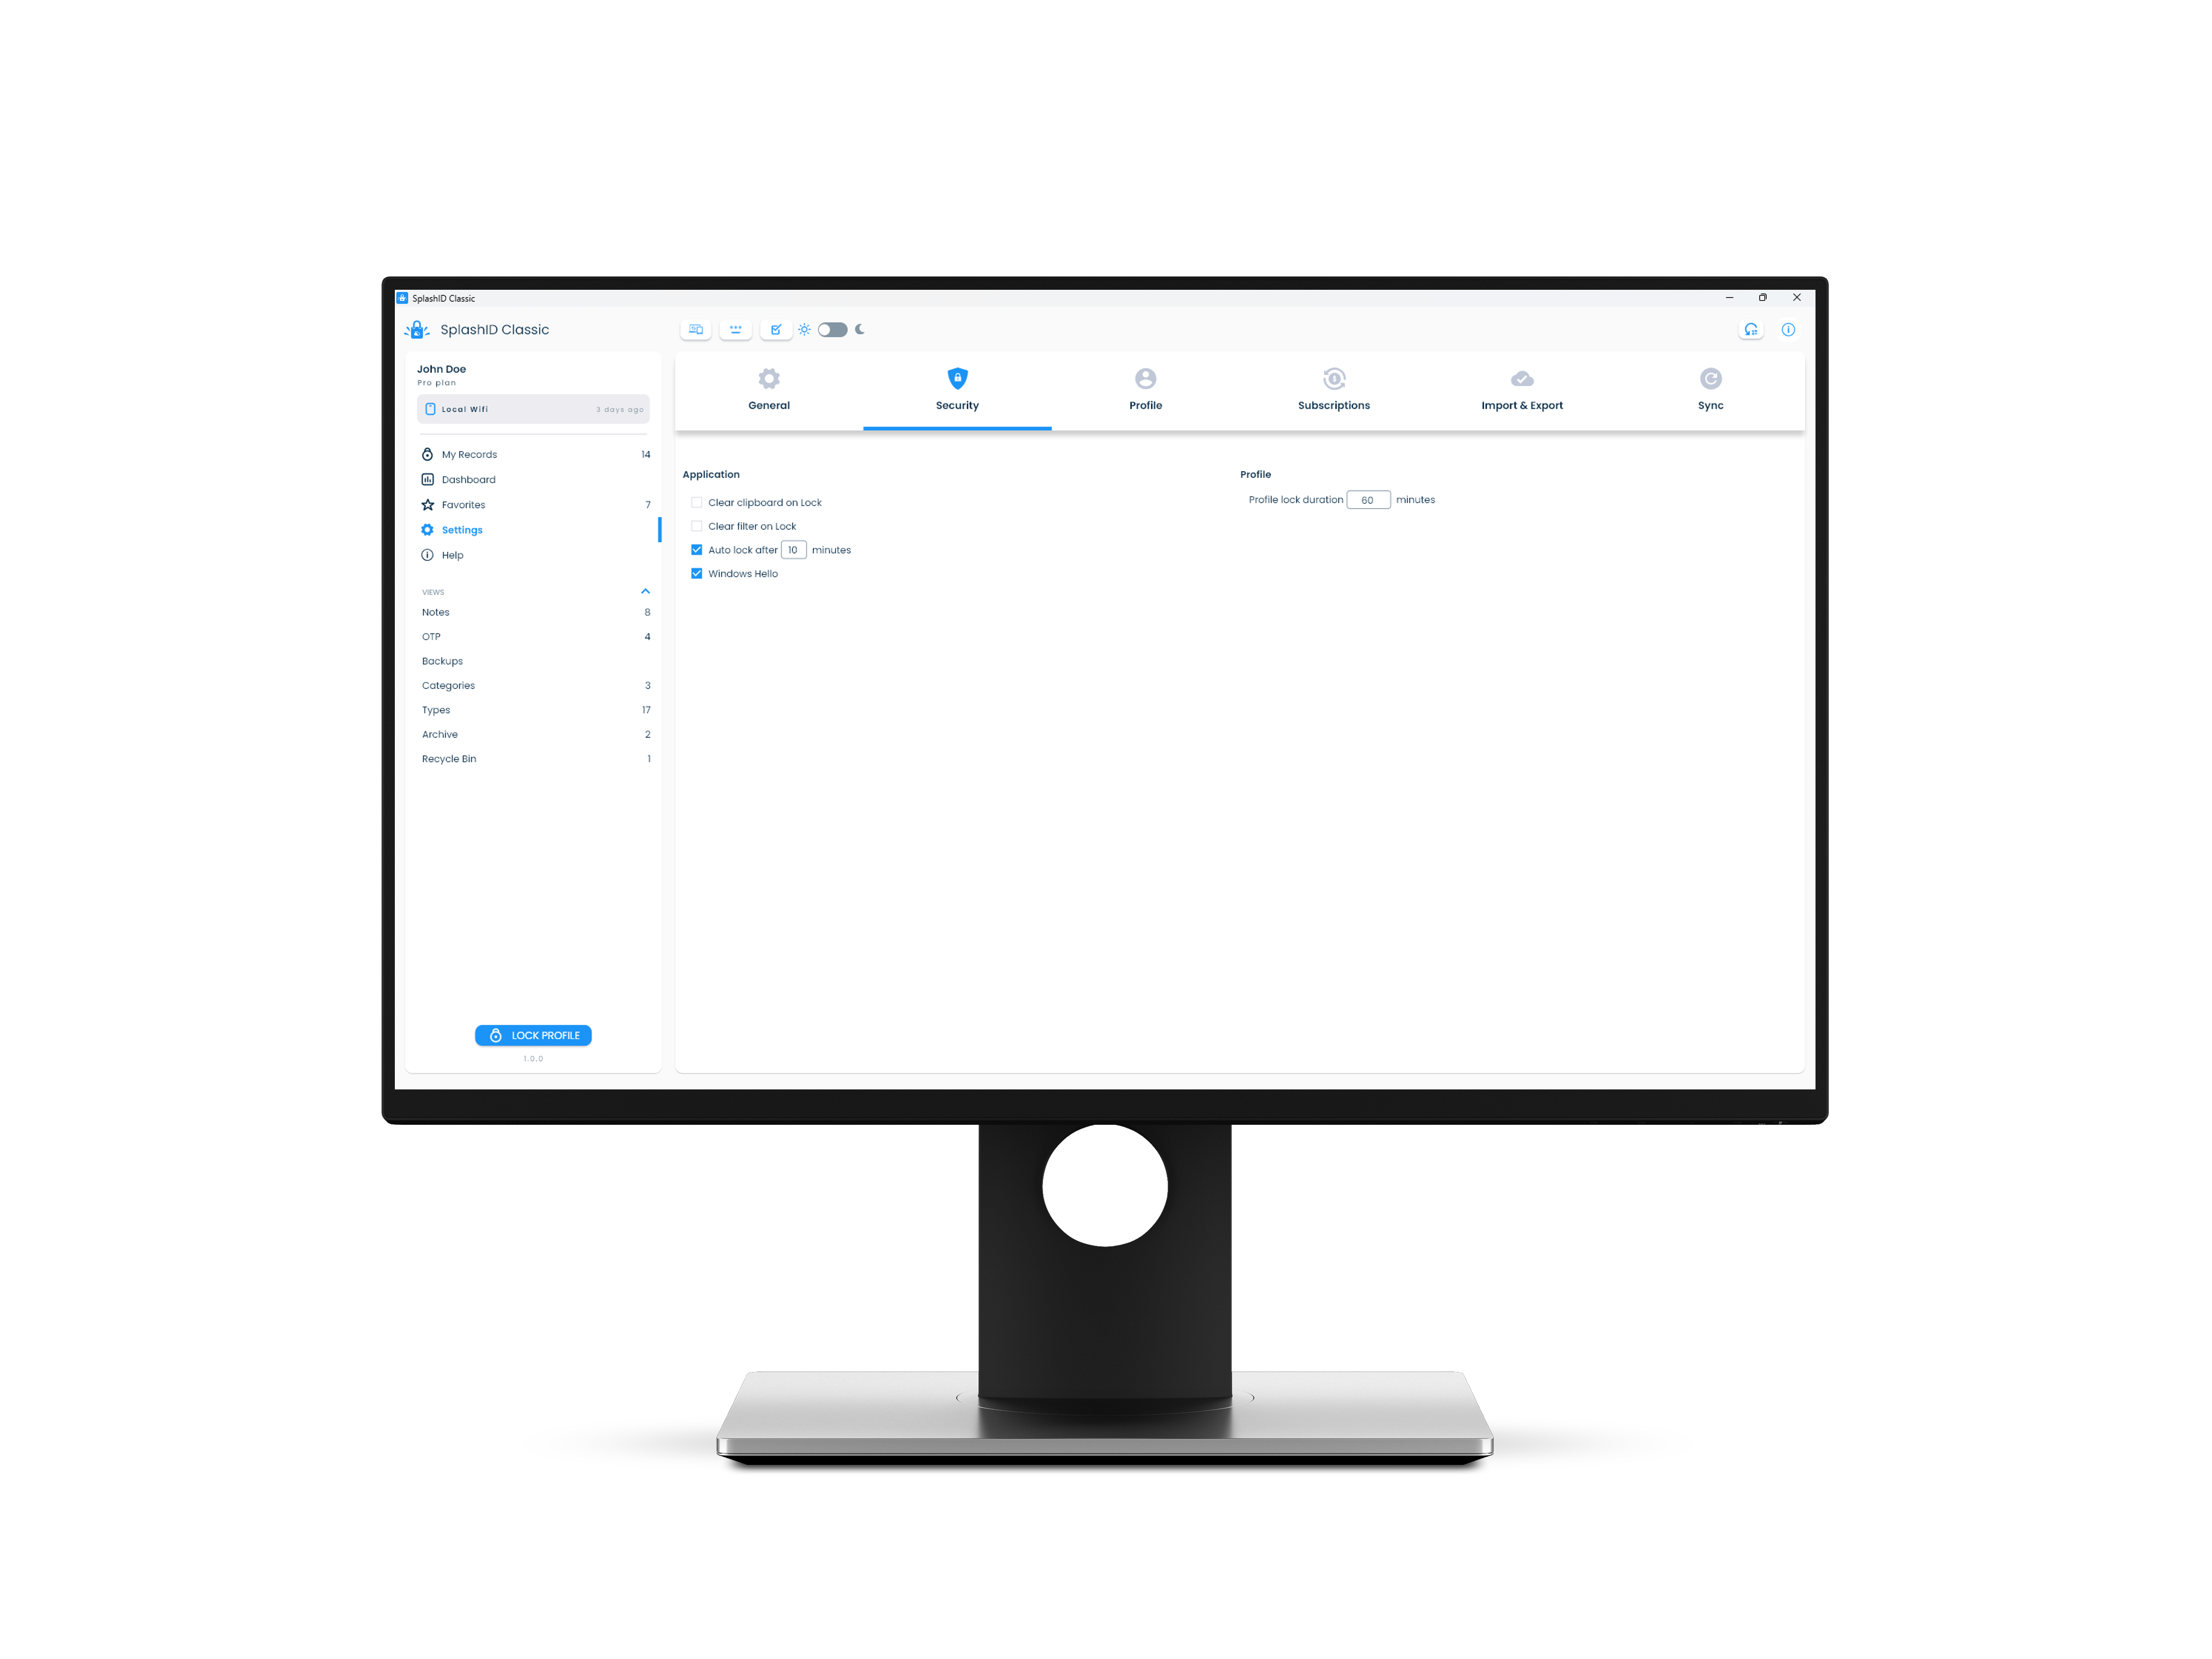
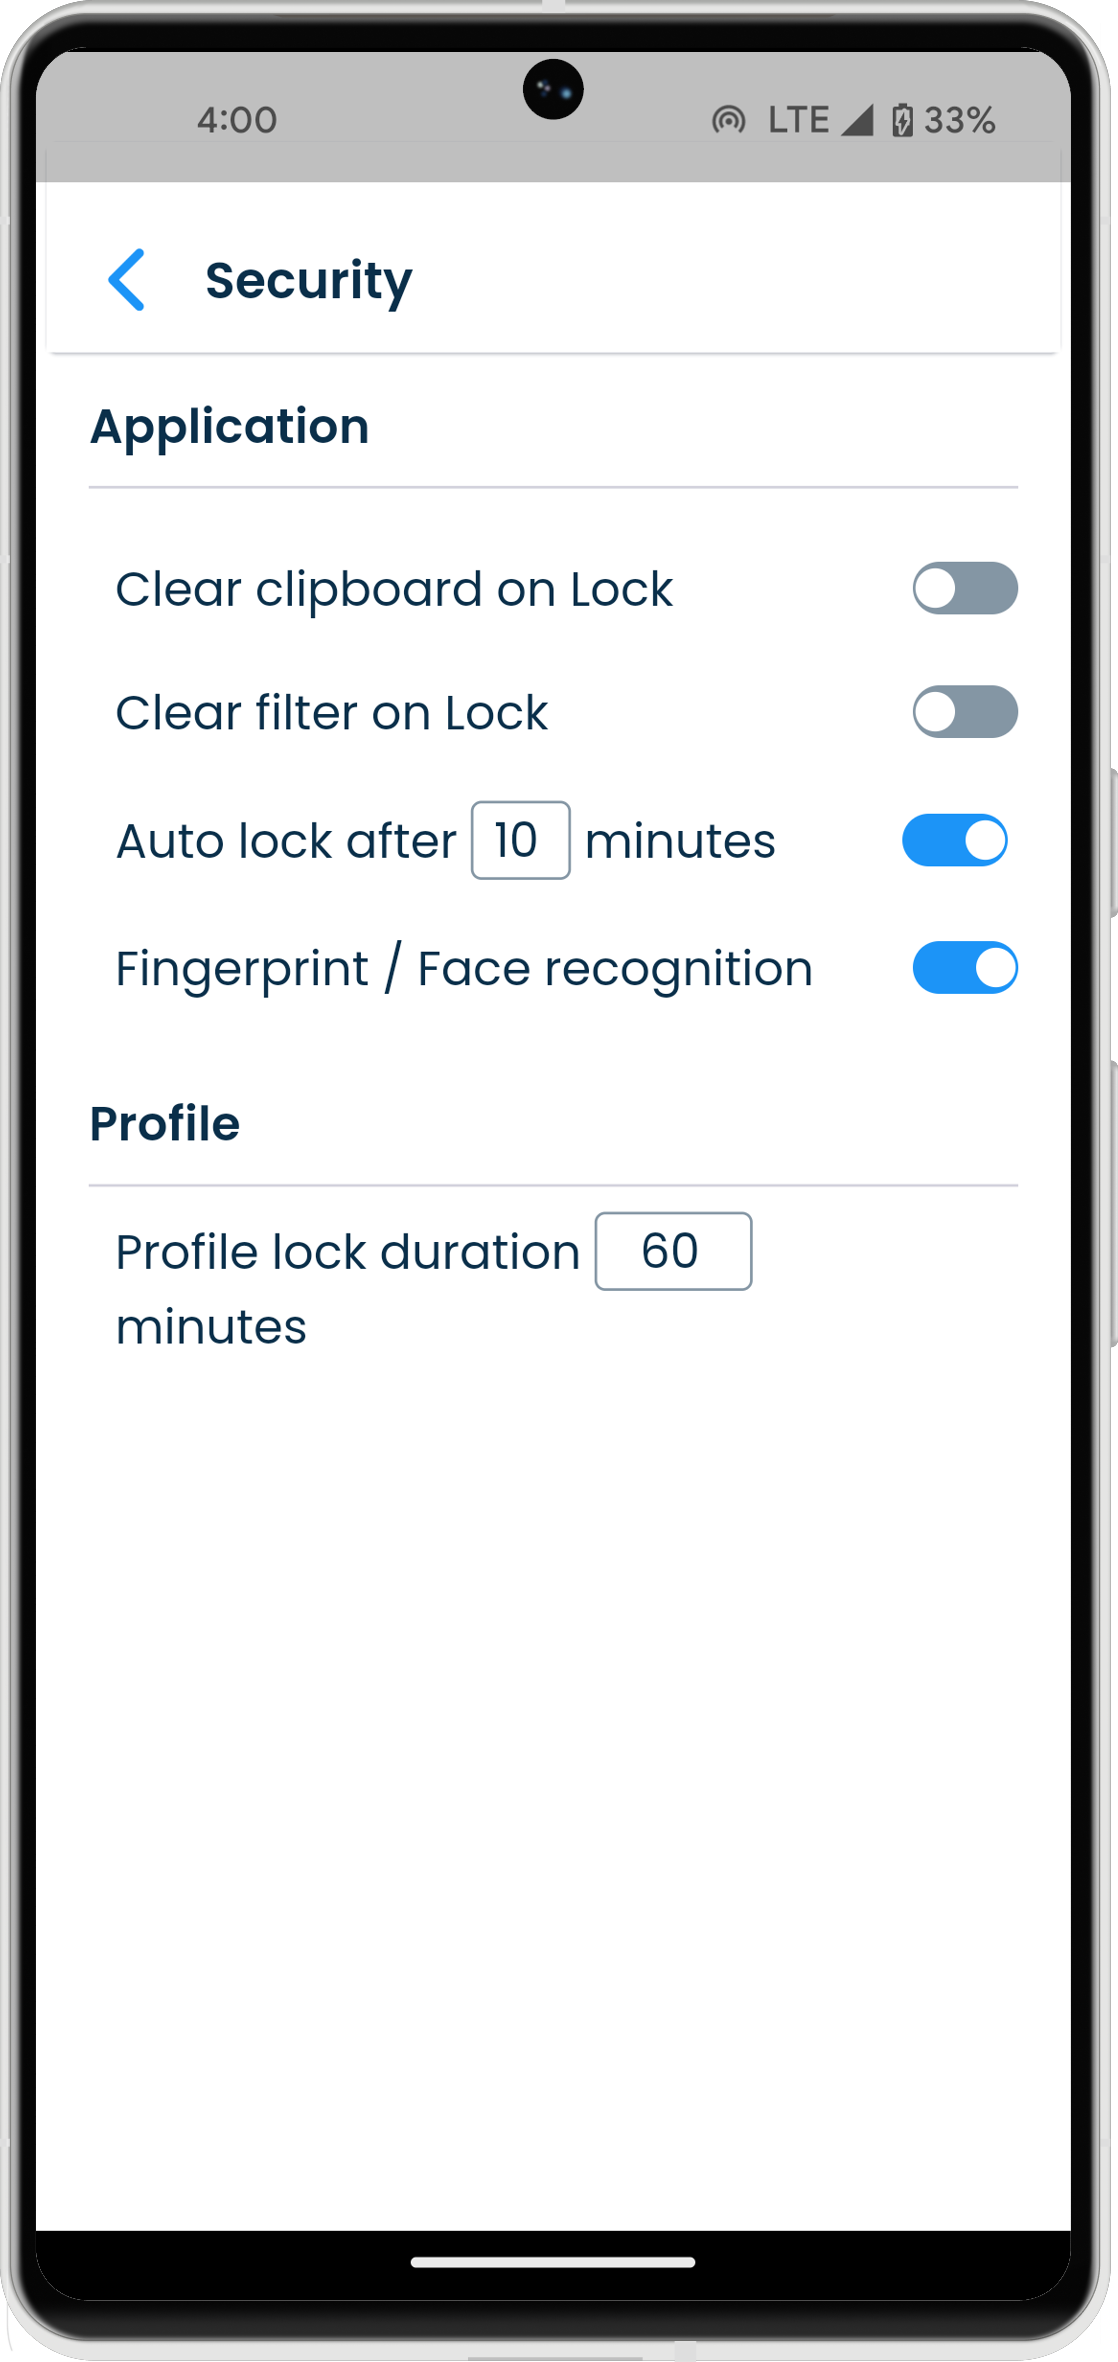
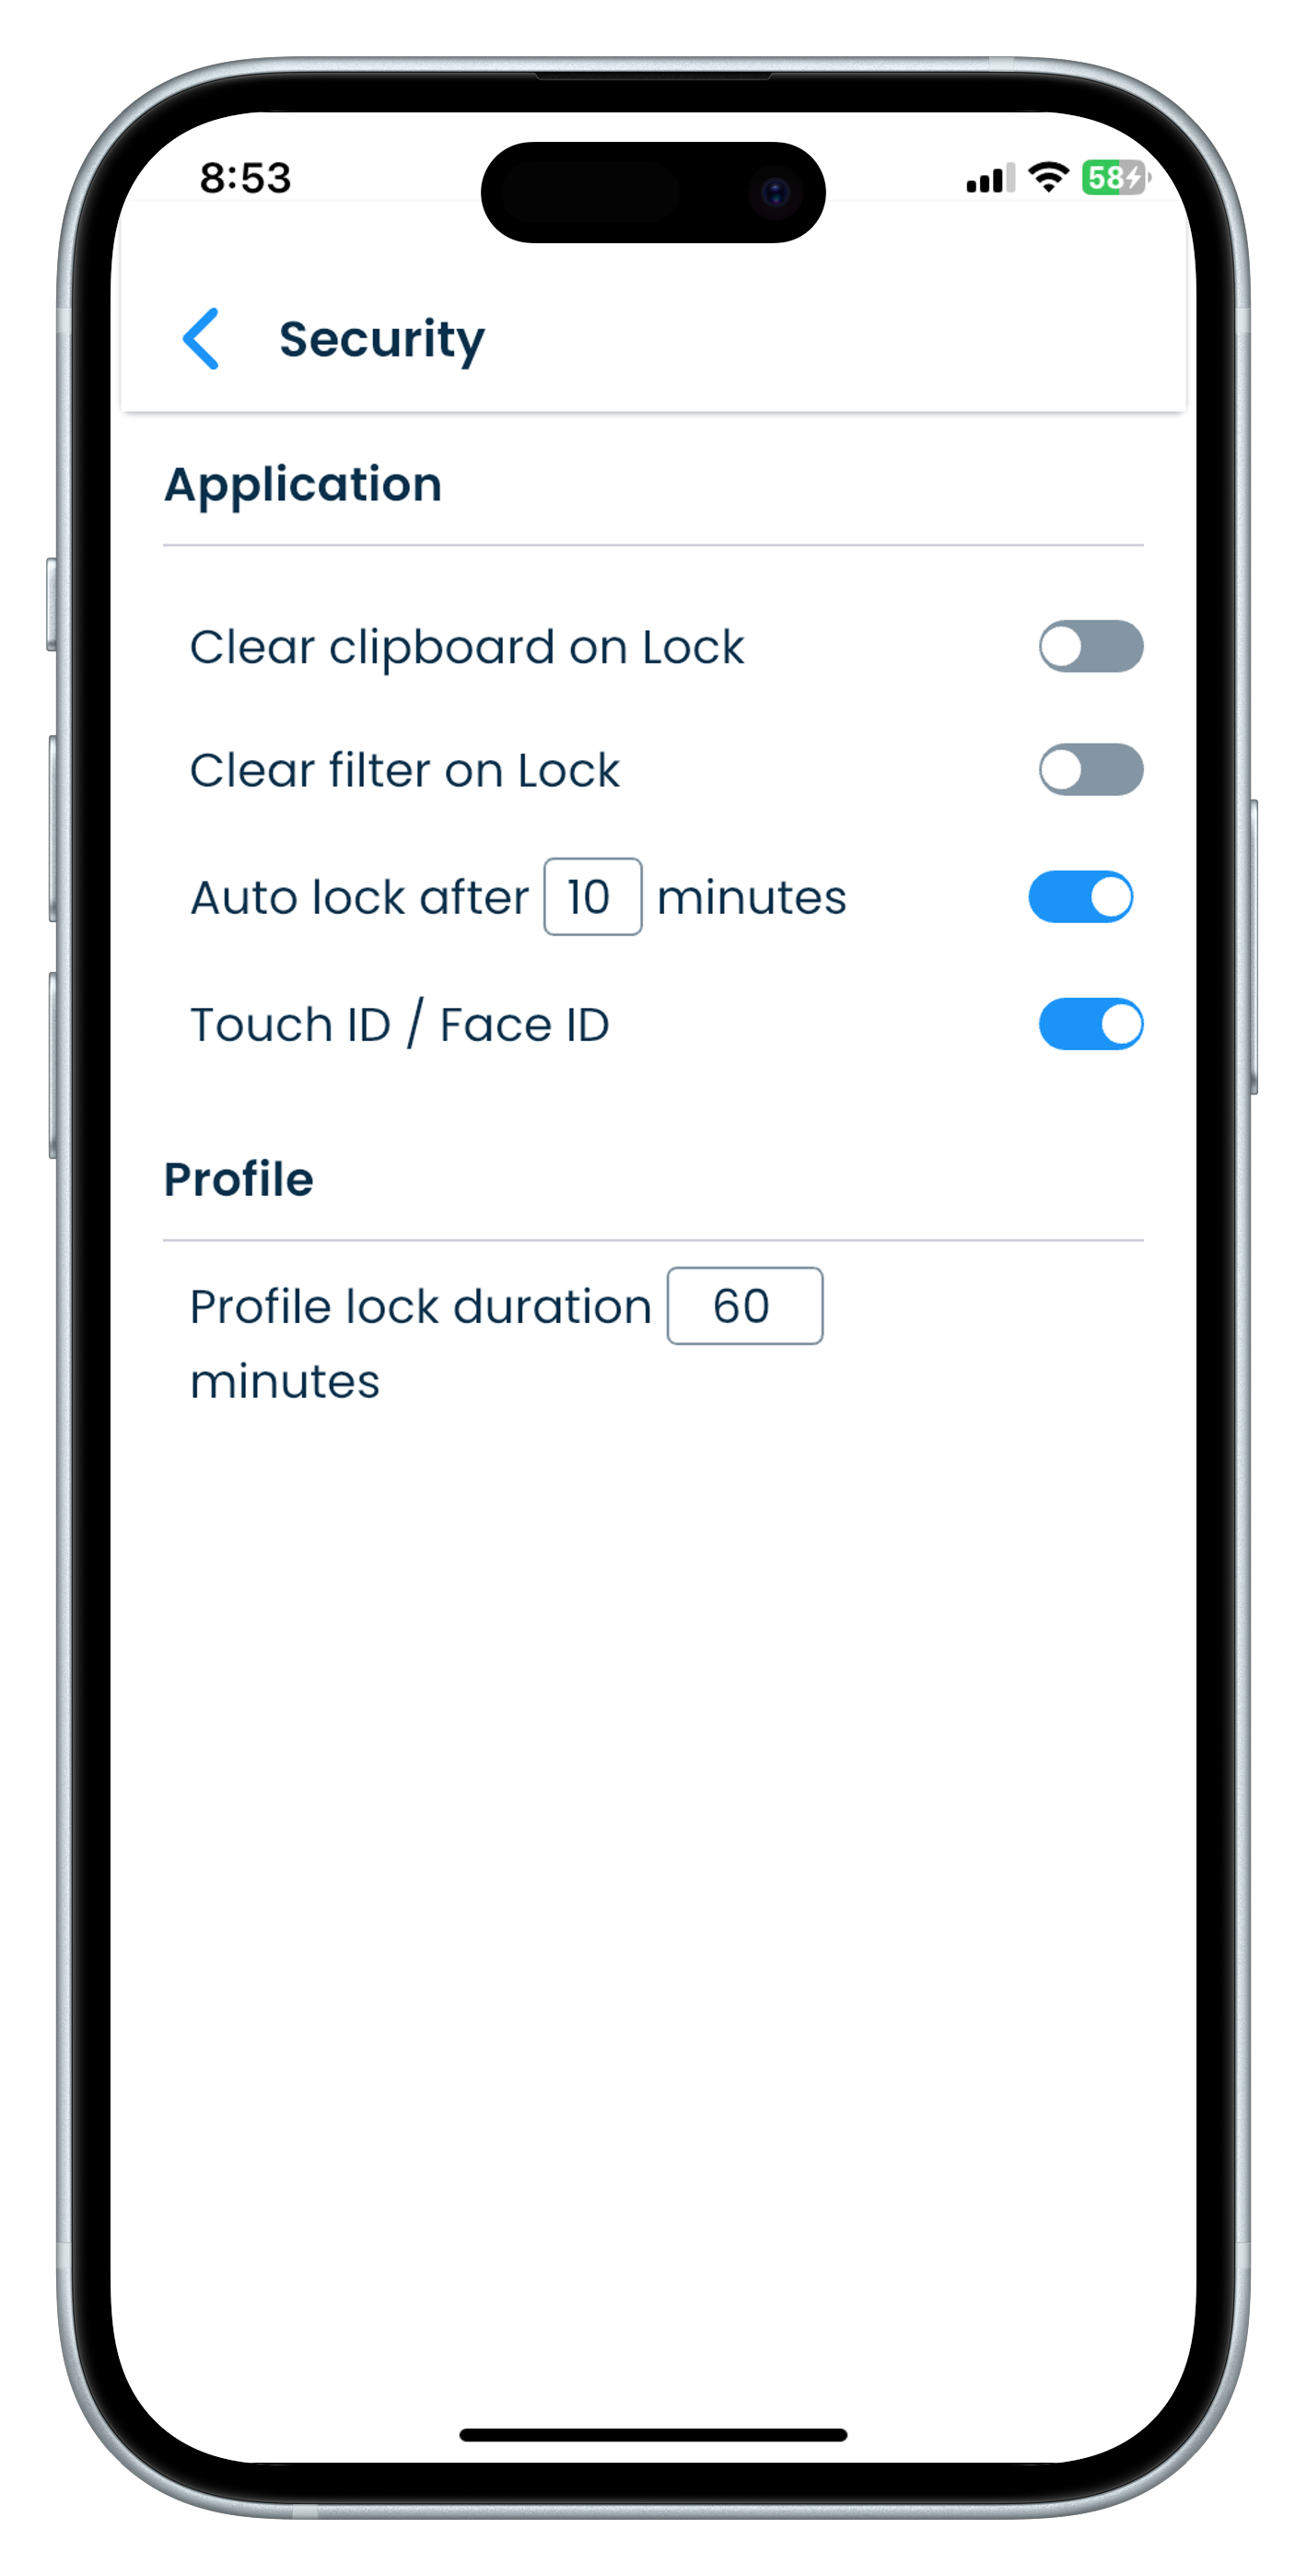
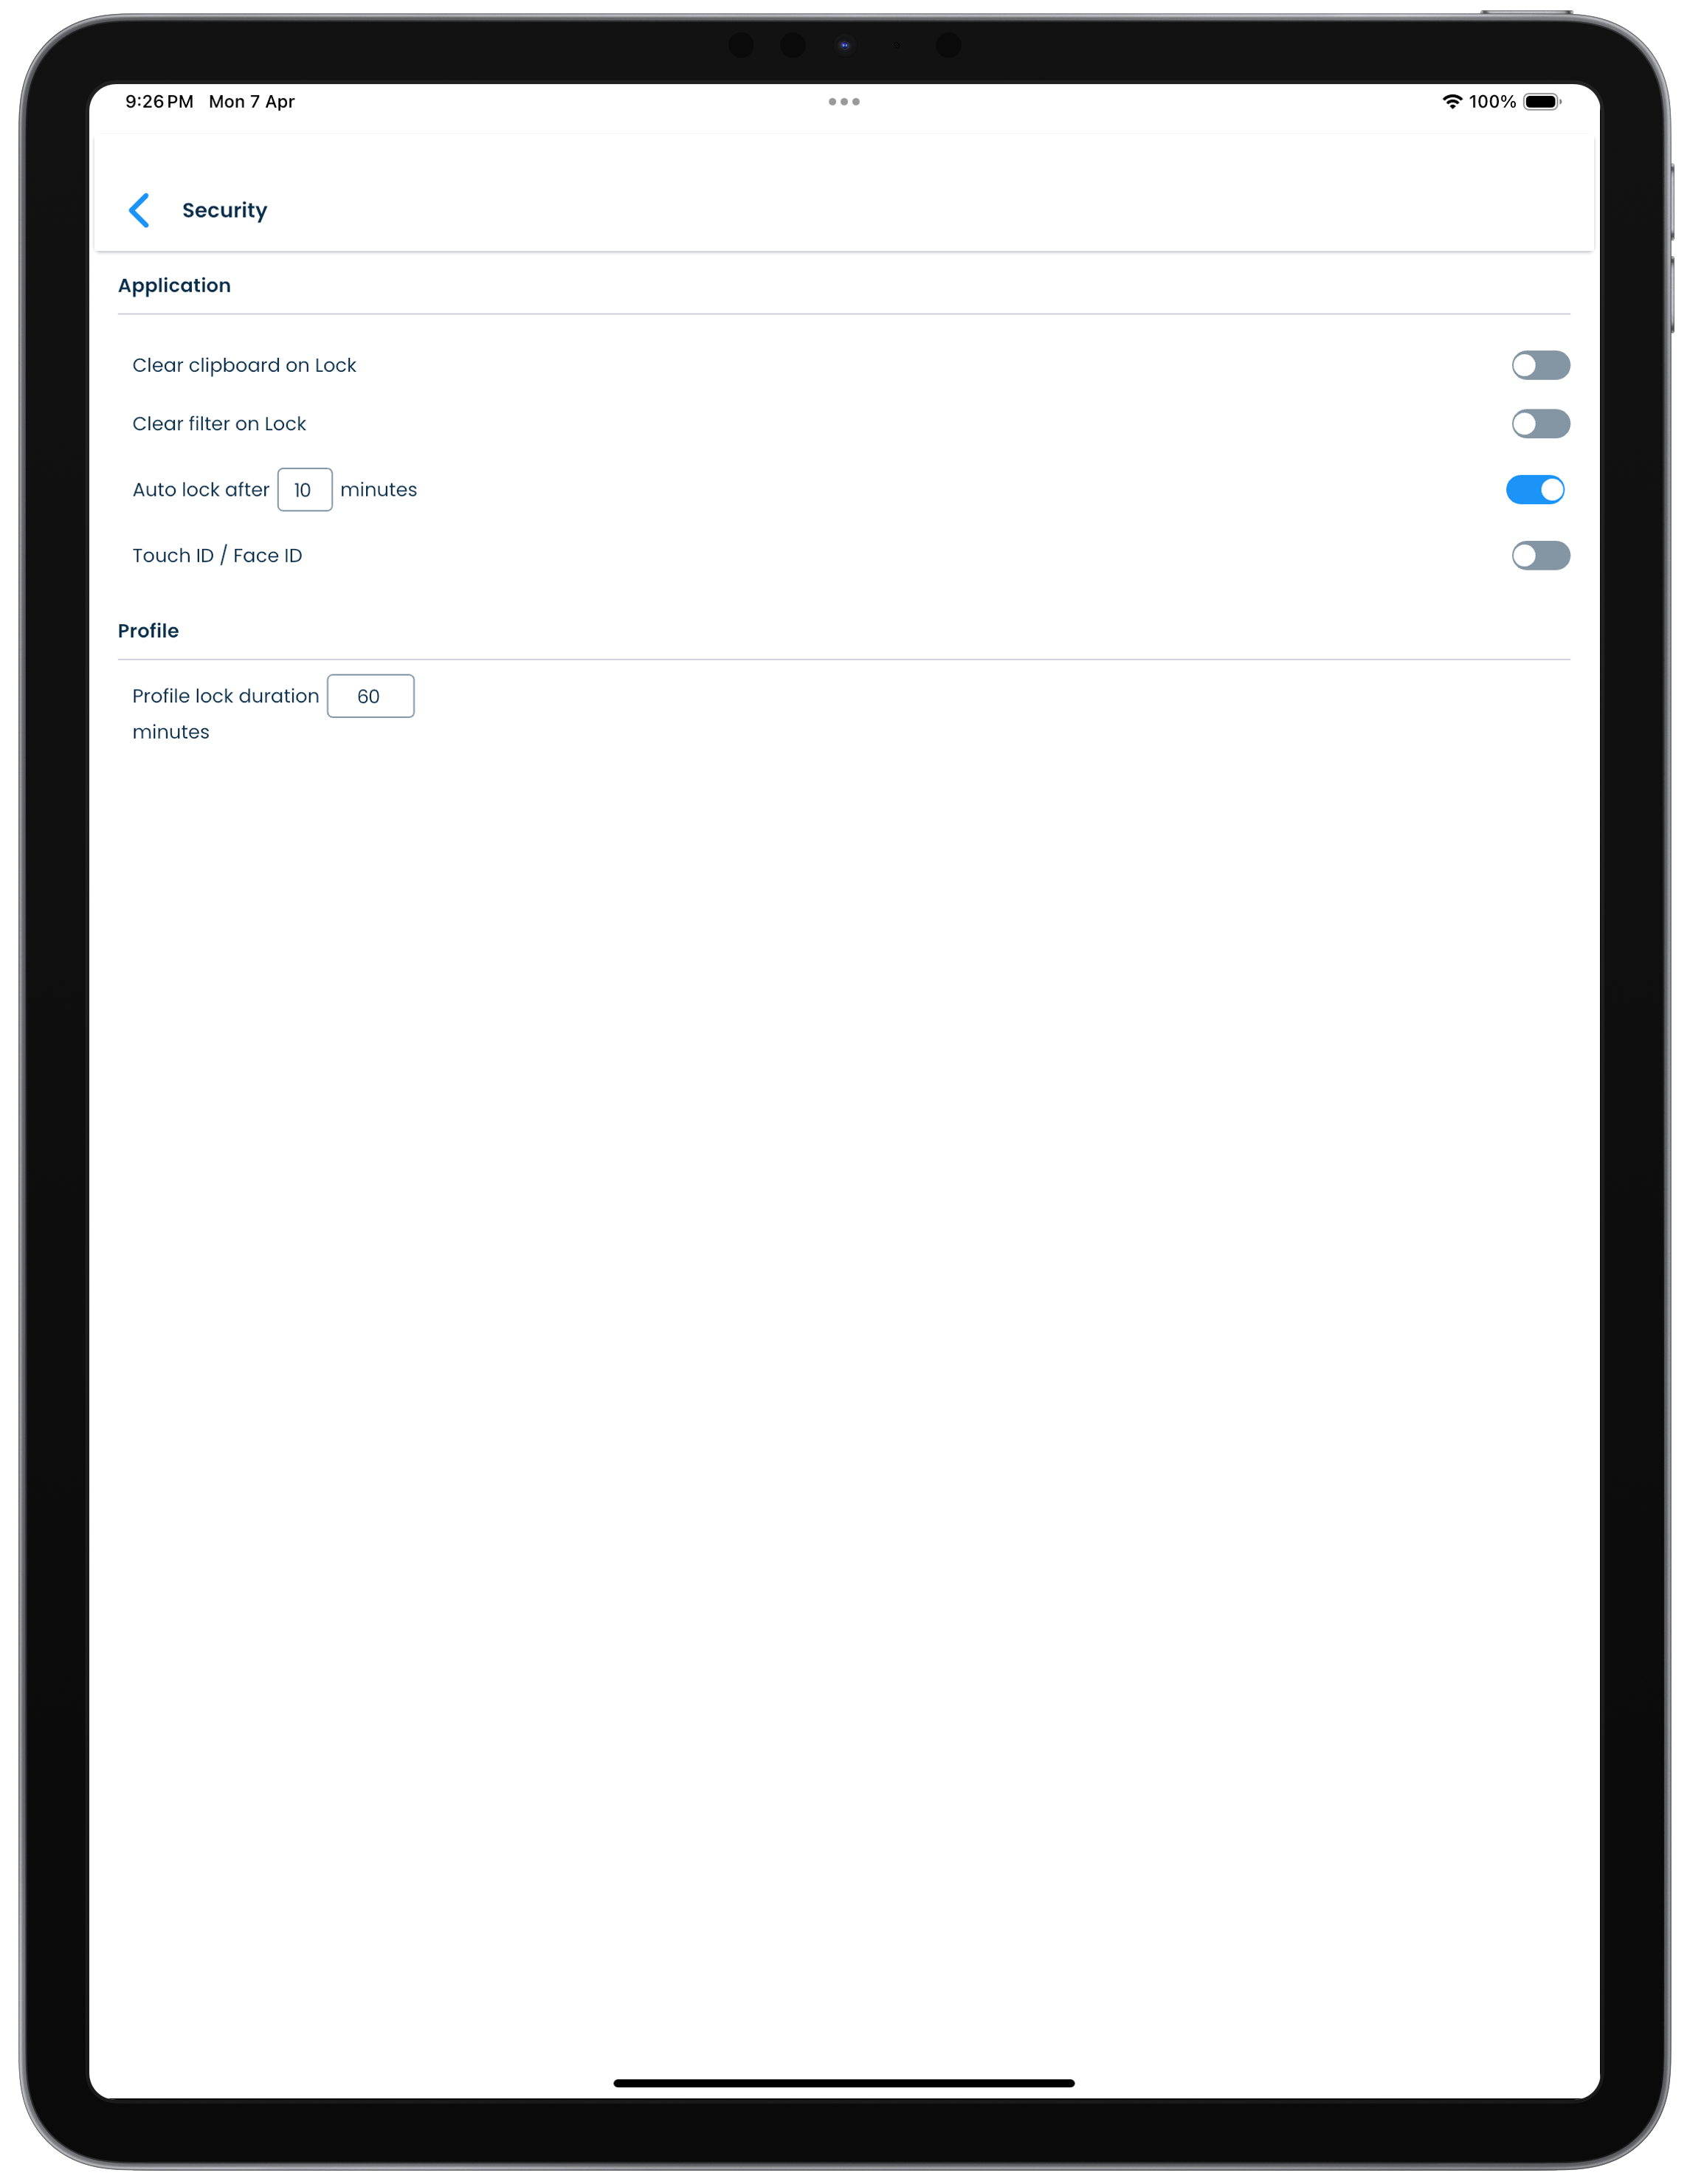
Security
You can secure the application behaviour here.
| Mac | Windows |
|---|---|
 |
 |
| Android | iPhone |
|---|---|
 |
 |
| iPad |
|---|
 |
Setting |
Description |
|---|---|
| Application | |
| Clear clipboard on Lock | Select to wipe out any copied to clipboard content when the application locks. |
| Clear filter on Lock | Select to wipe out any selected record filters when the application gets locked. |
| Auto lock after ___ minutes | Select to setup the application to lock automatically after a preset time interval if there is no activity. Set the inactivity time interval in minutes. The default interval is 10 minutes. |
| Fingerprint or facial recognition setup | Enable the use of the fingerprint or facial recognition feature provided by the device system for unlocking access to the application. |
| Profile | |
| Profile lock duration ___ minutes | Select the time the application should get locked if 10 successive failed unlock attempts are made on your device. Set the profile lock time interval in minutes. The default interval is 60 minutes. The app will automatically unlock after the time you have set. If you want to unlock it earlier, then you can use your recorvery kit to unlock the app. |
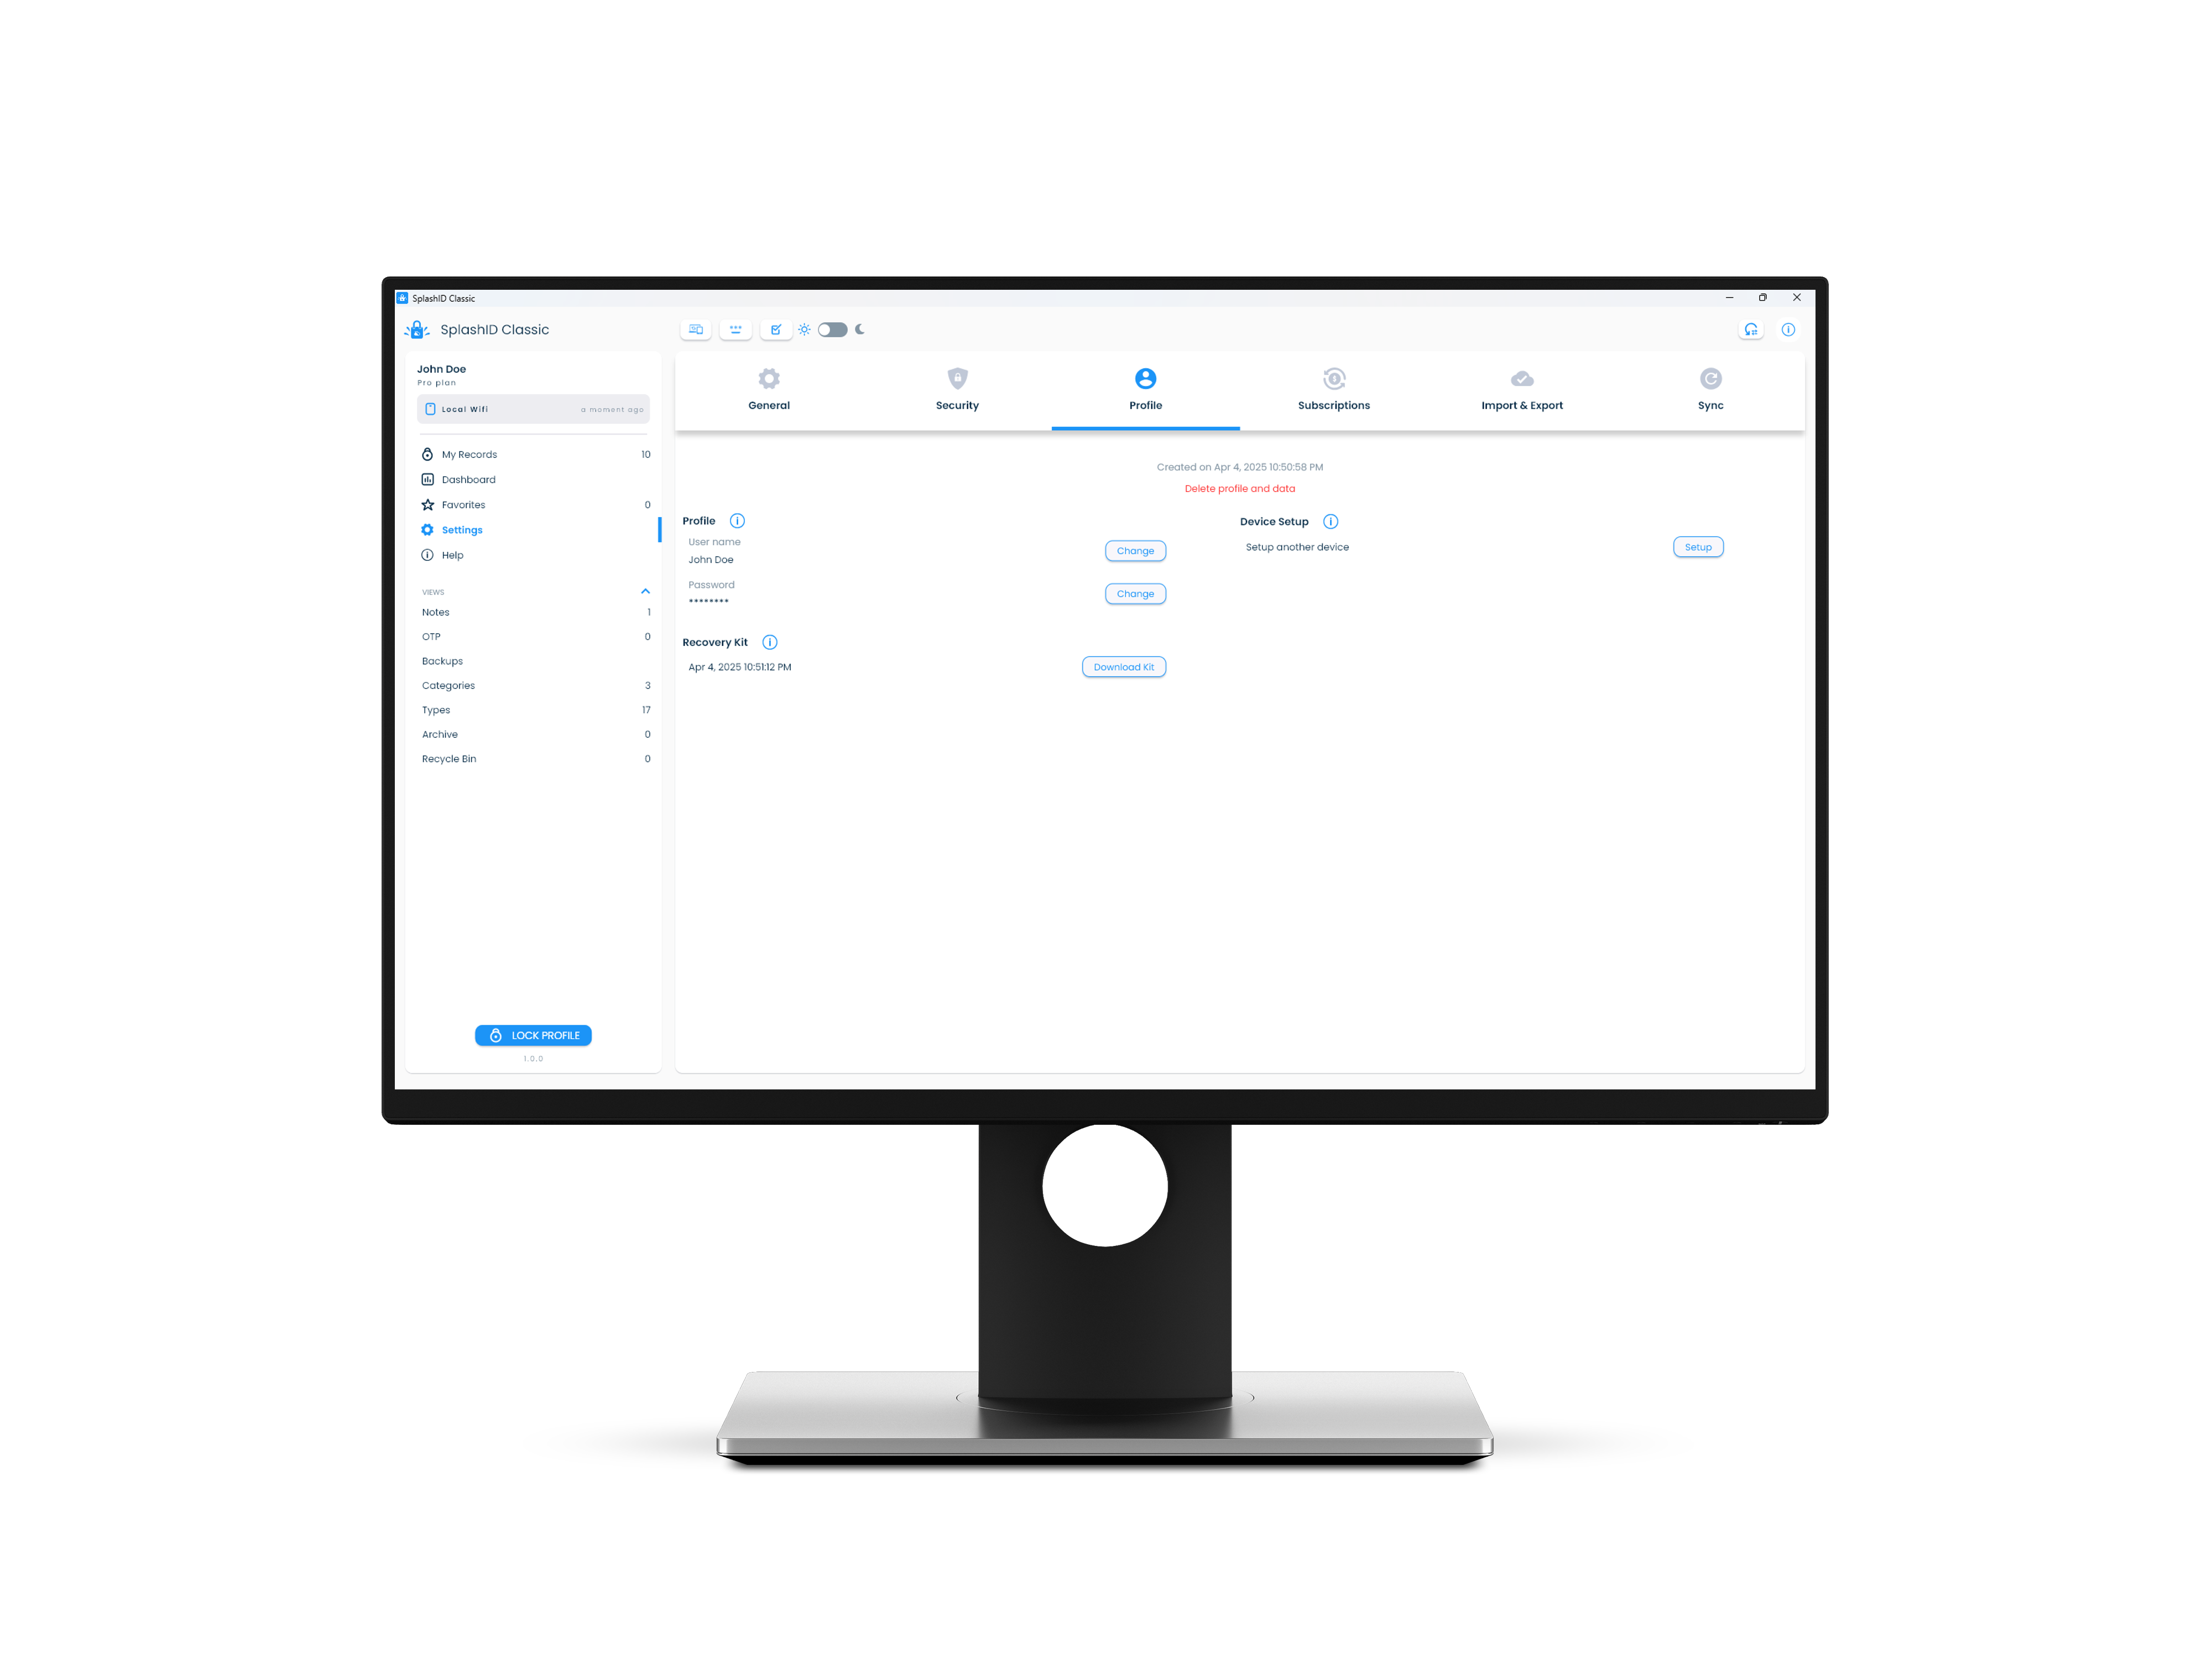
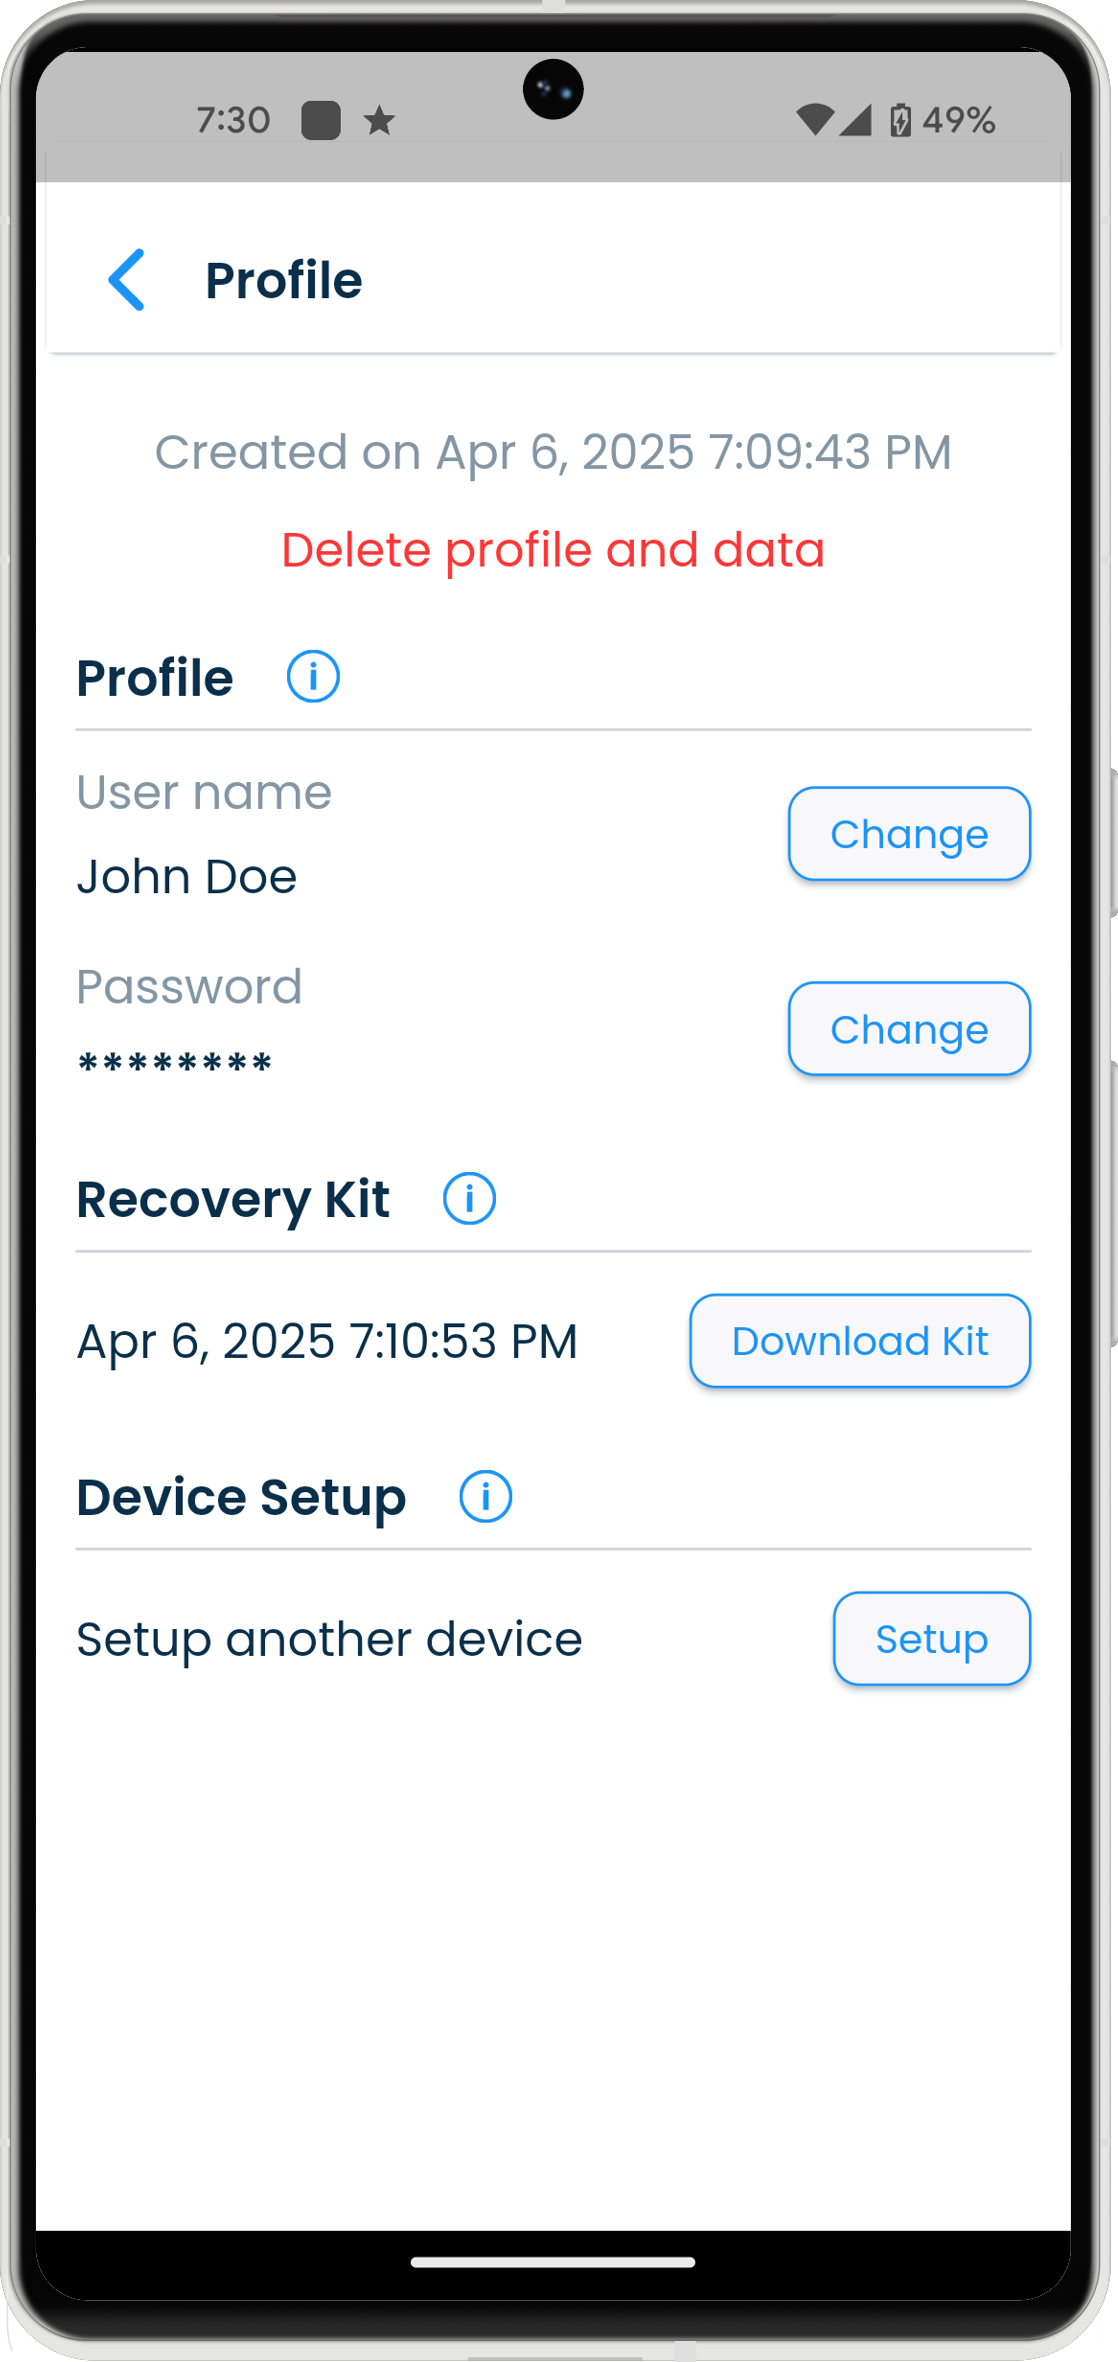
Profile
Settings specific to a users profile are handled here.
| Mac | Windows |
|---|---|
 |
|
| Android | iPhone |
|---|---|
|
|
| iPad |
|---|
|
Setting |
Description |
|---|---|
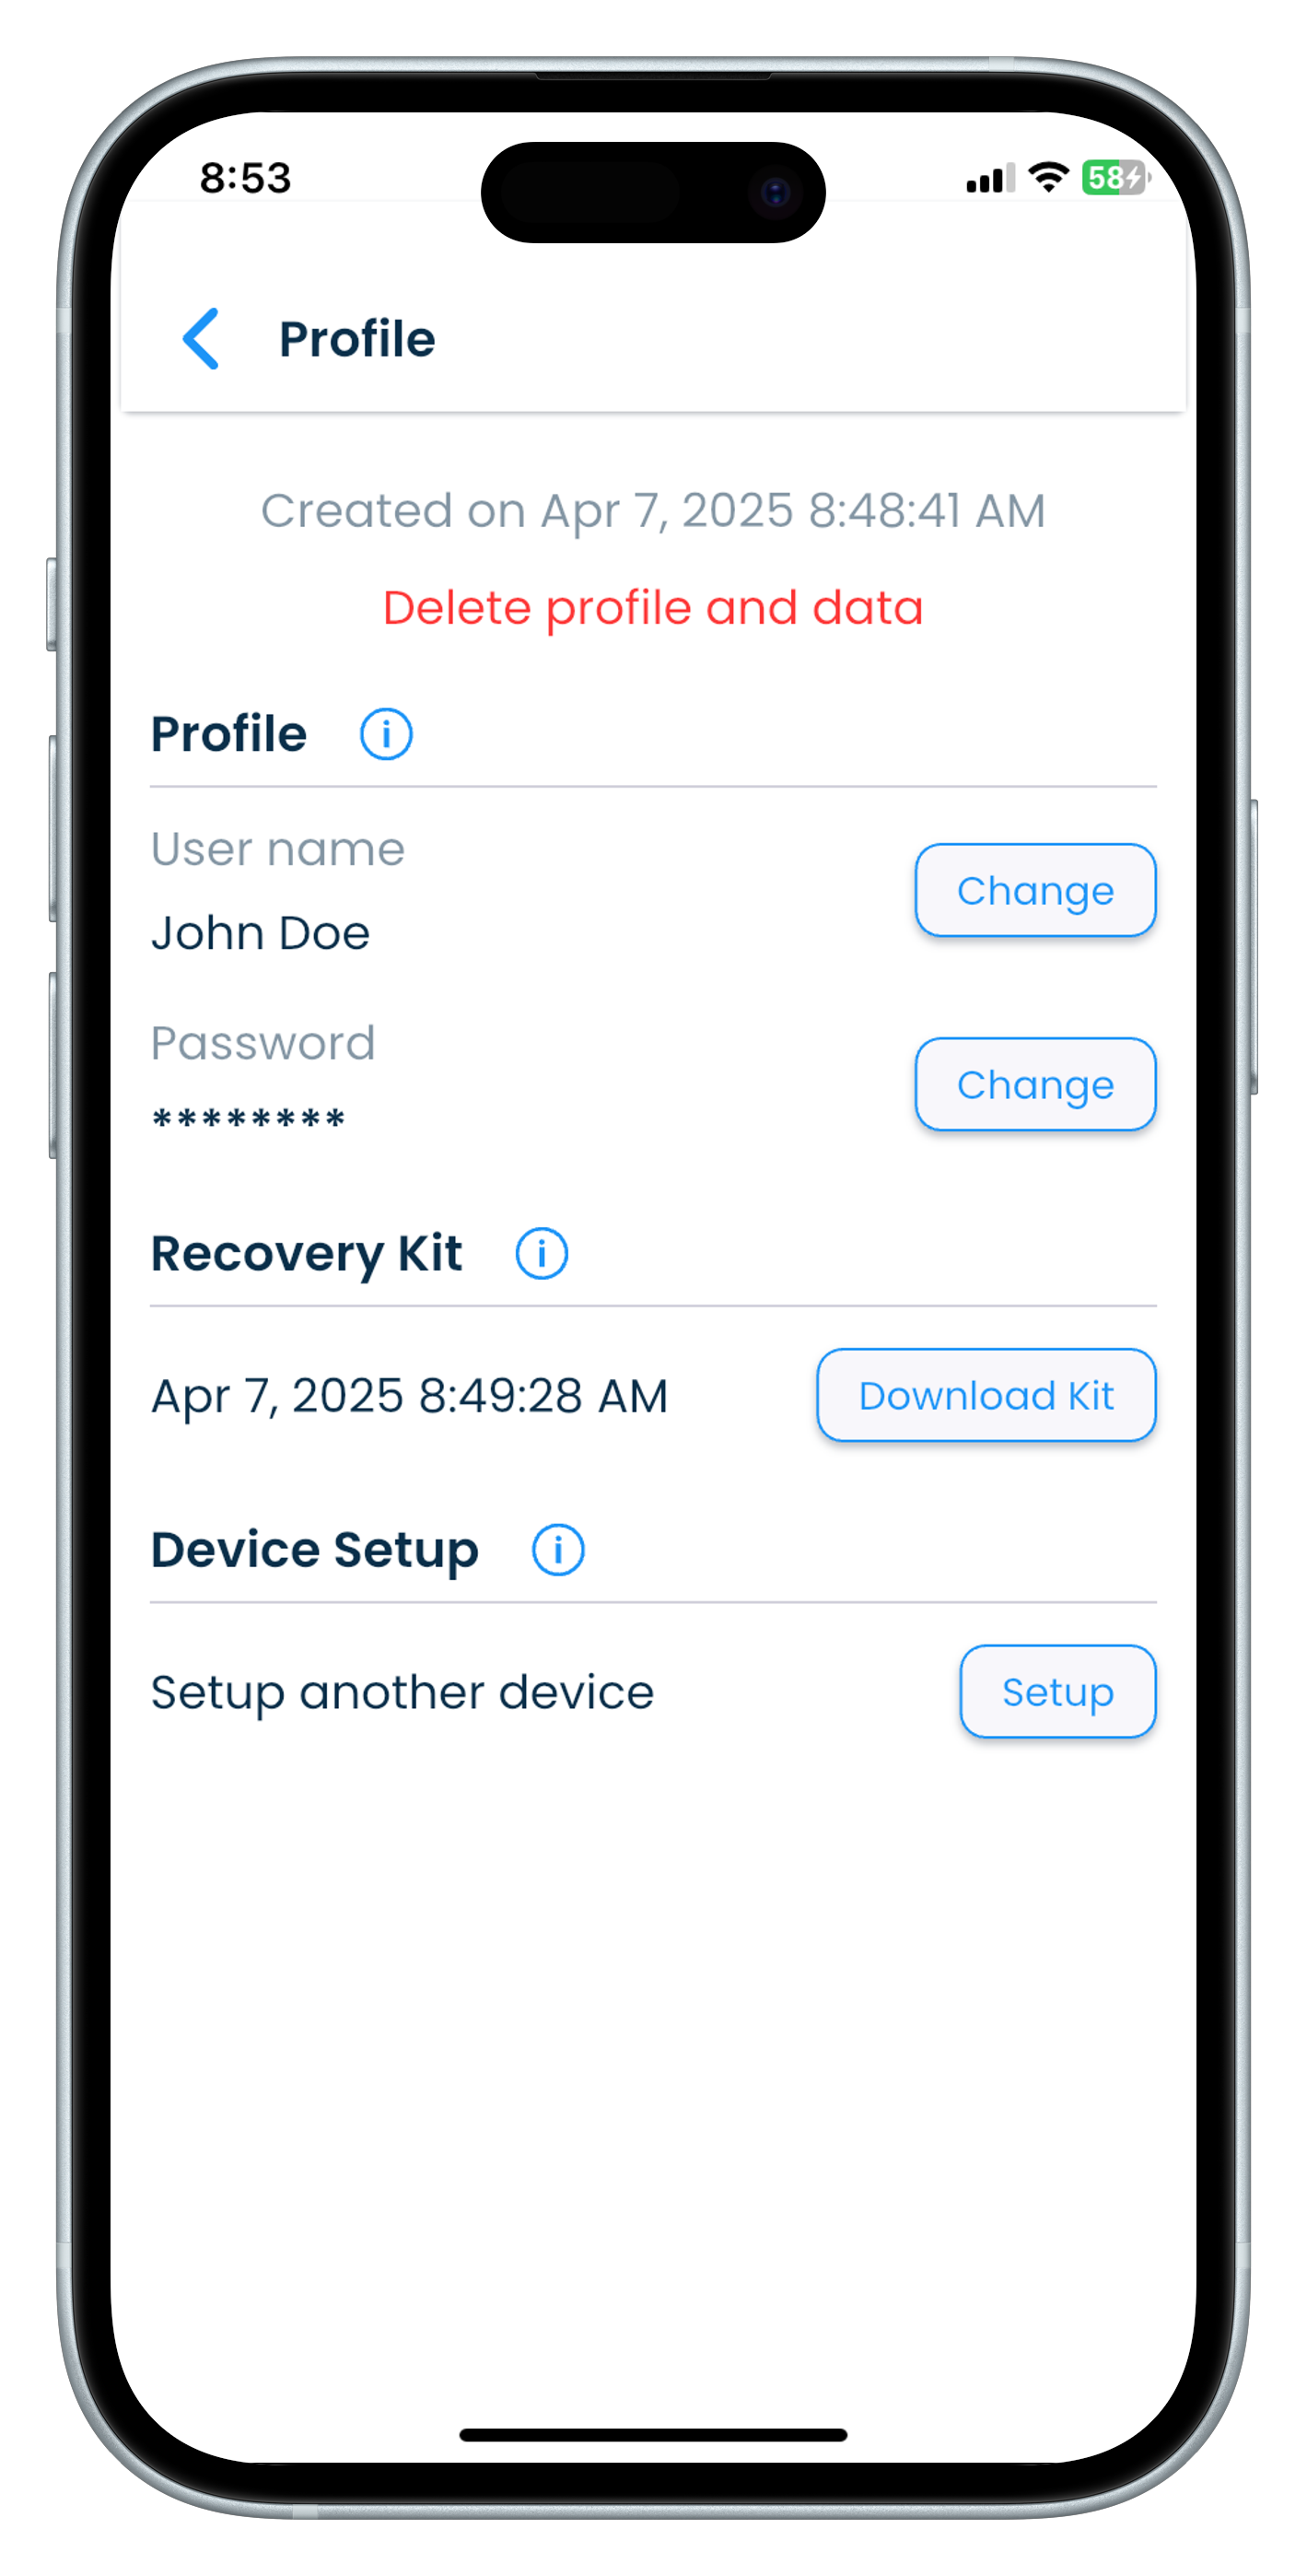
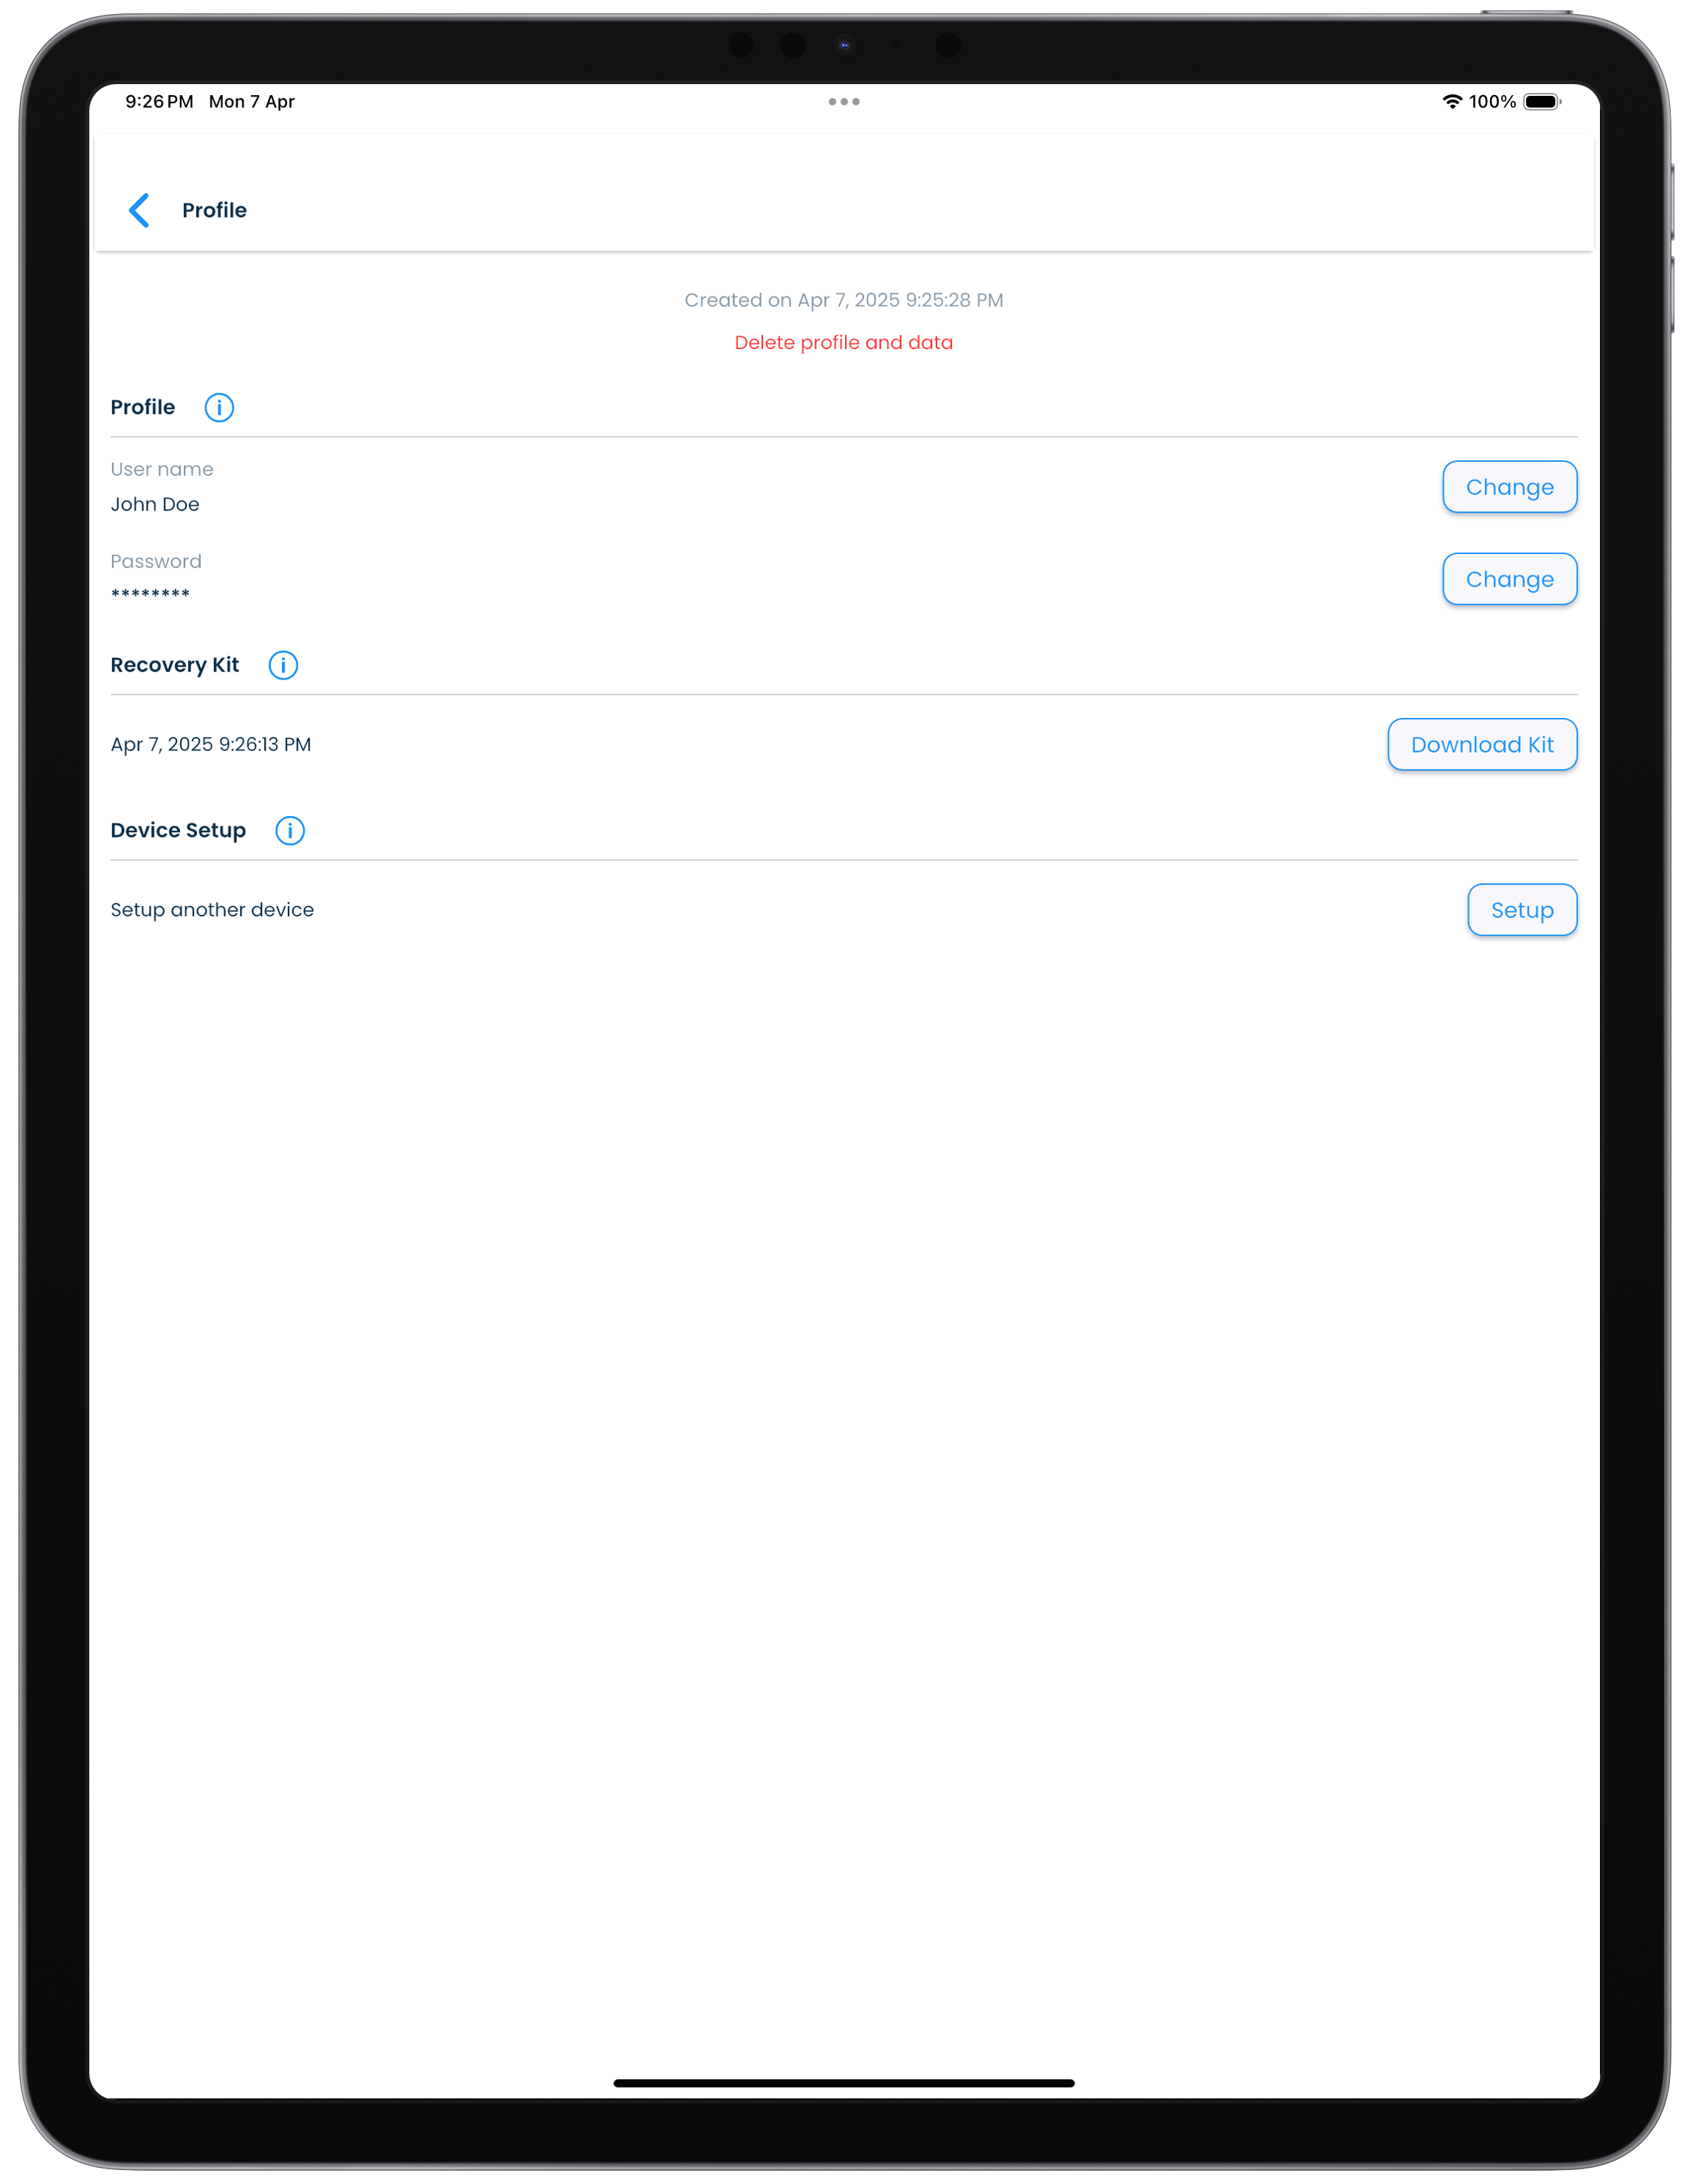
| Delete profile and data | Click or tap on the Delete profile and data link if you want to remove your profile and/or any of your data. After verifying your master password, you will have a choice of removing everything, only your data or only your stale invisible data from the device. If you want to remove everything then select the Everything on the device option and proceed. This will delete all the data and bring you to the initial profile setup screen. |
| Profile | |
| Change User name | Click or tap on the Change link to edit and change the name you want for your profile. |
| Change password | Click or tap on the Change link to edit and change the master password for your profile on the device. |
| Recovery Kit | |
| Download recovery kit | Click or tap on the Download Kit button to generate and download a recovery kit for your profile. The time displayed here is that of the latest recovery kit that you had downloaded aross your devices that had synced. |
| Device Setup | |
| Setup another device | Click or tap on the Setup button to set up SplashID Classic on another device with the same profile as on this device. Follow the instructions given on the displayed screen to proceed with the profile setup on your other device. This will setup your other device with the same master password, sync type, recovery kit details and profile information. |
Delete profile and data
The existing profile and data can be removed by using this feature. Click or tap on the Delete profile and data link to start the removal of your profile and/or data.
The options you can choose from for the deletion are
Option |
Description |
|---|---|
| Everything on this device | All your data on this device will be removed. This includes your profile, records data, trusted device data and all local backups. |
| My data only | This will delete your records and any types or categories that you added or modified. The profile and trusted devices data will be retained. |
| Stale data | Any data that is not used by the app and the deleted records data can be cleared using this option. This can be used to potentially improve the app performance on your device. |
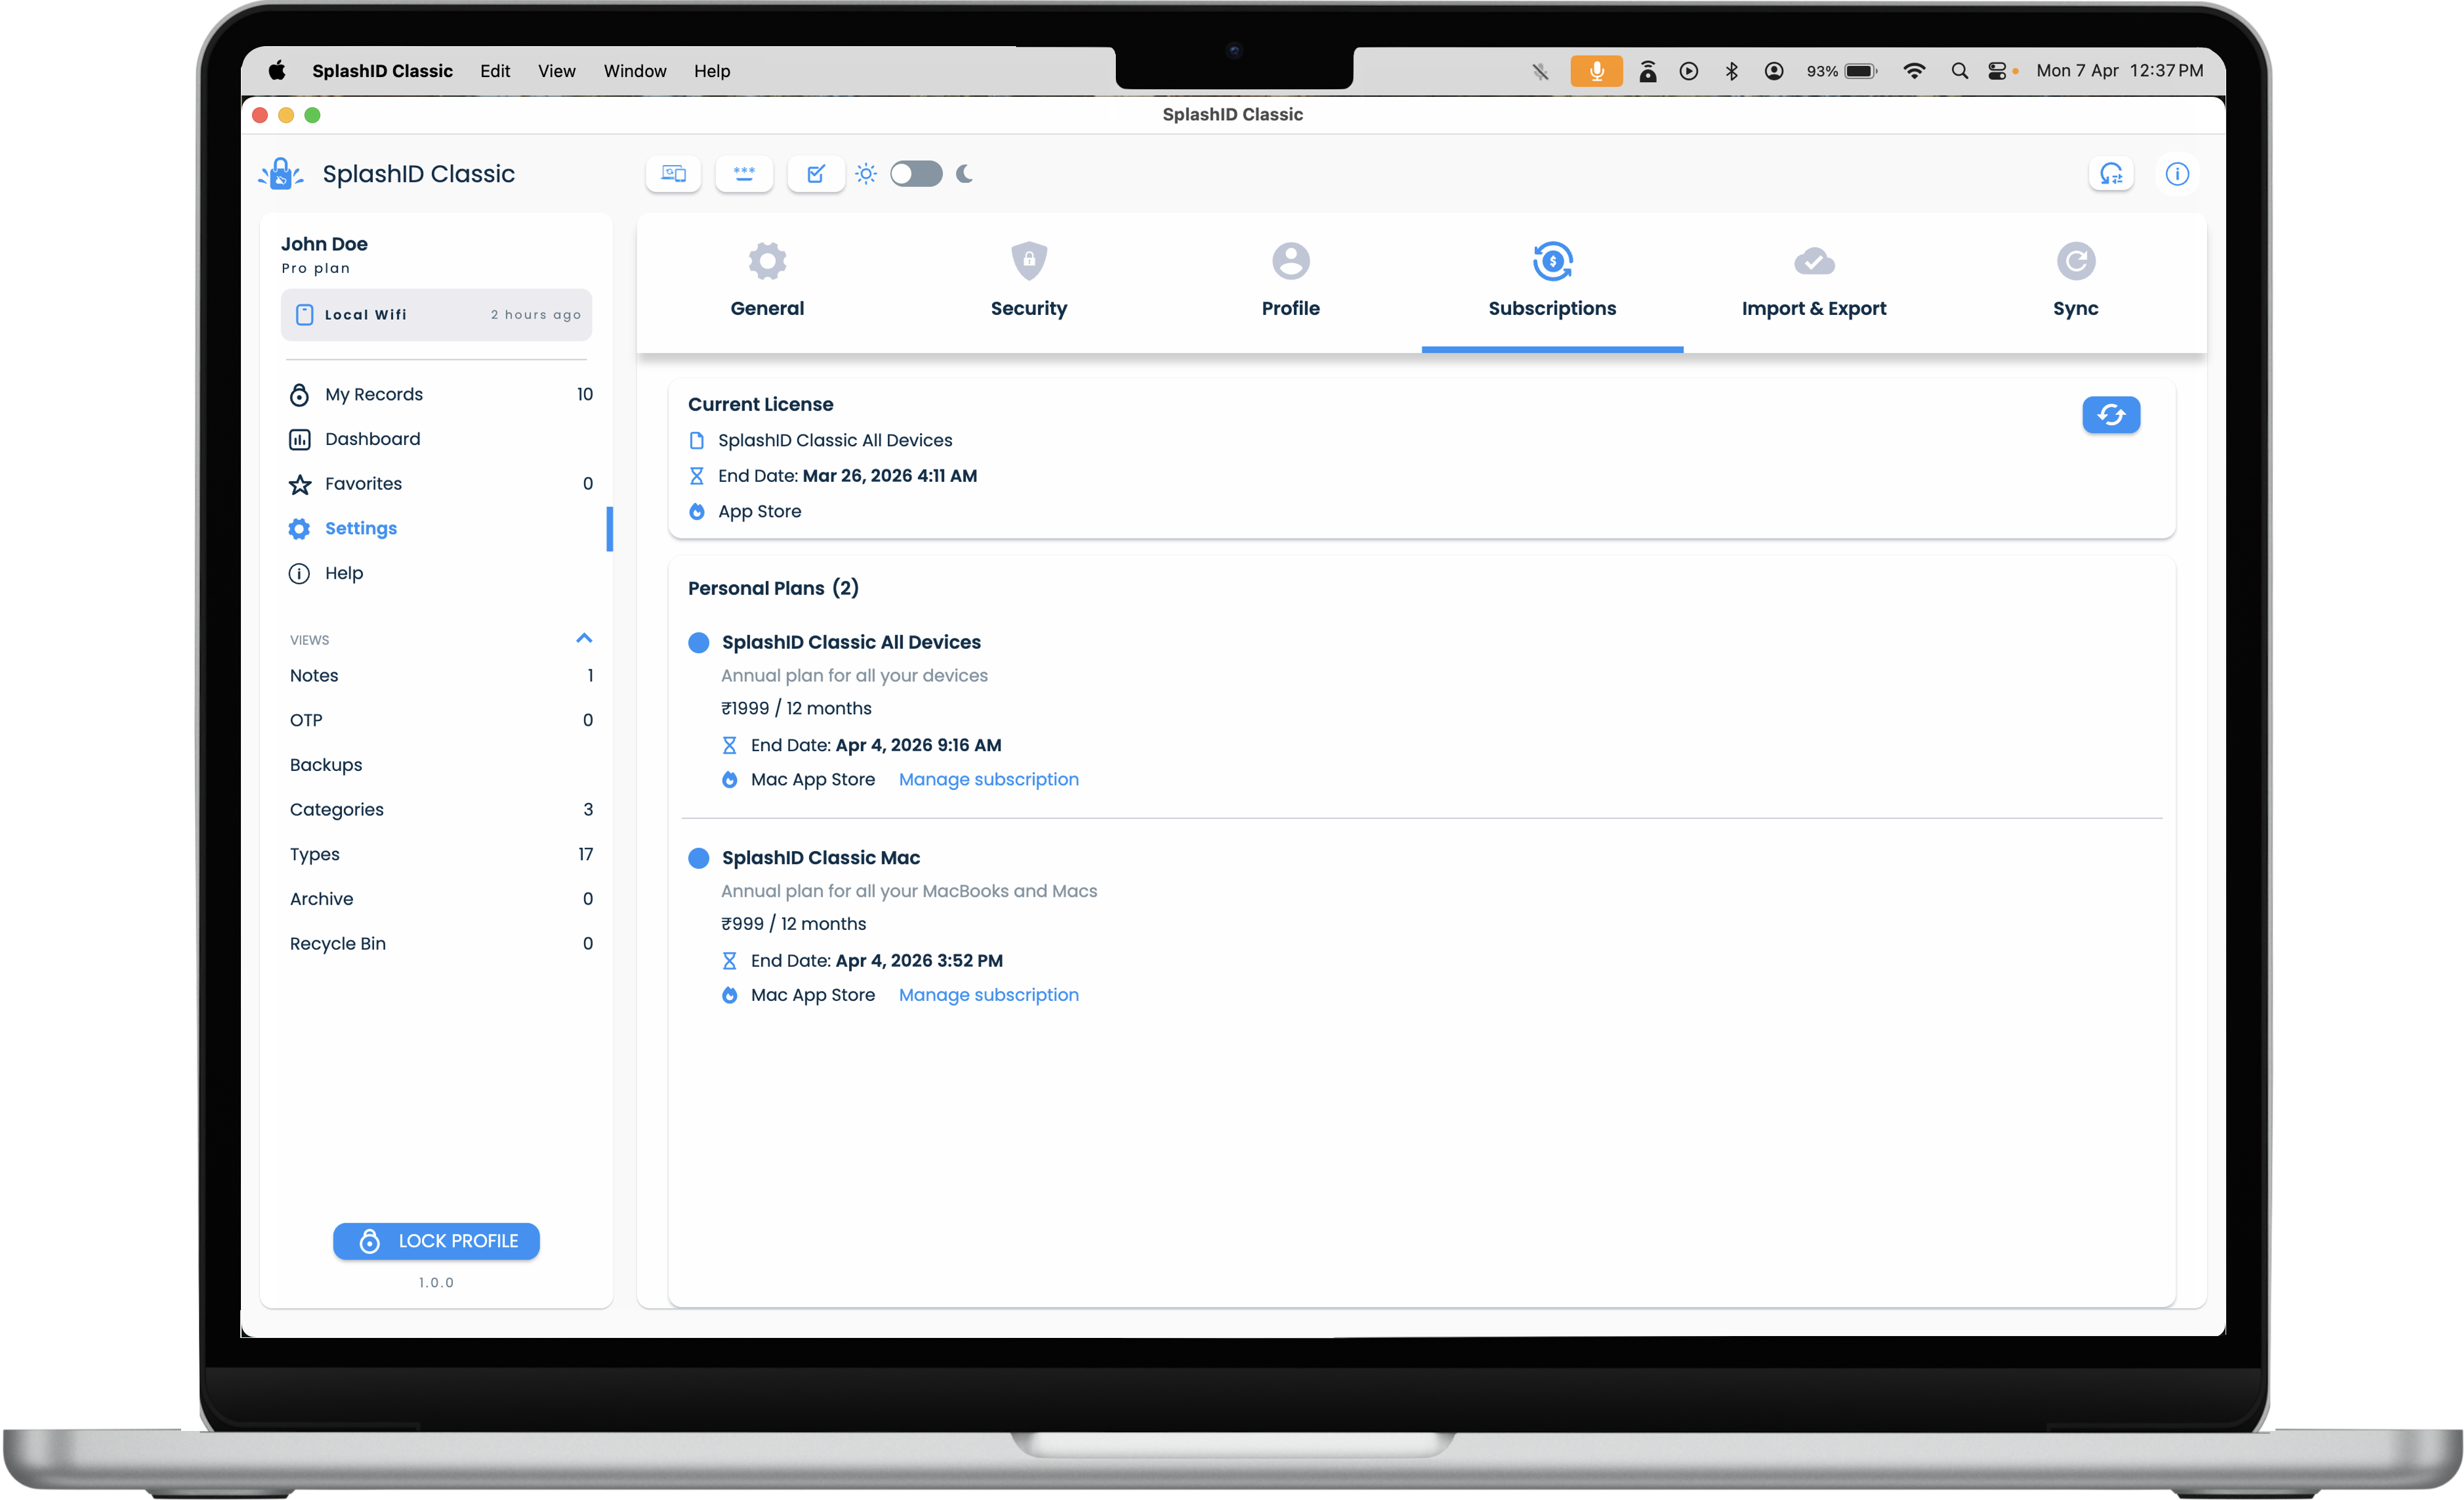
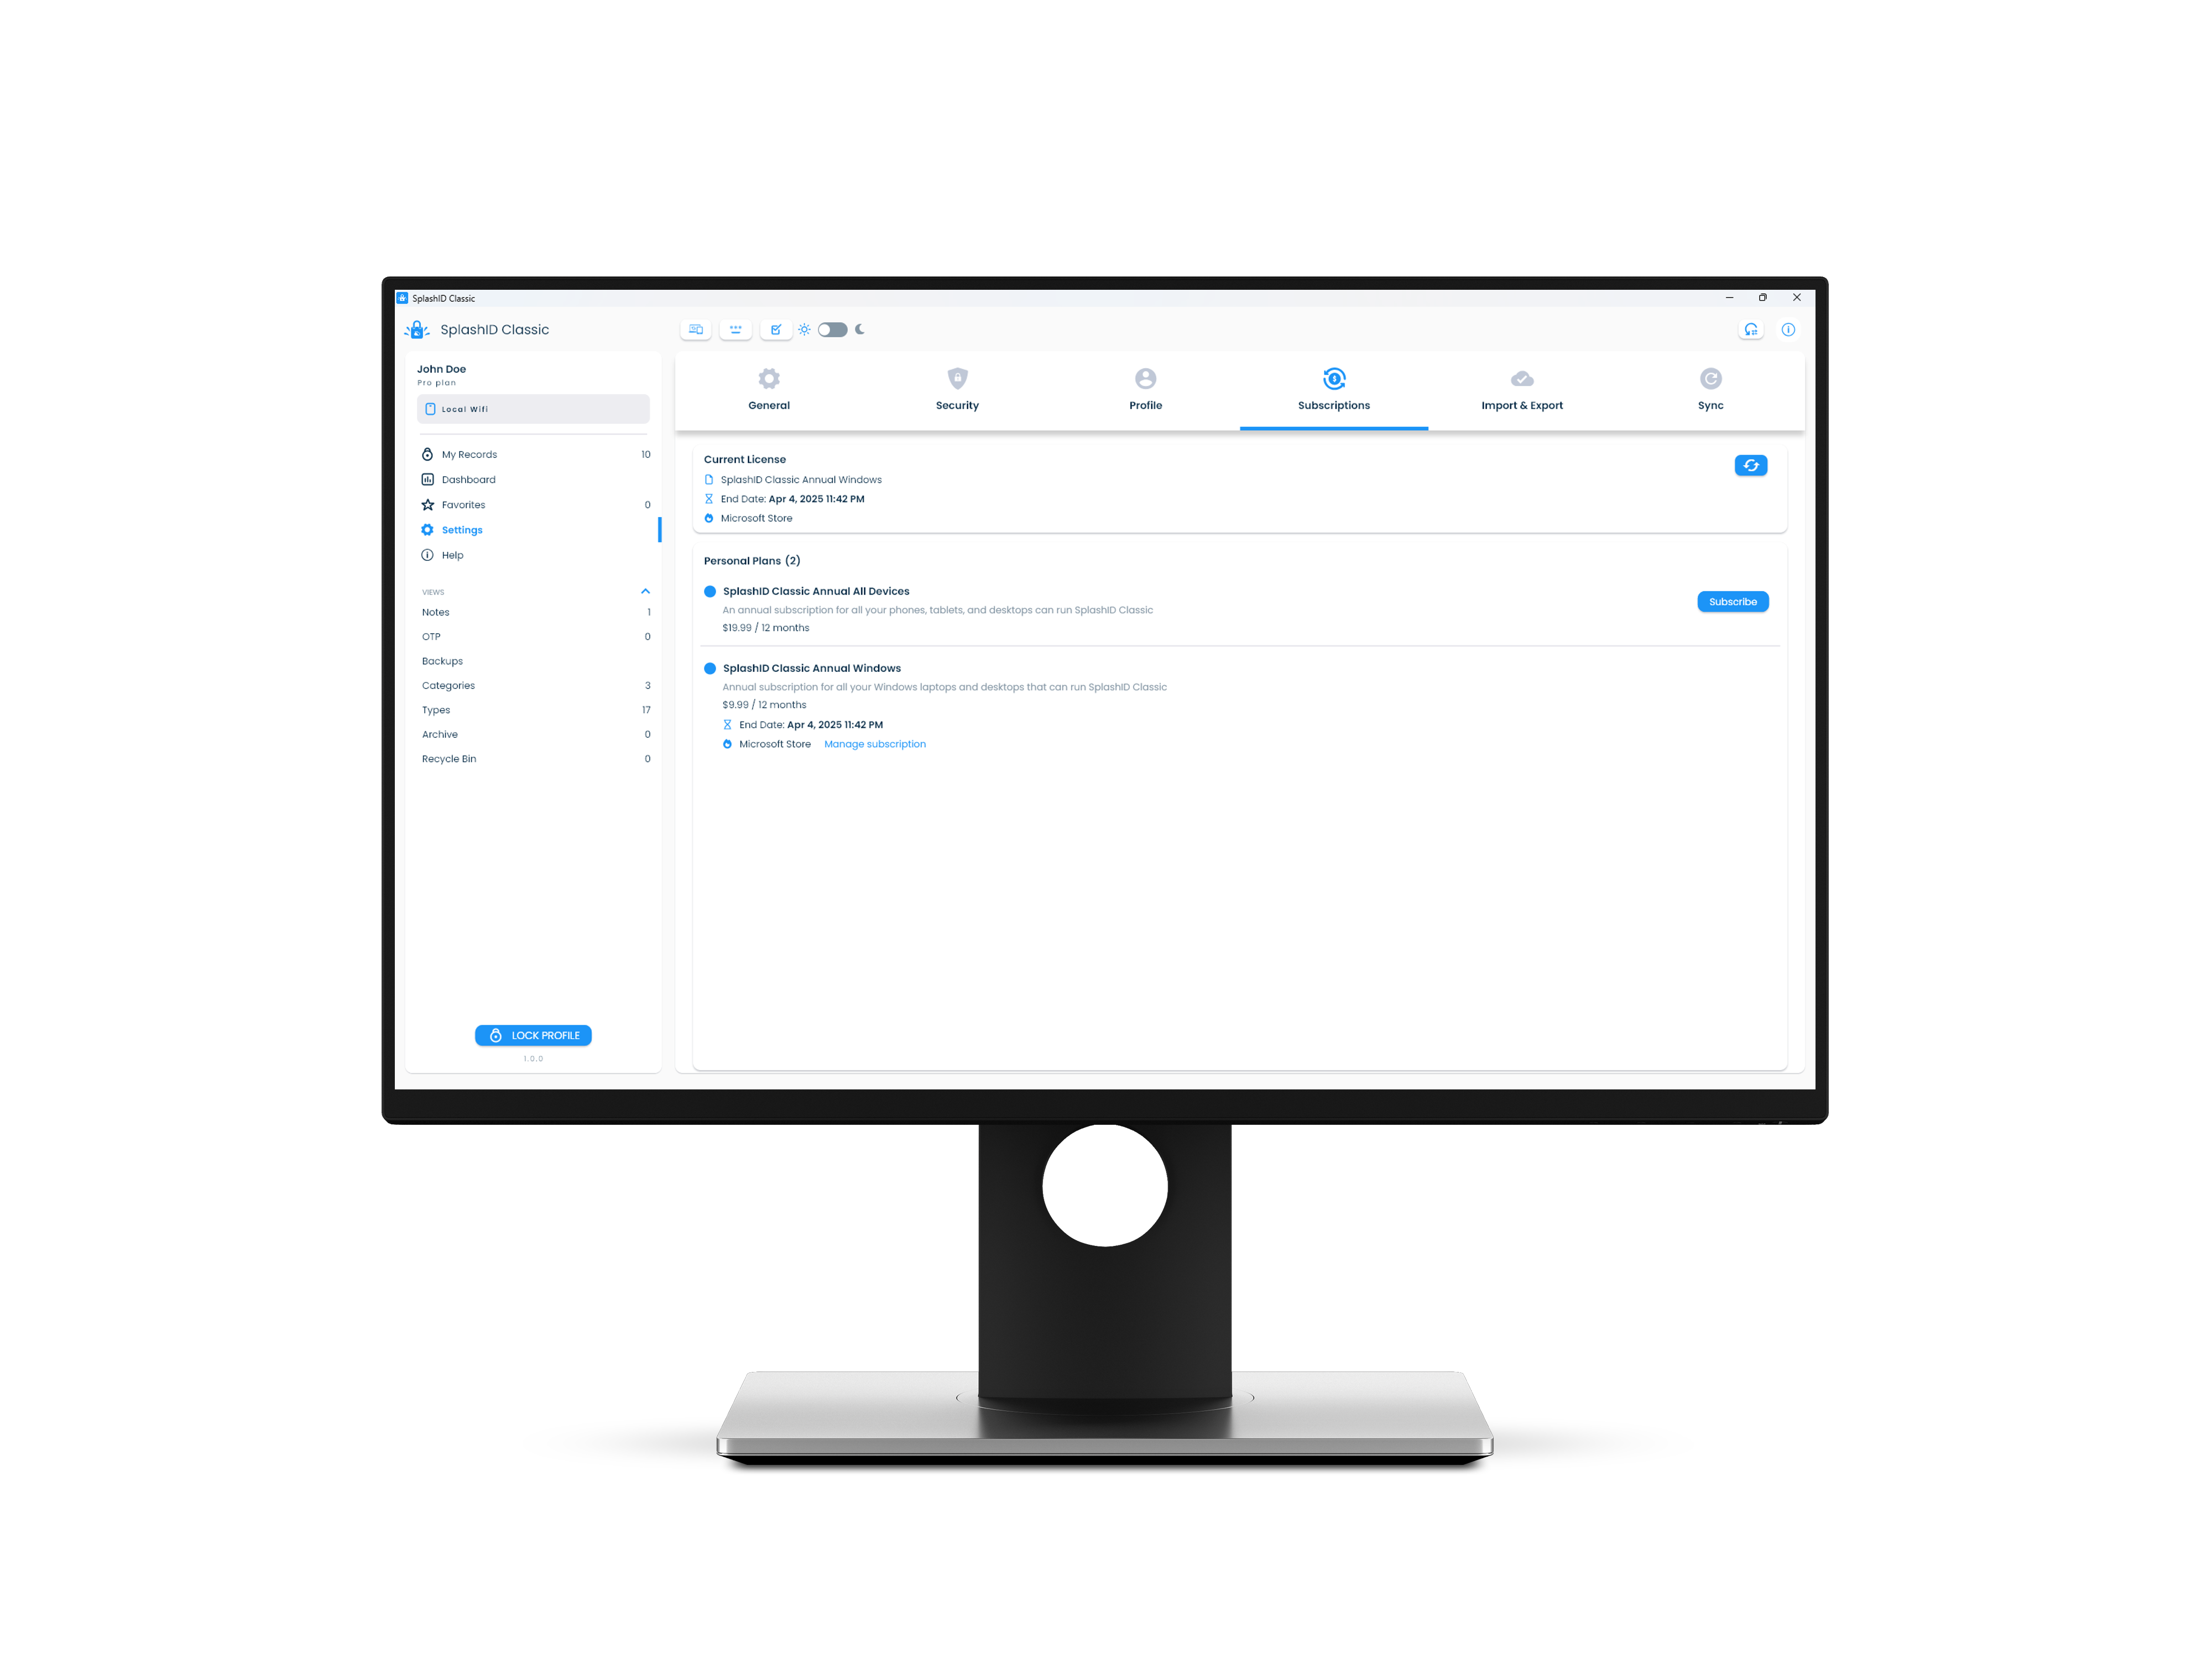
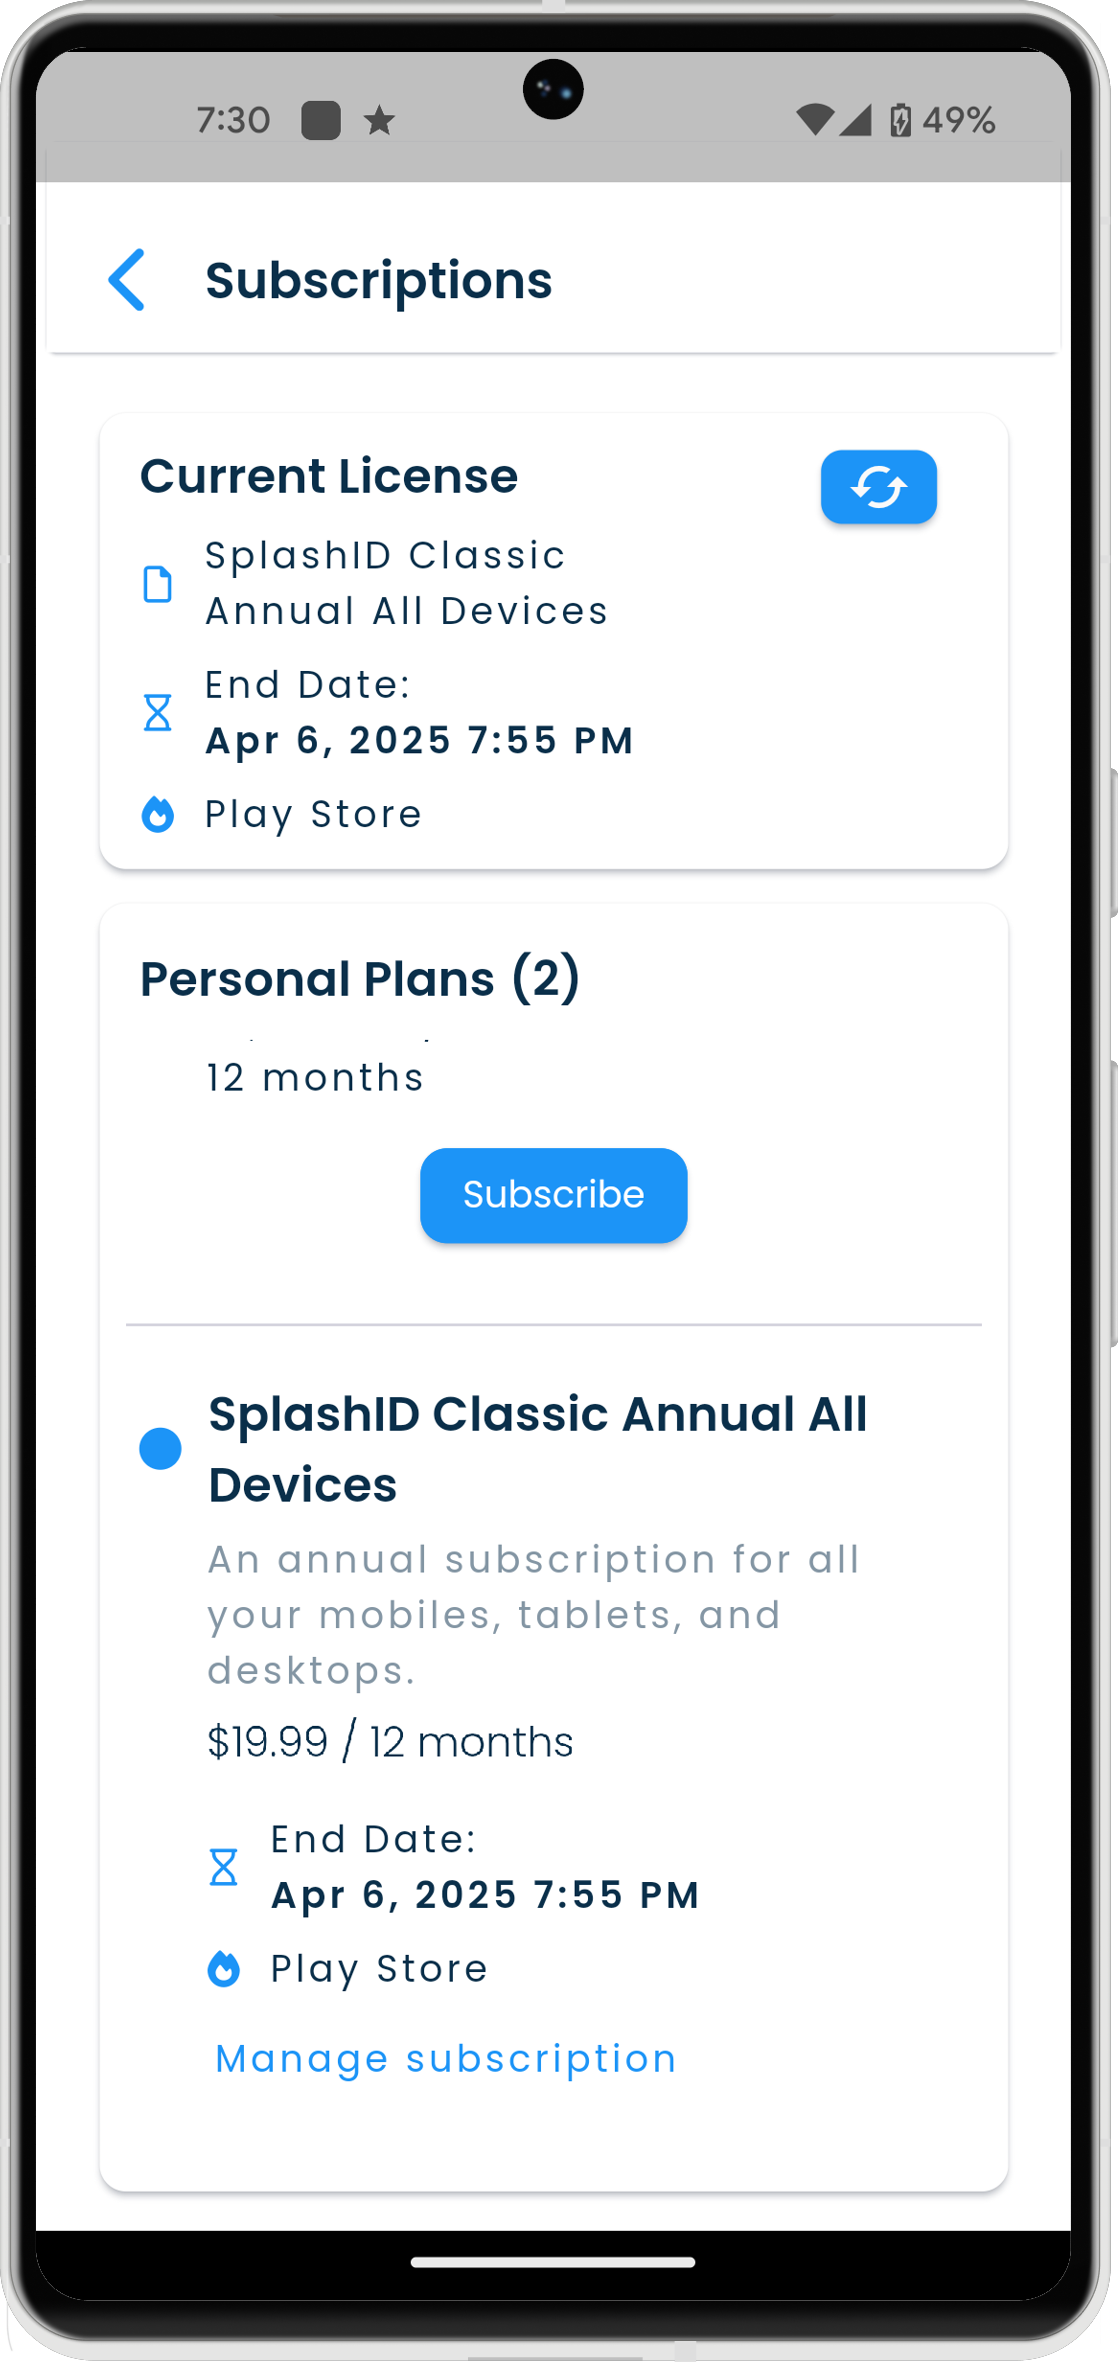
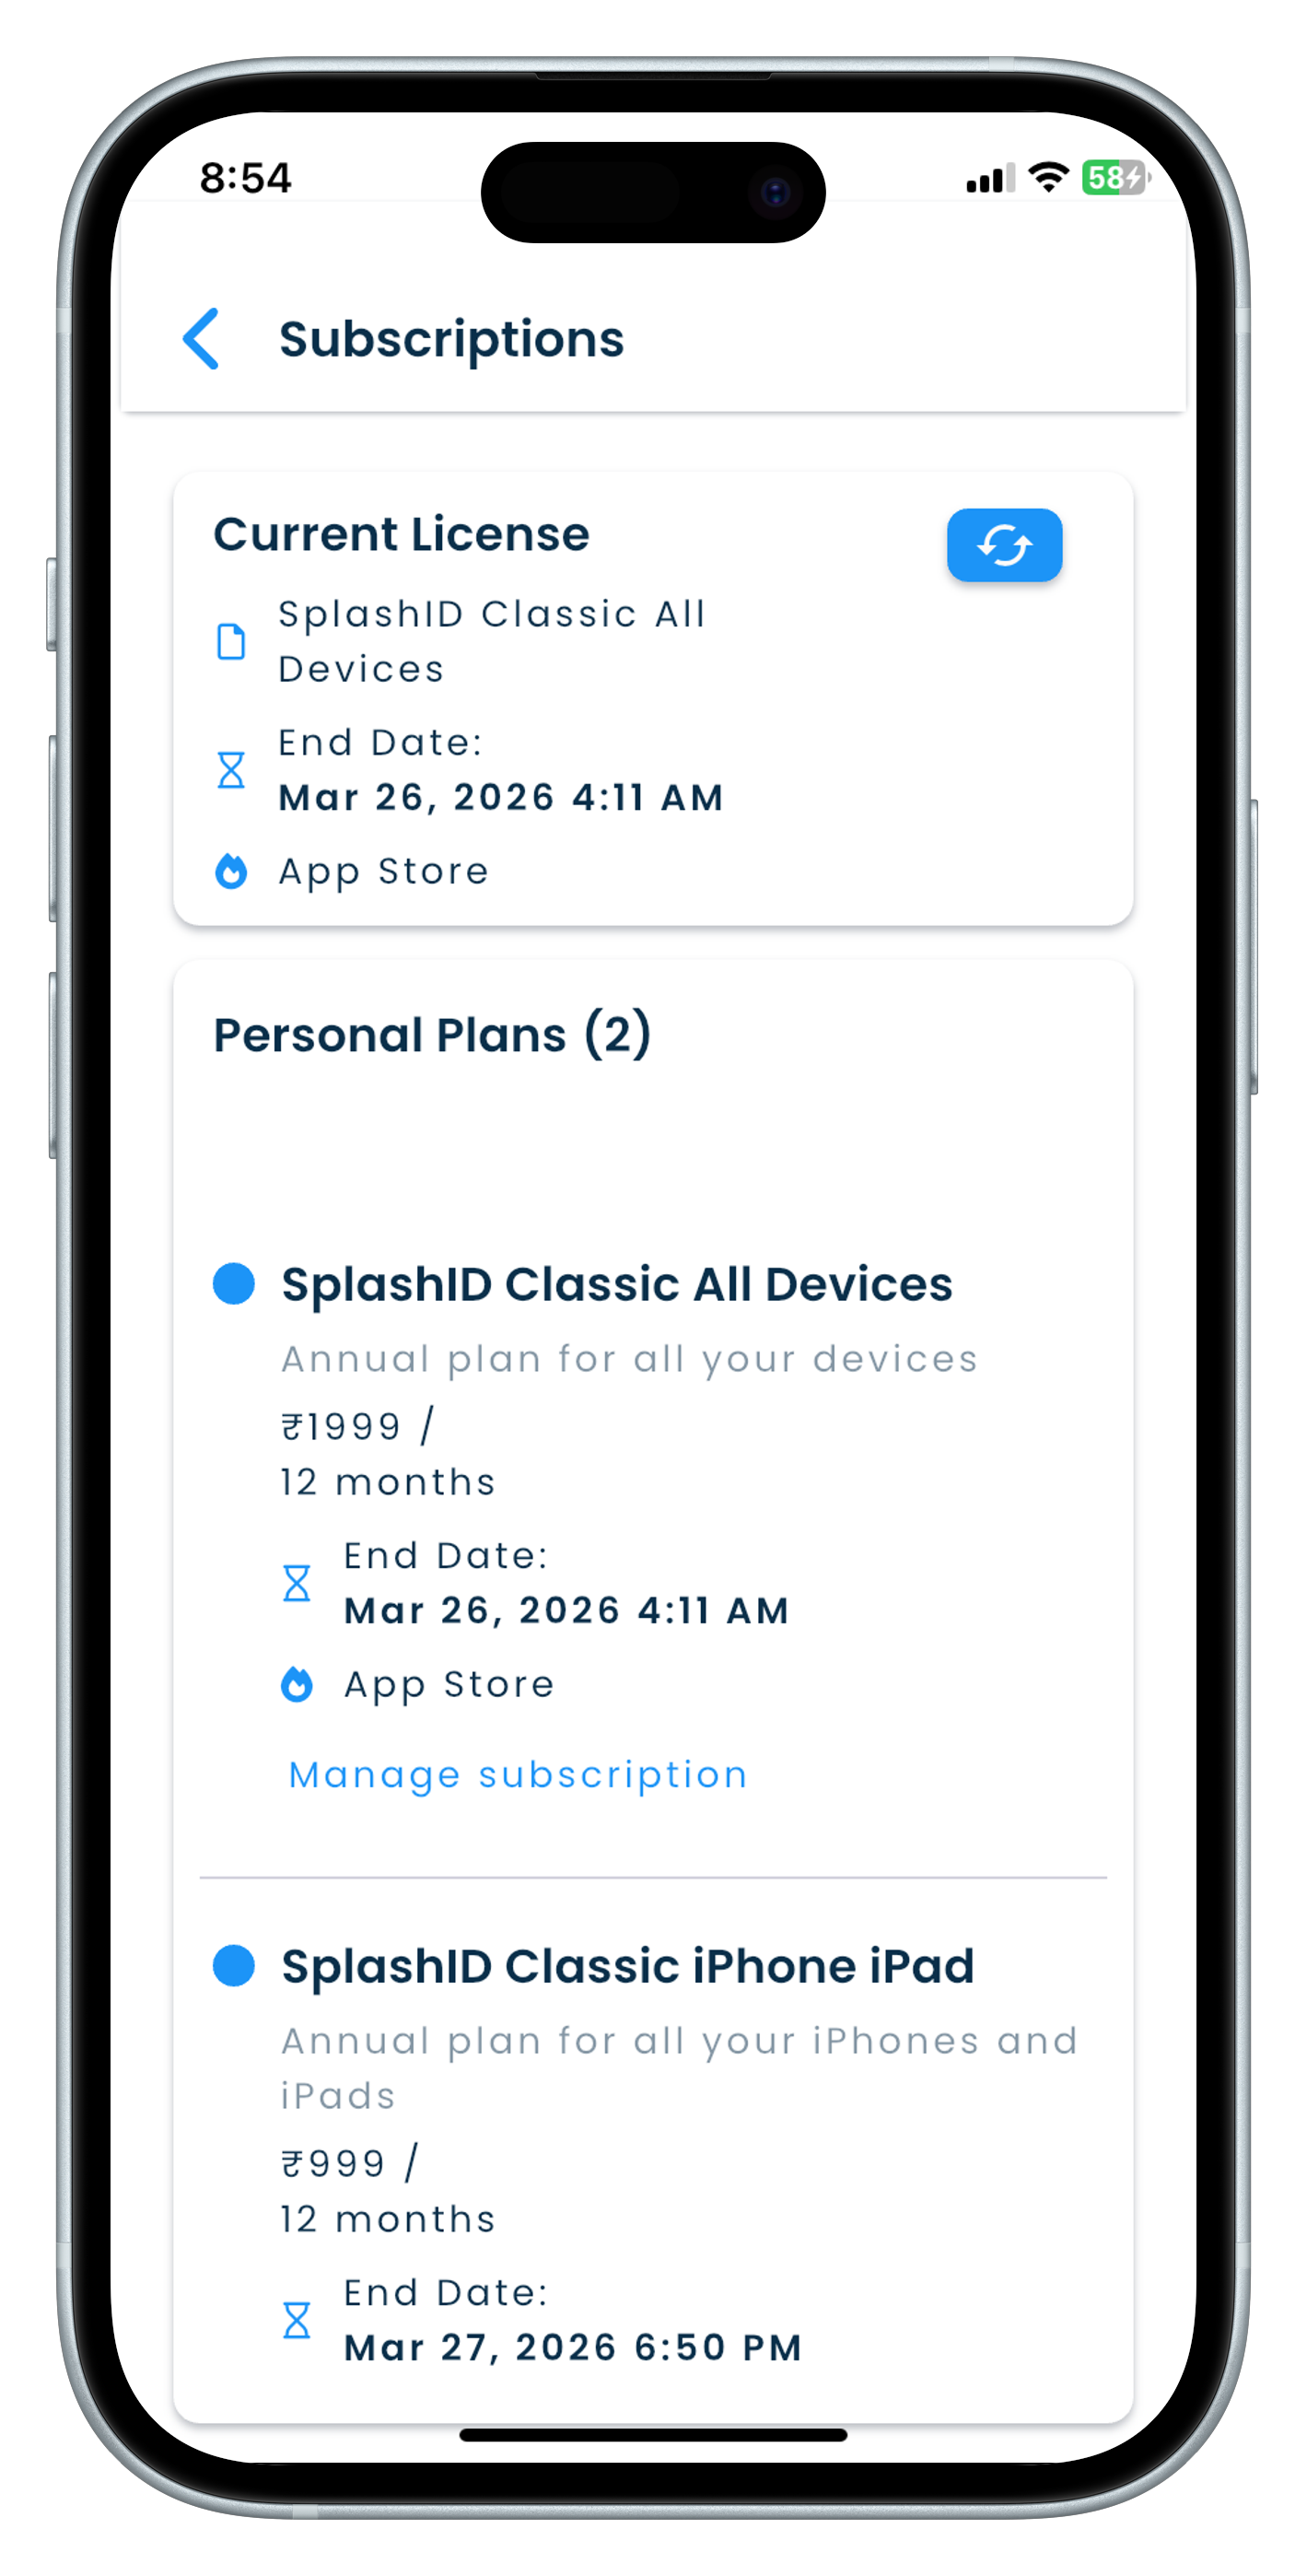
Subscriptions
You can purchase a subscription in this screen. A paid subscription will give you a Pro license that removes the restiction of 10 records allowed for a free user.
Details on how subscriptions give you a Pro license can be studied in the licenses page.
| Mac | Windows |
|---|---|
 |
 |
| Android | iPhone |
|---|---|
 |
 |
| iPad |
|---|
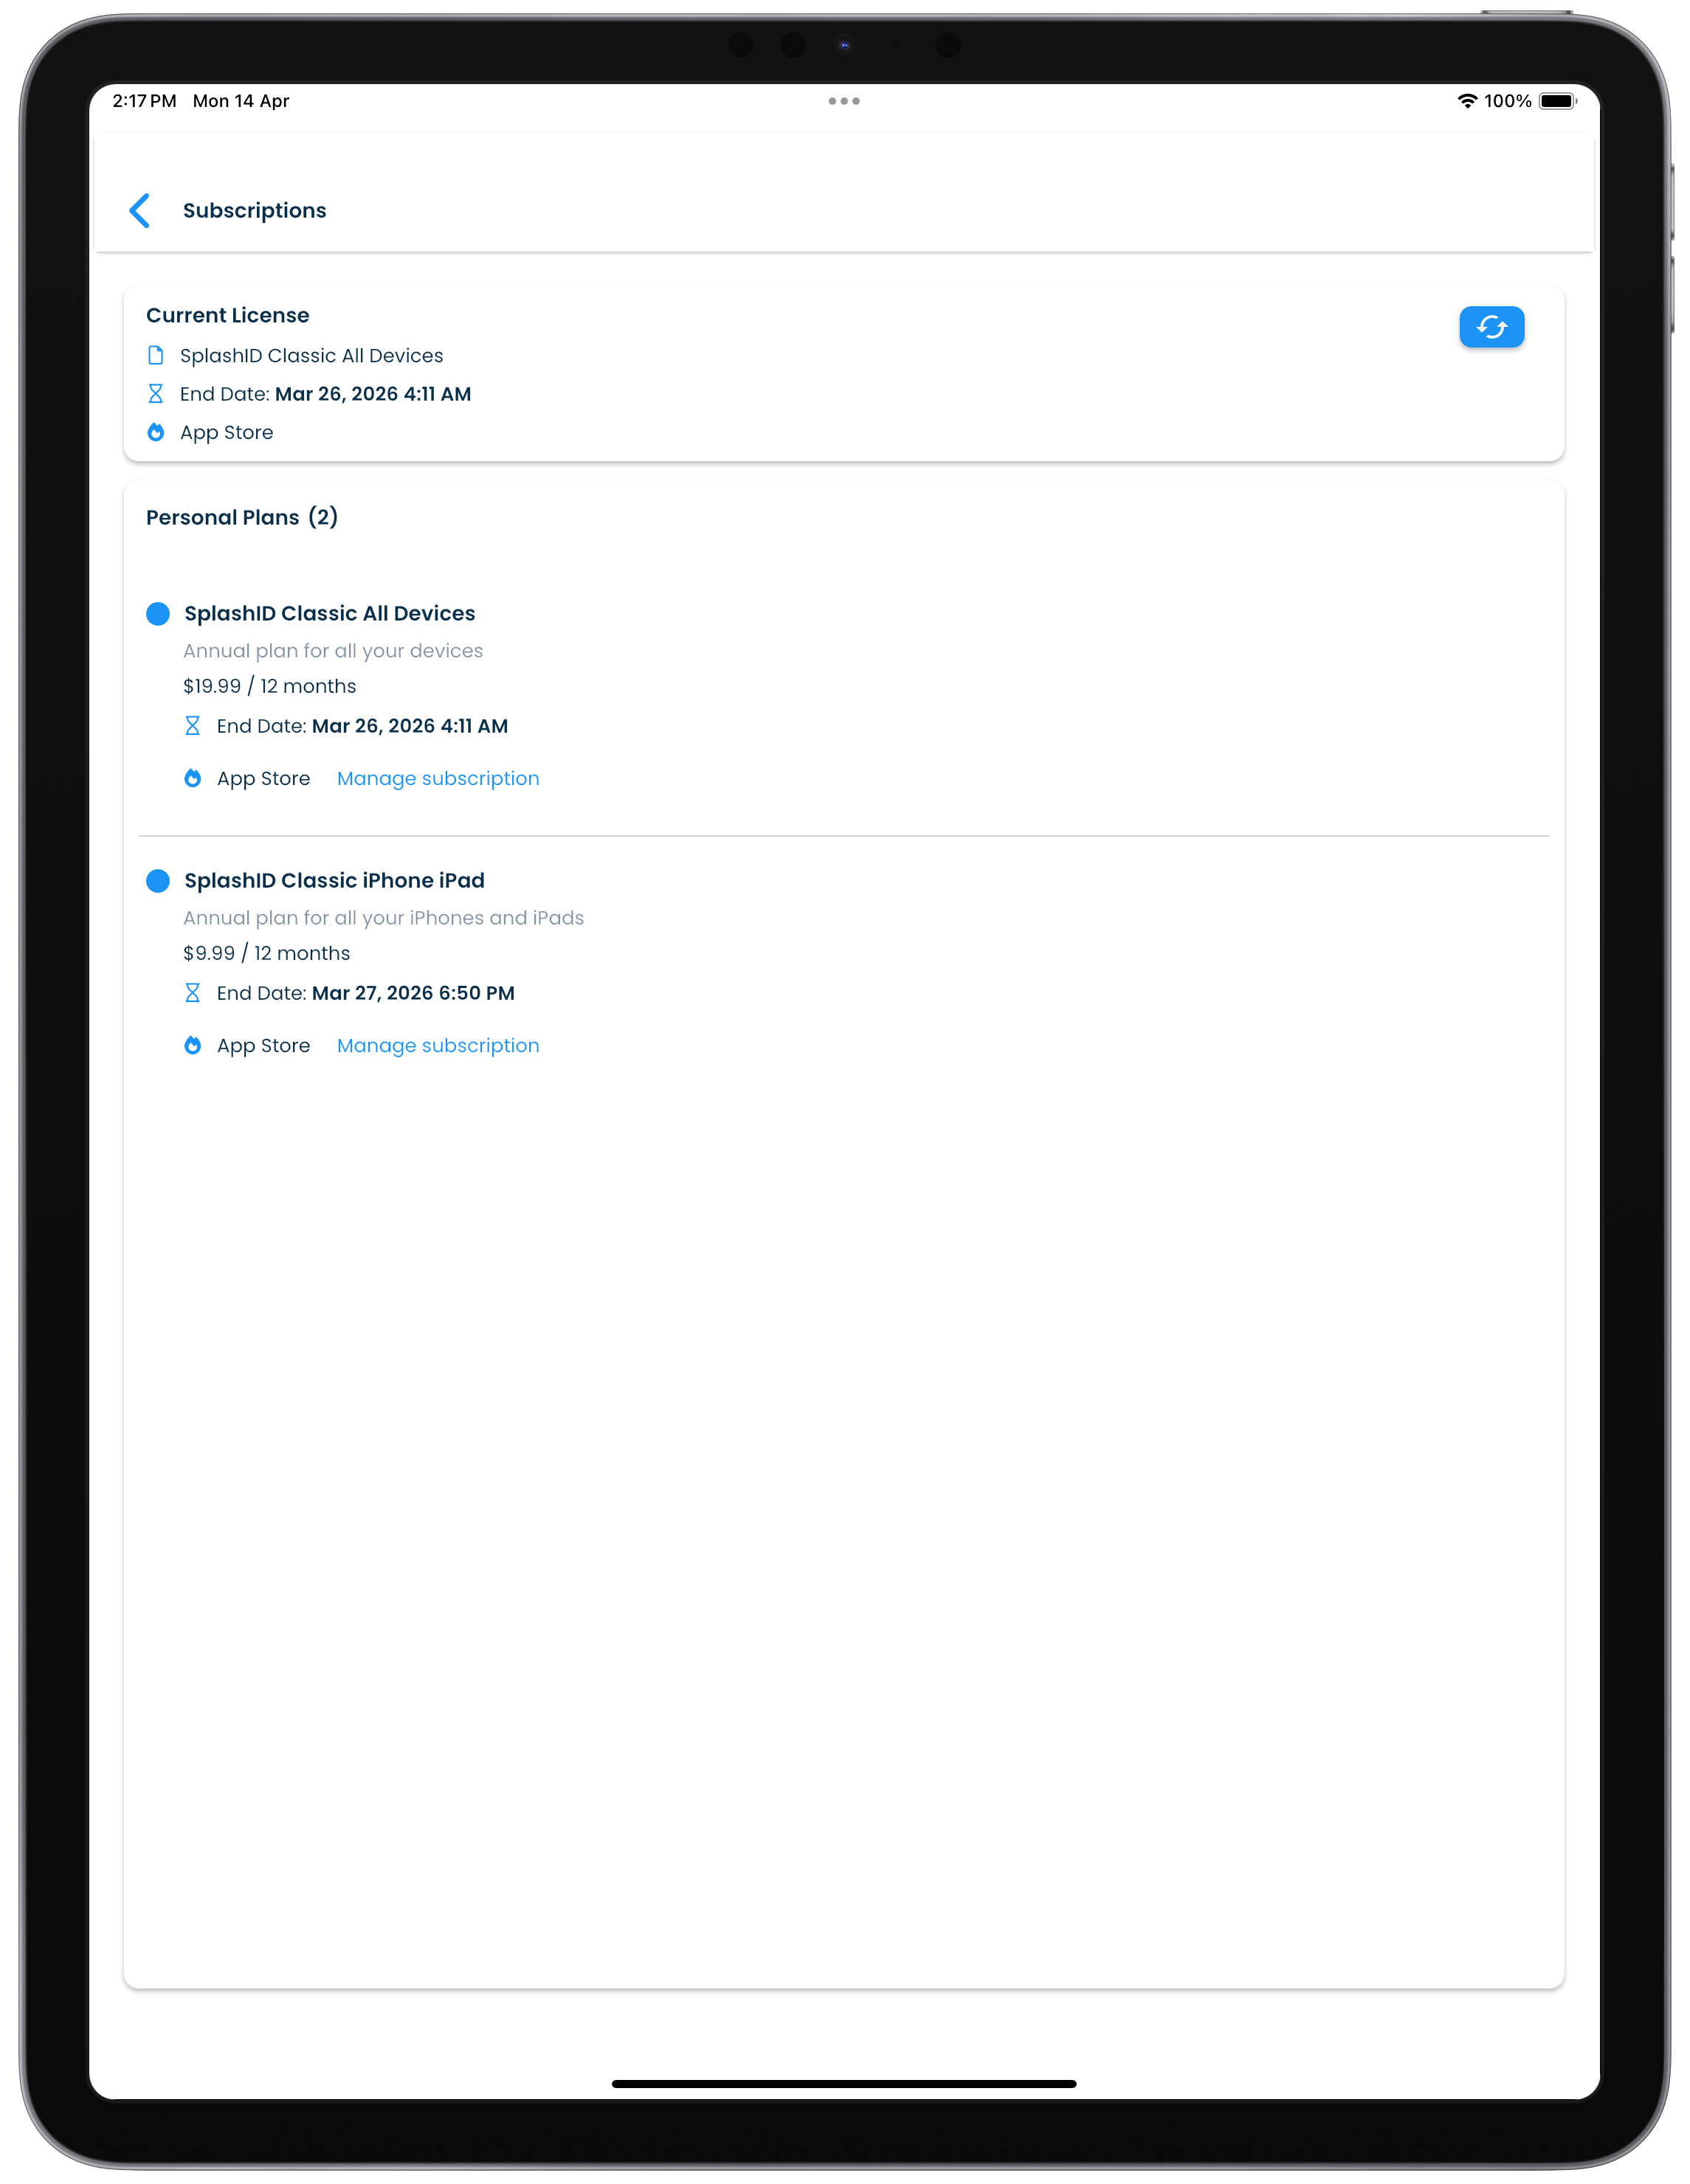 |
The screen will show you your current license in the Current license panel.
The list of subscriptions you can purchase will be displayed in the Peronal Plans section. These subscriptions give you licenses that are dependent on the type of subscription you purchase.
You only need one license for a device type as explained in the licenses page. If you have more than one and you want to cancel a subscription, go the App Store, Mac App Store, Play Store or Microsoft Store to cancel the subscription renewal.
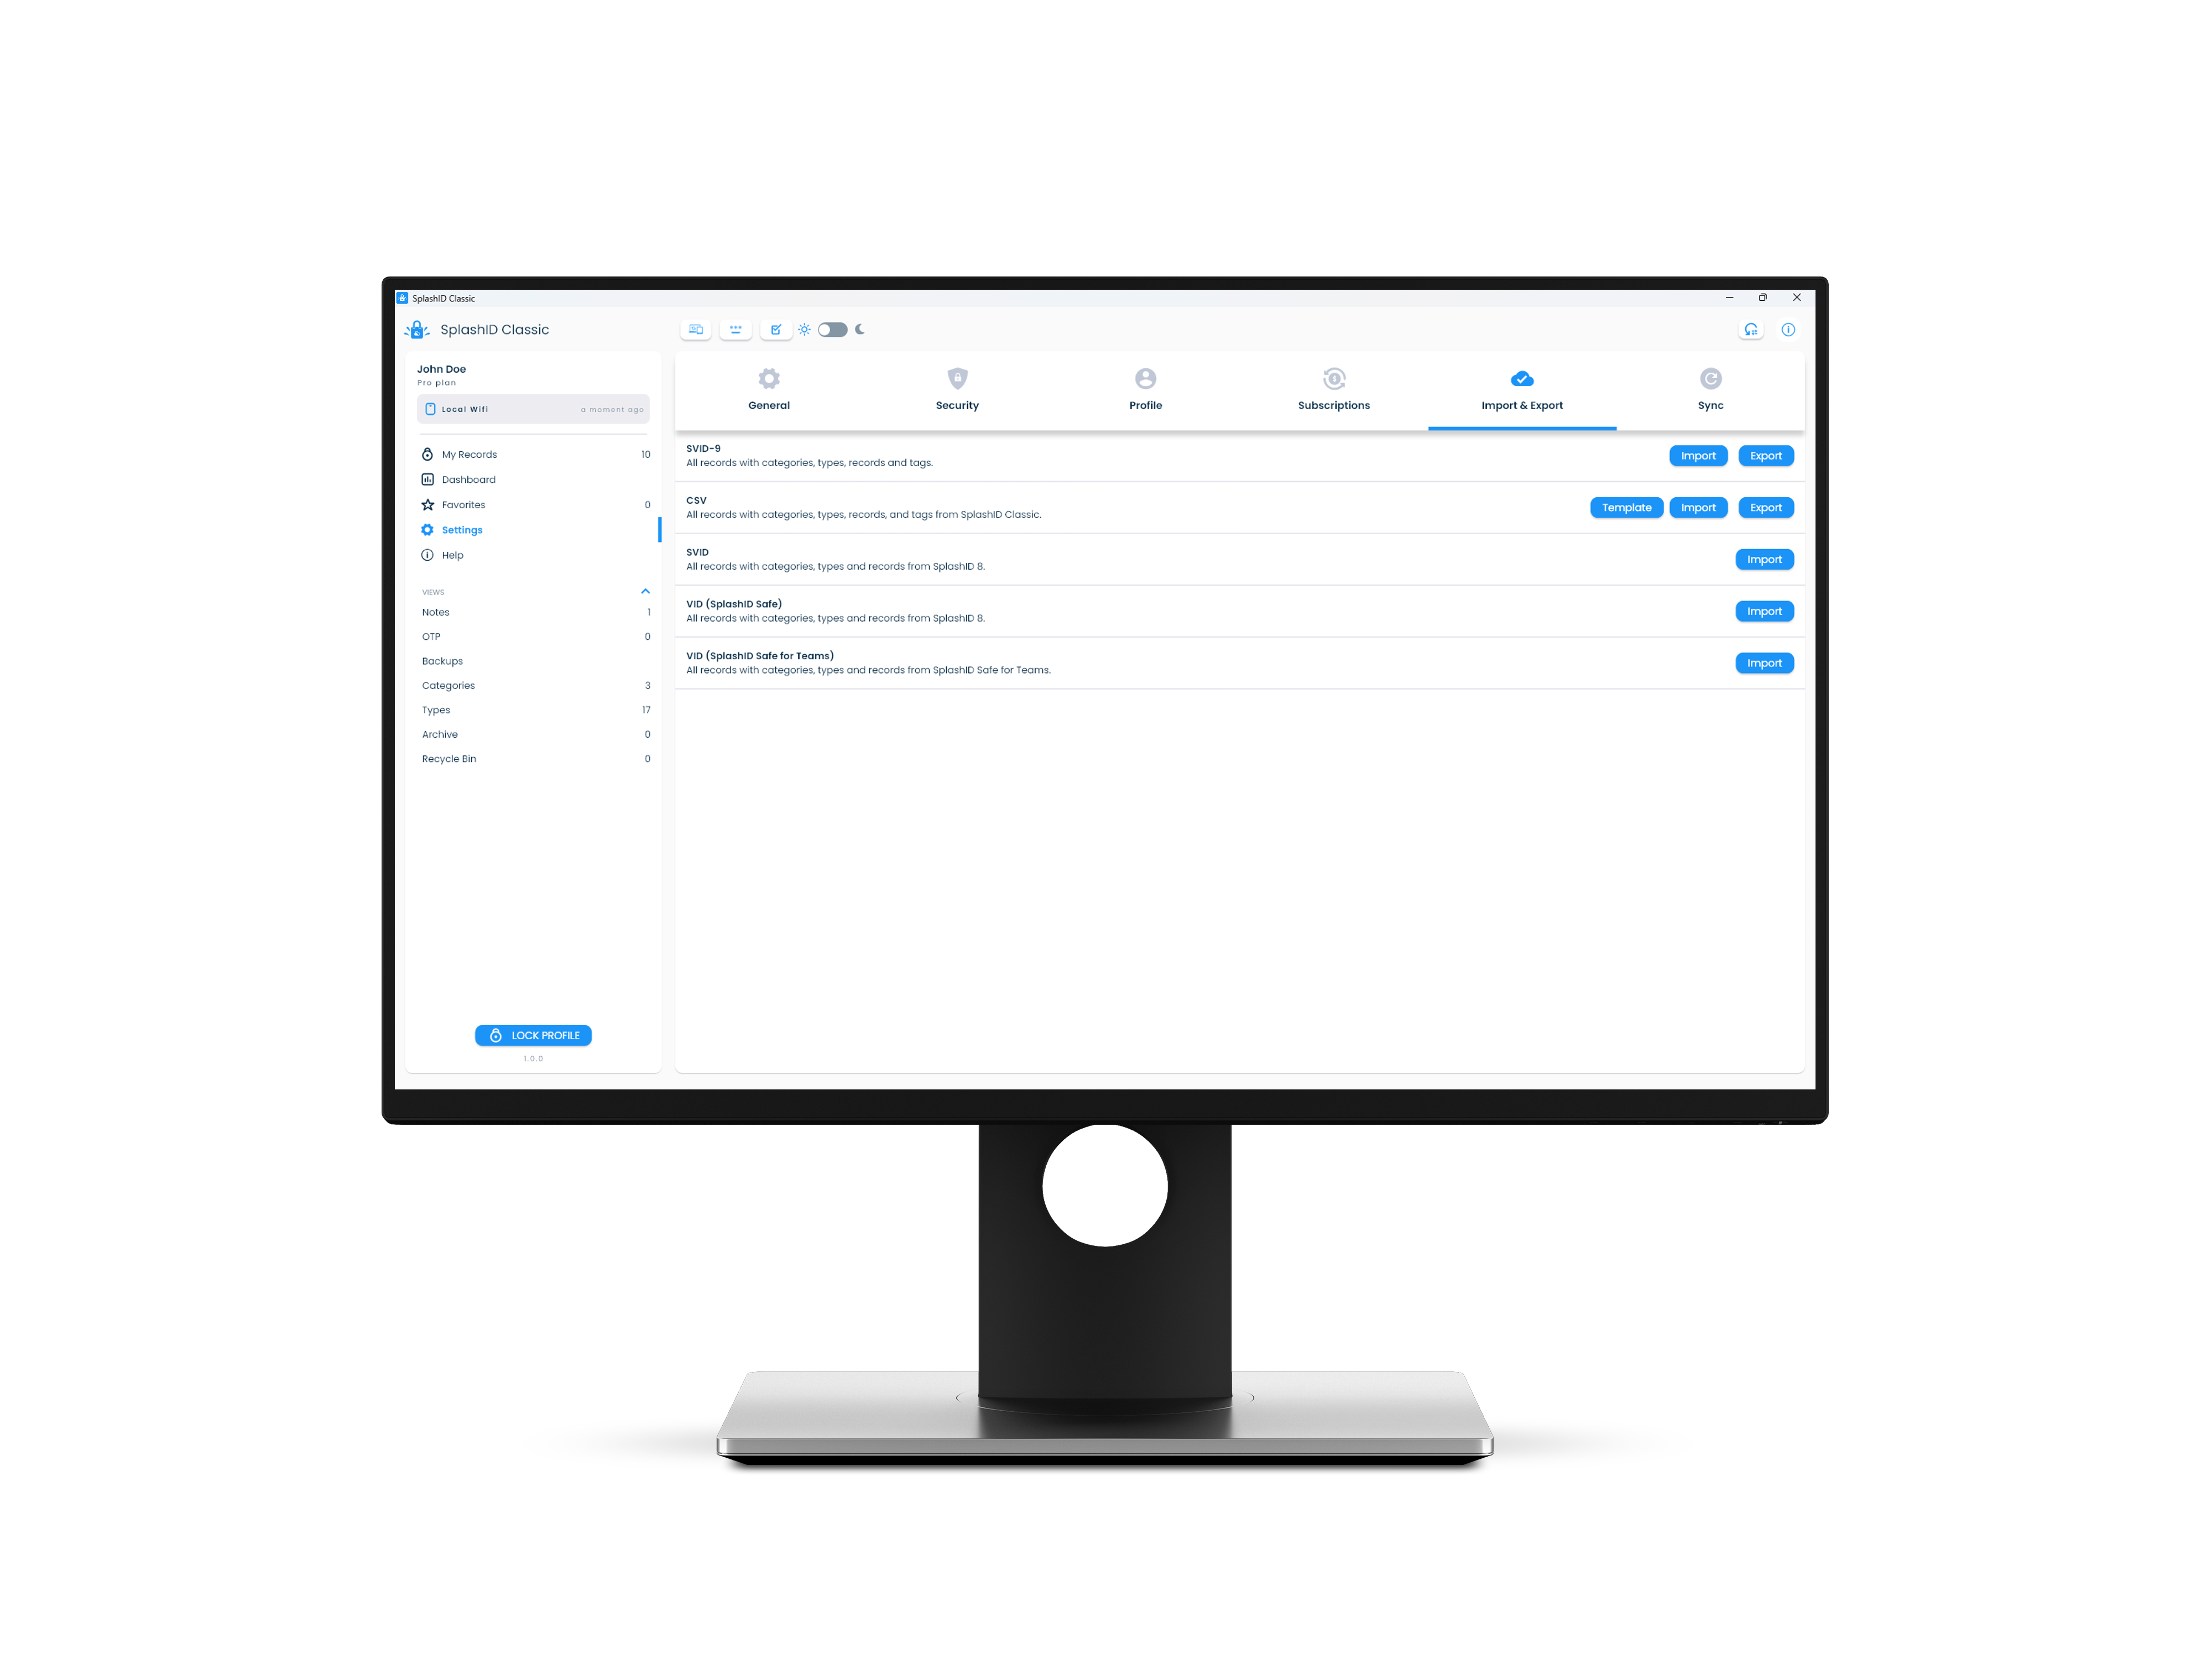
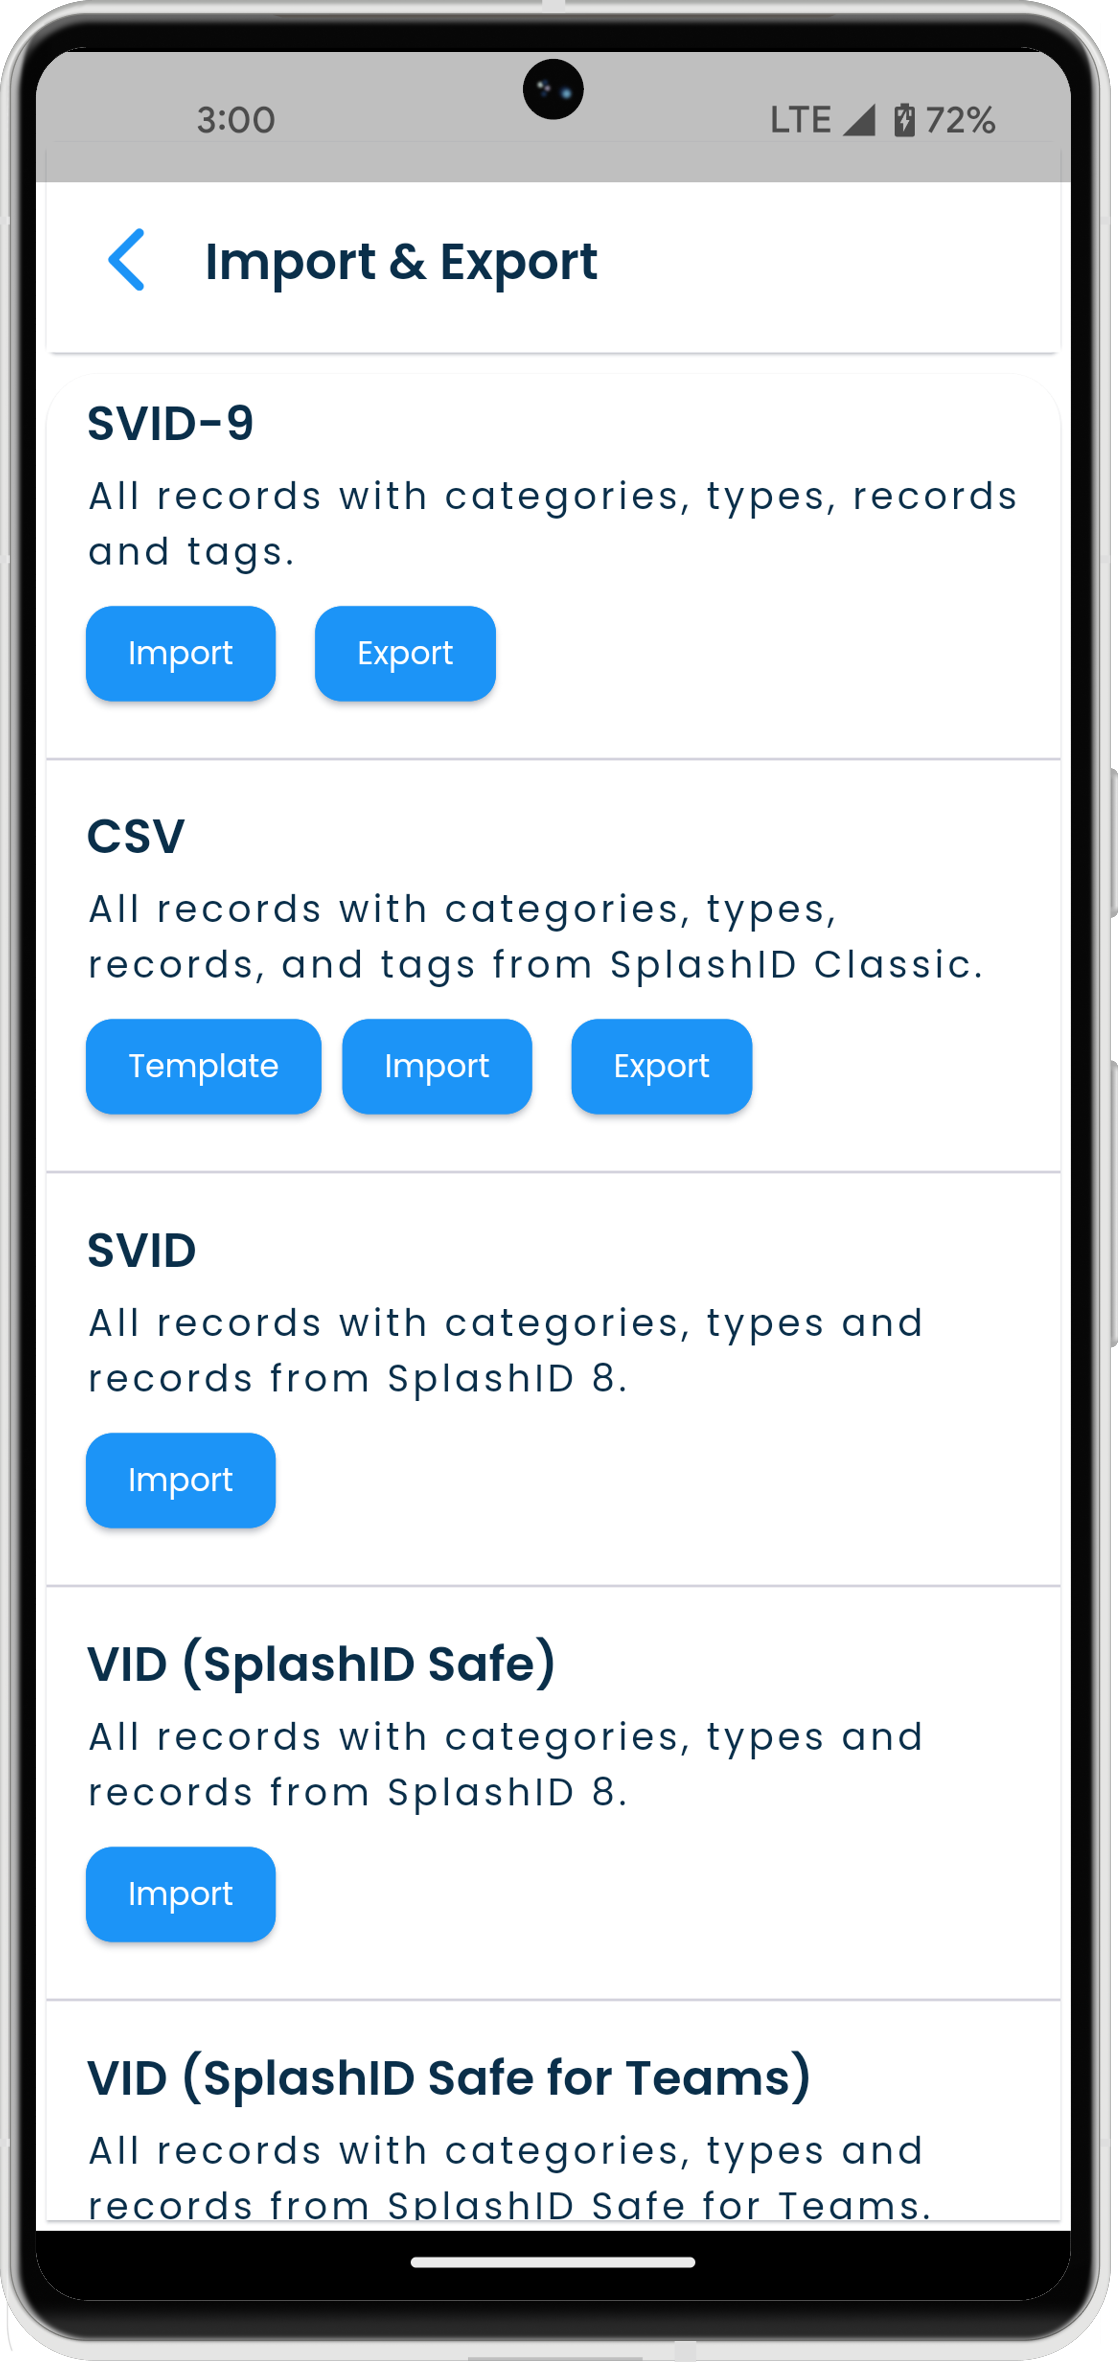
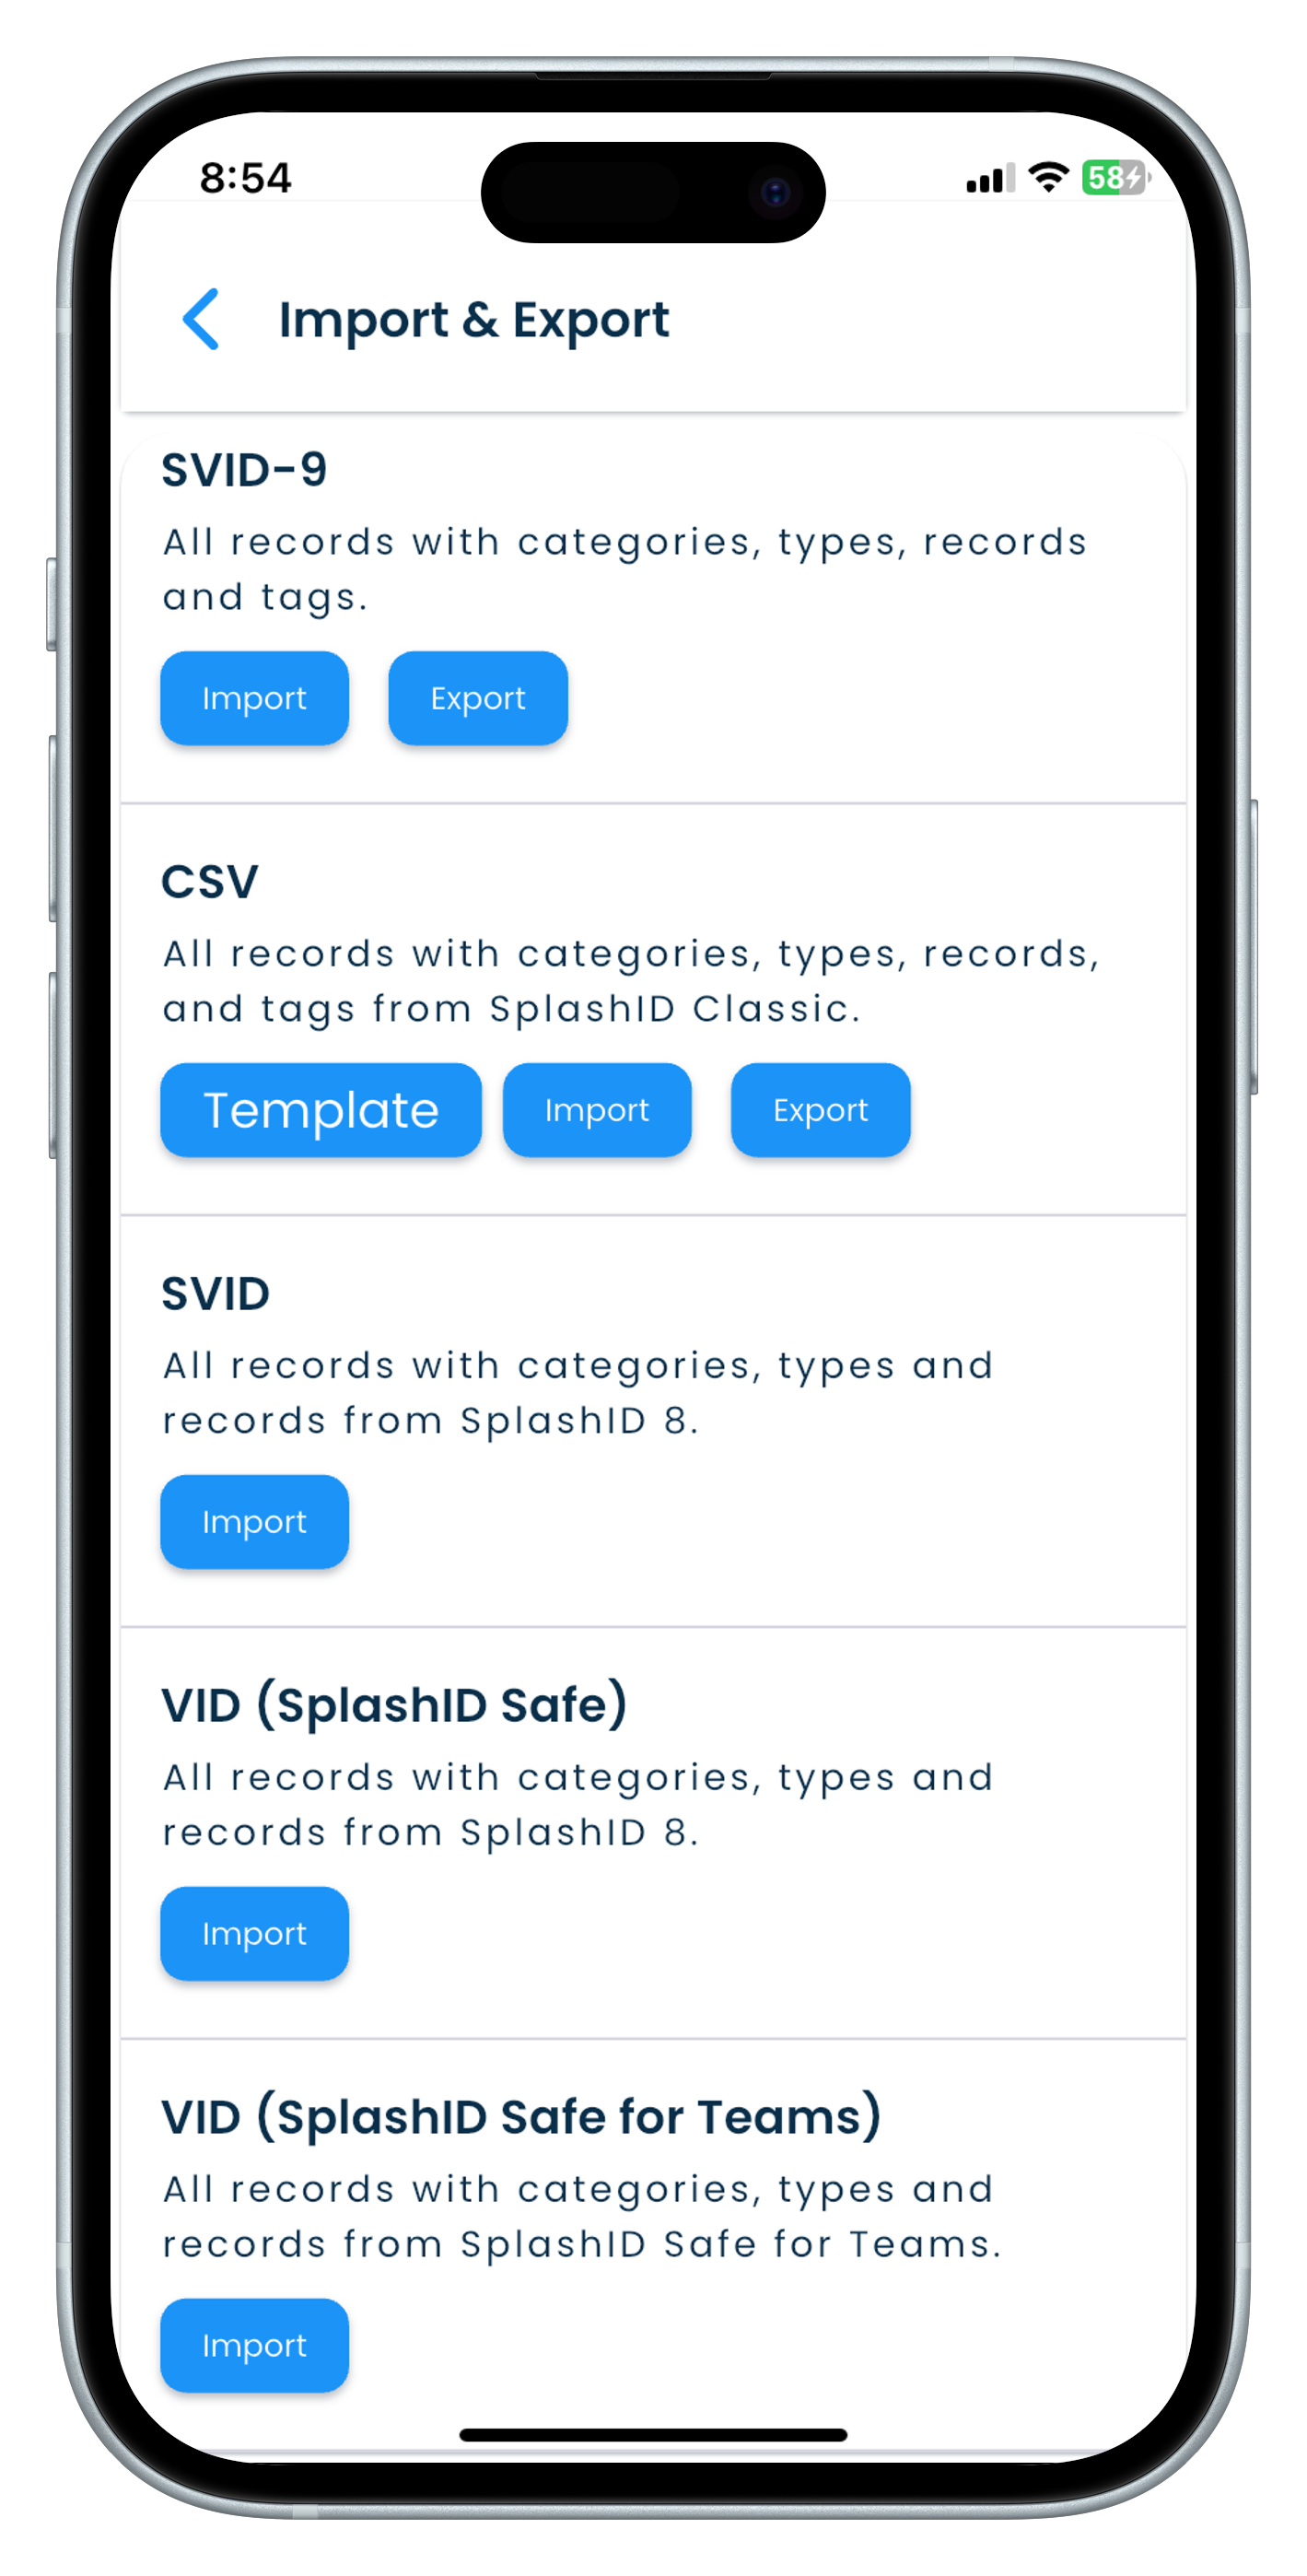
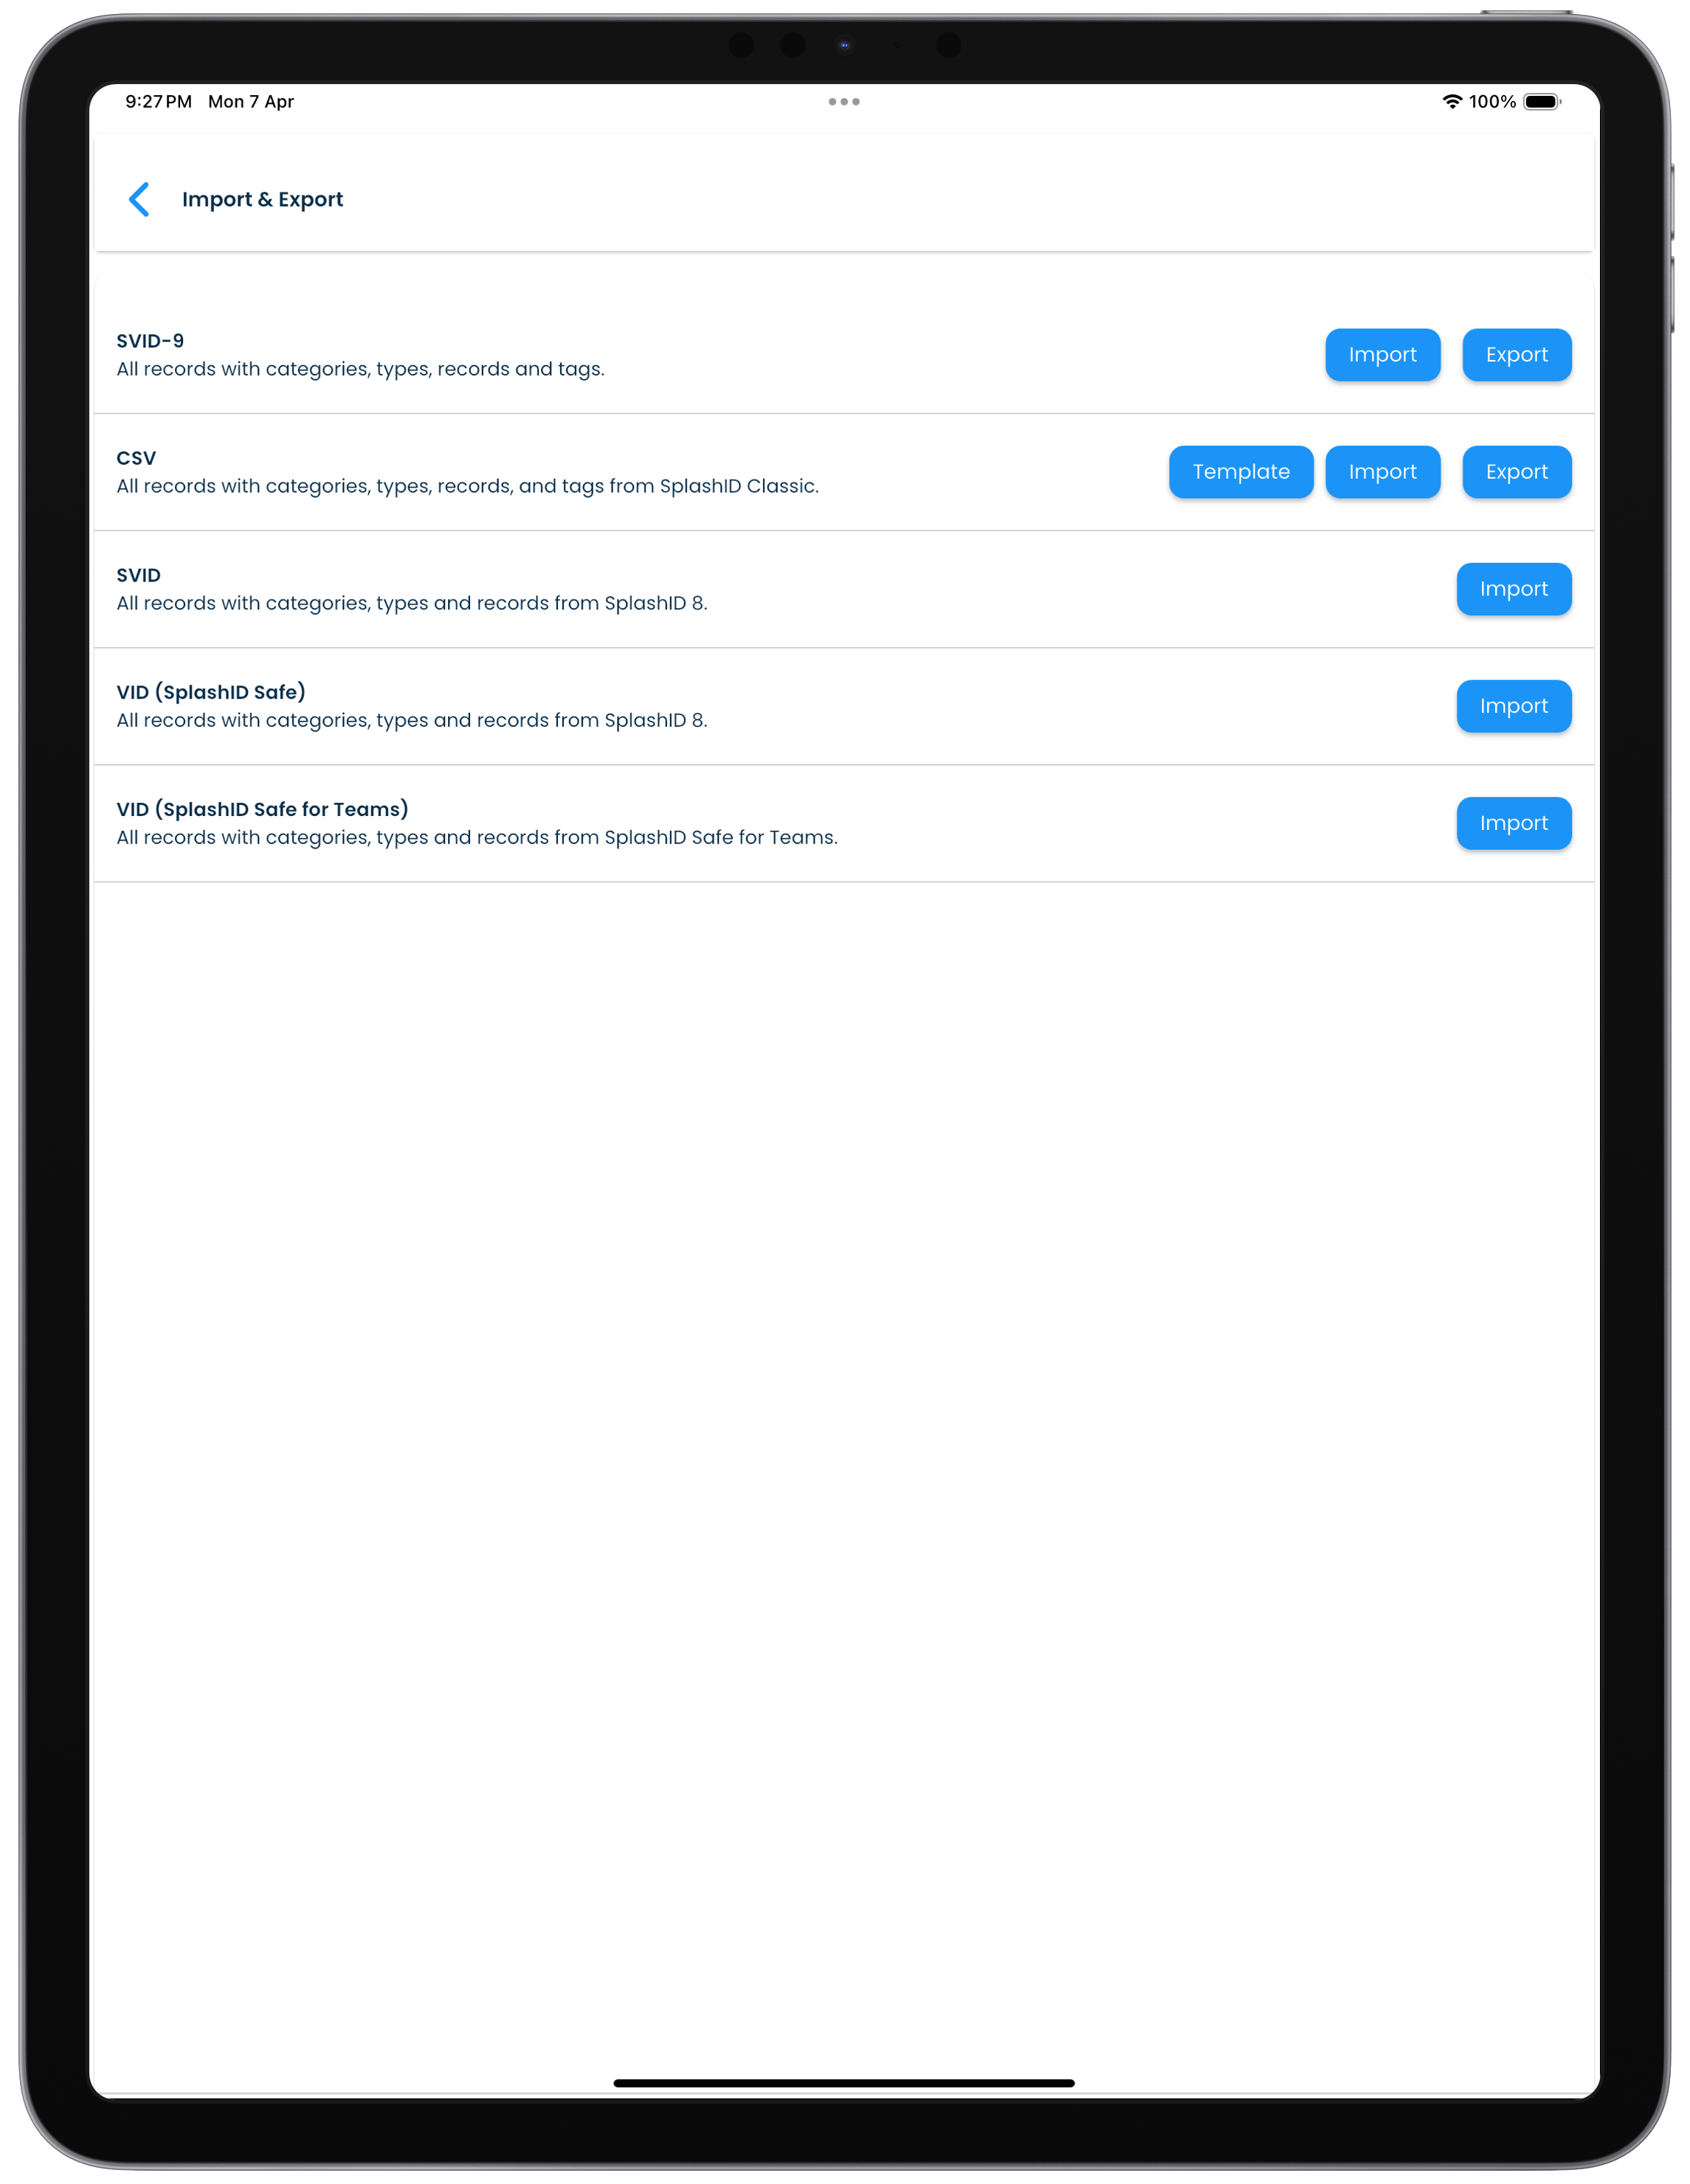
Import & Export
You can perform operations related to import and export of different versions of SplashID files.
| Mac | Windows |
|---|---|
|
|
| Android | iPhone |
|---|---|
|
|
| iPad |
|---|
|
Import
The following files can be imported.
- SVID9
- CSV (SplashID Classic format). Use the structure provided in the downloadable template to be able to create a file that you can import into SplashID Classic.
- SVID
- VID
Info
If you had exported an SVID or VID file on an iPhone in your SplashID Safe application, and no password was asked for at the time of the export, then the password will be your SplashID Safe master password.
Export
Own records and profile information can be exported to the following file types.
- SVID9
- CSV (SplashID Classic format)
Sync
Local WiFi or No sync?
The sync screen allows you to choose a sync mode that will determine how data in SplashID Classic synchronizes across your devices.
| Mac | Windows |
|---|---|
|
|
| Android | iPhone |
|---|---|
|
|
| iPad |
|---|
|
Selecting or deselecting the Sync with other devices over WiFi setting determines the sync mode of the app on the device.
Option |
Sync type |
|---|---|
| Local WiFi | Synchronize the data between all the devices. |
| No sync | Each app has its own data. |
You can also choose to have some devices sync over WiFi, and other devices to run in a no sync mode. Please refer to the syncing page for more information on how to sync your data across your devices.
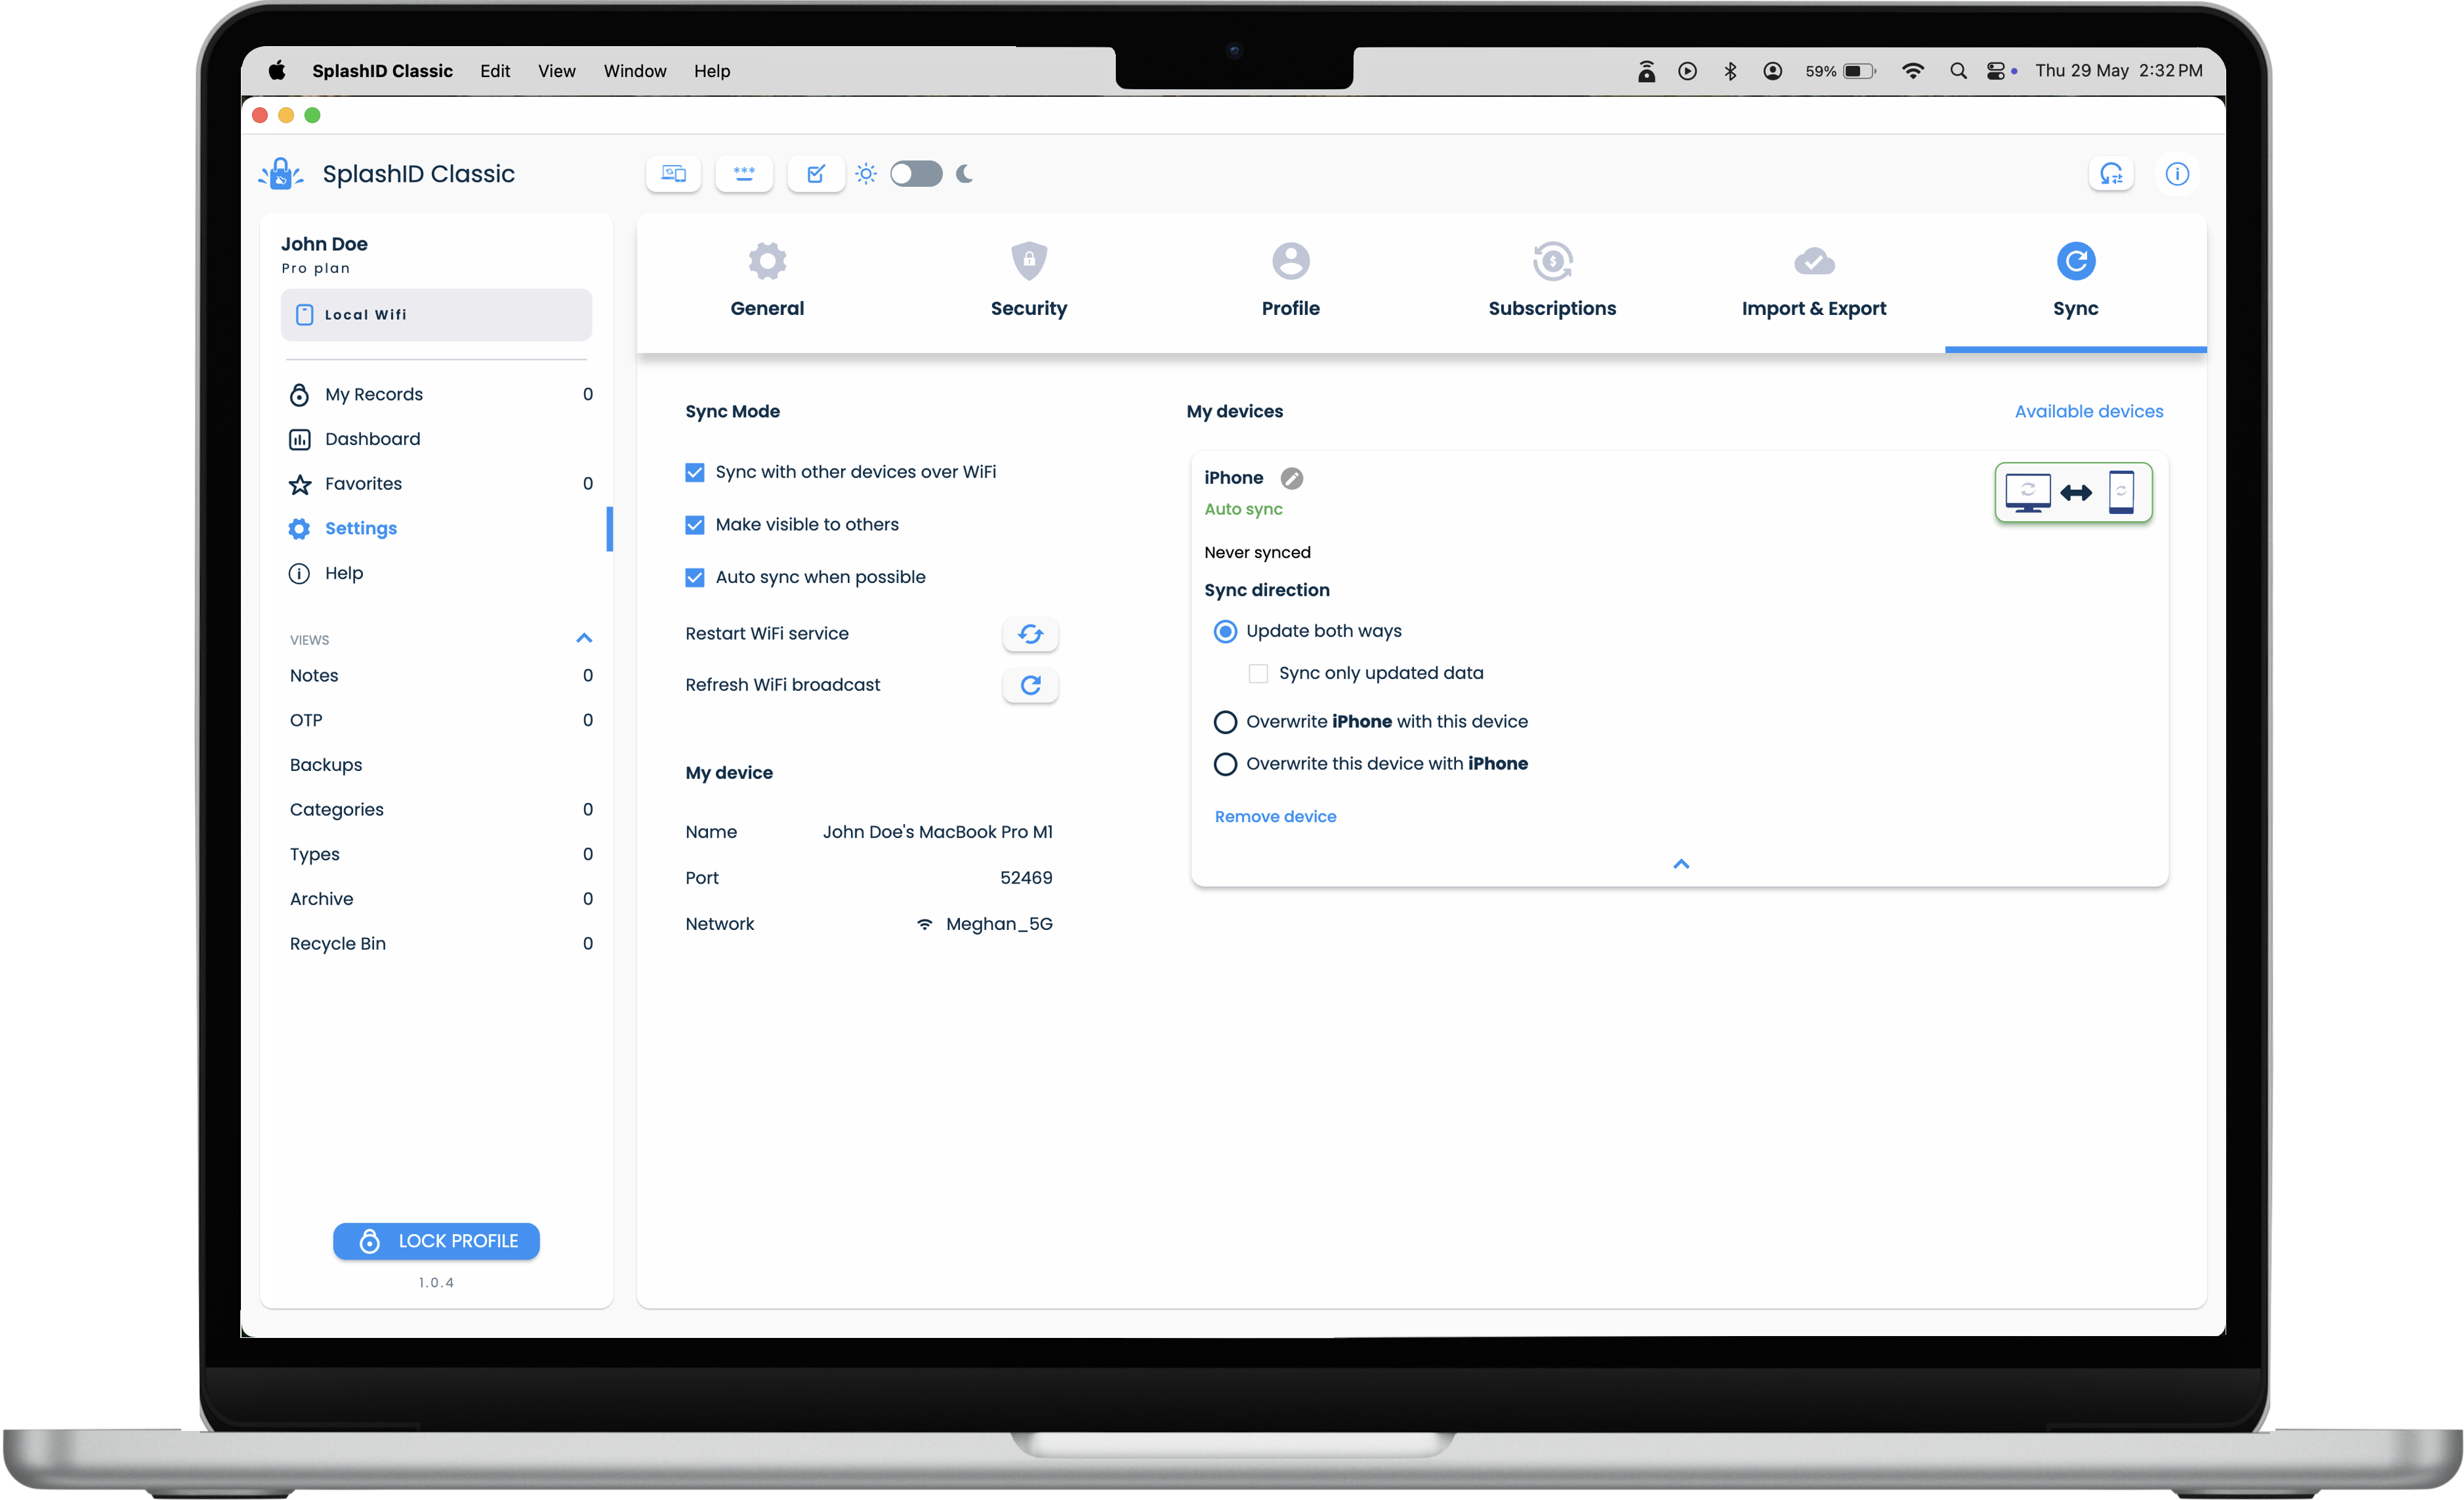
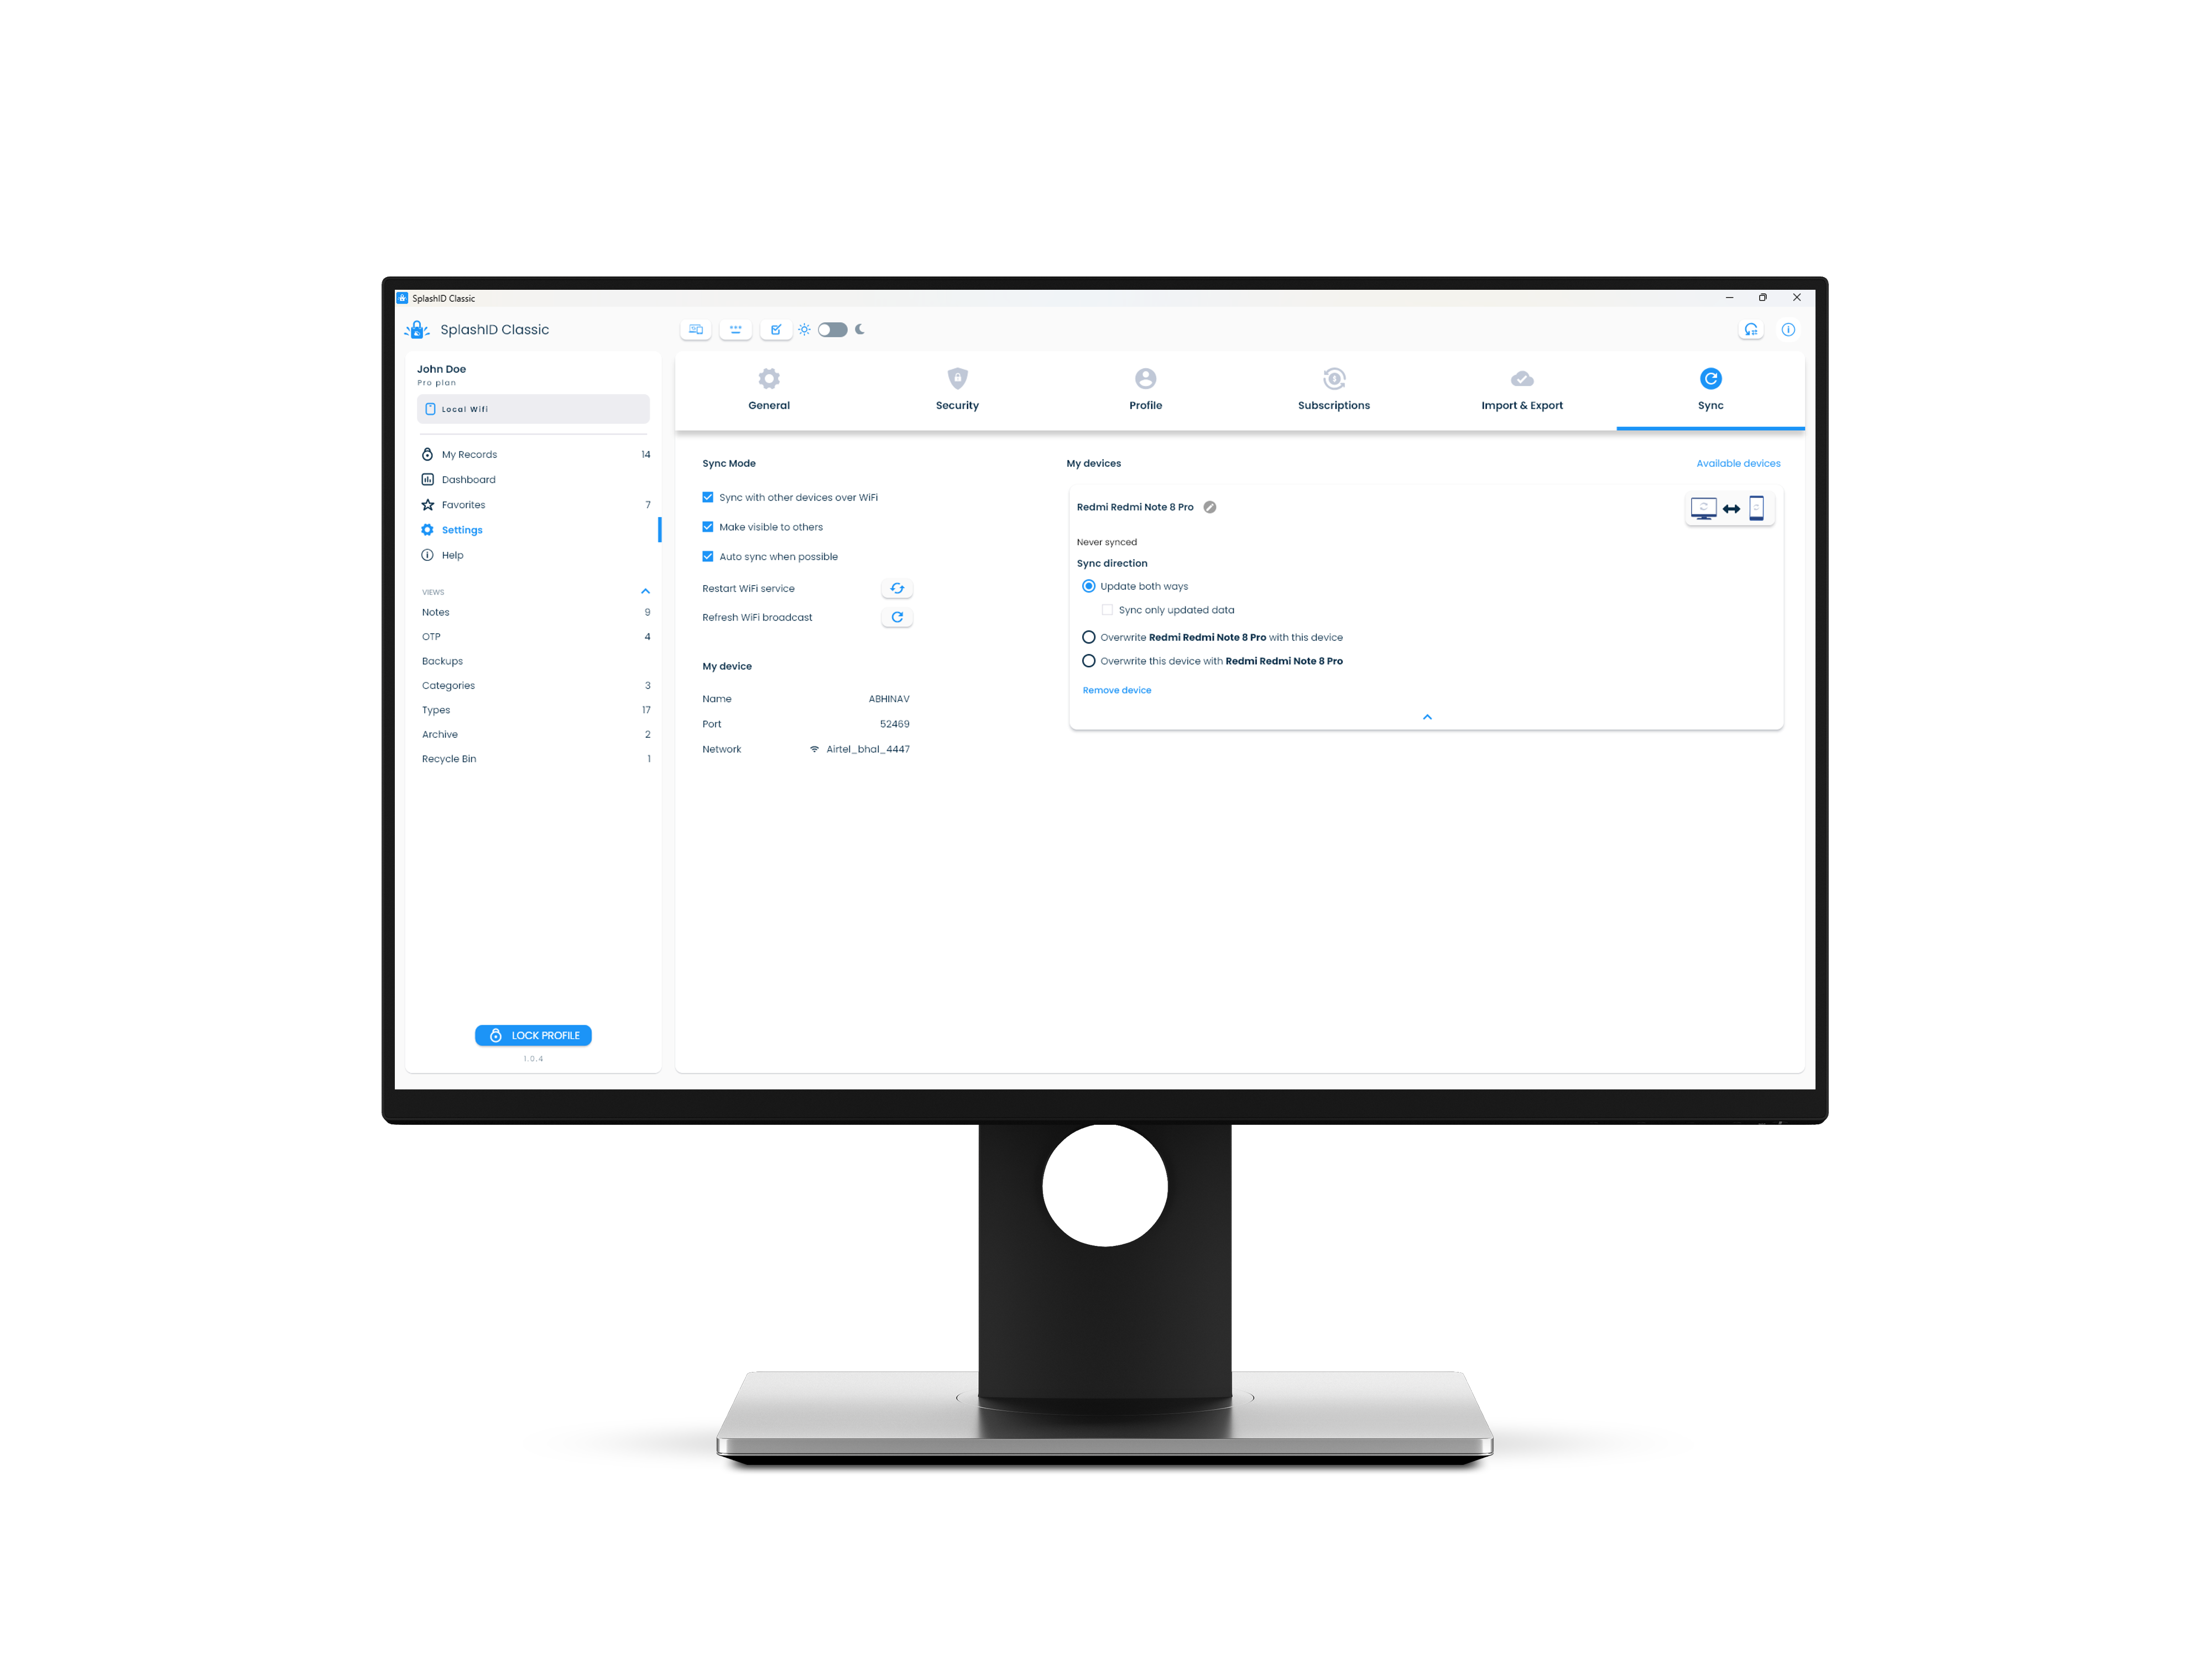
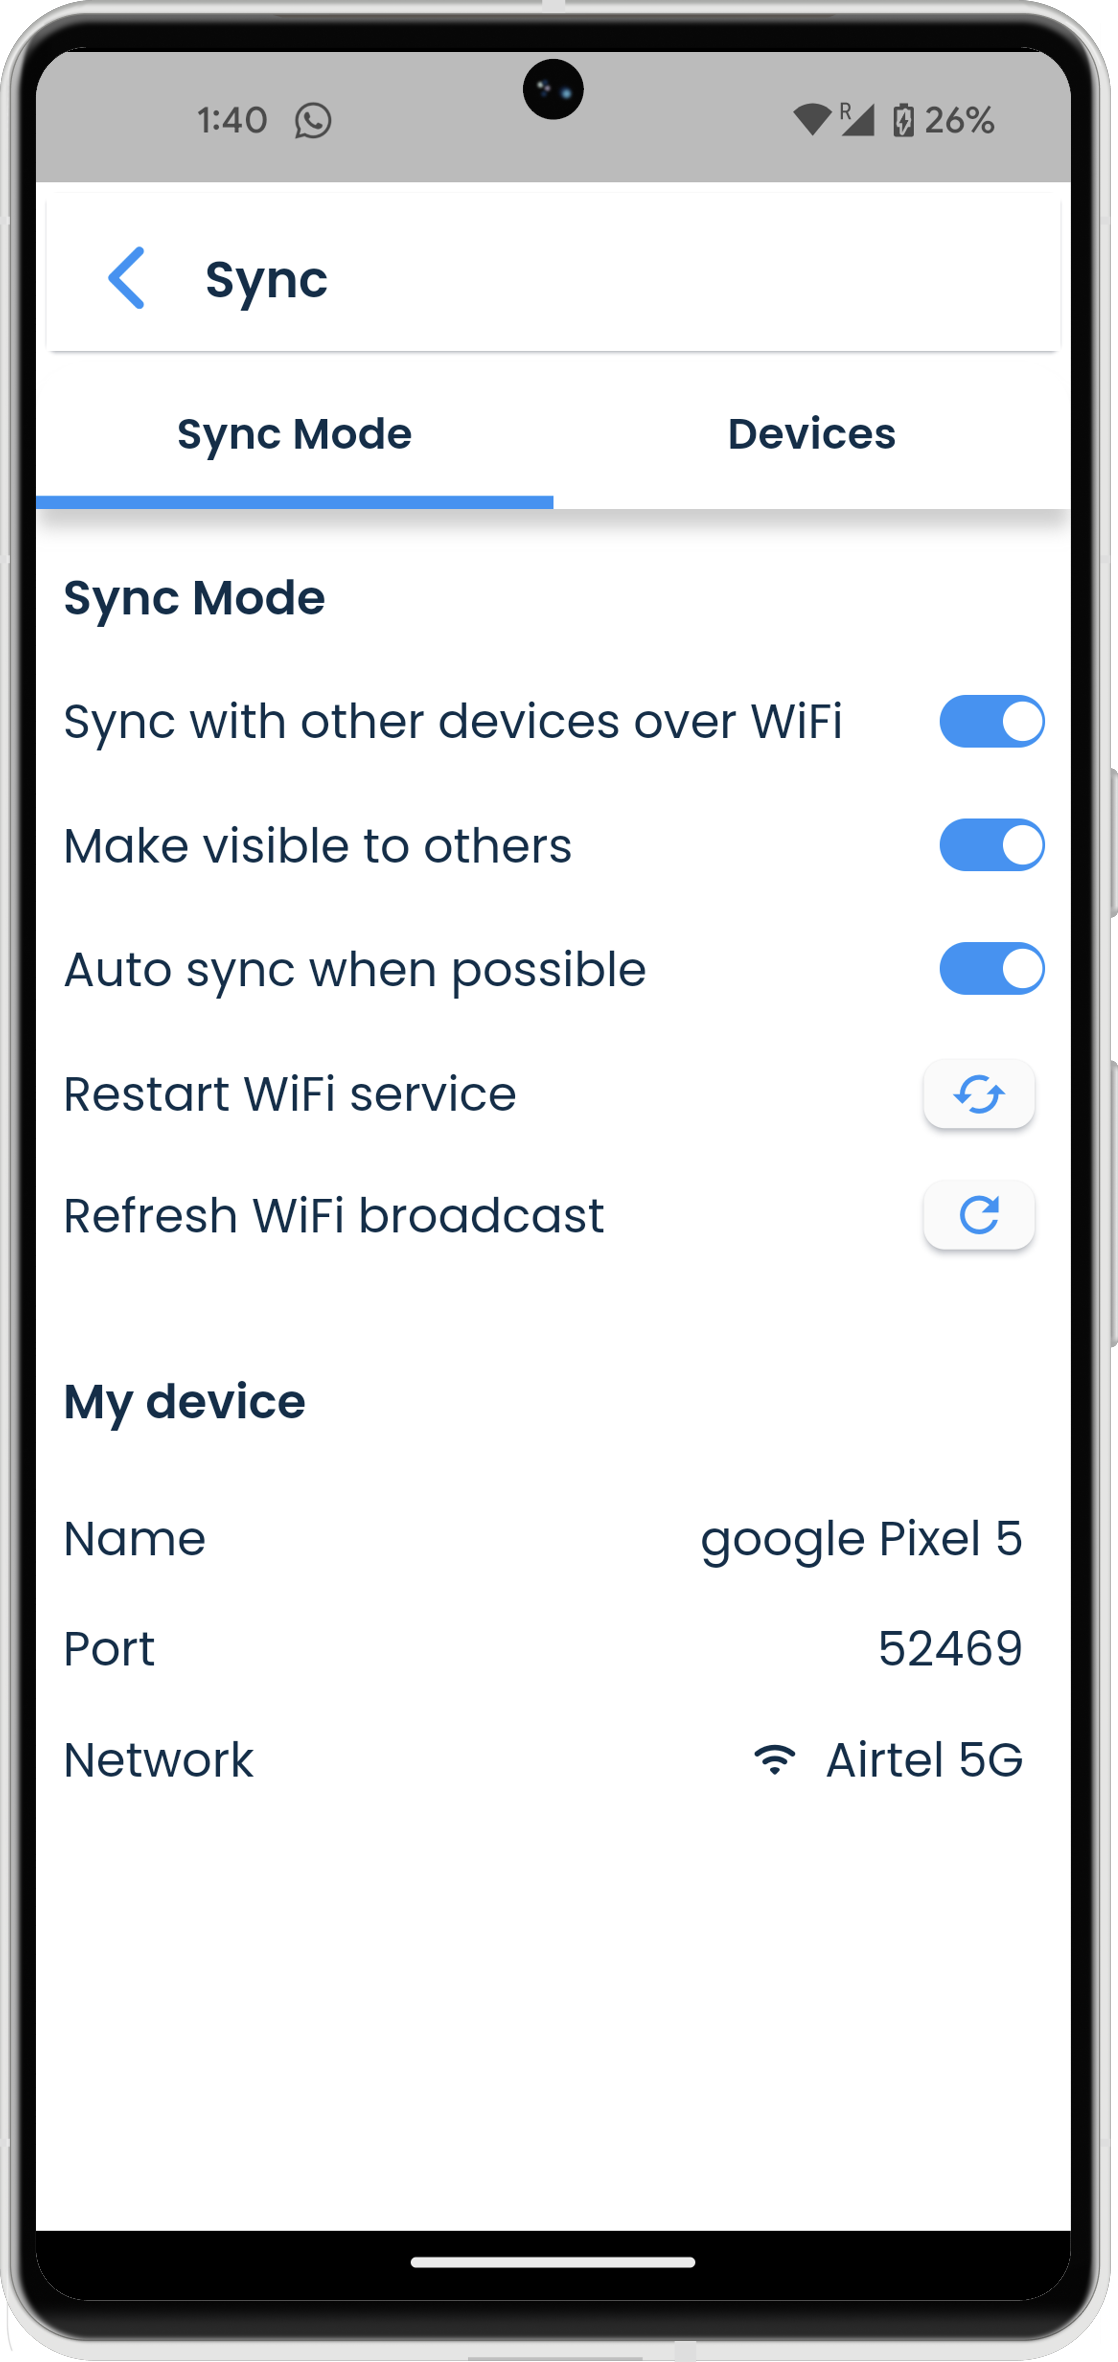
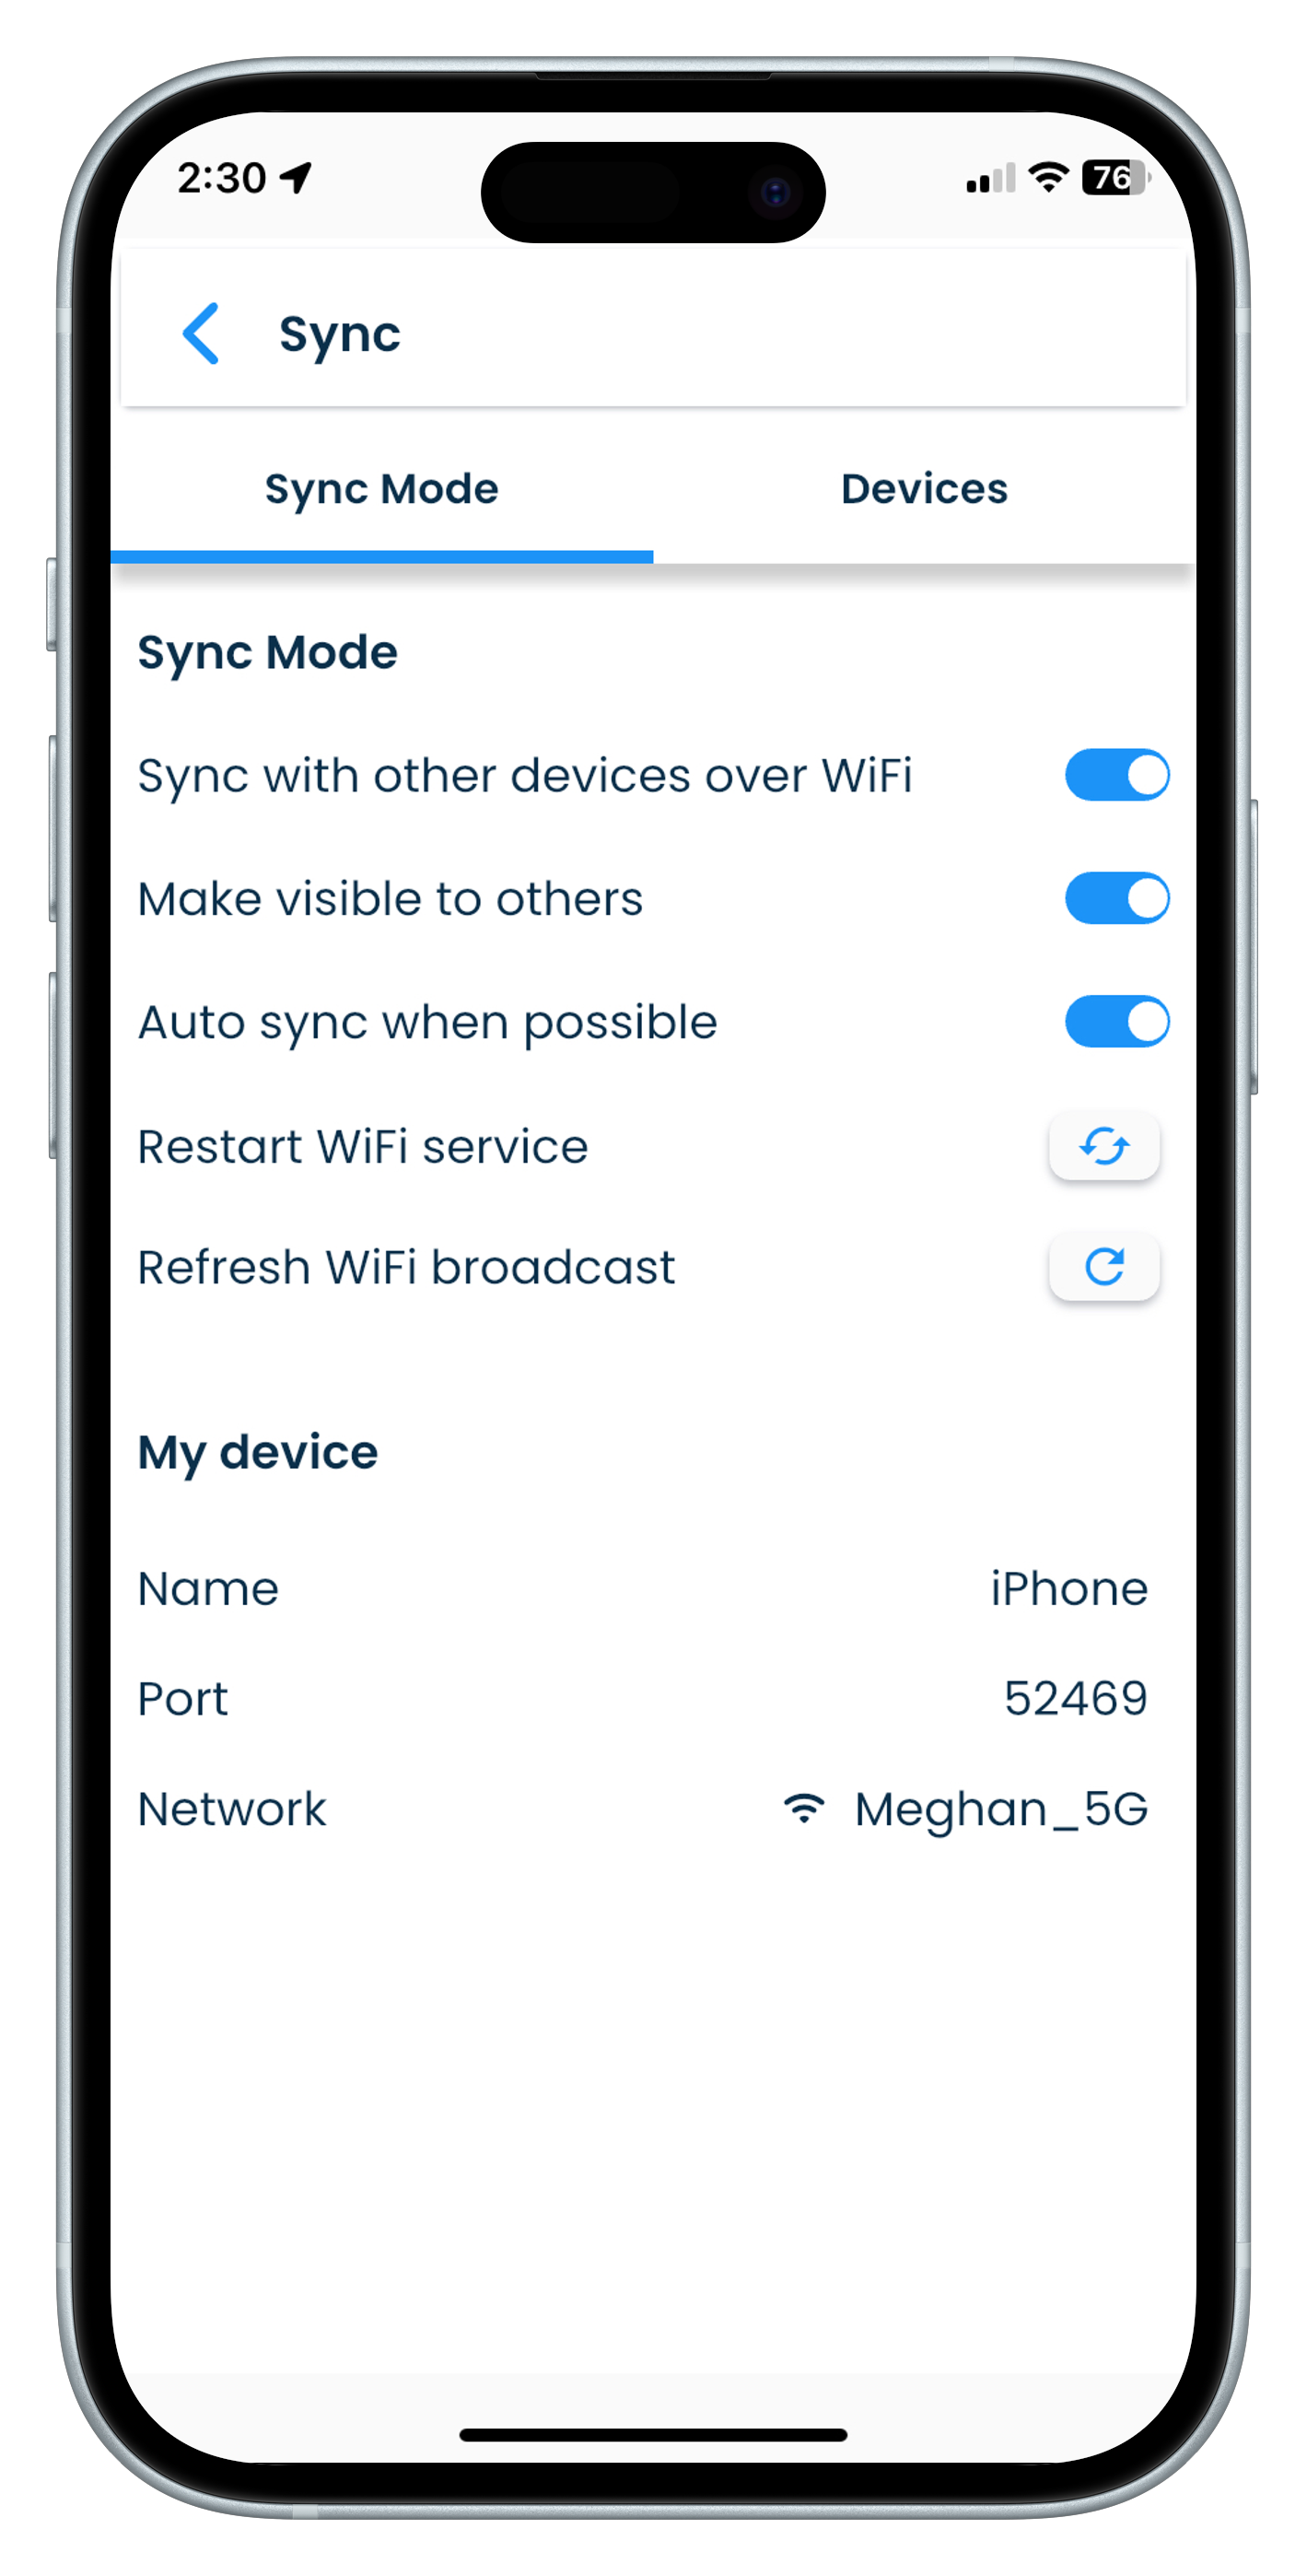
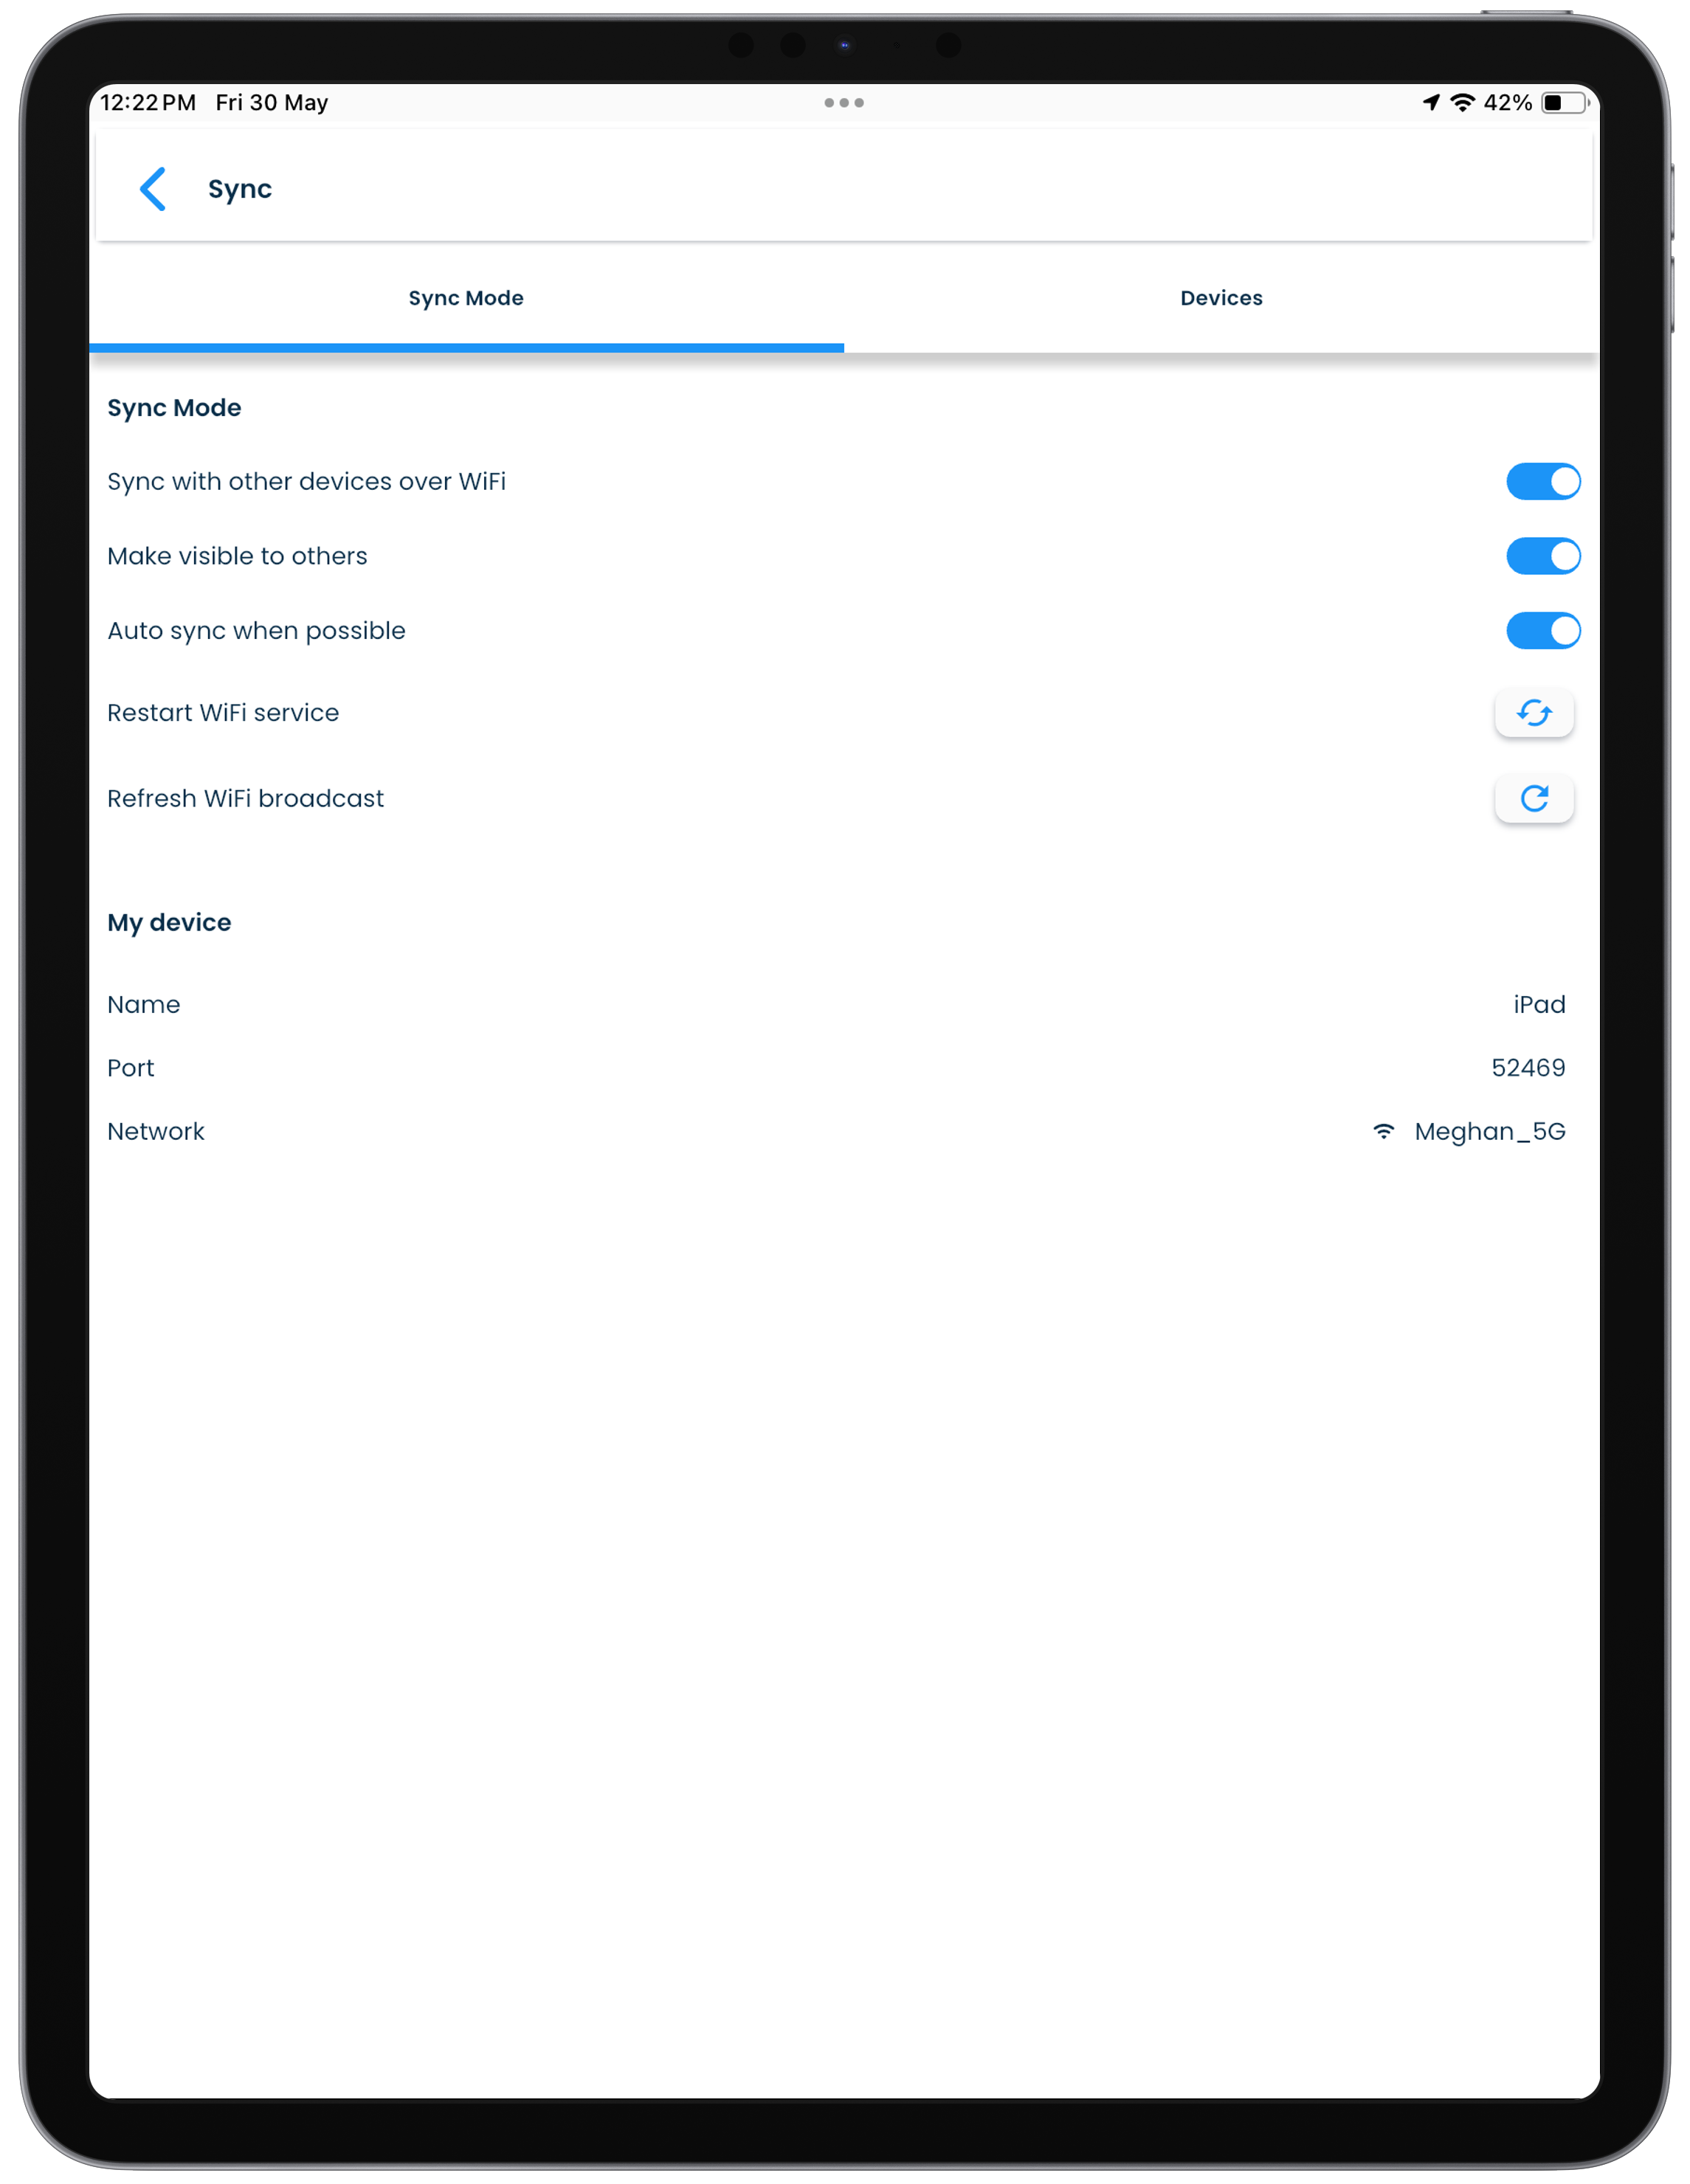
Options for Local WiFi sync
For a device that is set to use local WiFi sync, there are other features that allow finer control on the WiFi sync operations with other devices.
Some of the options you can decide on are listed below.
Option |
Description |
|---|---|
| Sync mode | |
| Sync with other devices over WiFi | Select this option to set WiFi or no sync mode for this device. |
| Make visible to others | Select this option to have other devices show if this device is online when displayed in their list of devices. |
| Auto sync when possible | This allows the app to participate in a WiFi sync initiated by another device if this app is in an unlocked state and connected to the WiFi network. |
| My device | |
| Name | The name you have set for this device. |
| Port | The port used on this device for WiFi sync. |
| My devices | |
| List of trusted devices | See other devices of yours that are setup to be used for WiFi sync with this device. |
| Available devices | See other devices of yours that are setup for WiFi sync but have not yet been trused on this device. |
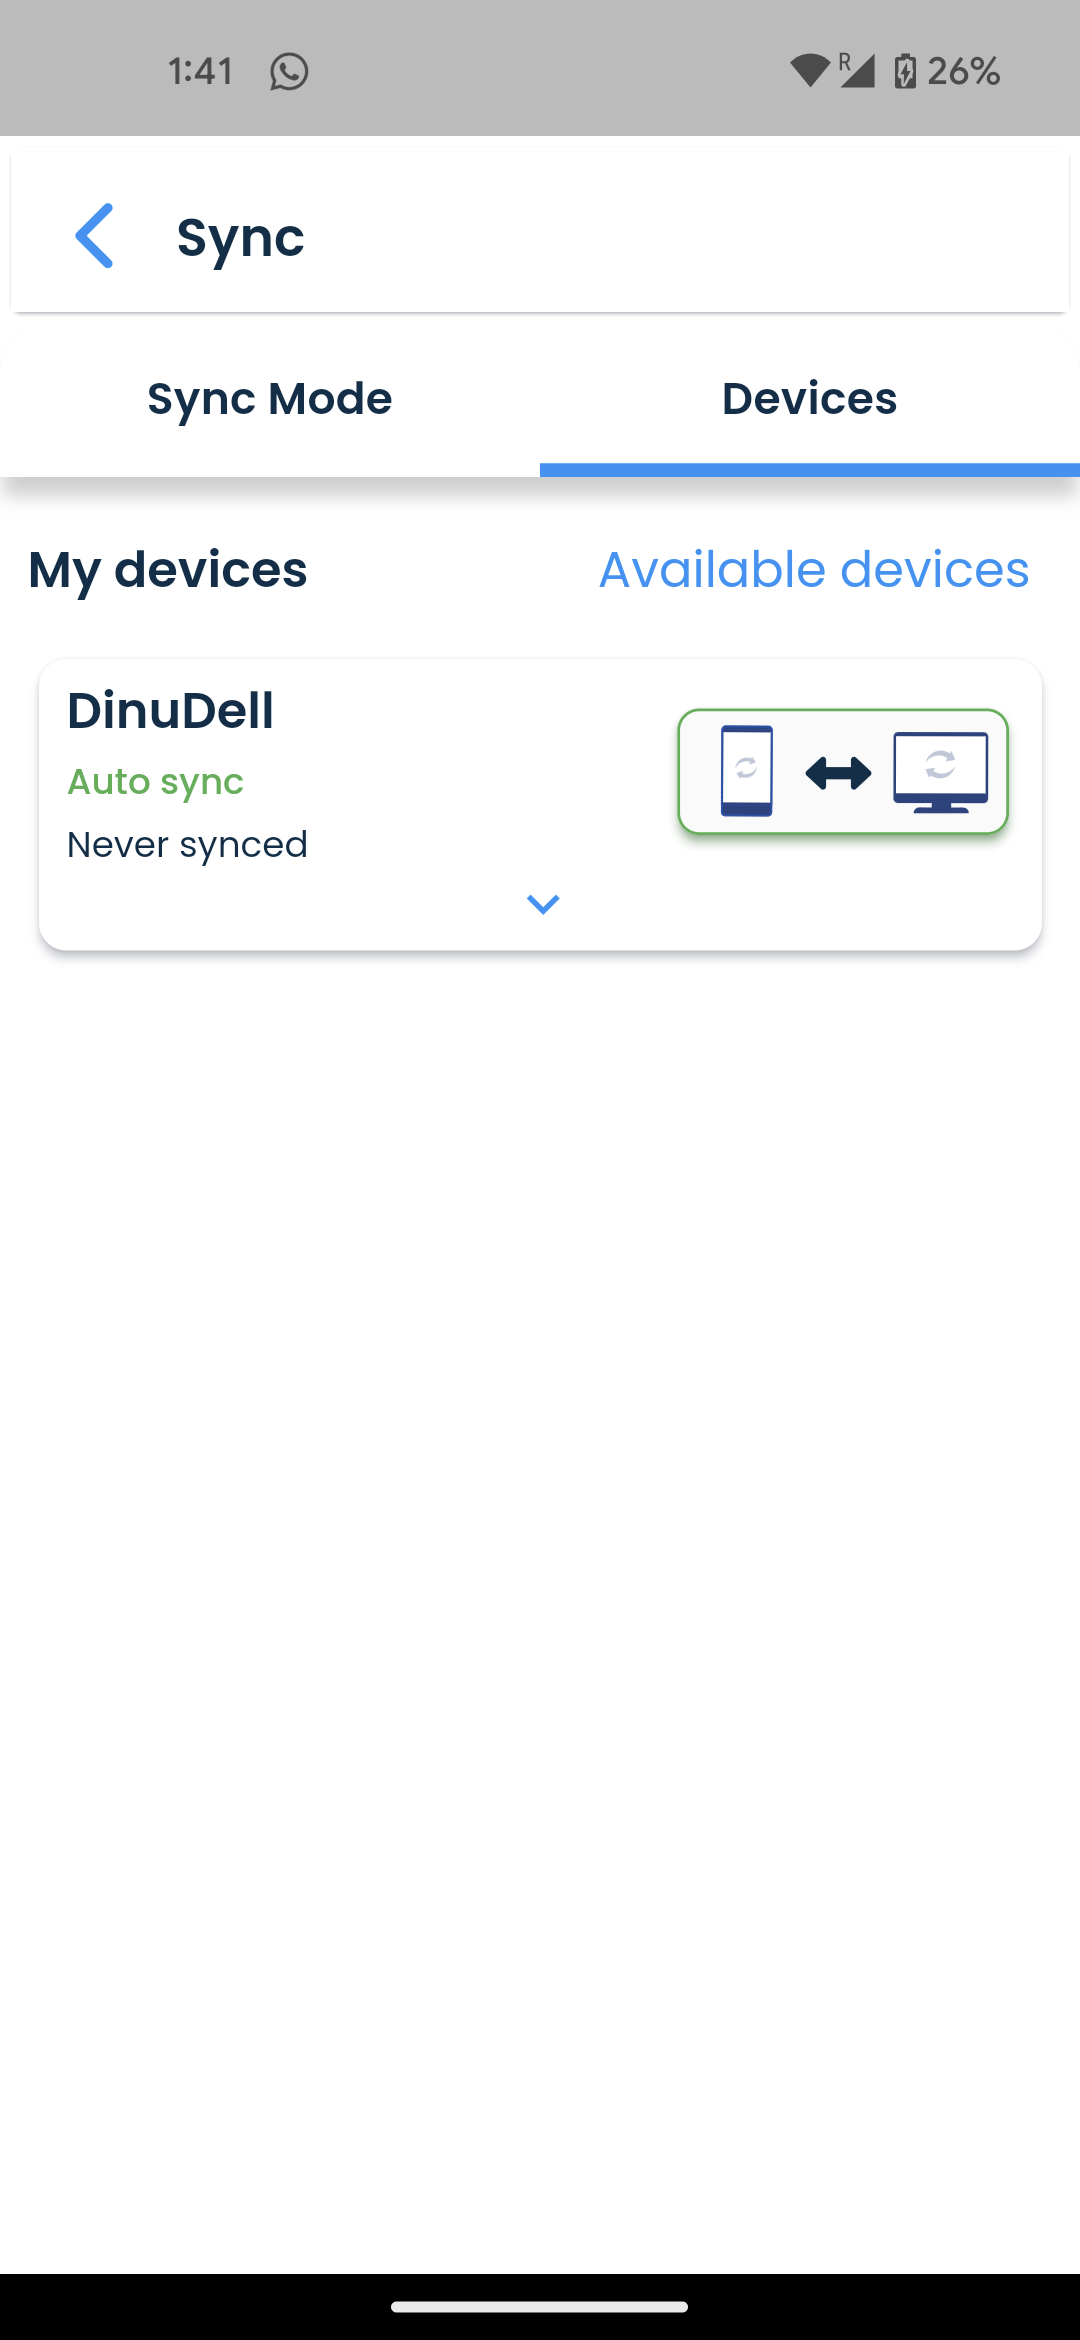
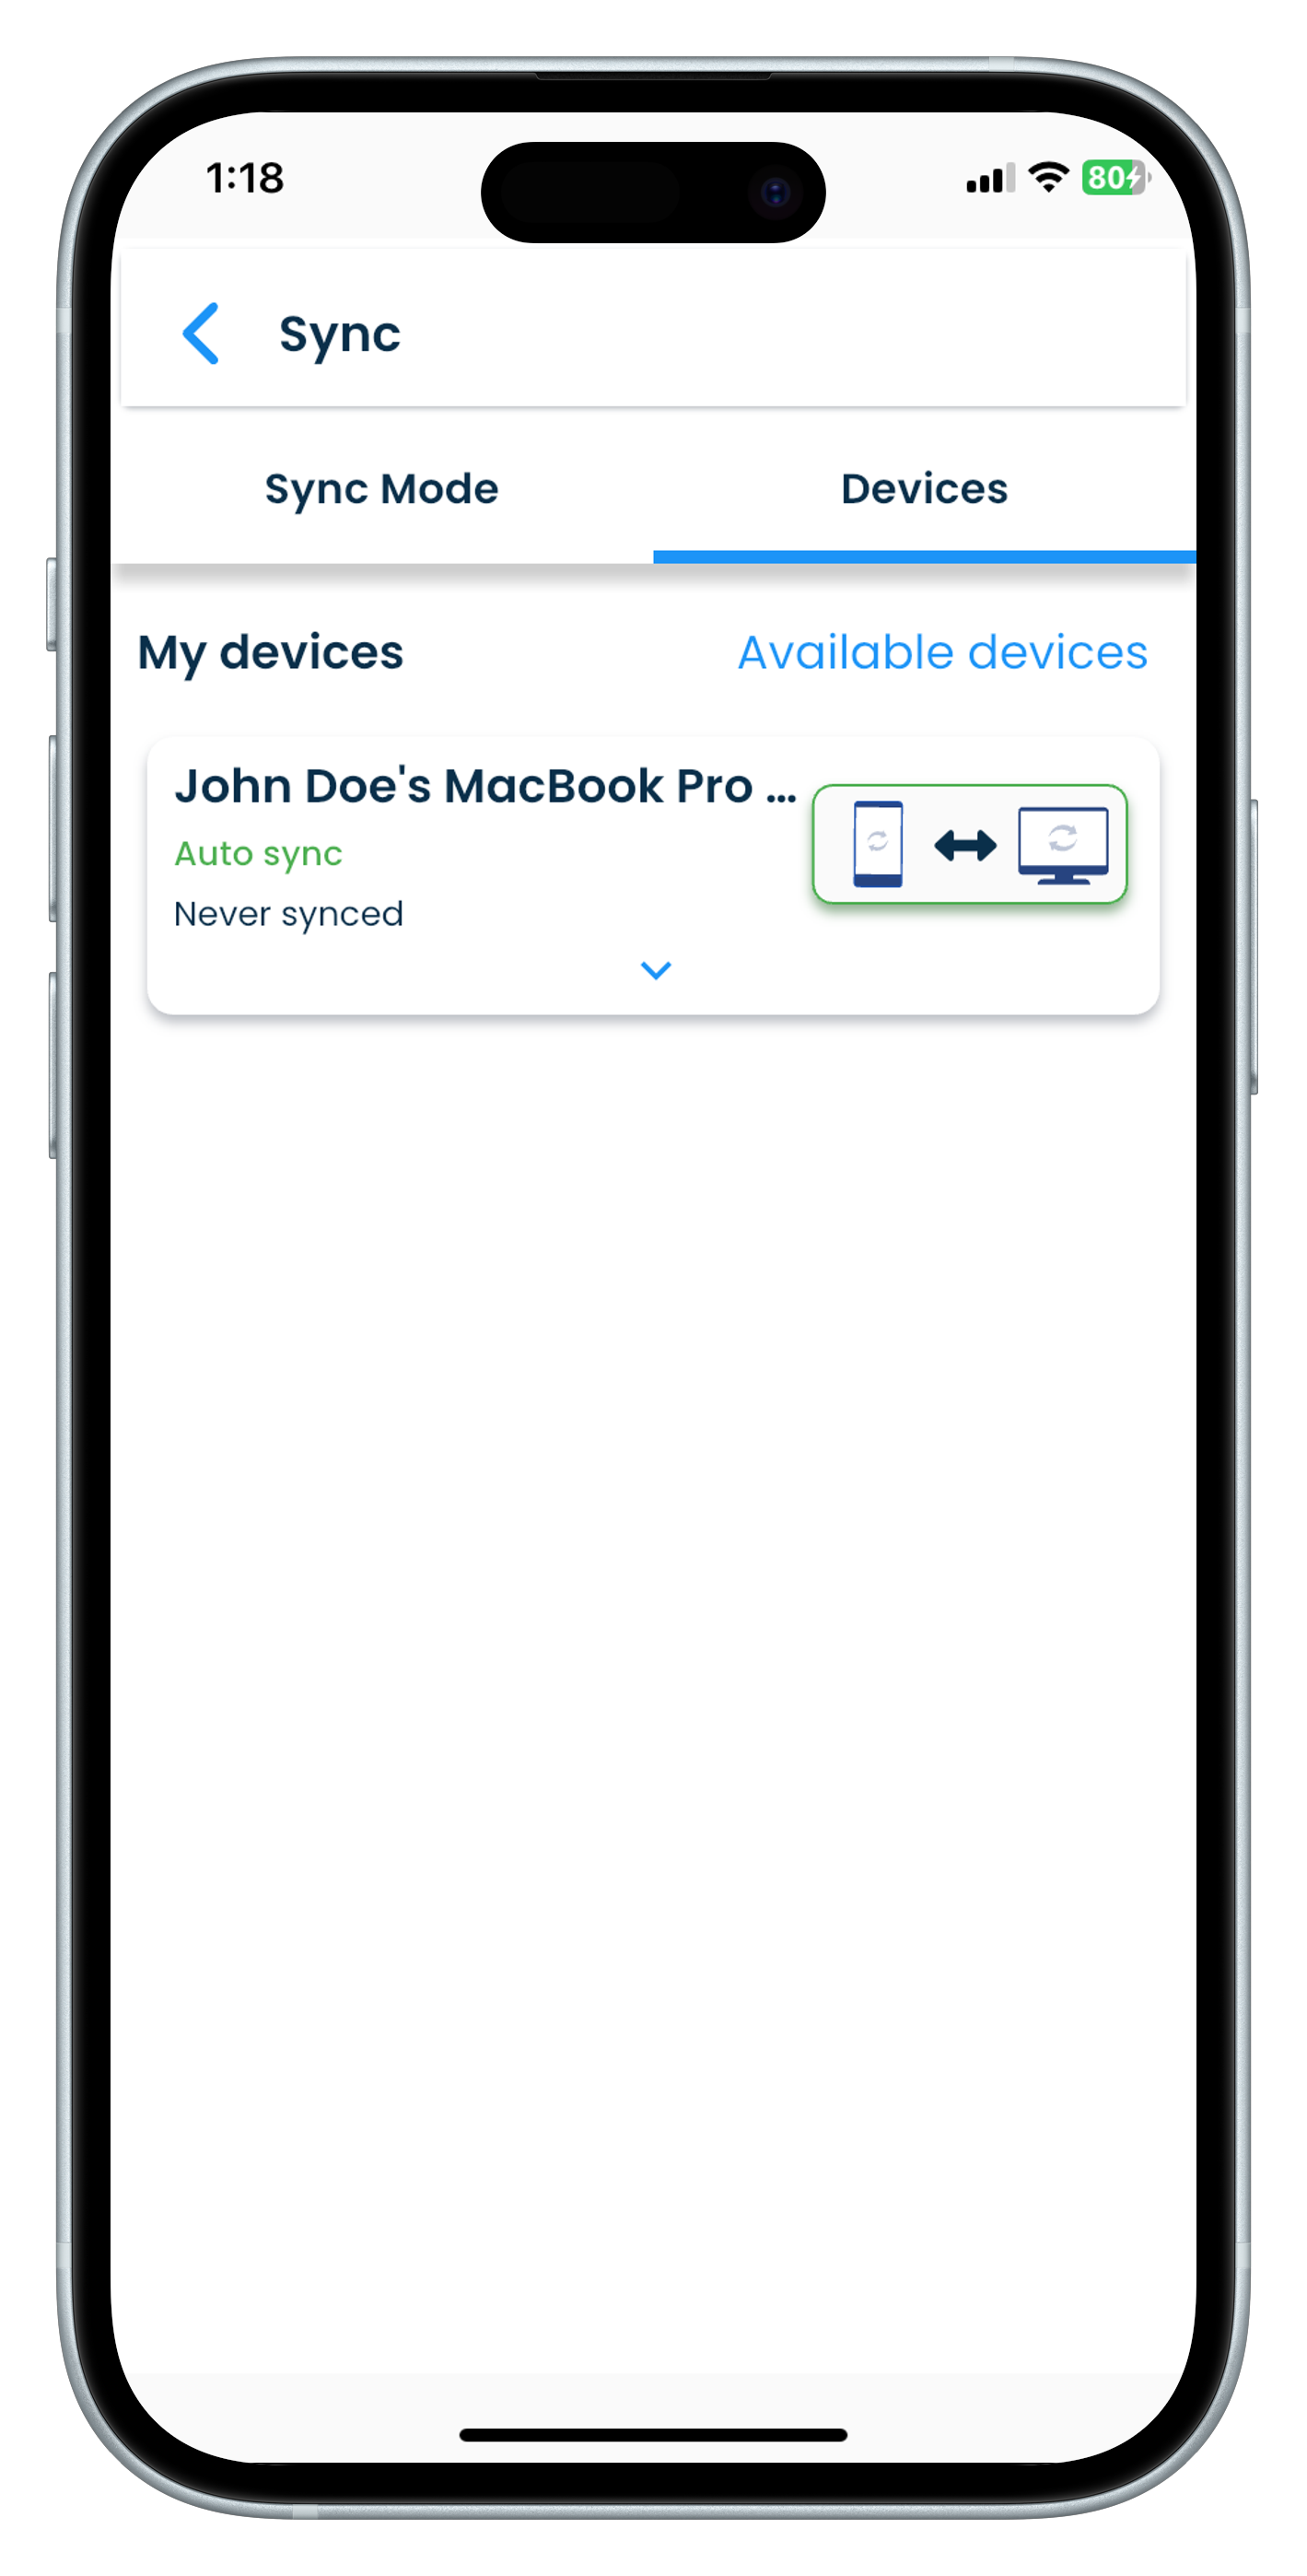
List of trusted devices
When other devices of yours are setup to be used for WiFi sync with this device, you can see a list of those devices here.
| Mac | Windows |
|---|---|
|
|
| Android | iPhone |
|---|---|
 |
 |
| iPad |
|---|
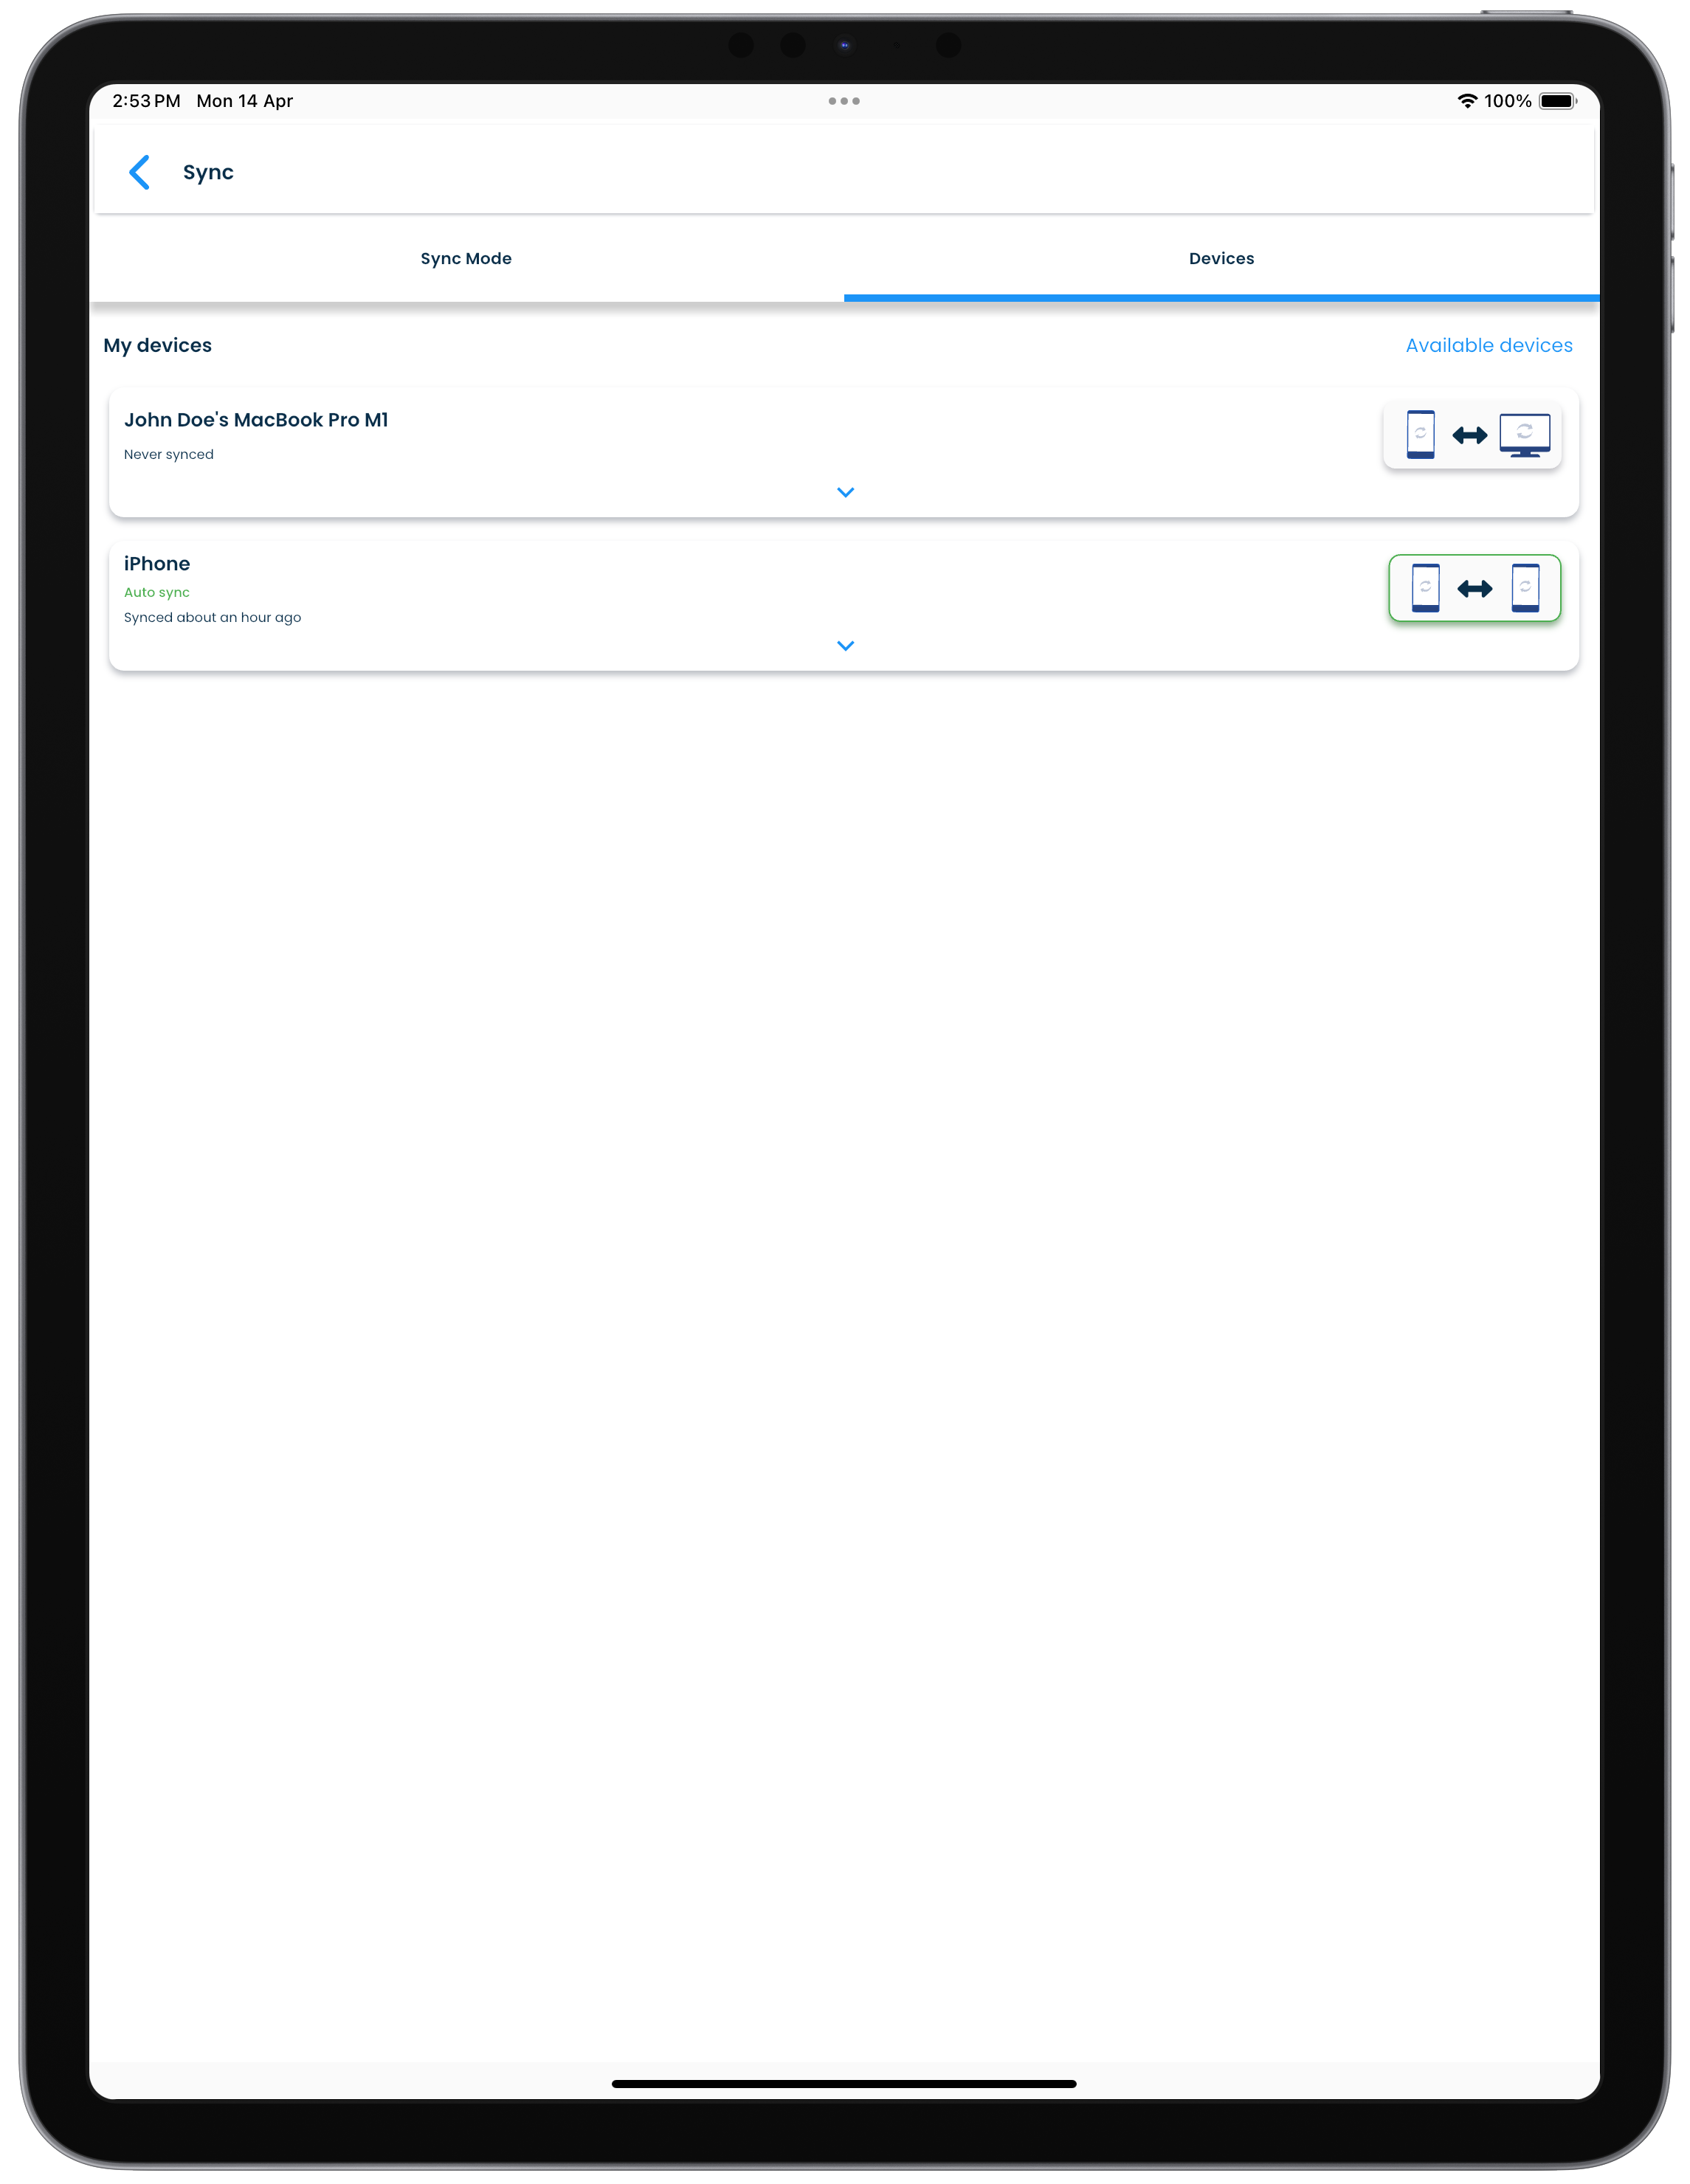 |
For each device displayed, you can do the following.
- Manually initiate a sync with another device that is connected to the WiFi network and in an unlocked state.
- Choose a sync direction for the maual sync.
- Check the last time a WiFi sync had happened with that device.
- Review the counts of the items processed during the previous WiFi sync.
- Remove the device from the trusted list.
Available devices
The other devices of yours that are setup to be used for WiFi sync, but have not been linked with this device, will appear here. You can link these devices and include them in your trusted devices list.
Maintain your trusted devices list
When you link devices with the same profile for WiFi sync, the data will sync between them when sync is initiated. This can become a security risk, if you no longer have your trusted device with you.
In such a scenario use the Remove device option to delink the devices that are no longer to be part of your WiFi sync devices.
Free and Pro licenses
Subscriptions screen shows purchased licenses
The Subscriptions screen can be reached by clicking or tapping on the Settings link in the application menu, and then clicking or tapping on Subscriptions.
SplashID Classic can be used without a paid license on multiple devices. This is a free license your new profile gets after you create it the first time. Your profile will also get converted to a free license if your paid subscription expires or is cancelled by you.
A profile with a free license will have the following restrictions.
- Limit of 10 oldest records for active use. Any additional records will be present, but unusable.
- All the records that you see in My Records, Archived and Recycle Bin are included in the limit.
- If you want to continue using the free license and need to have 10 records in the My Records list, then you will need to delete the records from the Archive and Recycle Bin views.
- No automatic local backups will be taken. You can still take local backups manually.
The above restrictions are removed when you purchase a SplashID Classic Pro license for your profile.
How can you get a Pro license?
You can get a Pro license by purchasing a subscription from the App Store, or the Play Store, or Microsoft Store on your device where you have installed SplashID Classic.
Once you create your profile and unlock SplashID Classic, click on the Get Pro License button in the bottom bar on the screen. Alternately go to Settings and then Subscriptions to see the subscriptions available for purchase.
You can purchase one of the subscriptions by clicking or tapping on the Subscribe button shown in the subscription plan you are interested in.
Types of Subscriptions
The subscriptions we offer come with yearly renewals. They renew automatically at the end of the validity period. You can cancel them anytime from renewing.
Subscriptions screen
The Subscriptions screen can be reached by clicking or tapping on the Settings link in the application menu, and then clicking or tapping on Subscriptions.
| Mac | Windows |
|---|---|
|
|
| Android | iPhone |
|---|---|
|
|
| iPad |
|---|
|
Subscriptions offered by us are of two types.
-
Single Store Pro plan
-
All Devices Pro plan
Single Store Pro plans
These are also called as single platform Pro plans. They allow you to use it on unlimited installations of SplashID Classic on the same family of devices.
The device families are listed below.
- Android phones and tablets
- iPhones and iPads
- MacBooks and Macs
- Windows laptops and desktops
These licenses are cost effective if you plan to use SplashID Classic on multiple devices belonging to the same family. If not, then the All Devices Pro plan will be the right plan for you.
All Devices Pro plan
An All Devices Pro plan license allows you to use SplashID Classic on any number of devices. You can buy this plan if you use multiple devices from different vendors.
Subscription plans
The availability of the subscription plans for purchase depend on the device you are using SplashID Classic on. Once purchased they give you a Pro license that is valid for use on multiple devices you want to use your profile on.
You can choose to purchase a subscription on the device you are most comfortable with.
Android phones and tablets
In Android mobiles and tablets you can purchase one of the following subscriptions from inside SplashID Classic, and then manage it in the Play Store application.
- SplashID Classic Annual Android
- SplashID Classic Annual All Devices
Purchasing from the Play Store is supported from inside SplashID Classic on Android devices.
To purchase a SplashID Classic subscription do the following.
- Unlock your SplashID Classic application on your Android device.
- Go to the Subscriptions screen in Settings.
- Tap on the Subscribe button in the list of available licenses and proceed to complete the purchase.
To cancel the purchased license, follow the guidelines recommended by the Play Store. The procedure to cancel is the same as you would follow for any other app that offers subscriptions from the Play Store.
No refunds on subscription cancellation
SplashID Classic is free to use with certain restrictions. This gives you the opportunity to try SplashID Classic before you purchase a subscription.
If you decide to cancel your subscription, then the Pro plan will still be active till the end date of the current subscription period.
iPhones and iPads
In iPhones and iPads you can purchase one of the following subscriptions from inside SplashID Classic, and then manage them in the App Store application.
- SplashID Classic iPhone iPad
- SplashID Classic All Devices
Purchasing from the App Store is supported from inside SplashID Classic on your iPhone or iPad.
To purchase a SplashID Classic subscription do the following.
- Unlock your SplashID Classic application on your iPhone or iPad.
- Go to the Subscriptions screen in Settings.
- Tap on the Subscribe button in the list of available licenses and proceed to complete the purchase.
To cancel the purchased license, follow the guidelines recommended by the App Store. The procedure to cancel is the same as you would follow for any other app that offers subscriptions from the App Store.
No refunds on subscription cancellation
SplashID Classic is free to use with certain restrictions. This gives you the opportunity to try SplashID Classic before you purchase a subscription.
If you decide to cancel your subscription, then the Pro plan will still be active till the end date of the current subscription period.
MacBooks and Macs
In MacBooks and Macs you can purchase one of the following subscriptions from inside SplashID Classic, and thn manage them in the Mac App Store application.
- SplashID Classic Mac
- SplashID Classic All Devices
Purchasing from the Mac App Store is supported from inside SplashID Classic on your MacBook or Mac.
To purchase a SplashID Classic subscription do the following.
- Unlock your SplashID Classic application on your MacBook or Mac.
- Go to the Subscriptions screen in Settings.
- Click on the Subscribe button in the list of available licenses and proceed to complete the purchase.
To cancel the purchased license, follow the guidelines recommended by the Mac App Store. The procedure to cancel is the same as you would follow for any other app that offers subscriptions from the Mac App Store.
No refunds on subscription cancellation
SplashID Classic is free to use with certain restrictions. This gives you the opportunity to try SplashID Classic before you purchase a subscription.
If you decide to cancel your subscription, then the Pro plan will still be active till the end date of the current subscription period.
Windows laptops and desktops
In Windows laptops and desktops you can purchase one of the following subscriptions from inside SplashID Classic, and thn manage them in the Microsoft Store application.
- SplashID Classic Annual Windows
- SplashID Classic Annual All Devices
Purchasing from the Microsoft Store is supported from inside SplashID Classic on your Windows laptop or deesktop.
To purchase a SplashID Classic subscription do the following.
- Unlock your SplashID Classic application on your Windows laptop or desktop.
- Go to the Subscriptions screen in Settings.
- Click on the Subscribe button in the list of available licenses and proceed to complete the purchase.
To cancel the purchased license, follow the guidelines recommended by the Microsoft Store. The procedure to cancel is the same as you would follow for any other app that offers subscriptions from the Microsoft Store.
No refunds on subscription cancellation
SplashID Classic is free to use with certain restrictions. This gives you the opportunity to try SplashID Classic before you purchase a subscription.
If you decide to cancel your subscription, then the Pro plan will still be active till the end date of the current subscription period.
Migrate your SplashID Safe or SplashID Pro 9 data
The page explains how you can manually migrate your SplashID Safe or SplashID Pro 9 data to SplashID Classic.
The applications for SplashID Classic can be installed and used along with the SplashID Safe or SplashID Pro 9 applications on the same device.
The migration does not change the data in your SplashID Safe or SplashID Pro 9 account, and you can continue using it as long as their licenses are valid.
However the data will not sync between SplashID Classic and SplashID Safe, or between SplashID Classic and SplashID Pro 9 apps.
Data migration from SplashID Safe
You can manually migrate your data using a SVID file.
-
Start both the SplashID Classic and, SplashID Safe applications on the same device. Use a desktop preferably, as it will be easier to export the SVID file to a folder of your choice.
-
In the SplashID Safe application select all records and export them to a SVID file.
-
Go back to the SplashID Classic application, and go to Settings, then Import & Export. Click on the Import button in the SVID section, and select the SVID file exported in step 2 above for import.
-
Wait till the import gets over. It could take a few minutes depending on the amount of data you have, and the processing power of your device.
Data migration from SplashID Pro 9
You can manually migrate your data using a SVID9 file.
-
Start both the SplashID Classic and, SplashID Pro 9 applications on the same device. Use a desktop preferably, as it will be easier to export the SVID9 file to a folder of your choice.
-
In the SplashID Pro 9 application select all records and export them to a SVID9 file.
-
Go back to the SplashID Classic application, and go to Settings, then Import & Export. Click on the Import button in the SVID-9 section, and select the SVID9 file exported in step 2 above for import.
-
Wait till the import gets over. It could take a few minutes depending on the amount of data you have, and the processing power of your device.
Note
Some users might see no records being displayed after the import process completes. We recommend you wait for some more time and then quit from the app. On relaunching your data should get displayed.
What do I do if my import fails?
You can retry the import after quitting the SplashID Classic application and launching it again.
If it still fails, check the size of the SVID or SVID9 file. It should not be zero bytes.
If the SVID or SVID9 file appears to have content, then please check your SplashID Safe or SplashID Pro 9 account to see if there is corrupted data, or any missing types or categories in the records. If you spot them, try editing the problematic records, save them and then export the SVID or SVID9 file again.
Finally, try importing this cleaned up SVID or SVID9 file again in SplashID Classic.